自定義控制器轉場動畫及實現下拉菜單的小Demo
本文為投稿文章,譯者:我是喬忘記瘋狂
本文翻譯總結自AppCoda以下兩篇文章:
Introduction to Custom View Controller Transitions and Animations
Creating a Slide Down Menu Using View Controller Transition
iOS 7開始,蘋果為開發者提供了自定義控制器轉場動畫相關的API,而實現該功能需要以下三個步驟:
創建一個類作為動畫管理器,該類需繼承自NSObject並遵守UIViewControllerAnimatedTransitioning協議,我們在這個類中編寫我們的動畫執行代碼。
為目標控制器指定轉場動畫代理,既可以使用上一步創建的動畫管理器對象,也可以指定來源控制器作為這個代理。
實現代理協議中的相應方法,在方法中返回第一步創建的動畫管理器對象。
准備工作
下載示例程序,地址在這裡。(譯注:原文地址需要FQ訪問,本人已轉存到GitHub上,點擊這裡。)
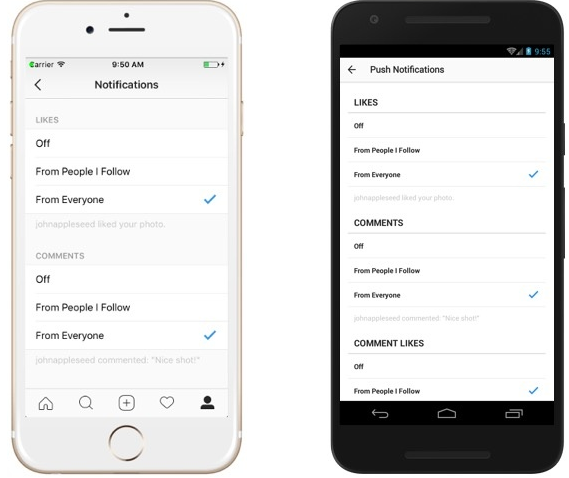
示例程序如下圖所示,點擊導航欄上的Action按鈕會modal出一個目標控制器,點擊Dismiss按鈕會返回來源控制器,只不過現在使用的是系統默認的modal動畫,接下來我們就來實現自定義轉場動畫。

創建動畫管理器
創建一個類名稱為CustomPresentAnimationController,繼承自NSObject並遵守UIViewControllerAnimatedTransitioning協議。這個協議有兩個必須實現的方法,我們的實現代碼如下:
func transitionDuration(transitionContext: UIViewControllerContextTransitioning) -> NSTimeInterval {
    return 2.5
}

func animateTransition(transitionContext: UIViewControllerContextTransitioning) {

    let fromViewController = transitionContext.viewControllerForKey(UITransitionContextFromViewControllerKey)!
    let toViewController = transitionContext.viewControllerForKey(UITransitionContextToViewControllerKey)!
    let finalFrameForVC = transitionContext.finalFrameForViewController(toViewController)
    let containerView = transitionContext.containerView()
    let bounds = UIScreen.mainScreen().bounds
    toViewController.view.frame = CGRectOffset(finalFrameForVC, 0, bounds.size.height)
    containerView.addSubview(toViewController.view)

    UIView.animateWithDuration(transitionDuration(transitionContext), delay: 0.0, usingSpringWithDamping: 0.5, initialSpringVelocity: 0.0, options: .CurveLinear, animations: {
        fromViewController.view.alpha = 0.5
        toViewController.view.frame = finalFrameForVC
        }, completion: {
            finished in
            transitionContext.completeTransition(true)
            fromViewController.view.alpha = 1.0
    })
}
第一個方法很簡單,設定動畫執行時間。第二個方法則用來編寫我們自定義的動畫代碼,在這個方法中我們可以利用transitionContext(轉場上下文)來獲得我們將來的來源控制器、目標控制器、動畫完成後的最終frame,還可以獲得用來管理來源或目標視圖的容器視圖。
然後我們將目標視圖調整到屏幕下方並將其添加到容器視圖內。接下來在動畫執行的閉包內,將目標視圖的位置變為最終位置,並將來源視圖的透明度降為0.5,使其在目標視圖進入的過程中產生一個淡出的效果。在動畫完成的閉包內,我們告知transitionContext動畫已完成,並將來源視圖的透明度改回1.0。
設置轉場動畫代理
接下來我們需要為目標控制器設置轉場動畫代理,這裡我們指定來源控制器作為我們的代理。在ItemsTableViewController中,讓其遵守UIViewControllerTransitioningDelegate協議,在storyboard中找到我們modal的segue,設置它的Identifier為showAction。然後在ItemsTableViewController中添加如下代碼:
let customPresentAnimationController = CustomPresentAnimationController()

override func prepareForSegue(segue: UIStoryboardSegue, sender: AnyObject?) {

    if segue.identifier == "showAction" {
        let toViewController = segue.destinationViewController as UIViewController
        toViewController.transitioningDelegate = self
    }
}

func animationControllerForPresentedController(presented: UIViewController, presentingController presenting: UIViewController, sourceController source: UIViewController) -> UIViewControllerAnimatedTransitioning? {
    return customPresentAnimationController
}
我們創建了一個動畫管理器對象,設置目標控制器的轉場代理為來源控制器,然後實現代理協議中的animationControllerForPresentedController方法,該方法用於指定modal過程中展示視圖的動畫,在該方法中返回我們自定義的動畫管理器對象。
運行我們的程序,效果如下圖所示:

跟系統默認modal效果差不多,不過帶有彈簧效果。如果你希望有不同的效果,你可以對下面這句代碼進行修改。
toViewController.view.frame = CGRectOffset(finalFrameForVC, 0, bounds.size.height)
比如將其改為如下代碼:
toViewController.view.frame = CGRectOffset(finalFrameForVC, 0, -bounds.size.height)
再次運行程序,我們的modal動畫就變為從上往下了。

自定義modal過程中退出視圖的動畫
我們的程序現在點擊Dismiss退出目標控制器時,仍然是系統默認的動畫,接下來實現這個自定義動畫。
步驟同前面基本一樣,創建一個叫做CustomDismissAnimationController的動畫管理器,實現如下代理方法:
func transitionDuration(transitionContext: UIViewControllerContextTransitioning) -> NSTimeInterval {
    return 2
}

func animateTransition(transitionContext: UIViewControllerContextTransitioning) {
    let fromViewController = transitionContext.viewControllerForKey(UITransitionContextFromViewControllerKey)!
    let toViewController = transitionContext.viewControllerForKey(UITransitionContextToViewControllerKey)!
    let finalFrameForVC = transitionContext.finalFrameForViewController(toViewController)
    let containerView = transitionContext.containerView()
    toViewController.view.frame = finalFrameForVC
    toViewController.view.alpha = 0.5
    containerView.addSubview(toViewController.view)
    containerView.sendSubviewToBack(toViewController.view)

    UIView.animateWithDuration(transitionDuration(transitionContext), animations: {
        fromViewController.view.frame = CGRectInset(fromViewController.view.frame, fromViewController.view.frame.size.width / 2, fromViewController.view.frame.size.height / 2)
        toViewController.view.alpha = 1.0
    }, completion: {
        finished in
        transitionContext.completeTransition(true)
    })
}
這次我們使用一個新的動畫方式,讓來源視圖從中心點開始逐漸變小直到消失。首先我們將目標控制器設置為最終位置,透明度為0.5,並將其添加到容器視圖的底層中使其開始時不可見。在動畫執行過程中,來源視圖逐漸變小,露出底層的目標視圖,並將目標視圖透明度過渡到1.0。
接下來在ItemsTableViewController中添加如下代碼:
let customDismissAnimationController = CustomDismissAnimationController()

func animationControllerForDismissedController(dismissed: UIViewController) -> UIViewControllerAnimatedTransitioning? {
    return customDismissAnimationController
}
animationControllerForDismissedController這個代理方法指定了modal過程中退出視圖的動畫。運行程序,你會發現我們的動畫有點小Bug。

我們可以看到,白色的背景視圖確實如我們所願從中心點逐漸縮小,但是圖片視圖的大小卻保持不變,這是因為改變來源視圖的時候,它的子控件的大小並不會跟著發生改變,我們可以通過視圖快照的技術來解決這一問題。
將animateTransition方法的實現修改為如下代碼:
func animateTransition(transitionContext: UIViewControllerContextTransitioning) {
    let fromViewController = transitionContext.viewControllerForKey(UITransitionContextFromViewControllerKey)!
    let toViewController = transitionContext.viewControllerForKey(UITransitionContextToViewControllerKey)!
    let finalFrameForVC = transitionContext.finalFrameForViewController(toViewController)
    let containerView = transitionContext.containerView()
    toViewController.view.frame = finalFrameForVC
    toViewController.view.alpha = 0.5
    containerView.addSubview(toViewController.view)
    containerView.sendSubviewToBack(toViewController.view)

    let snapshotView = fromViewController.view.snapshotViewAfterScreenUpdates(false)
    snapshotView.frame = fromViewController.view.frame
    containerView.addSubview(snapshotView)

    fromViewController.view.removeFromSuperview()

    UIView.animateWithDuration(transitionDuration(transitionContext), animations: {
        snapshotView.frame = CGRectInset(fromViewController.view.frame, fromViewController.view.frame.size.width / 2, fromViewController.view.frame.size.height / 2)
        toViewController.view.alpha = 1.0
    }, completion: {
        finished in
        snapshotView.removeFromSuperview()
        transitionContext.completeTransition(true)
    })
}
我們給來源視圖生成了一個快照,將它添加到容器視圖中利用它來做動畫,並將來源視圖從父控件中移除。再次運行程序,我們的動畫效果就正常了。

導航控制器的轉場動畫
在UITabBarController和UINavigationController的管理下,你無需為每個目標控制器都設置轉場代理,可以直接設置UITabBarControllerDelegate或UINavigationControllerDelegate即可。
接下來我們演示如何為導航控制器設置自定義轉場動畫。首先,仍然是創建一個動畫管理器類叫做CustomNavigationAnimationController,然後實現UIViewControllerAnimatedTransitioning協議的方法。這裡的動畫代碼采用的是一個開源的三維旋轉動畫,讀者可以到這裡自行研究。
var reverse: Bool = false

func transitionDuration(transitionContext: UIViewControllerContextTransitioning) -> NSTimeInterval {
    return 1.5
}

func animateTransition(transitionContext: UIViewControllerContextTransitioning) {
    let containerView = transitionContext.containerView()
    let toViewController = transitionContext.viewControllerForKey(UITransitionContextToViewControllerKey)!
    let fromViewController = transitionContext.viewControllerForKey(UITransitionContextFromViewControllerKey)!
    let toView = toViewController.view
    let fromView = fromViewController.view
    let direction: CGFloat = reverse ? -1 : 1
    let const: CGFloat = -0.005

    toView.layer.anchorPoint = CGPointMake(direction == 1 ? 0 : 1, 0.5)
    fromView.layer.anchorPoint = CGPointMake(direction == 1 ? 1 : 0, 0.5)

    var viewFromTransform: CATransform3D = CATransform3DMakeRotation(direction * CGFloat(M_PI_2), 0.0, 1.0, 0.0)
    var viewToTransform: CATransform3D = CATransform3DMakeRotation(-direction * CGFloat(M_PI_2), 0.0, 1.0, 0.0)
    viewFromTransform.m34 = const
    viewToTransform.m34 = const

    containerView.transform = CGAffineTransformMakeTranslation(direction * containerView.frame.size.width / 2.0, 0)
    toView.layer.transform = viewToTransform
    containerView.addSubview(toView)

    UIView.animateWithDuration(transitionDuration(transitionContext), animations: {
        containerView.transform = CGAffineTransformMakeTranslation(-direction * containerView.frame.size.width / 2.0, 0)
        fromView.layer.transform = viewFromTransform
        toView.layer.transform = CATransform3DIdentity
    }, completion: {
        finished in
        containerView.transform = CGAffineTransformIdentity
        fromView.layer.transform = CATransform3DIdentity
        toView.layer.transform = CATransform3DIdentity
        fromView.layer.anchorPoint = CGPointMake(0.5, 0.5)
        toView.layer.anchorPoint = CGPointMake(0.5, 0.5)

        if (transitionContext.transitionWasCancelled()) {
            toView.removeFromSuperview()
        } else {
            fromView.removeFromSuperview()
        }
        transitionContext.completeTransition(!transitionContext.transitionWasCancelled())
    })
}
注意這裡我們添加了一個reverse變量,用來指定轉場動畫的方向,這樣我們可以將導航控制器push和pop過程的動畫封裝在一個動畫管理器中。
在ItemsTableViewController中更改它的聲明使其遵守UINavigationControllerDelegate協議,在viewDidLoad方法中設置代理為自己navigationController?.delegate = self,然後添加如下代碼:
let customNavigationAnimationController = CustomNavigationAnimationController()

func navigationController(navigationController: UINavigationController, animationControllerForOperation operation: UINavigationControllerOperation, fromViewController fromVC: UIViewController, toViewController toVC: UIViewController) -> UIViewControllerAnimatedTransitioning? {
    customNavigationAnimationController.reverse = operation == .Pop
    return customNavigationAnimationController
}
上面這個導航控制器的代理方法用於指定push或pop時的轉場動畫,其中operation參數可以用來判斷轉場的方向。運行程序,如下圖所示:

導航控制器的手勢交互
我們知道蘋果官方為導航控制器添加了一個默認的手勢交互,就是在屏幕左側向右滑動可以返回上一界面並帶有pop動畫,接下來我們為我們的自定義動畫添加手勢交互。
手勢交互的管理器需要遵守的是UIViewControllerInteractiveTransitioning協議,該協議需要實現startInteractiveTransition方法指定開始交互,不過蘋果官方為我們提供了另一個已經實現該協議的交互管理器類UIPercentDrivenInteractiveTransition,並提供以百分比的形式來控制交互過程的功能,比如控制交互的更新、取消、完成等,我們直接使用它來實現我們的交互控制。
創建一個類叫做CustomInteractionController並繼承自UIPercentDrivenInteractiveTransition,添加如下代碼:
var navigationController: UINavigationController!
var shouldCompleteTransition = false
var transitionInProgress = false
var completionSeed: CGFloat {
    return 1 - percentComplete
}

func attachToViewController(viewController: UIViewController) {
    navigationController = viewController.navigationController
    setupGestureRecognizer(viewController.view)
}

private func setupGestureRecognizer(view: UIView) {
        view.addGestureRecognizer(UIPanGestureRecognizer(target: self, action: "handlePanGesture:"))
}

func handlePanGesture(gestureRecognizer: UIPanGestureRecognizer) {
    let viewTranslation = gestureRecognizer.translationInView(gestureRecognizer.view!.superview!)
    switch gestureRecognizer.state {
    case .Began:
        transitionInProgress = true
        navigationController.popViewControllerAnimated(true)
    case .Changed:
        var const = CGFloat(fminf(fmaxf(Float(viewTranslation.x / 200.0), 0.0), 1.0))
        shouldCompleteTransition = const > 0.5
        updateInteractiveTransition(const)
    case .Cancelled, .Ended:
        transitionInProgress = false
        if !shouldCompleteTransition || gestureRecognizer.state == .Cancelled {
            cancelInteractiveTransition()
        } else {
            finishInteractiveTransition()
        }
    default:
        println("Swift switch must be exhaustive, thus the default")
    }
}
attachToViewController方法用於將來傳入導航控制器的目標控制器,我們為目標控制器的整個view添加了滑動手勢以便將來可以實現滑動返回的pop動畫,在監聽手勢滑動的方法中,我們根據手勢的狀態做如下處理:
開始滑動:設置transitionInProgress為true,並開始執行導航控制器的pop返回。
滑動過程中:更新交互過程的百分比,我們假設指定滑動200點即為交互完成。
取消或結束:設置transitionInProgress為false,如果交互過程執行50%以上則認為交互完成。
接來下來到我們的ItemsTableViewController,添加如下代碼:
let customInteractionController = CustomInteractionController()
然後修改我們之前實現的導航控制器的代理方法如下:
func navigationController(navigationController: UINavigationController, animationControllerForOperation operation: UINavigationControllerOperation, fromViewController fromVC: UIViewController, toViewController toVC: UIViewController) -> UIViewControllerAnimatedTransitioning? {
    if operation == .Push {
        customInteractionController.attachToViewController(toVC)
    }
    customNavigationAnimationController.reverse = operation == .Pop
    return customNavigationAnimationController
}
當我們push一個目標控制器時,就為該目標控制器設定交互控制。最後實現導航控制器代理中的另一個方法用於指定交互控制器,代碼如下:
func navigationController(navigationController: UINavigationController, interactionControllerForAnimationController animationController: UIViewControllerAnimatedTransitioning) -> UIViewControllerInteractiveTransitioning? {
    return customInteractionController.transitionInProgress ? customInteractionController : nil
}
運行程序,如下圖所示:

完整的示例程序鏈接地址請點擊這裡。
推薦閱讀:
objc中國:自定義 ViewController 容器轉場
喵神的好文:WWDC 2013 Session筆記 - iOS7中的ViewController切換
實現下拉菜單的小Demo
Demo實現效果如下圖所示,下載完整的Demo代碼請點擊這裡。(譯注:原文地址需要FQ訪問,本人已轉存到GitHub上,點擊這裡。)

實現過程同我們前面講的自定義轉場動畫過程一樣,首先創建一個動畫管理器類MenuTransitionManager,然後設置目標控制器的轉場代理,這次我們使用動畫管理器對象作為代理,所以MenuTransitionManager既遵守了UIViewControllerAnimatedTransitioning協議,也遵守了UIViewControllerTransitioningDelegate協議。動畫的執行代碼比較簡單,只是通過改變transform控制來源和目標視圖的上下移動,目標視圖我們仍然使用了快照技術。
我們還為來源視圖的快照添加了一個點擊的手勢,這樣在顯示下拉菜單後,除了點擊相應的菜單選項,點擊下部的快照也可以返回到主頁視圖。只不過點擊手勢的處理我們使用了代理設計模式,而點擊手勢的添加我們使用了Swift的屬性觀察器語法,讀者可以自行研究學習。
最後,希望大家學的愉快!

- iOS開辟中文件的上傳和下載功效的根本完成
- iphone怎麼隔空在屏幕上方揮手接電話?
- 源碼推薦(8.25):簡單易用的Toast,實現水位波浪動畫
- iTouch5蘋果皮即將上市
- iOS9.2怎麼降級到iOS9.1 iOS9.2降級到iOS9.1方法介紹
- 《從零開始學Swift》學習筆記(Day 64)——Cocoa Touch設計模式及應用之目標與動作
- iphone上的app名稱被隱藏怎麼改回來?
- Objective C從遠程url下載圖片方法匯總
- iphone6s plus通話背景設置在哪 iPhone6s Plus通話背景設置方法
- iPhone5s白蘋果怎麼辦_iPhone5s白蘋果修復技巧
- iOS手勢辨認的詳細運用辦法(拖動,縮放,旋轉,點擊,手勢依賴,自定義手勢)
- iOS自定義UICollectionViewFlowLayout完成圖片閱讀效果
- iOS自定義控件要留意的問題
- iOS開發之代碼調用自定義tableView
- iOS在自定義控件中怎樣獲取以後的navigationController停止push頁面
- [iOS]零碎UITabBarController步驟及自定義
- IOS 運用XIB制造Storyboard運用的自定義控件
- IOS 開發之自定義按鈕完成文字圖片地位隨意定制
- iOS 為自定義前往按鈕leftBarButtonItem的頁面添加右滑前往功用
- iOS開發UI篇—CAlayer(自定義layer)
- IOS 自定義UICollectionView的頭視圖或許尾視圖UICollectionReusableView
- iOS中自定義進度條設置半通明背景(Swift 3)
- iOS10自定義tabBar出錯
- iOS導入自定義字體,藝術字體
- 【iOS】自定義textField的clearButton