IOS 運用XIB制造Storyboard運用的自定義控件
開發環境:IOS8.0+ Swift 2.3
創立一個UIView

遺憾的是Also create XIB file是灰色的。沒方法,只能分創始建了
新建文件,選擇User Interface中的View然後命名為CustomTest。
在CustomTest.Xib中的File’s Owner的屬性面板的Customer class選擇CustomTest,
記住是File’s Owner,而不是其他的任何中央
然後就是對Xib停止規劃和約束,然後將其中的控件與CustomTest.Swift停止連線。CustomTest 的class 後面需求加上@IBDesignable,表示在屬性面板中可見。
需求暴露的屬性,後面需求加上 @IBInspectable,如:
@IBInspectable var realBackColor:UIColor = UIColor.orangeColor() {
        didSet {
            self.viewRealNameBack.backgroundColor = realBackColor
        }
    }
關於控件的初始化,分為可視化調用和代碼調用兩種方式,將會調用不同的init
    //代碼創立
    override init(frame: CGRect) {
        super.init(frame: frame)
        contentView = loadViewFromNib()
        addSubview(contentView)
        addConstraints()
    }

    //可視化
    required init?(coder aDecoder: NSCoder) {
        super.init(coder: aDecoder)
        contentView = loadViewFromNib()
        addSubview(contentView)
        addConstraints()
    }
關於加載Xib的辦法,swift2.3
func loadViewFromNib() -> UIView {
        let bundle = NSBundle(forClass: self.classForCoder)
        let nib = UINib(nibName: String(self.classForCoder), bundle: bundle)
        let view = nib.instantiateWithOwner(self, options: nil)[0] as! UIView
        return view
    }
swif3.0
func loadViewFromNib() -> UIView {
        let className = type(of: self)
        let bundle = Bundle(for: className)
        let name = NSStringFromClass(className).components(separatedBy: ".").last
        let nib = UINib(nibName: name!, bundle: bundle)
        let view = nib.instantiate(withOwner: self, options: nil).first as! UIView
        return view
    }
加載完Xib後,需求與Self做好約束,否則會形成在Xib中的約束有效。
上面是完好的代碼例子:
import UIKit

@IBDesignable
class CustomTest: UIView {

    @IBOutlet weak var lbRealName: UILabel!
    @IBOutlet weak var lbLimit: UILabel!
    @IBOutlet weak var lbValDate: UILabel!
    @IBOutlet weak var lbPrice: UILabel!

    @IBOutlet weak var viewRealNameBack: UIView!


    var contentView:UIView!

    @IBInspectable var backColor:UIColor = Jiajiao.Color.Clr09aeb0 {
        didSet {
            self.contentView.backgroundColor = backColor
        }
    }

    @IBInspectable var realBackColor:UIColor = UIColor.orangeColor() {
        didSet {
            self.viewRealNameBack.backgroundColor = realBackColor
        }
    }


    //初始化時將xib中的view添加出去
    override init(frame: CGRect) {
        super.init(frame: frame)
        contentView = loadViewFromNib()
        addSubview(contentView)
        addConstraints()
    }

    //初始化時將xib中的view添加出去
    required init?(coder aDecoder: NSCoder) {
        super.init(coder: aDecoder)
        contentView = loadViewFromNib()
        addSubview(contentView)
        addConstraints()
    }

    func loadViewFromNib() -> UIView {
        let bundle = NSBundle(forClass: self.classForCoder)
        let nib = UINib(nibName: String(self.classForCoder), bundle: bundle)
        let view = nib.instantiateWithOwner(self, options: nil)[0] as! UIView
        return view
    }

    func addConstraints() {
        contentView.translatesAutoresizingMaskIntoConstraints = false

        let l = NSLayoutConstraint(item: contentView, attribute: .Leading, relatedBy: .Equal, toItem: self, attribute: .Leading, multiplier: 1, constant: 0)
        l.active = true

        let r = NSLayoutConstraint(item: contentView, attribute: .Trailing, relatedBy: .Equal, toItem: self, attribute: .Trailing, multiplier: 1, constant: 0)
        r.active = true

        let t = NSLayoutConstraint(item: contentView, attribute: .Top, relatedBy: .Equal, toItem: self, attribute: .Top, multiplier: 1, constant: 0)
        t.active = true

        let b = NSLayoutConstraint(item: contentView, attribute: .Bottom, relatedBy: .Equal, toItem: self, attribute: .Bottom, multiplier: 1, constant: 0)
        b.active = true
    }
}
調用,這個比擬復雜了,拖一個普通的View到storyboard中,然後修正屬性,將Class選擇為CustomTest

然後在屬性面板中就可以看到自定義的屬性了。
對了,還有一點
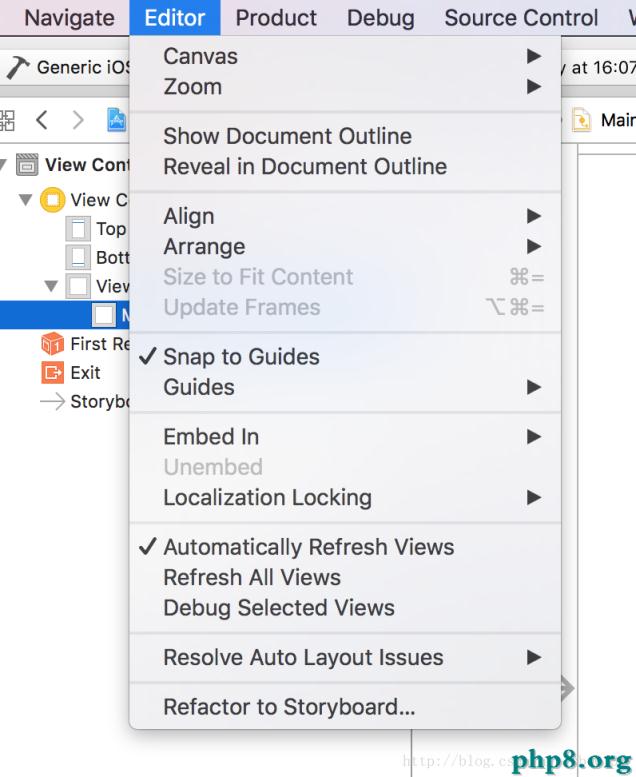
留意,Editor -> Automatically Refresh Views
當這個選擇的時分才會即時的編譯,在Storyboard中看到效果,不過帶來的負面影響就是,在翻開輔佐編輯器的時分,輸出代碼的時分會不停的編譯形成卡頓。
當不需求直接在Storyboard中看效果的時分,建議先關掉。
寫的比擬粗糙,有疑問可以吐槽
【IOS 運用XIB制造Storyboard運用的自定義控件】的相關資料介紹到這裡,希望對您有所幫助! 提示:不會對讀者因本文所帶來的任何損失負責。如果您支持就請把本站添加至收藏夾哦!