iOS中自定義進度條設置半通明背景(Swift 3)
編輯:IOS開發綜合
在顯示進度條的時分,有時分會發現用自帶的progressView可自定義的屬性比擬少,並不能滿足某些需求,承繼UIView重新完成一個也挺方便的,自定義progress view 代碼如下:
import Foundation
import UIKit

class CXEProgressView: UIView {


    private let textLabel = UILabel()


    private let bar = UIView()

    public var progress: Float = 0{
        didSet{
            percent = Int(progress * 100)
        }
    }

    var percent: Int = 0 {
        didSet {
            if percent > 100 {
                percent = 100
            }else if percent < 0 {
                percent = 0
            }
            textLabel.text =  "\(percent)%"
            setNeedsLayout()
        }
    }

    //文本顏色
    var color: UIColor = UIColor.black {
        didSet {
            textLabel.textColor = color
        }
    }

    //進度條顏色
    var barColor: UIColor = UIColor.orange {
        didSet {
            bar.backgroundColor = barColor
        }
    }

    //進度條背景顏色
    var barBgColor: UIColor = UIColor.white {
        didSet {
            layer.backgroundColor = barBgColor.cgColor
        }
    }


    override init(frame: CGRect) {
        super.init(frame: frame)

        initialSetup()
    }


    required init?(coder aDecoder: NSCoder) {
        super.init(coder: aDecoder)

        initialSetup()
    }

    private func initialSetup(){
        bar.backgroundColor = self.barColor
        addSubview(bar)

        self.layer.cornerRadius = CGFloat(12)
        self.layer.masksToBounds = true
        self.bar.layer.cornerRadius = CGFloat(12)
        self.bar.layer.masksToBounds = true

        textLabel.textAlignment = .center
        textLabel.numberOfLines = 0
        textLabel.textColor = self.color
        textLabel.text = "\(self.percent)%"
        addSubview(textLabel)
    }


    override func layoutSubviews() {
        super.layoutSubviews()

        layer.backgroundColor = self.barBgColor.cgColor

        var barFrame = bounds
        barFrame.size.width *= (CGFloat(self.percent) / 100)
        bar.frame = barFrame

        textLabel.frame = bounds
    }
}
自定義進度條後,想讓進度條顯示在一個半通明的背景上,這樣的操作還是常常遇到的,可以直接在屏幕上加一個Window,然後把自定義的進度條顯示在下面,代碼如下:
import Foundation
import UIKit

class CXEUserInteractiveManager: NSObject {

    private var _boardWindow : UIWindow?

    static let shared : CXEUserInteractiveManager = {
        let instance = CXEUserInteractiveManager.init()
        return instance
    }()

    //    MARK:load界面
    var boardWindow : UIWindow {
        if(self._boardWindow == nil) {

            let window : UIWindow = UIWindow(frame: UIScreen.main.bounds)
            window.windowLevel = UIWindowLevelStatusBar
            window.backgroundColor = UIColor.gray.withAlphaComponent(0.7)
            window.isUserInteractionEnabled = true
            window.makeKeyAndVisible()


            self._boardWindow = window
        }
        return self._boardWindow!
    }

    public func diss() {
        self.boardWindow.isHidden = true
        self.boardWindow.removeFromSuperview()
    }

    public func show(_ view : UIView) {
        self.boardWindow.addSubview(view)
        self.boardWindow.isHidden = false
    }

}
運用辦法如下:
import UIKit

class ViewController: UIViewController {

    var timer:Timer?
    var progress:Float = 0

    override func viewDidLoad() {
        super.viewDidLoad()

        let button = UIButton(type: .system)
        button.setTitle("點我點我點我", for: .normal)
        button.frame = CGRect(x:0, y:0, width:Int(UIScreen.main.bounds.width.native * 0.8), height:30)
        button.center = CGPoint(x: UIScreen.main.bounds.midX, y: UIScreen.main.bounds.midY - 50)
        button.addTarget(self, action: #selector(self.onClike), for: .touchUpInside)

        self.view.addSubview(button)

    }

    override func didReceiveMemoryWarning() {
        super.didReceiveMemoryWarning()
    }

    func onClike(){
        let progressView = CXEProgressView(frame: CGRect(x:0, y:0, width:Int(UIScreen.main.bounds.width.native * 0.8), height:22))
        progressView.center = CGPoint(x: UIScreen.main.bounds.midX, y: UIScreen.main.bounds.midY)
        CXEUserInteractiveManager.shared.show(progressView)

        let cancelProgressButton = UIButton(type: .system)
        cancelProgressButton.frame = CGRect(x: 0, y: 0, width: Int(UIScreen.main.bounds.width.native * 0.8), height: 60)
        cancelProgressButton.center = CGPoint(x: UIScreen.main.bounds.midX, y: UIScreen.main.bounds.midY + 80)
        let attributes:[String:Any] = [NSFontAttributeName: UIFont.systemFont(ofSize: 15)]
        cancelProgressButton.setAttributedTitle(NSAttributedString(string:"你再點我試試", attributes: attributes), for: .normal)
        cancelProgressButton.tintColor = UIColor.white
        cancelProgressButton.addTarget(self, action: #selector(self.onCancleProgress), for: .touchUpInside)
        CXEUserInteractiveManager.shared.show(cancelProgressButton)

        timer = Timer.scheduledTimer(withTimeInterval: 0.5, repeats: true){_ in
            progressView.progress = self.progress
            self.progress += 0.1
        }
    }

    func onCancleProgress(){
        CXEUserInteractiveManager.shared.diss()
        self.timer?.invalidate()
    }
}


Contact GitHub API Training Shop Blog About
Demo下載:https://github.com/Willib/CustomProgress
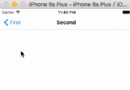
效果如下:

【iOS中自定義進度條設置半通明背景(Swift 3)】的相關資料介紹到這裡,希望對您有所幫助! 提示:不會對讀者因本文所帶來的任何損失負責。如果您支持就請把本站添加至收藏夾哦!
- 上一頁:iOS初級教程(一)
- 下一頁:切換主題 彈幕
相關文章
+