實例講解設計模式中的命令模式在iOS App開發中的運用
命令模式封裝一個請求或行為作為一個對象。封裝的請求比原的更加靈活,可以在對象之間傳遞,儲存,動態修改,或放入一個隊列。
那麼讓我們簡要的說一下命令模式的特點。
- 它能比較容易地設計一個命令隊列;
- 在需要的情況下,可以較容易地將命令記入日志;
- 允許接收請求地一方決定是否要否決請求;
- 可以容易地實現對請求地撤銷和重做;
- 由於加進新地具體命令類不影響其他的類,因此增加新的具體命令類很容易;
- 把請求一個操作的對象與知道怎麼執行一個操作的對象分隔開。
下面給出基本的類結構圖:
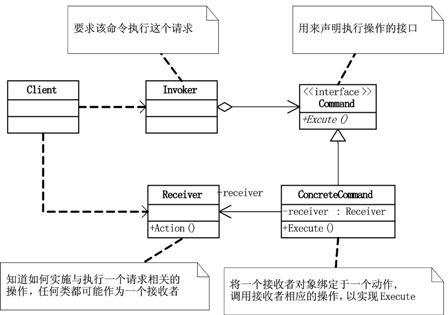
上面這張圖是命令模式的類結構的基本圖。其實從這張圖中還可以擴展出很多,細節就不說了,給大家留一些想象的空間,呵呵!
還是老規矩,下面給出實例:
Objective-C 示例:
Command:
復制代碼 代碼如下:
//
// NimoCommand.h
// CommandDemo
//
#import <Foundation/Foundation.h>
@protocol NimoCommand <NSObject>
- (void)execute;
@end
ConcreteCommand:
復制代碼 代碼如下:
//
// NimoConcreteCommand.h
// CommandDemo
//
#import <Foundation/Foundation.h>
#import "NimoCommand.h"
@class NimoReceiver;
@interface NimoConcreteCommand : NSObject <NimoCommand>
@property (nonatomic) NimoReceiver *receiver;
- (id)initWithReceiver:(NimoReceiver *)receiver;
@end
復制代碼 代碼如下:
//
// NimoConcreteCommand.m
// CommandDemo
//
#import "NimoConcreteCommand.h"
#import "NimoReceiver.h"
@implementation NimoConcreteCommand
- (void)execute
{
[_receiver action];
}
- (id)initWithReceiver:(NimoReceiver *)receiver
{
if (self = [super init]) {
_receiver = receiver;
}
return self;
}
@end
Receiver:
復制代碼 代碼如下:
//
// NimoReceiver.h
// CommandDemo
//
#import <Foundation/Foundation.h>
@interface NimoReceiver : NSObject
- (void)action;
@end
復制代碼 代碼如下:
//
// NimoReceiver.m
// CommandDemo
//
#import "NimoReceiver.h"
@implementation NimoReceiver
- (void)action
{
NSLog(@"實際執行");
}
@end
Invoker:
復制代碼 代碼如下:
//
// NimoInvoker.h
// CommandDemo
//
#import <Foundation/Foundation.h>
#import "NimoCommand.h"
@interface NimoInvoker : NSObject
@property (nonatomic, weak) id<NimoCommand> command;
- (void)executeCommand;
@end
復制代碼 代碼如下:
//
// NimoInvoker.m
// CommandDemo
//
#import "NimoInvoker.h"
@implementation NimoInvoker
- (void)executeCommand
{
[_command execute];
}
@end
Client:
復制代碼 代碼如下:
//
// main.m
// CommandDemo
//
#import <Foundation/Foundation.h>
#import "NimoReceiver.h"
#import "NimoInvoker.h"
#import "NimoConcreteCommand.h"
int main(int argc, const char * argv[]) {
@autoreleasepool {
NimoReceiver *receiver = [[NimoReceiver alloc] init];
NimoConcreteCommand *command = [[NimoConcreteCommand alloc] initWithReceiver:receiver];
NimoInvoker *invoker = [[NimoInvoker alloc] init];
invoker.command = command;
[invoker executeCommand];
}
return 0;
}
Running:
2015-08-13 22:49:56.412 CommandDemo[1385:43303] 實際執行
Cocoa Touch框架中的命令模式:
NSInvocation對象
如下示例,Client沒有直接調用Receiver的方法,而是用NSInvocation對象封裝了運行時庫向Receiver發送執行消息所需的所有必要信息,這裡的NSInvocation對象類似於上文中的ConcreteCommand對象。
Receiver:
復制代碼 代碼如下:
//
// NimoReceiver.h
// InvocationDemo
//
#import <Foundation/Foundation.h>
@interface NimoReceiver : NSObject
- (int)printWithName:(NSString *)name gender:(NSString *)gender age:(int)age;
@end
復制代碼 代碼如下:
//
// NimoReceiver.m
// InvocationDemo
//
#import "NimoReceiver.h"
@implementation NimoReceiver
- (int)printWithName:(NSString *)name gender:(NSString *)gender age:(int)age
{
NSLog(@"My name is %@, %@, %d years old.", name, gender, age);
return 119;
}
@end
Client:
復制代碼 代碼如下:
//
// main.m
// InvocationDemo
//
#import <Foundation/Foundation.h>
#import "NimoReceiver.h"
int main(int argc, const char * argv[]) {
@autoreleasepool {
//用Receiver的實例創建NSInvocation對象,並把Receiver的action作為選擇器
NimoReceiver *receiver = [[NimoReceiver alloc] init];
NSString *name = @"Lee";
NSString *gender = @"male";
int age = 28;
SEL sel = @selector(printWithName:gender:age:);
NSMethodSignature *methodSignature = [[receiver class] instanceMethodSignatureForSelector:sel];
NSInvocation *invocation = [NSInvocation invocationWithMethodSignature:methodSignature];
[invocation setTarget:receiver];
[invocation setSelector:sel];
[invocation setArgument:&name atIndex:2];
[invocation setArgument:&gender atIndex:3];
[invocation setArgument:&age atIndex:4];
[invocation retainArguments];
[invocation invoke]; //通過調用NSInvocation對象的invoke方法,完成對Receiver中action的調用
int returnValue = 0;
[invocation getReturnValue:&returnValue];
NSLog(@"returnValue: %d", returnValue);
}
return 0;
}
Running:
2015-08-14 13:37:44.162 InvocationDemo[1049:36632] My name is Lee, male, 28 years old.
2015-08-14 13:37:44.164 InvocationDemo[1049:36632] returnValue: 119
其實,單從類關系圖中可以簡單的看出,命令模式其實是把需求(Invoker)和具體實現(Receiver)通過命令層(Command)進行了解耦。具體實現過程根據不同的命令進行了區分。


- iOS 完成多署理的辦法及實例代碼
- IOS 陀螺儀開辟(CoreMotion框架)實例詳解
- ajax 三種完成辦法實例代碼
- iOS中 LGLAlertView 提醒框的實例代碼
- IOS 仿時間網選票UI實例代碼
- iOS 雷達後果實例詳解
- IOS 粒子體系 (CAEmitterLayer)實例詳解
- iOS 動畫 —— 禮花後果實例具體
- 在Swift中應用JSONModel 實例代碼
- iOS 9 Core Spotlight搜刮實例代碼
- 實例講授iOS中的UIPageViewController翻頁視圖掌握器
- 實例講授iOS中的CATransition轉場動畫應用
- 應用Swift代碼完成iOS手勢解鎖、指紋解鎖實例詳解
- iOS App開辟中應用設計形式中的單例形式的實例解析
- iOS中應用UIDatePicker制造時光選擇器的實例教程