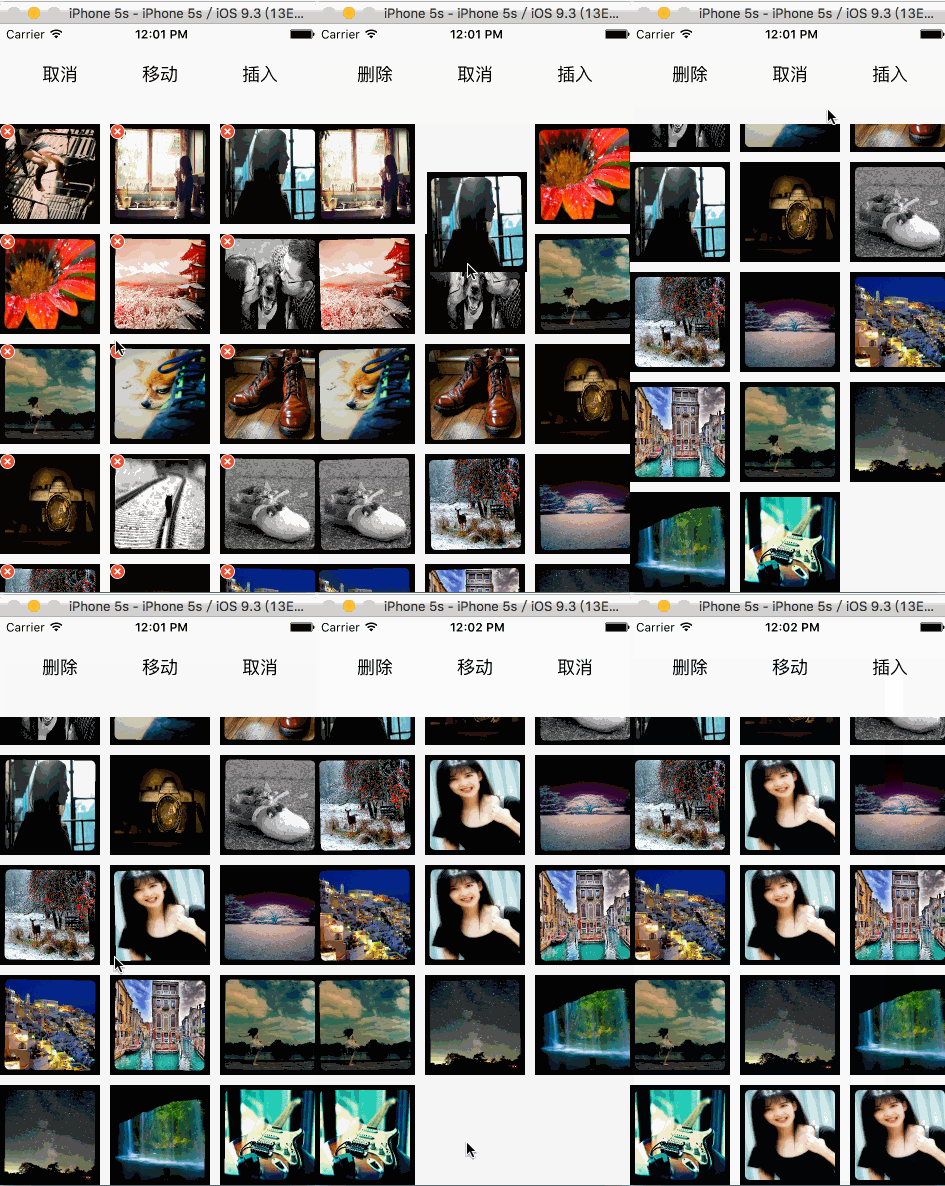
自定義刪除移動和插入的collectionview的封裝
導語
玩了幾天了,本來不打算寫的,還是寫下來留著自己以後可能會需要。本例是自己封裝一個collectionView,使用時只需要實例化並傳入數據源即可。就能進行相應的刪除,移動和插入操作。效果如下:

分析
1 本例中的collectionView實際是個UIView,上面放了個充滿view的UICollectionView,並且collectionView的代理是UIView。
2 為了代碼簡潔,使用了一個枚舉類型的methodType,來判斷需要的操作,用KVO實時觀測type的變化,這樣就不需要寫很多的接口方法,使用起來只需要修改type即可。
3 添加了一些動畫效果讓操作看起來更好看而且自然,自定義的FlowLayout是空的,如需自定義自行修改即可,自定義的Cell同理。
使用
實例化方法中傳入數據即可:
- (MDCollectionView *)collectionView{
    if (!_collectionView) {
        _collectionView = [[MDCollectionView alloc]initWithFrame:CGRectMake(0, 100, SW, SH-100) DataSource:self.dataSource];
    }
    return _collectionView;
}
具體實現
刪除:
在自定義cell上添加了一個刪除button,默認是hidden狀態,當type為MDDelete時,reload列表,在cellWillDisplay中將刪除button顯示出來。
- (void)collectionView:(UICollectionView )collectionView willDisplayCell:(UICollectionViewCell )cell forItemAtIndexPath:(NSIndexPath )indexPath{
    MDCollectionCell MDcell = (MDCollectionCell )cell;
    if (_isShake) {
        if (self.type == MDDelete) {
            MDcell.deleteBtn.hidden = NO;
        }else MDcell.deleteBtn.hidden = YES;
        CAKeyframeAnimation keyAnimation = [CAKeyframeAnimation animation];
        keyAnimation.keyPath = @"transform.rotation";
        keyAnimation.values = @[@(-0.03),@(0.03)];
        keyAnimation.repeatCount = MAXFLOAT;
        keyAnimation.duration = 0.2f;
        [MDcell.image.layer addAnimation:keyAnimation forKey:@"keyAnimation"];
    }else if (!_isShake){
        [MDcell.image.layer removeAllAnimations];
        MDcell.deleteBtn.hidden = YES;
    }
}
需要注意的是,刪除是必須先remove掉數據源,然後在remove掉Item。
移動
移動在IOS9之後非常簡單,有相應的方法實現,
需要注意的是,我們在移動時給collectionview添加了panGesture來移動,首先需要根據手的落點獲取選中的item,那麼就要判斷,獲取的IndexPath是否為空:
- (void)handleMethod:(UIPanGestureRecognizer )sender{
    CGPoint location = [sender locationInView:self.collectionView];
    NSIndexPath indexPath = [self.collectionView indexPathForItemAtPoint:location];
//    location.x =
    if (self.type == MDMove) {
        if (indexPath) {
            switch (sender.state) {
                case UIGestureRecognizerStateBegan:
                    [self.collectionView beginInteractiveMovementForItemAtIndexPath:indexPath];
                    break;
                case UIGestureRecognizerStateChanged:
                    [self.collectionView updateInteractiveMovementTargetPosition:[sender locationInView:self.collectionView]];
                    break;
                default:
                    break;
            }
        }
        if (sender.state == UIGestureRecognizerStateEnded) {
            [self.collectionView endInteractiveMovement];
        }
    }
需要注意的是,移動的時候必須在moveItem方法中先調整好數據源:
- (BOOL)collectionView:(UICollectionView )collectionView canMoveItemAtIndexPath:(NSIndexPath )indexPath{
    return YES;
}
- (void)collectionView:(UICollectionView )collectionView moveItemAtIndexPath:(NSIndexPath )sourceIndexPath toIndexPath:(NSIndexPath *)destinationIndexPath{
    id obj = [dataSource objectAtIndex:sourceIndexPath.row];
    [dataSource removeObjectAtIndex:sourceIndexPath.row];
    [dataSource insertObject:obj atIndex:destinationIndexPath.row];
}
插入
本例用插入女神周慧敏的照片作為例子,可按實際需要插入。
//以女神周慧敏照片做例子插入
else if (self.type == MDInsert){
    if (!indexPath) {
        indexPath = [self getIndexPathWithPoint:location];
        if (sender.state == UIGestureRecognizerStateBegan) {
        CGRect destinationFrame = [self.collectionView cellForItemAtIndexPath:indexPath].frame;
            if (indexPath.row == dataSource.count) {
                CGRect lastItemFrame = [self.collectionView cellForItemAtIndexPath:[NSIndexPath indexPathForItem:dataSource.count-1 inSection:0]].frame;
                destinationFrame = CGRectMake(lastItemFrame.origin.x+self.flowLayout.itemSize.width, lastItemFrame.origin.y, self.flowLayout.itemSize.width, self.flowLayout.itemSize.height);
}
            UIImageView showImage = [[UIImageView alloc]initWithFrame:CGRectMake(SW/2-100,             self.collectionView.contentOffset.y+SH/2 - 100, 200, 200)];
            [showImage setImage:[UIImage imageNamed:@"vivian.jpg"]];
            showImage.layer.cornerRadius = 5.0f;
            showImage.layer.masksToBounds = YES;
            [self.collectionView addSubview:showImage];
            [UIView animateWithDuration:1 animations:^{
                [showImage setFrame:destinationFrame];
            }completion:^(BOOL finished) {
                [showImage removeFromSuperview];
                [dataSource insertObject:@"vivian.jpg" atIndex:indexPath.row];
                [self.collectionView performBatchUpdates:^{
                    [self.collectionView insertItemsAtIndexPaths:@[indexPath]];
                } completion:nil];
            }];
        }
    }
}
由於插入的時候與移動相反,點擊的是Item之外的空白處,尤其是點擊最後一個Item之外的空白,就需要方法判斷到底該插入到哪個位置:
//獲取按壓點該插入的IndexPath
- (NSIndexPath )getIndexPathWithPoint:(CGPoint)point{
    if(![self.collectionView indexPathForItemAtPoint:CGPointMake(point.x+self.flowLayout.itemSize.width, point.y)] && [self.collectionView indexPathForItemAtPoint:CGPointMake(point.x, point.y+self.flowLayout.itemSize.height)]){
        return [self.collectionView indexPathForItemAtPoint:CGPointMake(point.x, point.y+self.flowLayout.itemSize.height)];
    }else if (![self.collectionView indexPathForItemAtPoint:CGPointMake(point.x, point.y+self.flowLayout.itemSize.height)] && [self.collectionView indexPathForItemAtPoint:CGPointMake(point.x+self.flowLayout.itemSize.width, point.y)]){
        return [self.collectionView indexPathForItemAtPoint:CGPointMake(point.x+self.flowLayout.itemSize.width, point.y)];
    }else{
        return [NSIndexPath indexPathForItem:dataSource.count inSection:self.collectionView.numberOfSections - 1];
    }
    return nil;
}
總結
大致實現就是這樣,具體請看源碼。由於代理是collectionView,所以需要自己寫一些代理方法將點擊等事件傳出來,可根據自己需要寫。
github博客
源碼地址
- iOS手勢辨認的詳細運用辦法(拖動,縮放,旋轉,點擊,手勢依賴,自定義手勢)
- iOS自定義UICollectionViewFlowLayout完成圖片閱讀效果
- iOS自定義控件要留意的問題
- iOS開發之代碼調用自定義tableView
- iOS在自定義控件中怎樣獲取以後的navigationController停止push頁面
- [iOS]零碎UITabBarController步驟及自定義
- IOS 運用XIB制造Storyboard運用的自定義控件
- IOS 開發之自定義按鈕完成文字圖片地位隨意定制
- iOS 為自定義前往按鈕leftBarButtonItem的頁面添加右滑前往功用
- iOS開發UI篇—CAlayer(自定義layer)
- IOS 自定義UICollectionView的頭視圖或許尾視圖UICollectionReusableView
- iOS中自定義進度條設置半通明背景(Swift 3)
- iOS10自定義tabBar出錯
- iOS導入自定義字體,藝術字體
- 【iOS】自定義textField的clearButton


