IOS 瀑布流UICollectionView實現
編輯:IOS編程技術
IOS 瀑布流UICollectionView實現
在實現瀑布流之前先來看看瀑布流的雛形(此方法的雛形 UICollectionView)
對於UICollectionView我們有幾點注意事項
- 它和tableView不一樣,ContentView的內容完全需要我們自己去添加。
- 它與tableview相比,他的初始化需要FlowLayout並且大部分操作在其上。
- UIcollectionView的實用性極強,雖然有時他並不是最好的解決方案,但是它可以很靈活的實現各種效果。
圖(一)
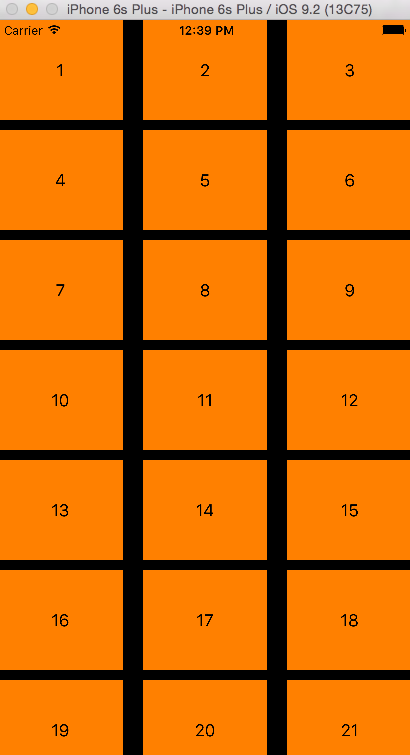
如圖,模擬器上展示的是很多方格,但是值得注意的是他們是有規則的。
雖然看上去很整潔但是並不美觀。
我們所說的要實現瀑布流就是要實現它的不整潔,但是規律(這裡我說的是規律)
正題
前面說了UIcollectionView的大部分操作在FlowLayout上,當然也包括格局部署。
為了實現瀑布流我們所要實現的便是改變他的格局部署。
在寫代碼前先確定一下實現思想。
- 需要什麼???
- 首先我們需要確定瀑布流的顯示風格
- 然後根據確定好的風格進行整體設計
- 最後通過細節的處理完善代碼
- 我們需要什麼樣的風格???
- 我們需要的是實現將上面圖片中的布局改變為不等高的效果
- 說的俗一點就是像名字一樣,像瀑布流水一樣
- 整體該如何設計???
- 整體采用與上面圖片一樣的設計方法,每個模塊都是一個cell
- 確保最上面一行的cell的y值相同(美觀)
- 確保不不會出現一列特別長,一列特別短的效果
- 初步細節有哪些???
- 因為每個cell的height不同,所以我們要考慮放置的順序應該是什麼
- 精簡代碼(這是每個項目必須注意的)
- 我們需要什麼樣的風格???
實現效果
代碼
下面是實現的代碼部分(不提供demo了 很簡單)
我在注釋中簡單介紹。
---
//
//  ViewController.m
//  CX-瀑布流UIcollectionView實現
//
//  Created by ma c on 16/4/8.
//  Copyright © 2016年 bjsxt. All rights reserved.
//

#import "ViewController.h"
#import "CXCollectionViewCell.h"
#import "CXCollectionViewLayout.h"

static NSString * identifier = @"cellID";

@interface ViewController ()<UICollectionViewDataSource>
//所要展示的UICollectionView
@property (nonatomic, strong) UICollectionView * collectionView;

@end

@implementation ViewController

#pragma mark - <懶加載>
- (UICollectionView *)collectionView {
    if (!_collectionView) {
        //初始化我們自定義的flowLayout
        CXCollectionViewLayout * flowLayout = [[CXCollectionViewLayout alloc]init];
        //初始化collectionView
        _collectionView = [[UICollectionView alloc]initWithFrame:self.view.bounds collectionViewLayout:flowLayout];
        //設置數據源(collectionView的命根子)
        _collectionView.dataSource = self;
        //注冊我們自定義的cell
        [_collectionView registerNib:[UINib nibWithNibName:NSStringFromClass([CXCollectionViewCell class]) bundle:nil] forCellWithReuseIdentifier:identifier];
    }
    return _collectionView;
}


#pragma mark - <life>

- (void)viewDidLoad {
    [super viewDidLoad];
    //在self.view上添加---
    [self.view addSubview:self.collectionView];
}
#pragma mark - <UICollectionViewDataSource>
//這裡返回的是item的個數 返回100
- (NSInteger)collectionView:(UICollectionView *)collectionView numberOfItemsInSection:(NSInteger)section{

    return 100;
}
//這裡返回的是cell 我們可以在這裡進行一些簡單的操作
-(UICollectionViewCell *)collectionView:(UICollectionView *)collectionView cellForItemAtIndexPath:(NSIndexPath *)indexPath{

    CXCollectionViewCell * cell = [collectionView dequeueReusableCellWithReuseIdentifier:identifier forIndexPath:indexPath];
    //為了瀑布流的實現細節我們添加的Label

    cell.label.text = [NSString stringWithFormat:@"%zd",indexPath.item];
    //cell的背景色
    cell.backgroundColor = [UIColor orangeColor];

    return cell;
}

@end
---
//
//  CXCollectionViewLayout.m
//  CX-瀑布流UIcollectionView實現
//
//  Created by ma c on 16/4/8.
//  Copyright © 2016年 bjsxt. All rights reserved.
//

#import "CXCollectionViewLayout.h"

//瀑布流的列數
static NSInteger CXcolumnCount = 3;
//瀑布流的內邊距
static UIEdgeInsets CXdefaultEdgeInsets = {20,15,10,15};
//cell的列間距
static NSInteger CXcolumnMagin = 10;
//cell的行間距
static NSInteger CXrowMagin = 10;

@interface CXCollectionViewLayout ()

//存放所有cell 的布局屬性
@property (nonatomic, strong) NSMutableArray * CXattrsArray;
//縮放所有列的高度
@property (nonatomic, strong) NSMutableArray * CXcolumnHeights;

@end

@implementation CXCollectionViewLayout

#pragma mark - <懶加載>
- (NSMutableArray *)CXattrsArray{
    if (!_CXattrsArray) {
        _CXattrsArray = [NSMutableArray array];
    }
    return _CXattrsArray;
}

- (NSMutableArray *)CXcolumnHeights{
    if (!_CXcolumnHeights) {
        _CXcolumnHeights = [NSMutableArray array];
    }
    return _CXcolumnHeights;
}
#pragma mark - <准備布局>
//准備布局(布局前自動執行)
- (void) prepareLayout{
    //重寫此方法一定要記得super
    [super prepareLayout];

    //在實際操作中我們的數據並不會固定不變的,因此我們每次布局前最好要清空之前存儲的屬性
    //清空存放所有列的高度
    //清空存放所有cell的不去屬性
    [self.CXcolumnHeights removeAllObjects];
    [self.CXattrsArray removeAllObjects];
    //首先為第一行的cell附高度
    for (NSInteger i = 0; i < CXcolumnCount; i ++) {
        //數組裡只能存放對象
        [self.CXcolumnHeights addObject:@(CXdefaultEdgeInsets.top)];
    }
    //下面開始創建每一個cell的布局屬性 並且添加到存儲cell布局屬性的數組中
    //cell總個數 因為這裡只要一個section
    NSInteger count = [self.collectionView numberOfItemsInSection:0];
    for (NSInteger i = 0; i < count; i ++) {
        // 創建位置 即indexPath
        NSIndexPath * indexPath = [NSIndexPath indexPathForItem:i inSection:0];
        //獲取indexPath對應的cell布局屬性
        UICollectionViewLayoutAttributes * attributes = [self layoutAttributesForItemAtIndexPath:indexPath];
        //把獲取到的布局屬性添加到數組中
        [self.CXattrsArray addObject:attributes];
    }
    //准備布局的工作到這裡就結束了
}
//返回所有cell布局屬性 及整體cell 的排布
- (NSArray<UICollectionViewLayoutAttributes *> *)layoutAttributesForElementsInRect:(CGRect)rect{
    return self.CXattrsArray;
}
//返回cell 的布局屬性
- (UICollectionViewLayoutAttributes *)layoutAttributesForItemAtIndexPath:(NSIndexPath *)indexPath{
    //創建布局屬性
    UICollectionViewLayoutAttributes * CXattributes = [UICollectionViewLayoutAttributes layoutAttributesForCellWithIndexPath:indexPath];

    //獲取collectionView 的寬
    CGFloat collectionViewWidth = self.collectionView.frame.size.width;
    //下面的一部分是獲取cell的frame(布局屬性)
    CGFloat width;
    CGFloat height;
    CGFloat X;
    CGFloat Y;
    //獲取width
    width = (collectionViewWidth - CXdefaultEdgeInsets.left - CXdefaultEdgeInsets.right - (CXcolumnCount - 1) * CXcolumnMagin) / CXcolumnCount;
    //獲取height
    //在實際開發中heigh並不是真正的隨機 而是根據數據來決定height 在這裡展示初步的介紹其原理 因此采用大於100小於150的隨機數
    height = 100 + arc4random_uniform(50);
    //獲取X (瀑布流的實現重點就在cell的X,Y值獲取)
    //設置一個列數的中間變量
    NSInteger tempColumn = 0;
    //設置高度小的中間變量 在這裡我們把第0列的高度給他,這樣可以減少循環次數,提高效率
    CGFloat minColumnHeight = [self.CXcolumnHeights[0] doubleValue];
    for (NSInteger i = 1; i < CXcolumnCount; i ++) {
        if (minColumnHeight > [self.CXcolumnHeights[i] doubleValue]) {
            minColumnHeight = [self.CXcolumnHeights[i] doubleValue];
            tempColumn = i;
        }
    }
    X = CXdefaultEdgeInsets.left + (width + CXcolumnMagin) * tempColumn;
    //獲取Y
    Y = minColumnHeight;
    if (Y != CXdefaultEdgeInsets.top) {
        Y += CXrowMagin;
    }
    //設置cell的frame
    CXattributes.frame = CGRectMake(X, Y, width, height);
    //更新高度最矮的那列的高度
    self.CXcolumnHeights[tempColumn] = @(CGRectGetMaxY(CXattributes.frame));

    return CXattributes;
}
//返回collegeView的Content的大小
- (CGSize)collectionViewContentSize{
    //雖說返回的是大小,但是我們這裡主要的是height
    CGFloat maxColumnHeight = [self.CXcolumnHeights[0] doubleValue];
    for (NSInteger i = 1; i < CXcolumnCount; i++) {

        CGFloat columnHeight = [self.CXcolumnHeights[i] doubleValue];

        if (maxColumnHeight < columnHeight) {
            maxColumnHeight = columnHeight;
        }
    }
    return CGSizeMake(0, maxColumnHeight + CXdefaultEdgeInsets.bottom);

}

@end
到此為止瀑布流的實現也就結束了。
在這裡說明幾點值得注意的地方。
- 瀑布流中的cell排布順勢是根據當前列的高度有關的(例如:如果當前第三列是最短的,但是按正常情況下cell應該排在第一列,那麼這個時候,新的cell會排在第三列,這是為了避免某一列高度特別長或某一列的高度特別短)
- 在實際應用中通常cell的大小是根據數據的來處理的
- UIcollectionView的content的高度是不確定的,因此我們要根據內容設定高度。
- 當涉及到刷新的時候我們要注意cell的布局屬性是否在新數據到來前清空了。
- 上一頁:iOS手勢識別
- 下一頁:OC中runtime的使用
相關文章
+