iOS手勢識別
一、手勢識別與觸摸事件
1、如果想監聽一個view上面的觸摸事件,可選的做法是:
(1)自定義一個view
(2)實現view的touches方法,在方法內部實現具體處理代碼
2、通過touches方法監聽view觸摸事件,有很明顯的幾個缺點
(1)必須得自定義view
(2)由於是在view內部的touches方法中監聽觸摸事件,因此默認情況下,無法讓其他外界對象監聽view的觸摸事件
(3)不容易區分用戶的具體手勢行為
3、iOS 3.2之後,蘋果推出了手勢識別功能(Gesture Recognizer),在觸摸事件處理方面,大大簡化了開發者的開發難度
二、手勢識別——Gesture Recognizer
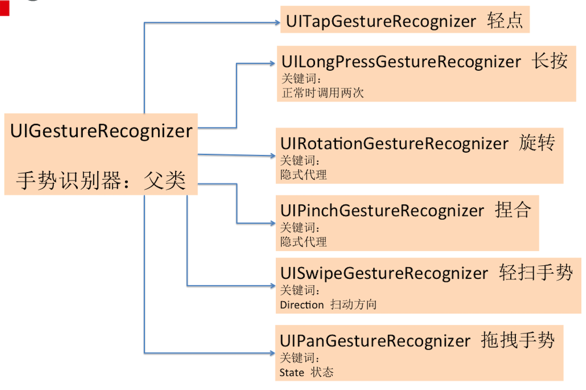
1、手勢識別器:UIGestureRecognizer
(1)UIGestureRecognizer是一個抽象類,定義了所有手勢的基本行為,使用它的子類才能處理具體的手勢
(2)子類的繼承和功能
圖示:
2、手勢識別的使用方法及步驟
(1)創建手勢識別實例
(2)設置手勢識別屬性,例如手指數量,方向等
(3)將手勢識別附加到指定的視圖之上
(4)編寫手勢觸發監聽方法
(5)手勢觸發監聽方法後,要還原手勢識別實例的屬性,比如:獲取了縮放比例,然後給某個控件進行了縮放,最後再把縮放比例還原為1。這樣後續的手勢操作會從新開始,避免錯誤
3、手勢識別的狀態
(1)類似於觸摸事件,手勢識別實例包含了屬性 state,可以區別此時手勢的狀態
(2)state屬性為枚舉類型:
<1> 沒有觸摸事件發生,所有手勢識別的默認狀態
UIGestureRecognizerStatePossible,
<2> 一個手勢已經開始但尚未改變或者完成時
UIGestureRecognizerStateBegan, (類似於 touchesBegan)
<3> 手勢狀態改變
UIGestureRecognizerStateChanged, (類似於 touchesMoved)
<4> 手勢完成
UIGestureRecognizerStateEnded, (類似於 touchesEnded)
<5> 手勢取消,恢復至Possible狀態
UIGestureRecognizerStateCancelled, (比如手指按下按鈕,然後從其他地方抬起)
<6> 手勢失敗,恢復至Possible狀態
UIGestureRecognizerStateFailed,
<7> 識別到手勢結束
UIGestureRecognizerStateRecognized = UIGestureRecognizerStateEnded
4、不同手勢識別子類具有不同的屬性或方法,幾個重要的舉例如下:
(1)在“輕點”手勢中:
<1> 需要連續敲擊2次觸發手勢
tap.numberOfTapsRequired = 2;
<2> 需要2根手指一起敲擊
tap.numberOfTouchesRequired = 2;
(2)在“旋轉”手勢中:
<1>獲取用戶旋轉角度
CGFloat rotation;
<2>獲取用戶旋轉速度
CGFloat velocity
(3)在“輕掃”手勢中:
<1>掃動的方向,注意,一個輕掃手勢識別對象,只能對應一個掃動方向
UISwipeGestureRecognizerDirection
(4)在“拖拽”手勢中:
<1> 獲取移動的距離 ,這個是對象方法
- (CGPoint)translationInView:(nullable UIView *)view;
<2>清除手勢移動的距離(為了下次手勢事件的正確計算)
例: [pan setTranslation:CGPointZero inView:self.view];
5、實現多手勢識別(比如縮放的同時可以旋轉)
(1)設置手勢識別器的代理
(2)實現相應的代理方法,支持多手勢識別。
三、demo實例
1、圖示
2、貼出部分代碼
#pragma mark - 長按手勢
- (IBAction)longPressBtnClick:(id)sender {

    //長按手勢識別器,正常下會執行兩次方法,不曉得為啥
    UILongPressGestureRecognizer * longPress = [[UILongPressGestureRecognizer alloc]initWithTarget:self action:@selector(longClick:)];

    [self.view addGestureRecognizer:longPress];
    //代理
    longPress.delegate = self;

}

-(void)longClick:(UILongPressGestureRecognizer *)longPress
{

    //根據狀態判斷
    if(longPress.state==UIGestureRecognizerStateBegan)
    {
        NSLog(@"開始長按了~~");

    }

}

#pragma mark - 旋轉手勢
- (IBAction)rotateBtnClick {

    UIRotationGestureRecognizer * rotate = [[UIRotationGestureRecognizer alloc]initWithTarget:self action:@selector(rotateClick:)];

    [self.view addGestureRecognizer:rotate];

    //增加代理
     rotate.delegate =self;

}

-(void)rotateClick:(UIRotationGestureRecognizer *)rotate
{

    CGFloat ratation = rotate.rotation;
    self.headerView.transform = CGAffineTransformRotate(self.headerView.transform, ratation);

    //清除掉累加的 rotation
    rotate.rotation=0;
}


#pragma mark - 縮放手勢
- (IBAction)pinchBtnClick {

    UIPinchGestureRecognizer * pinch = [[UIPinchGestureRecognizer alloc]initWithTarget:self action:@selector(pinchClick:)];

    [self.view addGestureRecognizer:pinch];

    //增加代理
    pinch.delegate = self;

}


-(void)pinchClick:(UIPinchGestureRecognizer *)pinch
{
    CGFloat scale = pinch.scale;
    self.headerView.transform = CGAffineTransformScale(self.headerView.transform, scale, scale);

    //同樣清除
    pinch.scale = 1;

}


#pragma mark - 輕掃手勢
- (IBAction)swipeBtnClick {

    UISwipeGestureRecognizer * swipe = [[UISwipeGestureRecognizer alloc]initWithTarget:self action:@selector(swipeClick:)];

    //向右掃動手勢
    swipe.direction= UISwipeGestureRecognizerDirectionRight;
    [self.view addGestureRecognizer:swipe];

    UISwipeGestureRecognizer * swipe2 =[[UISwipeGestureRecognizer alloc]initWithTarget:self action:@selector(swipeClick:)];

    //向左掃動手勢
    swipe2.direction= UISwipeGestureRecognizerDirectionLeft;
    [self.view addGestureRecognizer:swipe2];
}

-(void)swipeClick:(UISwipeGestureRecognizer *)swipe
{

    if (swipe.direction==UISwipeGestureRecognizerDirectionRight) {
        [UIView animateWithDuration:0.3 animations:^{

        self.headerView.transform = CGAffineTransformTranslate(self.headerView.transform, 100, 0);


        }completion:^(BOOL finished) {

            [UIView animateWithDuration:0.5 animations:^{
                self.headerView.transform = CGAffineTransformIdentity;

            }];


        }];

    }
    else if (swipe.direction==UISwipeGestureRecognizerDirectionLeft) {

        [UIView animateWithDuration:0.3 animations:^{

                self.headerView.transform = CGAffineTransformTranslate(self.headerView.transform, -100, 0);

        }completion:^(BOOL finished) {

            [UIView animateWithDuration:0.5 animations:^{
                self.headerView.transform = CGAffineTransformIdentity;

            }];
        }];
    }
}


#pragma mark - 拖拽手勢
- (IBAction)panBtnClick {

    UIPanGestureRecognizer * pan = [[UIPanGestureRecognizer alloc]initWithTarget:self action:@selector(panClick:)];

    [self.view addGestureRecognizer:pan];

}


-(void)panClick:(UIPanGestureRecognizer *)pan
{
    CGPoint point = [pan translationInView:self.view];

    self.headerView.transform = CGAffineTransformTranslate(self.headerView.transform, point.x, point.y);

    [pan setTranslation:CGPointZero inView:self.view];
}


//手勢識別代理實現
-(BOOL)gestureRecognizer:(UIGestureRecognizer *)gestureRecognizer shouldRecognizeSimultaneouslyWithGestureRecognizer:(UIGestureRecognizer *)otherGestureRecognizer
{
    return YES;

}