
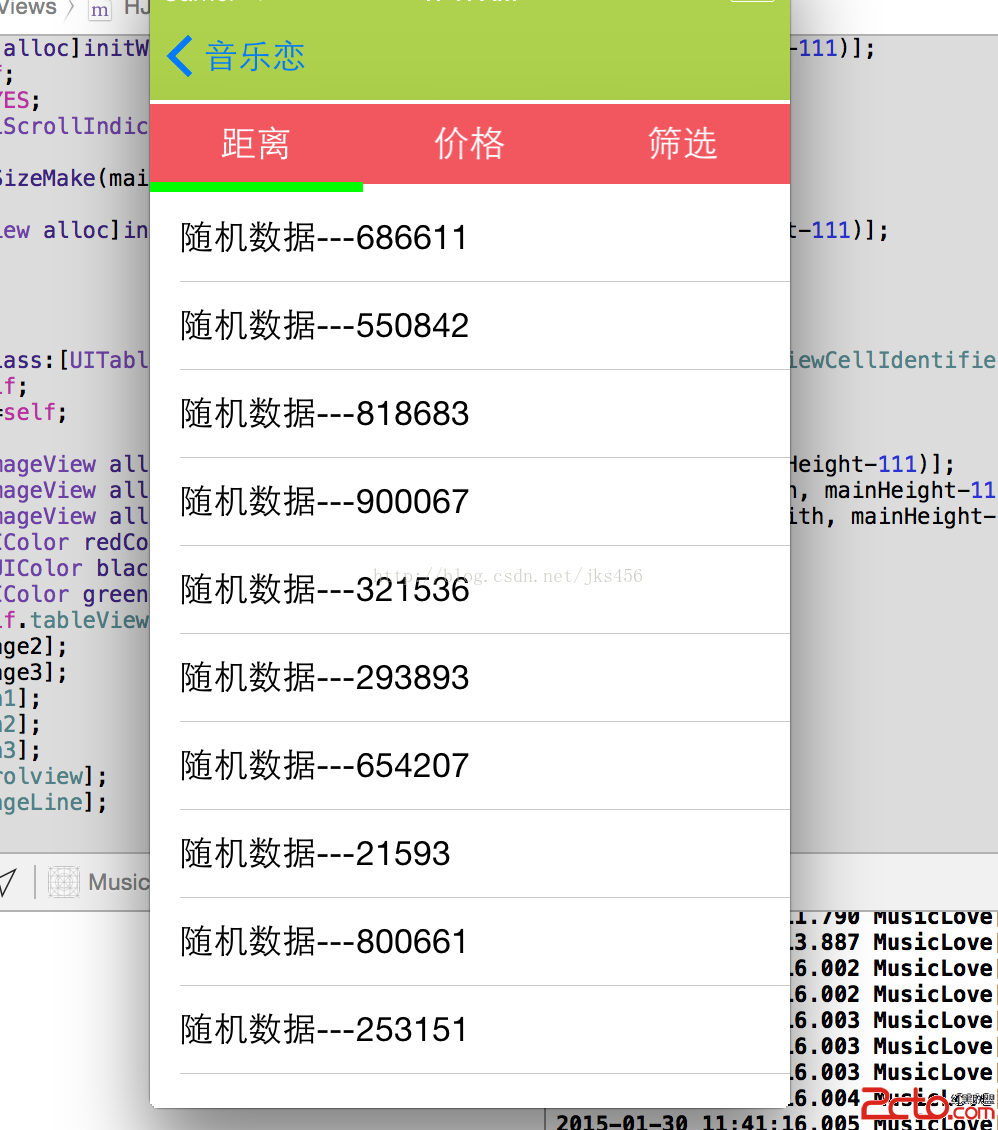
ios 頂部tab
主要使用了scrolview做的
//
// HJPagerViewController.h
// MusicLove
//
// Created by niuxinghua on 15/1/29.
// Copyright (c) 2015年 Hjojo. All rights reserved.
//
#import
@interface HJPagerViewController :UIViewController
@property(nonatomic,strong)UIScrollView* scrolview;
@property(nonatomic,strong)UIButton* btn1;
@property(nonatomic,strong)UIButton* btn2;
@property(nonatomic,strong)UIButton* btn3;
@property(nonatomic,strong)UIImageView* imageLine;
@property(nonatomic,strong)UITableView* tableView;
@end
/
//
// HJPagerViewController.m
// MusicLove
//
// Created by niuxinghua on 15/1/29.
// Copyright (c) 2015年 Hjojo. All rights reserved.
//
#import "HJPagerViewController.h"
#import "MJRefresh.h"
NSString *const MJTableViewCellIdentifier = @"Cell1";
/**
* 隨機數據
*/
#define MJRandomData [NSString stringWithFormat:@"隨機數據---%d", arc4random_uniform(1000000)]
@interface HJPagerViewController ()
@property (strong, nonatomic) NSMutableArray *fakeData;
@end
@implementation HJPagerViewController
- (void)viewDidLoad {
[super viewDidLoad];
// Do any additional setup after loading the view.
self.tabBarController.tabBar.hidden=YES;
self.fakeData=[[NSMutableArray alloc]init];
CGFloat mainWith=[UIScreen mainScreen].bounds.size.width;
CGFloat mainHeight=[UIScreen mainScreen].bounds.size.height;
_btn1=[[UIButton alloc]initWithFrame:CGRectMake(0, 66, mainWith/3, 40)];
_btn1.backgroundColor=[UIColor colorWithRed:242/255.0 green:87/255.0 blue:96/255.0 alpha:1.0f];
// [_btn1 setBackgroundColor:[UIColor blackColor]];
[_btn1 setTitle:@"距離" forState:UIControlStateNormal];
_btn2=[[UIButton alloc]initWithFrame:CGRectMake(mainWith/3, 66, mainWith/3, 40)];
_btn2.backgroundColor=[UIColor colorWithRed:242/255.0 green:87/255.0 blue:96/255.0 alpha:1.0f];
[_btn2 setTitle:@"價格" forState:UIControlStateNormal];
_btn3=[[UIButton alloc]initWithFrame:CGRectMake(mainWith/3*2, 66, mainWith/3, 40)];
_btn3.backgroundColor=[UIColor colorWithRed:242/255.0 green:87/255.0 blue:96/255.0 alpha:1.0f];
[_btn3 setTitle:@"篩選" forState:UIControlStateNormal];
_imageLine=[[UIImageView alloc]initWithFrame:CGRectMake(0, 104, mainWith/3, 5)];
_imageLine.center=CGPointMake(mainWith/6, 107.5);
[_imageLine setBackgroundColor:[UIColor greenColor]];
_scrolview=[[UIScrollView alloc]initWithFrame:CGRectMake(0, 111, mainWith, mainHeight-111)];
_scrolview.delegate=self;
_scrolview.pagingEnabled=YES;
_scrolview.showsHorizontalScrollIndicator=NO;
_scrolview.bounces=NO;
_scrolview.contentSize=CGSizeMake(mainWith*3, mainHeight-111);
self.tableView=[[UITableView alloc]initWithFrame:CGRectMake(0, 0, mainWith, mainHeight-111)];
// 2.集成刷新控件
[self setupRefresh];
[self.tableView registerClass:[UITableViewCell class] forCellReuseIdentifier:MJTableViewCellIdentifier];
self.tableView.delegate=self;
self.tableView.dataSource=self;
UIImageView* image1=[[UIImageView alloc]initWithFrame:CGRectMake(0, 0, mainWith, mainHeight-111)];
UIImageView* image2=[[UIImageView alloc]initWithFrame:CGRectMake(mainWith, 0, mainWith, mainHeight-111)];
UIImageView* image3=[[UIImageView alloc]initWithFrame:CGRectMake(mainWith*2, 0, mainWith, mainHeight-111)];
image1.backgroundColor=[UIColor redColor];
image2.backgroundColor=[UIColor blackColor];
image3.backgroundColor=[UIColor greenColor];
[_scrolview addSubview:self.tableView];
[_scrolview addSubview:image2];
[_scrolview addSubview:image3];
[self.view addSubview:_btn1];
[self.view addSubview:_btn2];
[self.view addSubview:_btn3];
[self.view addSubview:_scrolview];
[self.view addSubview:_imageLine];
[_btn1 setTag:101];
[_btn2 setTag:102];
[_btn3 setTag:103];
[_btn1 addTarget:self action:@selector(btnClicked:) forControlEvents:UIControlEventTouchUpInside];
[_btn2 addTarget:self action:@selector(btnClicked:) forControlEvents:UIControlEventTouchUpInside];
[_btn3 addTarget:self action:@selector(btnClicked:) forControlEvents:UIControlEventTouchUpInside];
}
-(void)btnClicked:(UIButton*)sender{
int tag=[sender tag];
if (tag==101) {
[UIView animateWithDuration:0.5f animations:^{
_imageLine.center=CGPointMake(self.view.bounds.size.width/6, _imageLine.center.y);
_scrolview.contentOffset=CGPointMake(0, 0);
}];
}
else if (tag==102){
[UIView animateWithDuration:0.5f animations:^{
_imageLine.center=CGPointMake(self.view.bounds.size.width/2, _imageLine.center.y);
_scrolview.contentOffset=CGPointMake(self.view.bounds.size.width, 0);
}];
}
else{
[UIView animateWithDuration:0.5f animations:^{
_imageLine.center=CGPointMake(self.view.bounds.size.width/6*5, _imageLine.center.y);
_scrolview.contentOffset=CGPointMake(self.view.bounds.size.width*2, 0);
}];
}
}
-(void)scrollViewDidScroll:(UIScrollView*)scrollView{
_imageLine.center=CGPointMake(scrollView.contentOffset.x/3+self.view.bounds.size.width/6, _imageLine.center.y);
}
/**
* 集成刷新控件
*/
- (void)setupRefresh
{
// 1.下拉刷新(進入刷新狀態就會調用self的headerRereshing)
// [self.tableView addHeaderWithTarget:self action:@selector(headerRereshing)];
// dateKey用於存儲刷新時間,可以保證不同界面擁有不同的刷新時間
[self.tableView addHeaderWithTarget:self action:@selector(headerRereshing) dateKey:@"table"];
[self.tableView headerBeginRefreshing];
// 2.上拉加載更多(進入刷新狀態就會調用self的footerRereshing)
[self.tableView addFooterWithTarget:self action:@selector(footerRereshing)];
// 設置文字(也可以不設置,默認的文字在MJRefreshConst中修改)
self.tableView.headerPullToRefreshText = @"下拉可以刷新了";
self.tableView.headerReleaseToRefreshText = @"松開馬上刷新了";
self.tableView.headerRefreshingText = @"正在刷新中。。。";
self.tableView.footerPullToRefreshText = @"上拉可以加載更多數據了";
self.tableView.footerReleaseToRefreshText = @"松開馬上加載更多數據了";
self.tableView.footerRefreshingText = @"正在加載中。。。";
}
#pragma mark 開始進入刷新狀態
- (void)headerRereshing
{
// 1.添加假數據
for (int i = 0; i<5; i++) {
[self.fakeData insertObject:MJRandomData atIndex:0];
}
// 2.模擬2秒後刷新表格UI(真實開發中,可以移除這段gcd代碼)
dispatch_after(dispatch_time(DISPATCH_TIME_NOW, (int64_t)(2.0 * NSEC_PER_SEC)), dispatch_get_main_queue(), ^{
// 刷新表格
[self.tableView reloadData];
// (最好在刷新表格後調用)調用endRefreshing可以結束刷新狀態
[self.tableView headerEndRefreshing];
});
}
- (void)footerRereshing
{
// 1.添加假數據
for (int i = 0; i<5; i++) {
[self.fakeData addObject:MJRandomData];
}
// 2.模擬2秒後刷新表格UI(真實開發中,可以移除這段gcd代碼)
dispatch_after(dispatch_time(DISPATCH_TIME_NOW, (int64_t)(2.0 * NSEC_PER_SEC)), dispatch_get_main_queue(), ^{
// 刷新表格
[self.tableView reloadData];
// (最好在刷新表格後調用)調用endRefreshing可以結束刷新狀態
[self.tableView footerEndRefreshing];
});
}
#pragma mark - Table view data source
//- (NSInteger)numberOfSectionsInTableView:(UITableView *)tableView
//{
// return 5;
//}
- (NSInteger)tableView:(UITableView *)tableView numberOfRowsInSection:(NSInteger)section
{
return self.fakeData.count;
}
- (UITableViewCell *)tableView:(UITableView *)tableView cellForRowAtIndexPath:(NSIndexPath *)indexPath
{
UITableViewCell *cell = [tableView dequeueReusableCellWithIdentifier:MJTableViewCellIdentifier forIndexPath:indexPath];
cell.textLabel.text = self.fakeData[indexPath.row];
NSLog(@"%@",self.fakeData[indexPath.row]);
return cell;
}
- (void)tableView:(UITableView *)tableView didSelectRowAtIndexPath:(NSIndexPath *)indexPath
{
}
- (void)didReceiveMemoryWarning {
[super didReceiveMemoryWarning];
// Dispose of any resources that can be recreated.
}
/*
#pragma mark - Navigation
// In a storyboard-based application, you will often want to do a little preparation before navigation
- (void)prepareForSegue:(UIStoryboardSegue *)segue sender:(id)sender {
// Get the new view controller using [segue destinationViewController].
// Pass the selected object to the new view controller.
}
*/
@end
- 上一頁:iOS開發-數據存儲NSCoder
- 下一頁:IOS中block和代理
- iOS App開發中導航欄的創建及基本屬性設置教程
- iOS touch事件區分單擊雙擊響應的方法
- iOS - 利用UILayer實現扁平化控件、帶弧度的UIButton、圓形的UIImageView:
- IOS獲取各種文件目錄路徑的方法
- IOS面試年夜全之罕見算法
- iOS開發之詳談屬性設置readwrite、readonly、retain、copy、assign、nonatomic
- iOS開發中使用UIScrollView實現無限循環的圖片浏覽器
- iOS之檢查代碼運轉的時間
- iOS開發-------基於WKWebView的原生與JavaScript數據交互
- iOS7中UIKit支持的動力行為之UIAttachmentBehavior