軟件中永遠繞不開的一個問題就是數據存儲的問題,PC的時候一般都是選擇在數據庫中存儲,iOS如果是和後端配合的話,那麼不需要考慮數據存儲的這個問題,上次寫了一下plist的存儲,不過數據都是存儲一些簡單的鍵值對對象。本次需要將一些自己定義的類型存儲在plist比如說圖片,這個時候可以利用NSCoding協議,將數據地以類似檔案的形式存儲到plist文件中,然後從plist的文件中讀取數據,使用協議的時候這個時候就會用到了NSCoder,如果對存檔和解壓沒有概念的話,可以簡單的理解為數據的序列化與反序列化。
基礎概念
NSCoding是一個protocol. 如果實現了NSCoding,需要實現其中的兩個方法:
- (void)encodeWithCoder:(NSCoder *)aCoder;
- (id)initWithCoder:(NSCoder *)aDecoder; // NS_DESIGNATED_INITIALIZER
方法中的主要的參數就是NSCoder,它是archivie字節流的抽象類.可以將數據寫入一個coder,也可以從coder中讀取我們寫入的數據. NSCoder是一個抽象類,不能直接使用它來創建對象. 但是可以通過其子類NSKeyedUnarchiver從字節流中讀取數據,NSKeyedArchiver將對象寫入到字節流。本文以書籍為例:
新建一個Book類,Book.h中的代碼:
#import <Foundation/Foundation.h>
#import <UIKit/UIKit.h>
@interface Book : NSObject<NSCoding>
@property (strong,nonatomic) UIImage *ConverPicture;
@property (strong,nonatomic) NSString *BookName;
@property (strong,nonatomic) NSString *Author;
@property (strong,nonatomic) NSNumber *Price;
@end
Book.m中實現NSCoding的兩個方法,注意中UIImage的寫法與其他有所不同:
@implementation Book
- (void)encodeWithCoder:(NSCoder *)aCoder{
//注意這裡是存儲的是JPG圖片的調用
[aCoder encodeObject:UIImageJPEGRepresentation(self.ConverPicture,1.0)forKey:@"ConverPicture"];
[aCoder encodeObject:_BookName forKey:@"BookName"];
[aCoder encodeObject:_Author forKey:@"Author"];
[aCoder encodeObject:_Price forKey:@"Price"];
}
- (id)initWithCoder:(NSCoder *)aDecoder{
self.ConverPicture=[UIImage imageWithData:[aDecoder decodeObjectForKey:@"ConverPicture"]];
self.BookName=[aDecoder decodeObjectForKey:@"BookName"];
self.Author=[aDecoder decodeObjectForKey:@"Author"];
self.Price=[aDecoder decodeObjectForKey:@"Price"];
return self;
}
@end
Demo實現
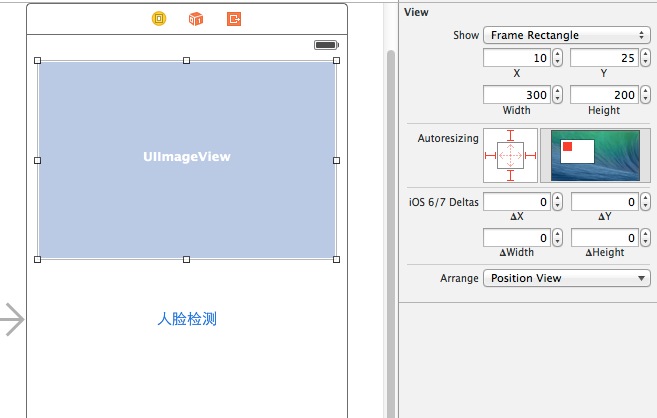
正常的情況的不需要新建頁面的,不過需要演示一下UIImage的效果,Main.storyboard中的布局:
稍微解釋一下,前兩個是存的單文件,後兩個存的是多文件,UIImage展示存儲的圖片:
ViewController定義字段:
@property (strong,nonatomic) NSString *storagePath;
@property (strong,nonatomic) NSString *storageListPath;
@property (strong,nonatomic) NSMutableArray *bookList;
設置路徑,如果不是很清晰,可參考本文之前的博客:
NSArray *codepath= NSSearchPathForDirectoriesInDomains(NSDocumentDirectory, NSUserDomainMask, YES);
_storagePath = [codepath[0] stringByAppendingPathComponent:@"book.plist"];
NSLog(@"%@",NSHomeDirectory());
_storageListPath = [codepath[0] stringByAppendingPathComponent:@"booklist.plist"];
單個存檔:
Book *book=[[Book alloc]init];
UIImage *image=[UIImage imageNamed:@"Code1.jpg"];
book.ConverPicture=image;
book.BookName=@"百年孤獨";
book.Author=@"加西亞.馬爾克斯";
book.Price=[[NSNumber alloc] initWithInteger:45];
if ([NSKeyedArchiver archiveRootObject:book toFile:_storagePath]) {
NSLog(@"數據存檔成功");
}
單個解壓:
Book *decodeBook=[NSKeyedUnarchiver unarchiveObjectWithFile:_storagePath];
self.myImageView.image=decodeBook.ConverPicture;
NSLog(@"%@",decodeBook.ConverPicture);
NSLog(@"%@",decodeBook.BookName);
NSLog(@"解檔成功");
多個存檔:
self.bookList=[NSMutableArray array];
for (NSInteger i=1; i<3; i++) {
Book *book=[[Book alloc]init];
NSString *imageName=[NSString stringWithFormat:@"Code%ld.jpg",(long)i];
UIImage *image=[UIImage imageNamed:imageName];
book.ConverPicture=image;
book.BookName=[NSString stringWithFormat:@"百年孤獨%ld",(long)i];
book.Author=[NSString stringWithFormat:@"加西亞.馬爾克斯%ld",(long)i];
book.Price=[[NSNumber alloc] initWithInteger:45];
[self.bookList addObject:book];
}
if ([NSKeyedArchiver archiveRootObject:self.bookList toFile:_storageListPath]) {
NSLog(@"數據存檔成功");
}
多個解檔:
self.bookList=[NSKeyedUnarchiver unarchiveObjectWithFile:_storageListPath];
Book *nextBook=self.bookList[1];
self.myImageView.image=nextBook.ConverPicture;
NSLog(@"解檔成功");
通過代碼基本上發現其實存檔和解壓是非常簡單的一個事情,不過事實這種方式缺點還是很明顯的,以這種方式保存數據只能一次性歸檔保存以及一次性解壓。數據較少的時候如果使用感覺比較方便,數據量過多的時候如果想修改其中的某一條,解壓整個數據然後歸檔整個數據還是比較耗時的