iOS開發中使用UIScrollView實現無限循環的圖片浏覽器
一、概述
UIKit框架中有大量的控件供開發者使用,在iOS開發中不僅可以直接使用這些控件還可以在這些控件的基礎上進行擴展打造自己的控件。在這個系列中如果每個控件都介紹一遍確實沒有必要,所謂授人以魚不如授人以漁,這裡會盡可能讓大家明白其中的原理,找一些典型的控件進行說明,這樣一來大家就可以觸類旁通。今天我們主要來看一下UIScrollView的內容:
- UIView
- UIScrollView
- 實戰--圖片浏覽器
二、UIView
在熟悉UIScrollView之前很有必要說一下UIView的內容。在上一篇文章也簡單的對UIView進行了介紹,但是由於那篇文章的主要內容是給大家一個iOS開發的總體印象,因此並沒有系統的介紹。另外由於UIScrollView的父類是UIView,所有在討論UIScrollView之前也很有必要把UIView的知識給補充上,這樣大家在使用UIScrollView的某些方法時也不至於無從下手。
既然UIView是所有控件的父類,那麼對於一些常用的方法我們很有必要弄清楚,其實在Xcode中要了解一個類有哪些屬性和方法特別簡單,只要按住apple鍵點擊類名就可以定位到這個類中查看相關定義(在日後的開發中我們會經常這麼來做,畢竟要記住iOS開發中所有的API是不現實的,有些API我們可以通過這種方法來查找),例如我們可以查看這個類的內容:
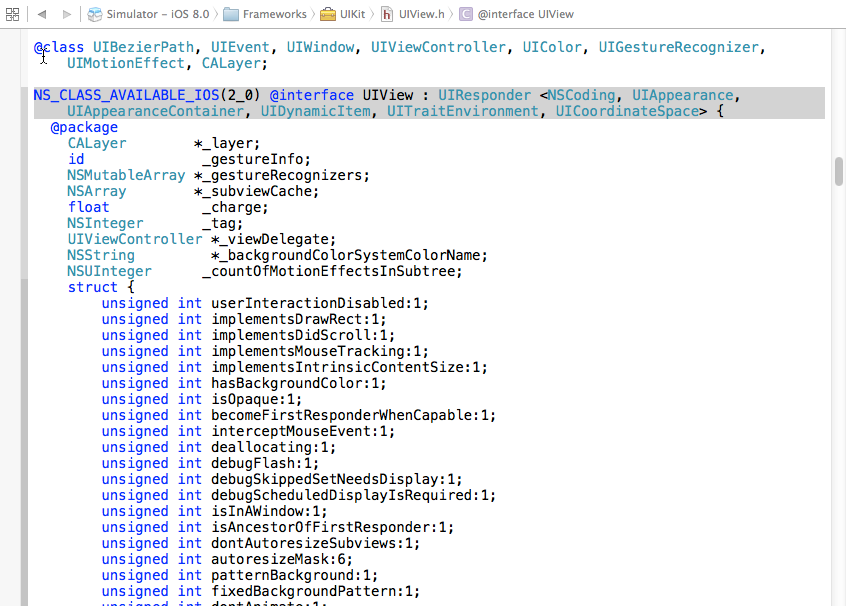
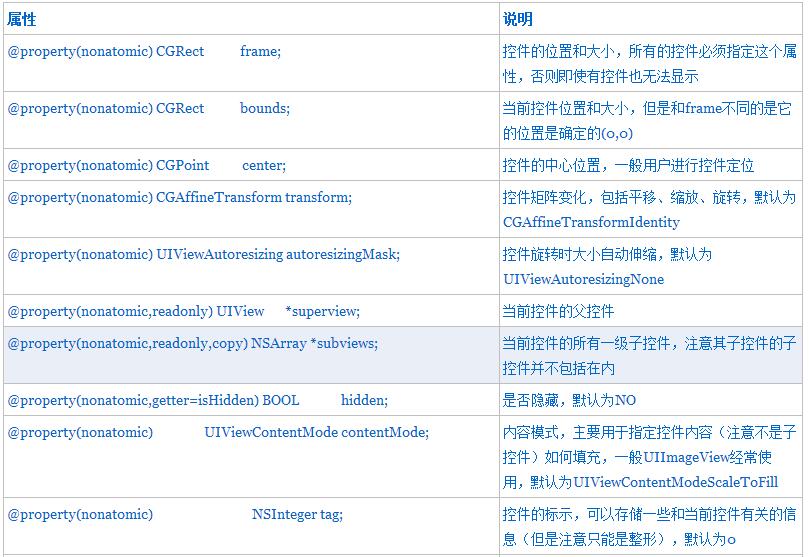
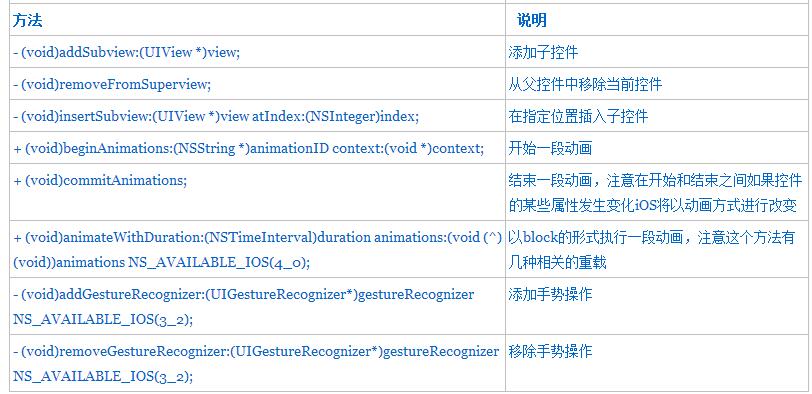
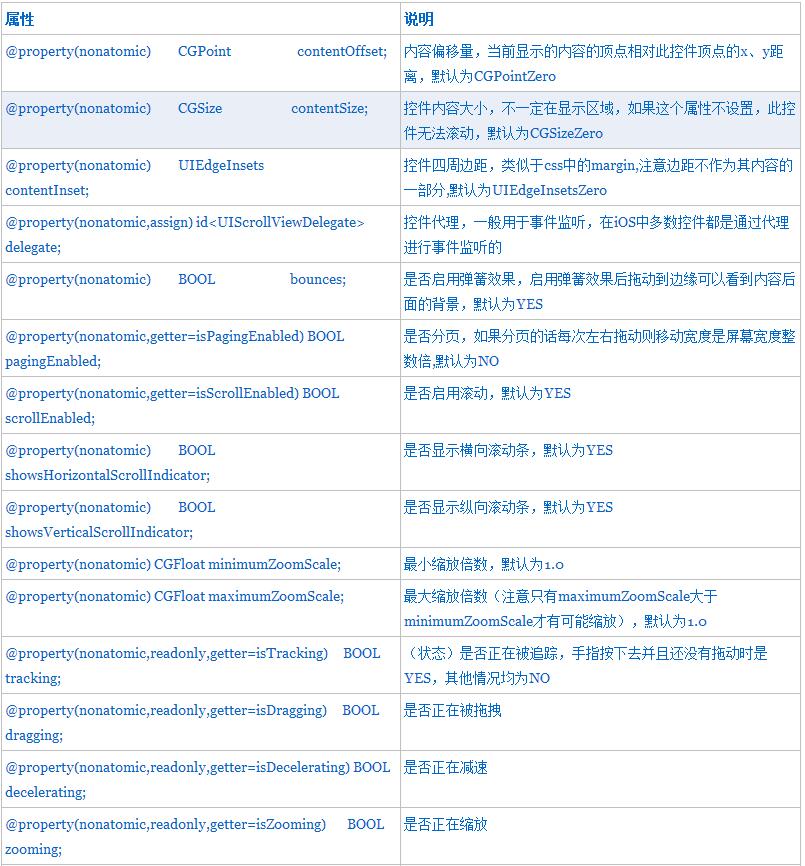
當然UIView的定義文件(.h文件)也是相當長的,我們如果全部截圖也沒有意義。這裡列出常用的屬性和方法。
注意上面所有的位置屬性都是相對於其父控件而言(不是相對於屏幕而言),多數屬性比較簡單這裡不再詳細解釋,我們重點解釋一下autoresizingMask、transform屬性。
三、autoresizingMask
autoresizingMask這個屬性一般我們進行屏幕旋轉的時候經常用到,它的值是一個枚舉類型:
typedef NS_OPTIONS(NSUInteger, UIViewAutoresizing) {
 UIViewAutoresizingNone   = 0, //不進行自動調整
 UIViewAutoresizingFlexibleLeftMargin = 1 << 0, //自動調整與superview左側距離,右側距離保持不變
 UIViewAutoresizingFlexibleWidth = 1 << 1, //自動調整控件自身寬度,保證與superview左右距離不變
 UIViewAutoresizingFlexibleRightMargin = 1 << 2, //自動調整與superview右側距離,左側距離保持不變
 UIViewAutoresizingFlexibleTopMargin = 1 << 3, //自動調整與superview頂部距離,底部距離保持不變
 UIViewAutoresizingFlexibleHeight = 1 << 4, //自動調整控件自身高度,保證與superview上下距離不變
 UIViewAutoresizingFlexibleBottomMargin = 1 << 5 //自動調整與superview底部距離,頂部距離保持不變
};
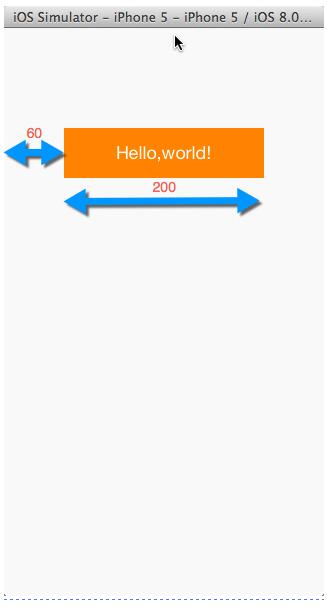
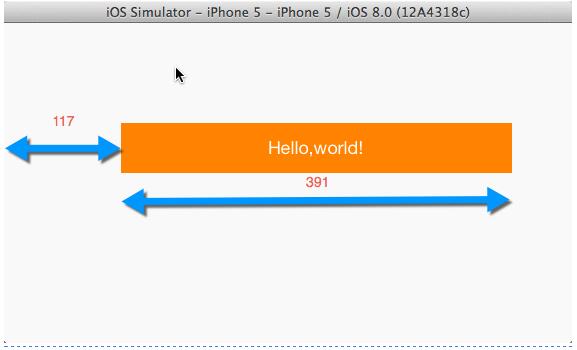
通過注釋大家應該大概了解每個枚舉值的意義,但是我們知道枚舉經常進行按位或操作(“|”),例如如果autoresizingMask=UIViewAutoresizingFlexibleWidth|UIViewAutoresizingFlexibleLeftMargin那麼iOS如何處理呢?此時會自動調整左邊的距離和控件自身寬度,右側距離不變,同時保證左側距離和控件寬度同等比例的調整(延長或縮短)。例如在iPhone 5中,如果一個按鈕假設自身寬度為200,左右側距離均為60(左側和寬度比例3:10),當從豎屏旋轉到橫屏的時候(此時寬度由320變為568,注意如果有狀態欄則寬度變為568-20=548),由於右側邊距不變為60,根據比例左側邊距應該是(568-60)*(3/13)=117,寬度為:(568-60)*(10/13)=391。
請看下面的代碼(下面例子通過純代碼方式創建iOS應用,並且自定義一個KCMainViewController):
AppDelegate.m
//
// AppDelegate.m
// UIViewAndUIScrollView
//
// Created by Kenshin Cui on 14-2-23.
// Copyright (c) 2014年 Kenshin Cui. All rights reserved.
//

#import "AppDelegate.h"
#import "KCMainViewController.h"
#import "KCTransformViewController.h"

@interface AppDelegate ()

@end

@implementation AppDelegate


- (BOOL)application:(UIApplication *)application didFinishLaunchingWithOptions:(NSDictionary *)launchOptions {

 self.window=[[UIWindow alloc]initWithFrame:[UIScreen mainScreen].applicationFrame];

 KCMainViewController *mainController=[[KCMainViewController alloc]init];
 self.window.rootViewController=mainController;
 self.window.backgroundColor=[UIColor colorWithRed:249/255.0 green:249/255.0 blue:249/255.0 alpha:1];

 [self.window makeKeyAndVisible];

 return YES;
}

- (void)applicationWillResignActive:(UIApplication *)application {
 // Sent when the application is about to move from active to inactive state. This can occur for certain types of temporary interruptions (such as an incoming phone call or SMS message) or when the user quits the application and it begins the transition to the background state.
 // Use this method to pause ongoing tasks, disable timers, and throttle down OpenGL ES frame rates. Games should use this method to pause the game.
}

- (void)applicationDidEnterBackground:(UIApplication *)application {
 // Use this method to release shared resources, save user data, invalidate timers, and store enough application state information to restore your application to its current state in case it is terminated later.
 // If your application supports background execution, this method is called instead of applicationWillTerminate: when the user quits.
}

- (void)applicationWillEnterForeground:(UIApplication *)application {
 // Called as part of the transition from the background to the inactive state; here you can undo many of the changes made on entering the background.
}

- (void)applicationDidBecomeActive:(UIApplication *)application {
 // Restart any tasks that were paused (or not yet started) while the application was inactive. If the application was previously in the background, optionally refresh the user interface.
}

- (void)applicationWillTerminate:(UIApplication *)application {
 // Called when the application is about to terminate. Save data if appropriate. See also applicationDidEnterBackground:.
}

@end
KCMainViewController.m
//
// KCMainViewController.m
// UIViewAndUIScrollView
//
// Created by Kenshin Cui on 14-2-23.
// Copyright (c) 2014年 Kenshin Cui. All rights reserved.
//

#import "KCMainViewController.h"

@interface KCMainViewController (){
 UIButton *_btn; //私有變量
}

@end

@implementation KCMainViewController

- (void)viewDidLoad {
 [super viewDidLoad];

 //添加一個Button
 _btn=[[UIButton alloc]initWithFrame:CGRectMake(60, 100, 200, 50)];
 _btn.backgroundColor=[UIColor orangeColor];
 [_btn setTitle:@"Hello,world!" forState:UIControlStateNormal];
 _btn.autoresizingMask=UIViewAutoresizingFlexibleWidth|UIViewAutoresizingFlexibleLeftMargin;
 [self.view addSubview:_btn];

}

#pragma mark 屏幕旋轉事件
-(void)didRotateFromInterfaceOrientation:(UIInterfaceOrientation)fromInterfaceOrientation{
 NSLog(@"%@",NSStringFromCGRect(_btn.frame));
}
@end
在上面的代碼中設置了window的背景為灰色,雖然上面有一個UIView但是我們可以看到最終效果是灰色的,這說明UIView默認是透明的。另外定義了一個私有成員變量_btn,這種定義方式大家以後會經常用到。
運行效果:
豎屏
橫屏
注意上面執行前請先隱藏iOS狀態欄目,全局隱藏iO狀態欄的方法:
1.在info.plist 中設置Status bar is initially hidden為YES
2.在info.plist中設置View controller-based status bar appearance 為NO
四、transform
transform我們一般稱為形變屬性,其本質是通過矩陣變化改變控件的大小、位置、角度等,這裡我們通過一個例子來看一下具體的操作,在下面的例子中我們也會看到UIImageView控件的常用操作。
KCTransformViewController.m
//
// KCTransformViewController.m
// UIViewAndUIScrollView
//
// Created by Kenshin Cui on 14-2-23.
// Copyright (c) 2014年 Kenshin Cui. All rights reserved.
//

#import "KCTransformViewController.h"
//定義rgb顏色
#define NORMAL_COLOR [UIColor colorWithRed:75/255.0 green:160/255.0 blue:253/255.0 alpha:1]
#define HIGHLIGHTED_COLOR [UIColor colorWithRed:197/255.0 green:221/225.0 blue:249/225.0 alpha:1]
//按鈕操作
typedef void(^ ButtonHandle)();

@interface KCTransformViewController (){
 UIImageView *_imageView;//圖片控件
 UIButton *_btnRotation;//旋轉按鈕
 UIButton *_btnScale;//縮放按鈕
 UIButton *_btnTranslate;//移動按鈕
}

@end

@implementation KCTransformViewController

- (void)viewDidLoad {
 [super viewDidLoad];

 [self addImageView];
 [self addRotationButton];
 [self addScaleButton];
 [self addTranslateButton];

}

#pragma mark 添加圖片控件
-(void)addImageView{
 //直接使用圖片名稱,系統會自動到資源文件中找到對應的文件
 UIImage *image=[UIImage imageNamed:@"promo_ios8.png"];
 //如果使用initWithImage進行初始化則控件大小會自動設置成圖片大小
 _imageView=[[UIImageView alloc]initWithImage:image];
 _imageView.frame=CGRectMake(20, 20, 280, 154);
 //設置內容填充模式為等比例填充
 _imageView.contentMode=UIViewContentModeScaleAspectFit;
 //self.view就是每個視圖控制器中的view屬性
 [self.view addSubview:_imageView];
}

#pragma mark 添加旋轉按鈕
-(void)addRotationButton{
 _btnRotation=[self getButton];
 _btnRotation.frame=CGRectMake(20, 400, 280, 30);
 [_btnRotation setTitle:@"旋轉" forState:UIControlStateNormal];
 //添加按鈕點擊事件
 [_btnRotation addTarget:self action:@selector(rotation:) forControlEvents:UIControlEventTouchUpInside];
 [self.view addSubview:_btnRotation];
}

#pragma mark 添加縮放按鈕
-(void)addScaleButton{
 //在上面一個按鈕位置的基礎上確認當前位置
 CGRect scaleButtonFrame=_btnRotation.frame;
 scaleButtonFrame.origin.y+=40;
 _btnScale =[self getButton];
 _btnScale.frame=scaleButtonFrame;
 [_btnScale setTitle:@"縮放" forState:UIControlStateNormal];
 //添加按鈕點擊事件
 [_btnScale addTarget:self action:@selector(scale:) forControlEvents:UIControlEventTouchUpInside];
 [self.view addSubview:_btnScale];
}

#pragma mark 添加移動按鈕
-(void)addTranslateButton{
 CGRect translateButtonFrame=_btnScale.frame;
 translateButtonFrame.origin.y+=40;
 _btnTranslate =[self getButton];
 _btnTranslate.frame=translateButtonFrame;
 [_btnTranslate setTitle:@"移動" forState:UIControlStateNormal];
 [_btnTranslate addTarget:self action:@selector(translate:) forControlEvents:UIControlEventTouchUpInside];
 [self.view addSubview:_btnTranslate];

}

#pragma mark 圖片旋轉方法,注意參數中的btn表示當前點擊按鈕
-(void)rotation:(UIButton *)btn{
 [self animation:^{
 //注意旋轉角度必須是弧度,不是角度
 CGFloat angle=M_PI_4;//M開頭的宏都是和數學(Math)相關的宏定義,M_PI_4表示四分之派,M_2_PI表示2派
 //使用CGAffineTransformMakeRotation獲得一個旋轉角度形變
 //但是需要注意tranform的旋轉不會自動在原來的角度上進行疊加,所以下面的方法旋轉一次以後再點擊按鈕不會旋轉了
 //_imageView.transform=CGAffineTransformMakeRotation(angle);
 //利用CGAffineTransformRotate在原來的基礎上產生一個新的角度(當然也可以定義一個全局變量自己累加)
 _imageView.transform=CGAffineTransformRotate(_imageView.transform, angle);

 }];
}

#pragma mark 圖片縮放方法
-(void)scale:(UIButton *)btn{
// [self animation:^{
// CGFloat scalleOffset=0.9;
// //_imageView.transform=CGAffineTransformMakeScale(scalleOffset, scalleOffset);
// _imageView.transform= CGAffineTransformScale(_imageView.transform, scalleOffset, scalleOffset);
// }];
 //通常我們使用UIView的靜態方法實現動畫而不是自己寫一個方法
 [UIView animateWithDuration:0.5 animations:^{
 CGFloat scalleOffset=0.9;
 //_imageView.transform=CGAffineTransformMakeScale(scalleOffset, scalleOffset);
 _imageView.transform= CGAffineTransformScale(_imageView.transform, scalleOffset, scalleOffset);
 }];
}

#pragma mark 圖片移動方法
-(void)translate:(UIButton *)btn{
 [self animation:^{
 CGFloat translateY=50;
 //_imageView.transform=CGAffineTransformMakeTranslation(0, translateY);
 _imageView.transform=CGAffineTransformTranslate(_imageView.transform, 0, translateY);
 }];
}

#pragma mark 動畫執行方法,注意這裡可以使用UIView的animateWithDuration方法代替這裡只是為了演示
-(void)animation:(ButtonHandle)handle{
 //開始動畫
 [UIView beginAnimations:@"animation" context:nil];
 //設置動畫執行時間
 [UIView setAnimationDuration:0.5];

 handle();

 //執行動畫操作
 [UIView commitAnimations];

}

#pragma mark 取得一個按鈕,統一按鈕樣式
-(UIButton *)getButton{
 UIButton *button =[[UIButton alloc]init ];
 //設置正常狀態下字體顏色
 [button setTitleColor:NORMAL_COLOR forState:UIControlStateNormal];
 //設置高亮狀態下的字體顏色
 [button setTitleColor:HIGHLIGHTED_COLOR forState:UIControlStateHighlighted];
 return button;
}

@end
1)、獲得CGAffineTransform有多種方法,例如使用CGAffineTransformMake,但是對於矩陣操作相對比較麻煩,事實上iOS已經為我們准備好了三個方法:CGAffineTransformMakeRotation(旋轉)、CGAffineTransformMakeScale(縮放)、CGAffineTransformMakeTranslation(移動);
2)、transform進行旋轉、縮放、移動的時候不是在原來的基礎上增量形變的,因此如果需要持續在原來的基礎上旋轉、縮放、移動那麼每次需要在原來的基礎上增加或減少。當然,我們可以定義一個全局變量進行累加,但是事實上iOS已經為我們提供好了三個對應的方法,分別用於在原來的角度、縮放、移動位置的基礎上做出修改:CGAffineTransformRotate、CGAffineTransformScale、CGAffineTransformTranslate;
3)、Objc語法規定不允許直接修改一個對象的結構體屬性的成員,只能給這個屬性直接賦值為一個結構體類型,例如上面的代碼中如果寫成“_btnRotation.frame.origin.x=380;”是不正確的;
4)、上面的代碼中我們用到了UIView的動畫相關方法,在iOS開發中動畫開發異常簡單,而且動畫和邏輯處理是完全分離的,只要在兩個動畫方法之間修改一個控件的屬性那麼當代碼執行時就會自動添加動畫效果,為了復習前面的block這裡我們實現了一個類似於animation方法,類似於UIView的animateWithDuration靜態方法的功能,僅僅為了說明它的實現原理,實際開發中可以直接調用animateWithDuration即可(而且它有多種重載);
運行效果:

注意在iOS開發中推薦使用png圖片,iOS會對png圖片進行優化。
五、UIScrollView
通過上面的介紹相信大家對於UIView的基本操作應該比較熟悉了,那麼下面就看一下UIView的子控件UIScrollView 。顧名思義,這是一個可以處理滾動操作的視圖,UIScrollView在開發過程中使用很頻繁,而且它也經常作為其他控件的子控件,例如UITableView就繼承自UIScrollView。 我們還是先看一下UIScrollView的常用屬性和方法:
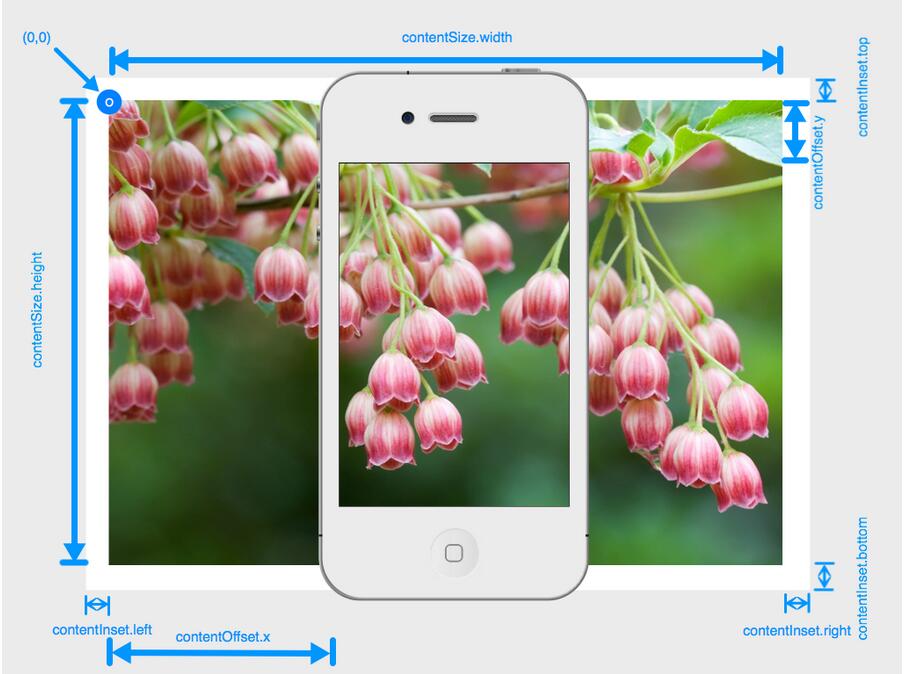
contentSize、contentInset、contentOffset在開發中會經常使用,為了幫助大家理解這裡以圖形的形式展現三者之間的關系:
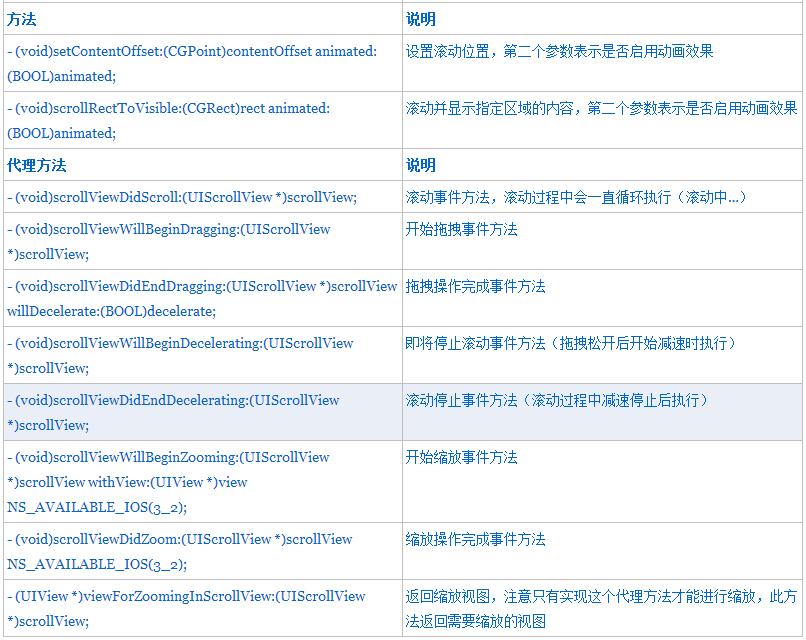
關於上面列出的幾個方法,我們有必要說一下它們的執行順序:
a.如果我們拖動一個UIScrollView中的子控件移動的時候它的執行順序如下:開始拖拽,滾動,滾動…,停止拖拽,將要停止滾動,滾動,滾動…,停止滾動。
紅色部分有可能執行也有可能不執行,關鍵看你拖拽的停止的時候是突然停止還是有一段慣性讓他繼續執行(就好像剎車一樣,如果是急剎車就沒有後面的慣性滑動了,如果是慢慢踩剎車可能會有一段滑動距離)。但是不管怎麼樣滾動事件會一直執行,因此如果在這個事件中進行某種操作一定要注意性能。
b.如果我們縮放UIScrollView的子控件的時候它的執行順序如下:開始縮放,滾動,滾動…,停止縮放。同樣在這個過程中滾動事件會一直調用(當然如果縮放過程中手指有別的動作也可能會觸發其他事件,這個大家可以自己體會一下)。
下面我們簡單做一個例子
KCScrollViewController.h
//
// KCScrollViewController.h
// UIViewAndUIScrollView
//
// Created by Kenshin Cui on 14-2-23.
// Copyright (c) 2014年 Kenshin Cui. All rights reserved.
//

#import <UIKit/UIKit.h>

@interface KCScrollViewController : UIViewController

@property (nonatomic,strong) UIScrollView *scrollView;

@property (nonatomic,strong) UIImageView *imageView;

@end
KCScrollViewController.m
//
// KCScrollViewController.m
// UIViewAndUIScrollView
//
// Created by Kenshin Cui on 14-2-23.
// Copyright (c) 2014年 Kenshin Cui. All rights reserved.
//

#import "KCScrollViewController.h"

//實現UIScrollView代理
@interface KCScrollViewController ()<UIScrollViewDelegate>

@end

@implementation KCScrollViewController

- (void)viewDidLoad {
 [super viewDidLoad];

 //添加scrollView控件
 //注意UIScreen代表當前屏幕對象,其applicationFrame是當前屏幕內容區域
 _scrollView =[[UIScrollView alloc]initWithFrame:[UIScreen mainScreen].applicationFrame];
 //_scrollView.backgroundColor=[UIColor redColor];
 _scrollView.contentMode=UIViewContentModeScaleToFill;
 [self.view addSubview:_scrollView];


 //添加圖片控件
 UIImage *image=[UIImage imageNamed:@"wwdc14-labs-hero-background.jpg"];
 _imageView=[[UIImageView alloc]initWithImage:image];
 [_scrollView addSubview:_imageView];


 //contentSize必須設置,否則無法滾動,當前設置為圖片大小
 _scrollView.contentSize=_imageView.frame.size;

 //實現縮放:maxinumZoomScale必須大於minimumZoomScale同時實現viewForZoomingInScrollView方法
 _scrollView.minimumZoomScale=0.6;
 _scrollView.maximumZoomScale=3.0;
 //設置代理
 _scrollView.delegate=self;


 //邊距,不屬於內容部分,內容坐標(0,0)指的是內容的左上角不包括邊界
 //_scrollView.contentInset=UIEdgeInsetsMake(10, 20, 10, 20);

 //顯示滾動內容的指定位置
 //_scrollView.contentOffset=CGPointMake(10, 0);

 //隱藏滾動條
 _scrollView.showsHorizontalScrollIndicator=NO;
 _scrollView.showsVerticalScrollIndicator=NO;

 //禁用彈簧效果
 //_scrollView.bounces=NO;
}

#pragma mark 實現縮放視圖代理方法,不實現此方法無法縮放
-(UIView *)viewForZoomingInScrollView:(UIScrollView *)scrollView{
 return _imageView;
}
-(void)scrollViewWillBeginDecelerating:(UIScrollView *)scrollView{
 NSLog(@"scrollViewWillBeginDecelerating");
}
-(void)scrollViewDidEndDecelerating:(UIScrollView *)scrollView{
 NSLog(@"scrollViewDidEndDecelerating");
}
-(void)scrollViewWillBeginDragging:(UIScrollView *)scrollView{
 NSLog(@"scrollViewWillBeginDragging");
}
-(void)scrollViewDidEndDragging:(UIScrollView *)scrollView willDecelerate:(BOOL)decelerate{
 NSLog(@"scrollViewDidEndDragging");
}
-(void)scrollViewWillBeginZooming:(UIScrollView *)scrollView withView:(UIView *)view{
 NSLog(@"scrollViewWillBeginZooming");
}
-(void)scrollViewDidEndZooming:(UIScrollView *)scrollView withView:(UIView *)view atScale:(CGFloat)scale{
 NSLog(@"scrollViewDidEndZooming");
}
//-(void)scrollViewDidScroll:(UIScrollView *)scrollView{
// NSLog(@"scrollViewDidScroll");
//}

#pragma mark 當圖片小於屏幕寬高時縮放後讓圖片顯示到屏幕中間
-(void)scrollViewDidZoom:(UIScrollView *)scrollView{
 CGSize originalSize=_scrollView.bounds.size;
 CGSize contentSize=_scrollView.contentSize;
 CGFloat offsetX=originalSize.width>contentSize.width?(originalSize.width-contentSize.width)/2:0;
 CGFloat offsetY=originalSize.height>contentSize.height?(originalSize.height-contentSize.height)/2:0;

 _imageView.center=CGPointMake(contentSize.width/2+offsetX, contentSize.height/2+offsetY);
}

@end
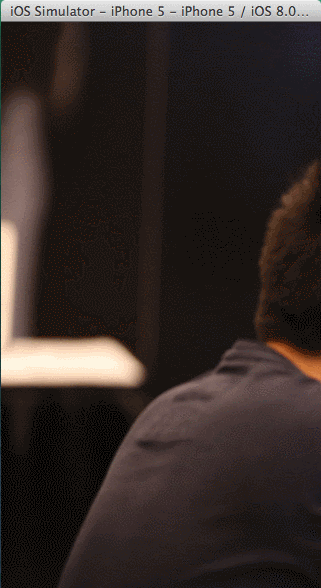
運行效果如下:
默認情況下縮放後的內容會放到UIScrollView的內容起始位置,所以如果要想縮放後內容放到中間我們必須自己維護它的位置,上面已經給出了設置方法。
擴展—ARC
iOS5之後引入了ARC特性,程序中不用自己retain、release、autorelease操作,編譯器會自動為你管理內存,編譯時自動加上內存釋放的代碼,使用起來很方便。ARC是編譯器特性,而不是iOS運行時特性,其實質還是手動管理內存,只是相應內存管理的代碼編譯器會自動生成而已。由於ARC是編譯器特性,因此它管理內存的規則和之前ObjC內存管理是類似的,只要有一個對象引用(強引用)指向這個對象,那麼這個對象就不會被釋放。
在開啟ARC之後我們可以使用四個關鍵字修飾我們的成員變量、局部變量和屬性:
strong(修飾變量用__strong):強引用,相當於原來的retain,每次賦值引用計數器加1,只要指針引用這個對象,這個對象就不會被銷毀;
weak(修飾變量用__weak):弱引用,相當於assign,和assign不同的是當對象釋放後該變量會設置為nil防止野指針(雖然之前講過的內容中assign都是應用於基本數據類型,其實它也完全可以修飾對象類型的屬性);
unsafe_unretained(修飾變量用__unsafe_unretained):和weak類似,區別就是如果對象釋放後它不會像weak一樣自動將指針設置為nil,有可能出現野指針;
__autoreleasing(只能修飾變量不能修飾屬性):修飾一個對象在使用完之後自動釋放,通常用於延遲釋放內存,同在MRC下調用對象的autorelease方法是等效的;
注意:
除了weak(注意不是__weak)之外其他的修飾符在非ARC(MRC)下使用也不會報錯,但是這麼做並沒有什麼意義,因為在編譯時會被忽略。舉例來說:在MRC下使用__autoreleasing修飾一個對象也不會自動釋放,而是應該使用autorelease方法。同樣的,在MRC下使用__strong來修飾一個變量也同樣是會直接忽略這個關鍵字;
unsafe_unretained(或者__unsafe_unretained)和weak(或__weak)的區別不大,只是weak(或__weak)做釋放之後會將變量設置為nil避免野指針,之所以目前兩個關鍵字還存在主要是因為後者在在iOS5.0及lion之後才出現,出於兼容性考慮,因此推薦使用weak或__weak;
__autoreleasing主要用於函數參數是ObjC對象指針的情況下(也就是參數”NSObject **obj”類型,指針的指針),典型的應用就是NSError的使用。在這種情況下,經常需要在函數內部重新創建一個對象給傳入的參數賦值(修改參數內容),如果使用__autorelesing參數編譯器在處理內部函數時會使用自動釋放池,即保證內部對象能夠正常釋放又可以修改外部變量。之所以很多時候使用NSError作為參數傳遞到一些方法中沒有將變量聲明為__autoreleasing是因為編譯器已經自動做了處理(因此,如果考慮到性能推薦還是加上此參數);
strong和weak在iOS開發過程中經常使用,這裡簡單看一個例子(注意這兩個參數仍然可以修飾屬性,意義是完全一樣的在此不再演示)
KCPerson.h
//
// KCPerson.h
// ARC
//
// Created by Kenshin Cui on 14-2-23.
// Copyright (c) 2014年 Kenshin Cui. All rights reserved.
//

#import <Foundation/Foundation.h>

@interface KCPerson : NSObject

@property (nonatomic,assign) int no;

@end
KCPerson.m
//
// KCPerson.m
// ARC
//
// Created by Kenshin Cui on 14-2-23.
// Copyright (c) 2014年 Kenshin Cui. All rights reserved.
//

#import "KCPerson.h"

@implementation KCPerson

-(NSString *)description{
 return [NSString stringWithFormat:@"no=%i",_no];
}

@end
main.m
//
// main.m
// ARC
//
// Created by Kenshin Cui on 14-2-23.
// Copyright (c) 2014年 Kenshin Cui. All rights reserved.
//

#import <Foundation/Foundation.h>
#import "KCPerson.h"

int main(int argc, const char * argv[]) {
 @autoreleasepool {

 //strong
 __strong KCPerson *person1=[[KCPerson alloc]init];
 __strong KCPerson *person2=person1;
 person1.no=1;
 NSLog(@"%@",person2); //結果:no=1
 person1=nil;
 NSLog(@"%@",person2); //結果:no=1


 //weak
 __strong KCPerson *person3=[[KCPerson alloc]init];
 __weak KCPerson *person4=person3;
 person3.no=3;
 NSLog(@"%@",person4); //結果:no=3
 person3=nil;
 NSLog(@"%@",person4); //結果:(null)

 }
 return 0;
}
由於person1和person2都指向一個對象並且都是強引用,因此當person1設置為nil時對象仍然不會釋放,所以此時person2還是指向這個對象,可以正常輸出;person3和它指向的對象是強引用,而person4是弱引用,因此當person3設置為nil後,對象沒有了強引用就會釋放,此時再打印person4自然就是null。為了說明strong和weak的使用,下面使用圖形方式描繪上面的情況:
strong--person1和person2的關系

weak--person3和person4的關系
由此得出如下結論:
1、不管是怎麼管理內存都是針對對象類型而言(無論是strong,weak都不能應用到基本數據類型),對於基本數據類型直接聲明為assign就可以了,它不需要我們自己管理內存;
2、所有的指針變量默認都是__strong類型,因此我們通常省略不寫__strong;
3、如果一個對象沒有強引用之後即使存在弱引用它也會被釋放,與此同時弱引用將被設置為nil;
回過頭來我們看一下前面UIScrollView部分的幾個屬性都設置成了strong,如果設置成weak行不行呢?答案是否定的。如果我們設置成weak,Xcode首先就會給出提出“Assigning retained object to weak variable; object will be released after assignment”,就是說ObjC對象賦值給一個弱引用變量,賦值之後對象會立即被銷毀。其實根據前面介紹的內容很容易理解,就拿上面的scrollView屬性來說,如果設置為weak,當使用“_scrollView =[[UIScrollView alloc]initWithFrame:[UIScreen mainScreen].applicationFrame];”給這個變量賦值,根據前面的知識如果一個對象沒有了強引用就會被銷毀,賦值完成後運行時看到這個對象只有一個弱引用_scrollView自然就會銷毀這個對象,因此如果運行上面的程序就達不到之前看到的效果了。
但是如果使用storyboard來設計界面的時候,我們會發現系統默認生成的屬性就是weak,此時為什麼不會銷毀呢?那是因為它的頂層對象保持了一個強引用strong,因此這個對象不會被銷毀。這樣一來我們得出如下結論:
1、在iOS開發中使用strong、weak代替之前的retain、assign(基本類型使用assign);
2、如果一個屬性使用IBOutlet修飾(也就是此屬性時strongboard中組件)那麼使用weak;
3、如果一個屬性不是storyboard組件(一般純代碼編寫界面時),使用strong;
六、UIScrollView實戰
前面介紹了iOS中UIKit的一些簡單知識,這裡我們一起利用前面的知識做一個例子--圖片無限循環滾動。在這個例子中我們需要解決如下兩個問題:
如何無限循環?
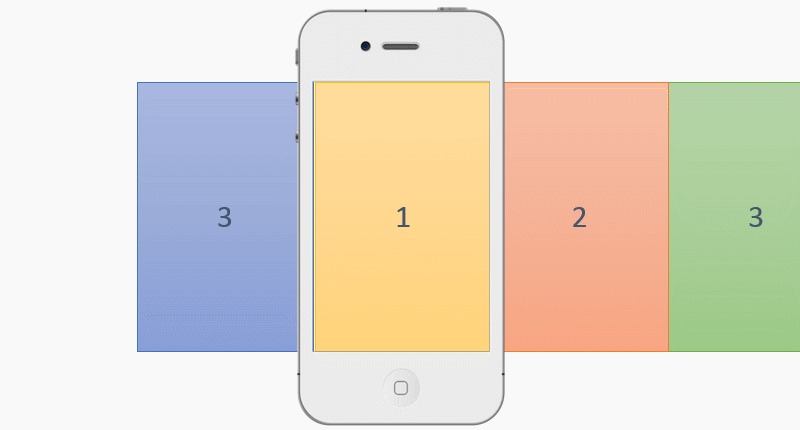
我們知道在UIScrollView中如果放置其他控件後,只要設置contentSize之後這些圖片就可以滾動。如果要讓圖片無限循環那麼只有兩種辦法,一種是無限循環疊加圖片,另一種就是如果最後一張圖片浏覽完立即顯示第一張圖片。很明顯第一種方法是不現實的,我們考慮使用第二種方式。其實使用第二種方式實現原理比較簡單,只要在圖片前後各放一張圖片即可(此時共有n+2個圖片在UIScrollView中)。例如我們有5張圖片,只要使用7個UIImageView依次存放:圖片5,圖片1,圖片2,圖片3,圖片4,圖片5,圖片1。當從圖片1滾動到圖片5時由於最後一張是圖片1就給用戶一種無限循環的感覺,當這張圖完全顯示後我們迅速將UIScrollView的contentOffset設置到第二個UIImageView,也就是圖片1,接著用戶可以繼續向後滾動。當然向前滾動原理完全一樣,當滾動到第一張圖片(圖片5)就迅速設置UIScrollView的contentOffset顯示第6張圖(圖片5)。為了方便說明請看下面的示意圖(注意示意圖由於寬度有限只描述了3張圖片顯示的情景):
如何優化性能?
無限循環實現了,但是我們知道如果圖片過多這些圖片勢必全部加載到內存,這是我們不願意看到的,此時我們需要優化上面的方案。其實從上面的方案我們也可以看出端倪,我們完全沒必要創建n+2個UIImageView,其實3個已經足夠(事實上也可以用兩個實現,大家不妨自己思考一下),只要一直保持顯示中間的UIImageView,滾動時動態更改三個UIImageView的圖片即可。例如三個UIImageView默認放圖片5、圖片1、圖片2,當前顯示中間的UIImageView,也就是圖片1,。如果向後滾動那麼就會顯示圖片2,當圖片2顯示完整後迅速重新設置三個UIImageView的內容為圖片1、圖片2、圖片3,然後通過contentOffset設置顯示中間的UIImageView,也就是圖片2。繼續向後看到圖片3,當圖片3滾動完成迅速重新設置3個UIImageView的內容為圖片2、圖片3、圖片4,然後設置contentOffset顯示中間的UIImageView,也就是圖片3。當然,向前滾動原理完全一樣,如此就給用戶一種循環錯覺,而且不占用過多內存。
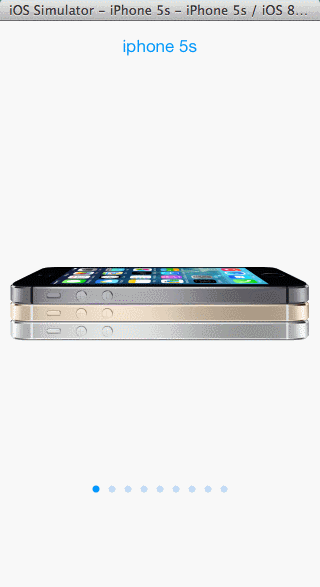
下面給出具體的實現,在這個程序中除了UIscrollView我們還可以看到UIPageControl的使用,實現並不復雜。首先我們需要將圖片信息存儲到plist文件中(日後方便擴展),並且設置plist的key表示圖片的名稱,value代表對應的圖片描述,這個描述我們需要展示在界面上方。具體內容如下:
imageInfo.plist
<?xml version="1.0" encoding="UTF-8"?>
<!DOCTYPE plist PUBLIC "-//Apple//DTD PLIST 1.0//EN" "http://www.apple.com/DTDs/PropertyList-1.0.dtd">
<plist version="1.0">
<dict>
 <key>0.jpg</key>
 <string>iphone 5s</string>
 <key>1.jpg</key>
 <string>iphone 5c</string>
 <key>2.jpg</key>
 <string>ipad min with retain</string>
 <key>3.jpg</key>
 <string>ipad air</string>
 <key>4.jpg</key>
 <string>ipod</string>
 <key>5.jpg</key>
 <string>ipod touch</string>
 <key>6.jpg</key>
 <string>mac book pro</string>
 <key>7.jpg</key>
 <string>mac book air</string>
 <key>8.jpg</key>
 <string>imac</string>
</dict>
</plist>
在程序中我們需要讀取plist文件並加載對應的圖片,這裡我們將圖片按順序依次命名:0.jpg、1.jpg…8.jpg。我們的程序主要集中於自定義的KCMainViewController.m中,在這裡我們聲明1個UIScrollView和3個UIImageView用於顯示圖片,同時聲明一個UILable顯示圖片描述信息,聲明一個UIPageControl來顯示當前圖片頁數,具體代碼如下:
//
// KCMainViewController.m
// ImageViewer
//
// Created by Kenshin Cui on 14-2-23.
// Copyright (c) 2014年 Kenshin Cui. All rights reserved.
//

#import "KCMainViewController.h"
#define SCREEN_WIDTH 320
#define SCREEN_HEIGHT 568
#define IMAGEVIEW_COUNT 3

@interface KCMainViewController ()<UIScrollViewDelegate>{
 UIScrollView *_scrollView;
 UIImageView *_leftImageView;
 UIImageView *_centerImageView;
 UIImageView *_rightImageView;
 UIPageControl *_pageControl;
 UILabel *_label;
 NSMutableDictionary *_imageData;//圖片數據
 int _currentImageIndex;//當前圖片索引
 int _imageCount;//圖片總數
}

@end

@implementation KCMainViewController

- (void)viewDidLoad {
 [super viewDidLoad];
 //加載數據
 [self loadImageData];
 //添加滾動控件
 [self addScrollView];
 //添加圖片控件
 [self addImageViews];
 //添加分頁控件
 [self addPageControl];
 //添加圖片信息描述控件
 [self addLabel];
 //加載默認圖片
 [self setDefaultImage];
}

#pragma mark 加載圖片數據
-(void)loadImageData{
 //讀取程序包路徑中的資源文件
 NSString *path=[[NSBundle mainBundle] pathForResource:@"imageInfo" ofType:@"plist"];
 _imageData=[NSMutableDictionary dictionaryWithContentsOfFile:path];
 _imageCount=(int)_imageData.count;
}

#pragma mark 添加控件
-(void)addScrollView{
 _scrollView=[[UIScrollView alloc]initWithFrame:[UIScreen mainScreen].bounds];
 [self.view addSubview:_scrollView];
 //設置代理
 _scrollView.delegate=self;
 //設置contentSize
 _scrollView.contentSize=CGSizeMake(IMAGEVIEW_COUNT*SCREEN_WIDTH, SCREEN_HEIGHT) ;
 //設置當前顯示的位置為中間圖片
 [_scrollView setContentOffset:CGPointMake(SCREEN_WIDTH, 0) animated:NO];
 //設置分頁
 _scrollView.pagingEnabled=YES;
 //去掉滾動條
 _scrollView.showsHorizontalScrollIndicator=NO;
}

#pragma mark 添加圖片三個控件
-(void)addImageViews{
 _leftImageView=[[UIImageView alloc]initWithFrame:CGRectMake(0, 0, SCREEN_WIDTH, SCREEN_HEIGHT)];
 _leftImageView.contentMode=UIViewContentModeScaleAspectFit;
 [_scrollView addSubview:_leftImageView];
 _centerImageView=[[UIImageView alloc]initWithFrame:CGRectMake(SCREEN_WIDTH, 0, SCREEN_WIDTH, SCREEN_HEIGHT)];
 _centerImageView.contentMode=UIViewContentModeScaleAspectFit;
 [_scrollView addSubview:_centerImageView];
 _rightImageView=[[UIImageView alloc]initWithFrame:CGRectMake(2*SCREEN_WIDTH, 0, SCREEN_WIDTH, SCREEN_HEIGHT)];
 _rightImageView.contentMode=UIViewContentModeScaleAspectFit;
 [_scrollView addSubview:_rightImageView];

}
#pragma mark 設置默認顯示圖片
-(void)setDefaultImage{
 //加載默認圖片
 _leftImageView.image=[UIImage imageNamed:[NSString stringWithFormat:@"%i.jpg",_imageCount-1]];
 _centerImageView.image=[UIImage imageNamed:[NSString stringWithFormat:@"%i.jpg",0]];
 _rightImageView.image=[UIImage imageNamed:[NSString stringWithFormat:@"%i.jpg",1]];
 _currentImageIndex=0;
 //設置當前頁
 _pageControl.currentPage=_currentImageIndex;
 NSString *imageName=[NSString stringWithFormat:@"%i.jpg",_currentImageIndex];
 _label.text=_imageData[imageName];
}

#pragma mark 添加分頁控件
-(void)addPageControl{
 _pageControl=[[UIPageControl alloc]init];
 //注意此方法可以根據頁數返回UIPageControl合適的大小
 CGSize size= [_pageControl sizeForNumberOfPages:_imageCount];
 _pageControl.bounds=CGRectMake(0, 0, size.width, size.height);
 _pageControl.center=CGPointMake(SCREEN_WIDTH/2, SCREEN_HEIGHT-100);
 //設置顏色
 _pageControl.pageIndicatorTintColor=[UIColor colorWithRed:193/255.0 green:219/255.0 blue:249/255.0 alpha:1];
 //設置當前頁顏色
 _pageControl.currentPageIndicatorTintColor=[UIColor colorWithRed:0 green:150/255.0 blue:1 alpha:1];
 //設置總頁數
 _pageControl.numberOfPages=_imageCount;

 [self.view addSubview:_pageControl];
}

#pragma mark 添加信息描述控件
-(void)addLabel{

 _label=[[UILabel alloc]initWithFrame:CGRectMake(0, 10, SCREEN_WIDTH,30)];
 _label.textAlignment=NSTextAlignmentCenter;
 _label.textColor=[UIColor colorWithRed:0 green:150/255.0 blue:1 alpha:1];

 [self.view addSubview:_label];
}

#pragma mark 滾動停止事件
-(void)scrollViewDidEndDecelerating:(UIScrollView *)scrollView{
 //重新加載圖片
 [self reloadImage];
 //移動到中間
 [_scrollView setContentOffset:CGPointMake(SCREEN_WIDTH, 0) animated:NO];
 //設置分頁
 _pageControl.currentPage=_currentImageIndex;
 //設置描述
 NSString *imageName=[NSString stringWithFormat:@"%i.jpg",_currentImageIndex];
 _label.text=_imageData[imageName];
}

#pragma mark 重新加載圖片
-(void)reloadImage{
 int leftImageIndex,rightImageIndex;
 CGPoint offset=[_scrollView contentOffset];
 if (offset.x>SCREEN_WIDTH) { //向右滑動
  _currentImageIndex=(_currentImageIndex+1)%_imageCount;
 }else if(offset.x<SCREEN_WIDTH){ //向左滑動
  _currentImageIndex=(_currentImageIndex+_imageCount-1)%_imageCount;
 }
 //UIImageView *centerImageView=(UIImageView *)[_scrollView viewWithTag:2];
 _centerImageView.image=[UIImage imageNamed:[NSString stringWithFormat:@"%i.jpg",_currentImageIndex]];

 //重新設置左右圖片
 leftImageIndex=(_currentImageIndex+_imageCount-1)%_imageCount;
 rightImageIndex=(_currentImageIndex+1)%_imageCount;
 _leftImageView.image=[UIImage imageNamed:[NSString stringWithFormat:@"%i.jpg",leftImageIndex]];
 _rightImageView.image=[UIImage imageNamed:[NSString stringWithFormat:@"%i.jpg",rightImageIndex]];
}

@end
在上面的代碼中需要提醒大家的是一定要謹慎在滾動時進行相關操作,前面我們說過滾動事件會循環執行十分消耗性能,因此如果能不在其中操作的話盡可能不要在這個方法中進行相關操作,例如在上面的代碼中我們的核心邏輯主要集中在滾動停止事件中,這個事件在一次滾動操作中只需要執行一次。
運行效果: