iOS高級動畫:圓形樹展開&收起動畫

轉自:標哥的技術博客,作者:黃儀標(微博)
前段時間幫某某做了一個動畫效果,今天分享給大家。關於動畫的基礎知識,這裡不會細說,如果您還沒有核心動畫的基礎知識,請先閱讀相關文章,了解核心動畫如何使用,然後再繼續閱讀本篇文章。
本篇文章,涉及到以下知識點:
如何添加縮放動畫
如何添加平移動畫
如何添加旋轉動畫
如何添加關鍵幀動畫
如何使用組合動畫
如何實現漸變圖層
如何實現圓形漸變進度條
溫馨提示:新手不適合閱讀本篇文章哦,不過可以初步閱讀了解一下!
如果沒有了解過動畫的基礎知識,可先看看筆者之前的一些文章:
CALayer精講
UIBezierPath精講
iOS CAShapeLayer精講
CAAnimation解讀
CABasicAnimation精講
本篇文章不深入講基礎知識,只講如何實現及實現的要點,並放出關鍵代碼。對於伸手黨,請不要私聊我要完整的源代碼。如果您正好在項目中有這樣的需求,可以嘗試根據本篇文章講解動手做一個!
最終效果圖
無縮放動畫的效果圖:

從動畫效果可以看出來,有平移、旋轉、關鍵幀動畫,同時還有漸變進度條充滿的動畫。另外還要注意移動的距離。請忽略樣式丑陋的問題~
有縮放動畫的效果圖:

從動畫效果可以看出來,個人變成了6個,且是平分的,比上面的效果圖多了縮放的動畫!這個縮放動畫,生成GIF圖的效果真丑,跟手機運行起來看到的差別比較大!
設計思路
這裡是封裝裡了通用的組件,如果是在項目中使用,可以輕松調用且可以復用。從動畫效果可以看到,這個整體是由以下幾個部分組成的:
1)中間帶進度圖的圓形控件(這裡叫葉子吧)
2)從中心圓出來到四周的N個控件,其中每個都是擁有同樣的特性的
所以,我們設計成三個類,分別是:
HYBCurveItemView:代表散開的每個子項控件
HYBCurveMainView:代表中間的圓形控件
HYBCurveMenuView:由前兩個控件組合而形成的整體控件
設計HYBCurveItemView
假設叫葉子。那麼每個葉子就有相同的特性,需要知道自己的歸屬:
自身的大小
展示的元素
可移動到最遠的哪個位置
可移動到最近的哪個位置
起始位置
最終展開後停留的位置
可設置以下幾個位置屬性:
@property (nonatomic, assign) CGPoint startPoint;
@property (nonatomic, assign) CGPoint endPoint;
@property (nonatomic, assign) CGPoint nearPoint;
@property (nonatomic, assign) CGPoint farPoint;
這個類只需要有相關屬性即可!
設計HYBCurveMainView
假設中大圓。大圓主要需要屬性以下特性:
自身大小
展示的元素
帶有漸變圓形進度條
可執行的操作:
更新進度
展開、收起葉子
對於這個大圓類,細讀如何添加圓形進度條。
設計漸變進度圓環
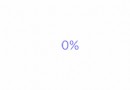
首先,添加白色固定圓形
底部是一個白色的圓環,當白色圓環填滿時,表示0%。那麼白色圓環可以用什麼來實現呢?其實CAShapeLayer就是非常好的,它可以添加圓形路徑來實現的,記得設置填充色為透明哦,不然連中間的內容也看不見了。代碼如下:
self.outLayer = [CAShapeLayer layer];
CGRect rect = {kLineWidth / 2, kLineWidth / 2, frame.size.width - kLineWidth, frame.size.height - kLineWidth};
UIBezierPath *path = [UIBezierPath bezierPathWithOvalInRect:rect];
self.outLayer.strokeColor = [UIColor whiteColor].CGColor;
self.outLayer.lineWidth = kLineWidth;
self.outLayer.fillColor =  [UIColor clearColor].CGColor;
self.outLayer.lineCap = kCALineCapRound;
self.outLayer.path = path.CGPath;
[self.layer addSublayer:self.outLayer];
因為要設置為白色圓環,所以畫筆顏色設置為白色,線寬就設置為圓環的大小。這樣就可以初步形成了帶有白色圓環的底色了。此時就是0%。
其次,設置可調進度的進度圓環圖層
下面所創建的圖層,會用於設置漸變顏色圖層的mask,這樣才能顯示中間的內容,而不是漸變的圖層。它的大小與白底圓環一樣大小:
self.progressLayer = [CAShapeLayer layer];
self.progressLayer.frame = self.bounds;
self.progressLayer.fillColor = [UIColor clearColor].CGColor;
self.progressLayer.strokeColor = [UIColor whiteColor].CGColor;
self.progressLayer.lineWidth = kLineWidth;
self.progressLayer.lineCap = kCALineCapRound;
self.progressLayer.path = path.CGPath;
然後,增加漸變圖層
要實現漸變圖層,可以通過CAGradientLayer來創建,這裡的顏色是隨意指定的,所以效果不太協調,大家可自由調整。這裡呢使用了兩個漸變圖層,然後放到一個大的漸變圖層中,兩個小的圖層各占一半。 當添加了mask後,就只有進度這一部分漸變可顯示了。
CAGradientLayer *gradientLayer1 = [CAGradientLayer layer];
gradientLayer1.frame = CGRectMake(0, 0, width / 2, height);
CGColorRef red = [UIColor redColor].CGColor;
CGColorRef purple = [UIColor purpleColor].CGColor;
CGColorRef yellow = [UIColor yellowColor].CGColor;
CGColorRef orange = [UIColor orangeColor].CGColor;
[gradientLayer1 setColors:@[(__bridge id)red, (__bridge id)purple, (__bridge id)yellow, (__bridge id)orange]];
[gradientLayer1 setLocations:@[@0.3, @0.6, @0.8, @1.0]];
[gradientLayer1 setStartPoint:CGPointMake(0.5, 1)];
[gradientLayer1 setEndPoint:CGPointMake(0.5, 0)];
CAGradientLayer *gradientLayer2 =  [CAGradientLayer layer];
gradientLayer2.frame = CGRectMake(width / 2, 0, width / 2, height);
CGColorRef blue = [UIColor brownColor].CGColor;
CGColorRef purple1 = [UIColor purpleColor].CGColor;
CGColorRef r1 = [UIColor yellowColor].CGColor;
CGColorRef o1 = [UIColor orangeColor].CGColor;
[gradientLayer2 setColors:@[(__bridge id)blue, (__bridge id)purple1, (__bridge id)r1, (__bridge id)o1]];
[gradientLayer2 setLocations:@[@0.3, @0.6, @0.8, @1.0]];
[gradientLayer2 setStartPoint:CGPointMake(0.5, 0)];
[gradientLayer2 setEndPoint:CGPointMake(0.5, 1)];
CAGradientLayer *gradientLayer = [CAGradientLayer layer];
gradientLayer.frame = self.bounds;
[gradientLayer addSublayer:gradientLayer1];
[gradientLayer1 addSublayer:gradientLayer2];
gradientLayer.mask = self.progressLayer;
[self.layer addSublayer:gradientLayer];
注意,一定要設置gradientLayer.mask = self.progressLayer;這樣才能顯示中間的內容,如果不設置mask,那麼就只有漸變圖層了。
最後,動畫更新進度
在需要更新進度的時候,可以調用這個API來更新進度,帶有動畫效果。
- (void)updateProgressWithNumber:(NSUInteger)number {
    [CATransaction begin];
    [CATransaction setAnimationTimingFunction:[CAMediaTimingFunction functionWithName:kCAMediaTimingFunctionEaseIn]];
    [CATransaction setAnimationDuration:0.5];
    self.progressLayer.strokeEnd =  number / 100.0;
    self.percentLabel.text = [NSString stringWithFormat:@"%@%%", @(number)];
    [CATransaction commit];
}
設計HYBCurveMenuView
這個類就是圓形菜單類了,整合前兩個。它主要具備以下特性:
自身大小
是否添加縮放動畫
更換葉子
可執行的操作:
展開、收起
點擊大圓回調
更換葉子
當更換所有的葉子時,需要調整所有葉子的位置:
- (void)setMenuItems:(NSArray *)menuItems {
  if (_menuItems != menuItems) {
    _menuItems = menuItems;

    for (UIView *v in self.subviews) {
      if (v.tag >= 1000) {
        [v removeFromSuperview];
      }
    }

    // add the menu buttons
    int count = (int)[menuItems count];
    CGFloat cnt = 1;
    for (int i = 0; i < count; i ++) {
      HYBCurveItemView *item = [menuItems objectAtIndex:i];
      item.tag = 1000 + i;
      item.startPoint = self.startPoint;
      CGFloat pi =  M_PI / count;
      CGFloat endRadius = item.bounds.size.width / 2 + self.endDistance + _mainView.bounds.size.width / 2;
      CGFloat nearRadius = item.bounds.size.width / 2 + self.nearDistance + _mainView.bounds.size.width / 2;
      CGFloat farRadius = item.bounds.size.width / 2 + self.farDistance + _mainView.bounds.size.width / 2;
      item.endPoint = CGPointMake(self.startPoint.x + endRadius * sinf(pi * cnt),
                                  self.startPoint.y - endRadius * cosf(pi * cnt));
      item.nearPoint = CGPointMake(self.startPoint.x + nearRadius * sinf(pi * cnt),
                                   self.startPoint.y - nearRadius * cosf(pi * cnt));
      item.farPoint = CGPointMake(self.startPoint.x + farRadius * sinf(pi * cnt),
                                  self.startPoint.y - farRadius * cosf(pi * cnt));
      item.center = item.startPoint;
      [self addSubview:item];

      cnt += 2;
    }

    [self bringSubviewToFront:_mainView];
  }
}
其中,這幾個屬性帶有默認值(分別表示起點、最近點、最遠點、展開後最終停留點):
self.startPoint = self.center;
// 修改這時的參數來調整大圓與圓之間的距離
self.nearDistance = 30;
self.farDistance = 60;
self.endDistance = 30;
對於上面的點的計算,主要是一點點的數學知識,需要懂得象限與角度的關系。
展開或者收起
調用下面的方法來展開或者收起。這裡會遍歷所有的葉子,讓每個葉子都添加對應的動畫變換,就可以看到動畫軌跡了:
- (void)expend:(BOOL)isExpend {
  _isExpend = isExpend;

  [self.menuItems enumerateObjectsUsingBlock:^(HYBCurveItemView *obj, NSUInteger idx, BOOL * _Nonnull stop) {
    if (self.scale) {
      if (isExpend) {
        obj.transform = CGAffineTransformIdentity;
      } else {
        obj.transform = CGAffineTransformMakeScale(0.001, 0.001);
      }
    }

    [self addRotateAndPostisionForItem:obj toShow:isExpend];
  }];
}
接下來是最關鍵的動畫核心代碼:
- (void)addRotateAndPostisionForItem:(HYBCurveItemView *)item toShow:(BOOL)show {
  if (show) {
    CABasicAnimation *scaleAnimation = nil;
    if (self.scale) {
      scaleAnimation = [CABasicAnimation animationWithKeyPath:@"transform.scale"];
      scaleAnimation.fromValue = [NSNumber numberWithFloat:0.2];
      scaleAnimation.toValue = [NSNumber numberWithFloat:1.0];
      scaleAnimation.duration = 0.5f;
      scaleAnimation.timingFunction = [CAMediaTimingFunction functionWithName:kCAMediaTimingFunctionEaseInEaseOut];
    }

    CAKeyframeAnimation *rotateAnimation = [CAKeyframeAnimation animationWithKeyPath:@"transform.rotation.z"];
    rotateAnimation.values = @[@(M_PI), @(0.0)];
    rotateAnimation.duration = 0.5f;
    rotateAnimation.keyTimes = @[@(0.3), @(0.4)];

    CAKeyframeAnimation *positionAnimation = [CAKeyframeAnimation animationWithKeyPath:@"position"];
    positionAnimation.duration = 0.5f;
    CGMutablePathRef path = CGPathCreateMutable();
    CGPathMoveToPoint(path, NULL, item.startPoint.x, item.startPoint.y);
    CGPathAddLineToPoint(path, NULL, item.farPoint.x, item.farPoint.y);
    CGPathAddLineToPoint(path, NULL, item.nearPoint.x, item.nearPoint.y);
    CGPathAddLineToPoint(path, NULL, item.endPoint.x, item.endPoint.y);
    positionAnimation.path = path;
    CGPathRelease(path);

    CAAnimationGroup *animationgroup = [CAAnimationGroup animation];
    if (self.scale) {
      animationgroup.animations = @[scaleAnimation, positionAnimation, rotateAnimation];
    } else {
      animationgroup.animations = @[positionAnimation, rotateAnimation];
    }
    animationgroup.duration = 0.5f;
    animationgroup.fillMode = kCAFillModeForwards;
    animationgroup.timingFunction = [CAMediaTimingFunction functionWithName:kCAMediaTimingFunctionEaseIn];
    [item.layer addAnimation:animationgroup forKey:@"Expand"];
    item.center = item.endPoint;
  } else {
    CABasicAnimation *scaleAnimation = nil;
    if (self.scale) {
      scaleAnimation = [CABasicAnimation animationWithKeyPath:@"transform.scale"];
      scaleAnimation.fromValue = [NSNumber numberWithFloat:1.0];
      scaleAnimation.toValue = [NSNumber numberWithFloat:0.2];
      scaleAnimation.duration = 0.5f;
      scaleAnimation.timingFunction = [CAMediaTimingFunction functionWithName:kCAMediaTimingFunctionEaseInEaseOut];
    }

    CAKeyframeAnimation *rotateAnimation = [CAKeyframeAnimation animationWithKeyPath:@"transform.rotation.z"];
    rotateAnimation.values = @[@0, @(M_PI * 2), @(0)];
    rotateAnimation.duration = 0.5f;
    rotateAnimation.keyTimes = @[@0, @(0.4), @(0.5)];
    CAKeyframeAnimation *positionAnimation = [CAKeyframeAnimation animationWithKeyPath:@"position"];
    positionAnimation.duration = 0.5f;
    CGMutablePathRef path = CGPathCreateMutable();
    CGPathMoveToPoint(path, NULL, item.endPoint.x, item.endPoint.y);
    CGPathAddLineToPoint(path, NULL, item.farPoint.x, item.farPoint.y);
    CGPathAddLineToPoint(path, NULL, item.startPoint.x, item.startPoint.y);
    positionAnimation.path = path;
    CGPathRelease(path);

    CAAnimationGroup *animationgroup = [CAAnimationGroup animation];
    if (self.scale) {
      animationgroup.animations = @[scaleAnimation, positionAnimation, rotateAnimation];
    } else {
      animationgroup.animations = @[positionAnimation, rotateAnimation];
    }

    animationgroup.duration = 0.5f;
    animationgroup.fillMode = kCAFillModeForwards;
    animationgroup.timingFunction = [CAMediaTimingFunction functionWithName:kCAMediaTimingFunctionEaseIn];
    [item.layer addAnimation:animationgroup forKey:@"Close"];
    item.center = item.startPoint;
  }
}
講講展開縮放動畫
展開時縮放動畫可以通過修改transform.scale來實現,這是x、y方向都縮放了。也就是在剛出來時,縮放不斷變大到最終大小。
scaleAnimation = [CABasicAnimation animationWithKeyPath:@"transform.scale"];
scaleAnimation.fromValue = [NSNumber numberWithFloat:0.2];
scaleAnimation.toValue = [NSNumber numberWithFloat:1.0];
講講展開旋轉動畫
我們旋轉的是z軸,而不是x、y軸,通過transform.rotation.z來實現。這裡使用的是關鍵幀來實現,其中設置values及keyTimes的個數是對應的:
CAKeyframeAnimation *rotateAnimation = [CAKeyframeAnimation animationWithKeyPath:@"transform.rotation.z"];
rotateAnimation.values = @[@(M_PI), @(0.0)];
rotateAnimation.duration = 0.5f;
rotateAnimation.keyTimes = @[@(0.3), @(0.4)];
講講展開移動動畫
通過position可以實現平移動畫,這裡也是使用關鍵幀來實現,因為需要到path。通過添加路徑,來實現起點、最近、最遠、最終停留的路徑:
CAKeyframeAnimation *positionAnimation = [CAKeyframeAnimation animationWithKeyPath:@"position"];
positionAnimation.duration = 0.5f;
CGMutablePathRef path = CGPathCreateMutable();
CGPathMoveToPoint(path, NULL, item.startPoint.x, item.startPoint.y);
CGPathAddLineToPoint(path, NULL, item.farPoint.x, item.farPoint.y);
CGPathAddLineToPoint(path, NULL, item.nearPoint.x, item.nearPoint.y);
CGPathAddLineToPoint(path, NULL, item.endPoint.x, item.endPoint.y);
positionAnimation.path = path;
CGPathRelease(path);
講講展開組合動畫
上面創建了好幾種動畫,那麼要實現組合,就需要通過CAAnimationGroup來實現了。然後添加到葉子中的動畫,就是組合動畫:
CAAnimationGroup *animationgroup = [CAAnimationGroup animation];
if (self.scale) {
    animationgroup.animations = @[scaleAnimation, positionAnimation, rotateAnimation];
} else {
    animationgroup.animations = @[positionAnimation, rotateAnimation];
}
animationgroup.duration = 0.5f;
animationgroup.fillMode = kCAFillModeForwards;
animationgroup.timingFunction = [CAMediaTimingFunction functionWithName:kCAMediaTimingFunctionEaseIn];
[item.layer addAnimation:animationgroup forKey:@"Expand"];
item.center = item.endPoint;
關於收起的動畫也差不多,就不說了!
結尾
本篇文章主要是想教大家如何去設計一個動畫及UI控件,當然筆者所講的並不一定是最好的,也許你就能想出更簡單更優秀的辦法來實現。本篇文章的源代碼不放出,只放出關鍵代碼。對於學習能力比較強,比較愛研究的小伙伴已經足夠了。