IOS開發中UITableView(表視圖)的滾動優化及自定義Cell
IOS開發中UITableView(表視圖)的滾動優化及自定義Cell
IOS 開發中UITableView是非常常用的一個控件,我們平時在手機上看到的聯系人列表,微信好友列表等都是通過UITableView實現的。UITableView這個控件中的列表的每一行是一個cell,當UITableView中cell數量特別大的時候,由於每次都需要alloc分配內存並初始化,會導致app運行不流暢,所以可以使用蘋果提供的幾個方法進行優化,我把這個過程記錄下來供自己以後查閱。
當然,既然說到優化,那我們就從沒有優化的狀態開始談起。先使用最基本的流程實現一個UITableView(表視圖),然後再談優化,以及自定義。
本文正文主要分一下三步:
一、使用最基本的流程來實現一個表視圖。
二、通過滾動優化表視圖中cell的創建使之節約內存。
三、自定義表視圖中cell樣式。
一、使用最基本的流程來實現一個表視圖:
文章一開始說了UITableView這個控件中的列表的每一行是一個cell,所以我們先創建一個UITableView表視圖,然後在datasource代理方法中返回cell的個數,以及創建cell:
1、創建UITableView控件myTableView,全局變量、設置代理、添加到當前view:
 #import "ViewController.h"

 @interface ViewController (){
     UITableView *myTableView;
 }
 @end

 @implementation ViewController

 - (void)viewDidLoad {
     [super viewDidLoad];

     myTableView = [[UITableView alloc]initWithFrame:CGRectMake(0, 20, 414, 600)];
     myTableView.backgroundColor = [UIColor lightGrayColor];
     myTableView.delegate = self;
     myTableView.dataSource = self;

     [self.view addSubview:myTableView];
 }
2、在頭文件中添加代理:
 //
 //  ViewController.h
 //  UITableView列表
 //
 //  Created by mac on 16/4/15.
 //  Copyright © 2016年 mzw. All rights reserved.
 //

 #import <UIKit/UIKit.h>

 //添加代理UITableViewDataSource和UITableViewDelegate
 @interface ViewController : UIViewController<UITableViewDataSource,UITableViewDelegate>


 @end
3、進入UITableViewDataSource中找到代理方法並粘貼到.m文件中,實現方法,其中:
- (NSInteger)tableView:(UITableView *)tableView numberOfRowsInSection:(NSInteger)section 返回一個數字,是cell的個數;
- (UITableViewCell *)tableView:(UITableView *)tableView cellForRowAtIndexPath:(NSIndexPath *)indexPath 返回的是UITableViewCell,所以我們就在這個函數中創建cell,並返回,這樣就實現了代理方法。
具體代碼:
 //myTableView的行數
 - (NSInteger)tableView:(UITableView *)tableView numberOfRowsInSection:(NSInteger)section{
     return  10;
 }


 - (UITableViewCell *)tableView:(UITableView *)tableView cellForRowAtIndexPath:(NSIndexPath *)indexPath{
 //    創建UITableViewCell
     UITableViewCell *cell = [[UITableViewCell alloc]init];
 //    UITableViewCell自帶textlabel,indexPath.row為行數
     cell.textLabel.text = [NSString stringWithFormat:@"這是第%ld行",indexPath.row];
     return cell;
 }
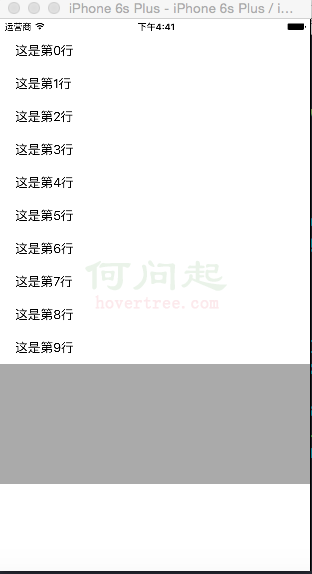
以上代碼的第9行創建了UITableViewCell並初始化,第11行是給cell自帶的textlabel設置文字的,這樣的做法就是:需要多少個cell,就alloc多少次,如果軟件需要的cell個數太多,會導致下拉時非常卡。但是在需要展示的數據量很小,也就是需要的cell不多的時候,可以使用這種方式。
通過這種方式實現的表視圖模擬如下:
二、通過優化表視圖中cell的創建使之節約內存。
滾動優化的原理就是如果這個屏幕上能顯示10個cell,那我就創建11個cell,不管有多少數據要現實,就用這11個cell。當用戶上拉或下拉的時候,上面消失的cell將重新裝入要顯示的數據,然後顯示在屏幕上,相當於總有一個在緩沖等待顯示。通過這樣的方式減少了cell的alloc次數,進而降低了內存開銷,提高了系統性能。
要實現以上思路,只需要把一中的創建cell的代碼換成一下語句:
 // //  2、使用隊列池優化方式創建cell
     static NSString *cellid = @"cell";//一個固定的標識
     UITableViewCell *cell = [tableView dequeueReusableCellWithIdentifier:cellid];
     if (cell == nil) {
         cell = [[UITableViewCell alloc]initWithStyle:UITableViewCellStyleSubtitle reuseIdentifier:cellid];
     }
三、自定義表視圖中cell樣式:
1、先新建一個繼承自UITableViewCell的類,我這裡創建的名稱是myTableViewCell,創建的時候勾選創建nib文件。
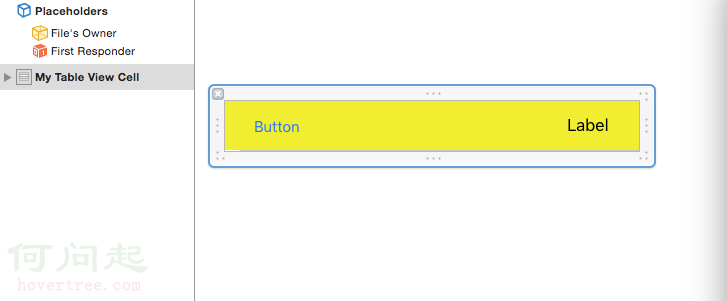
2、打開創建好的nib文件,然後裡面已經有一個cell了,我們采用拖拽的辦法給這個cell裡加入一個UIImageView,然後給裡面放置一個圖片,在這裡我使用一張黃色的純色圖片,然後在cell的左邊拖入一個buttom,右邊拖入一個label,完成後如下圖:
3、在 myTableViewCell.h中定義兩條語句
 @property(nonatmic, strong)IBOUTLET UIButton *mybutton;
 @property(nonatmic, strong)IBOUTLET UILabel    *mylabel;
寫完這兩句之後就可以在nib中拖線連接關系了,這個過程是最基本的,這裡不說。
4、在ViewController.m中完成app 的主要功能,也就是表視圖的實現:
 //
 //  ViewController.m
 //  UITableView使用nib拖動自定義
 //
 //  Created by mac on 16/4/15.
 //  Copyright © 2016年 mzw. All rights reserved.
 //

 #import "ViewController.h"
 #import "myTableViewCell.h"

 @interface ViewController (){
     UITableView *myTableView;
     NSArray *contentArray;
 }

 @end

 @implementation ViewController

 - (void)viewDidLoad {
     [super viewDidLoad];

     myTableView = [[UITableView alloc]initWithFrame:CGRectMake(0, 20, 414, 500)];

     myTableView.delegate = self;
     myTableView.dataSource = self;
     [self.view addSubview:myTableView];


 // 用來為cell的mulabel賦值的數組
     contentArray = @[@"one",@"two",@"three",@"four",@"five",@"six",@"seven",@"eight",@"nine",@"ten",];

 }


 - (NSInteger)tableView:(UITableView *)tableView numberOfRowsInSection:(NSInteger)section{
 //    設置cell的數量為數組的元素個數
     return contentArray.count;
 }


 - (UITableViewCell *)tableView:(UITableView *)tableView cellForRowAtIndexPath:(NSIndexPath *)indexPath{

 //    優化方式創建cell
     static NSString *cellid = @"cell";
     myTableViewCell *cell = [tableView dequeueReusableCellWithIdentifier:cellid];

     if (cell == nil) {

 //        使用繪制好的nib為cell賦值
         cell = (myTableViewCell*)[[[NSBundle mainBundle]loadNibNamed:@"myTableViewCell" owner:self options:nil] objectAtIndex:0];

 //        cell上按鈕的button,為了從cell上的多個控件中區分出某個button
         cell.mybutton.tag = 1000;

 //        為cell上的button添加方法
         [cell.mybutton addTarget:self action:@selector(haha:) forControlEvents:UIControlEventTouchUpInside];

 //        使用數組的內容為cell賦值
         cell.mylabel.text = [contentArray objectAtIndex:[indexPath row]];
     }


     return cell;

 }


 //拿到cell,然後根據tag拿到button然後輸出buttn上的文字
 -(void)haha:(UIButton*)sender{
 //    button在cell的content上,所以通過以下方法獲取
     myTableViewCell *cell =(myTableViewCell*)[[sender superview]superview];
     UIButton *mybutton = (UIButton*)[cell viewWithTag:1000];
     NSLog(@"%@",mybutton.titleLabel.text);
 }


 - (void)didReceiveMemoryWarning {
     [super didReceiveMemoryWarning];
     // Dispose of any resources that can be recreated.
 }

 @end
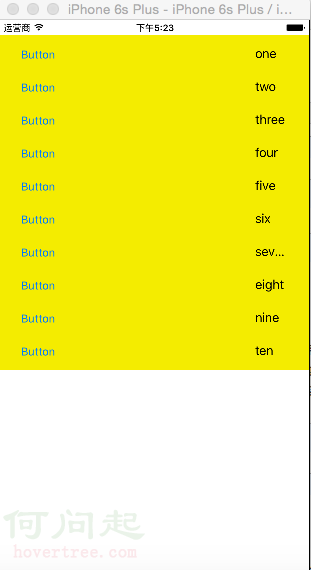
模擬效果如下:
以上。
- 上一頁:iOS之QQ粘性布局
- 下一頁:iOS學習筆記28-系統服務(一)短信和郵件