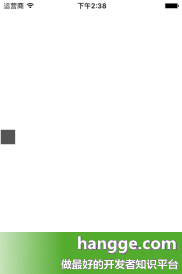
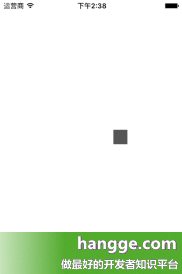
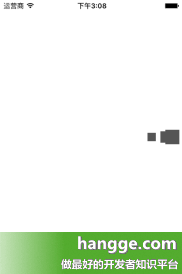
蘋果開發之一個簡單的動畫效果(方塊來回反復移動)
使用 UIView.animateWithDuration() 給方塊添加動畫,讓其在屏幕左側與右側間不斷地來回運動。 .Autoreverse參數表示:動畫運行到結束點後仍然以動畫方式回到初始點(本例是x坐標)
.Repeat參數表示:動畫重復執行

import UIKit
class ViewController: UIViewController {
// 方塊
var block:UIView!
override func viewDidLoad()
{
super.viewDidLoad()
//創建方塊
block = UIView(frame:CGRectMake(0, 0, 25, 25))
block.center.y = self.view.bounds.height / 2 //方塊垂直居中
block.backgroundColor = UIColor.darkGrayColor()
self.view.addSubview(block)
//播放動畫
playAnimation()
}
//播放動畫
func playAnimation()
{
UIView.animateWithDuration(0.6, delay: 0.4, options: [.Repeat, .Autoreverse],
animations: {
self.block.frame.origin.x = self.view.bounds.width - self.block.frame.width
},
completion: nil)
}
override func didReceiveMemoryWarning() {
super.didReceiveMemoryWarning()
}
}
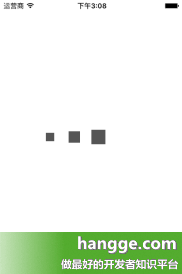
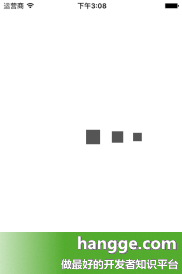
2,添加多個大小不一的方塊,並設置動畫
方塊隨著尺寸變小,對應動畫逐級添加 delay 延時,看起來有種跟隨的效果。
import UIKit
class ViewController: UIViewController {
// 方塊
var block1:UIView!
var block2:UIView!
var block3:UIView!
override func viewDidLoad()
{
super.viewDidLoad()
//創建方塊
block3 = UIView(frame:CGRectMake(0, 0, 15, 15))
block3.center.y = self.view.bounds.height / 2 //方塊垂直居中
block3.backgroundColor = UIColor.darkGrayColor()
self.view.addSubview(block3)
block2 = UIView(frame:CGRectMake(0, 0, 20, 20))
block2.center.y = self.view.bounds.height / 2 //方塊垂直居中
block2.backgroundColor = UIColor.darkGrayColor()
self.view.addSubview(block2)
block1 = UIView(frame:CGRectMake(0, 0, 25, 25))
block1.center.y = self.view.bounds.height / 2 //方塊垂直居中
block1.backgroundColor = UIColor.darkGrayColor()
self.view.addSubview(block1)
//播放動畫
playAnimation()
}
//播放動畫
func playAnimation()
{
UIView.animateWithDuration(0.6, delay: 0.4, options: [.Repeat, .Autoreverse],
animations: {
self.block1.frame.origin.x =
self.view.bounds.width - self.block1.frame.width
},
completion: nil)
UIView.animateWithDuration(0.6, delay: 0.45, options: [.Repeat, .Autoreverse],
animations: {
self.block2.frame.origin.x =
self.view.bounds.width - self.block2.frame.width
},
completion: nil)
UIView.animateWithDuration(0.6, delay: 0.5, options: [.Repeat, .Autoreverse],
animations: {
self.block3.frame.origin.x =
self.view.bounds.width - self.block2.frame.width
},
completion: nil)
}
override func didReceiveMemoryWarning() {
super.didReceiveMemoryWarning()
}
}
- iOS抽屜後果開辟案例分享
- iOS9蘋果將原http協定改成了https協定的辦法
- iOS開發--仿舊事首頁效果WMPageController的運用詳解
- iOS開發之獲取零碎相冊中的圖片與視頻教程(內帶url轉換)
- iOS開發系列--告訴與音訊機制詳解
- iOS項目開發--完成相似淘寶概況頁面
- iOS開發中Swift3 監聽UITextView文字改動的辦法(三種辦法)
- iOS使用開發中監聽鍵盤事情的代碼實例小結
- iOS 10行將來襲!晉級你的iOS開發配備
- 詳解iOS的UI開發中控制器的創立辦法
- iOS使用開發中運用Auto Layout來適配不同屏幕尺寸
- iOS開發之運用Storyboard預覽UI在不同屏幕上的運轉效果
- iOS開發中運用Picker View完成一個點菜使用的UI示例
- IOS開發根底知識--碎片51
- 挪動開發周報 Issue #170:罕見功能優化戰略的總結