ios開發之Swift 使用NSURLSession通過HTTPS進行網絡請求,及證書的使用
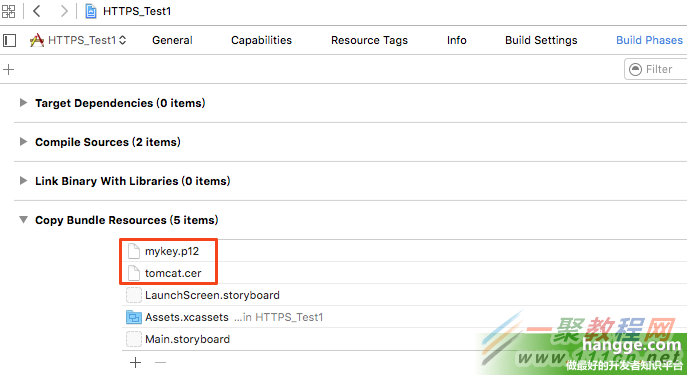
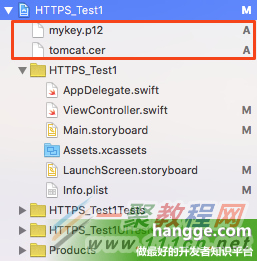 記的同時在 “工程” -> “Build Phases” -> “Copy Bundle Resources” 中添加這兩個證書文件。
 2,配置Info.plist
由於我們使用的是自簽名的證書,而蘋果ATS(App Transport Security)只信任知名CA頒發的證書,所以在iOS9下即使是HTTPS請求還是會被ATS攔截。
所以在Info.plist下添加如下配置(iOS8不需要):
2,配置Info.plist
由於我們使用的是自簽名的證書,而蘋果ATS(App Transport Security)只信任知名CA頒發的證書,所以在iOS9下即使是HTTPS請求還是會被ATS攔截。
所以在Info.plist下添加如下配置(iOS8不需要):
2,配置Info.plist
由於我們使用的是自簽名的證書,而蘋果ATS(App Transport Security)只信任知名CA頒發的證書,所以在iOS9下即使是HTTPS請求還是會被ATS攔截。
所以在Info.plist下添加如下配置(iOS8不需要):
<key>NSAppTransportSecurity</key>
<dict>
<key>NSAllowsArbitraryLoads</key>
<true/>
</dict>
3,使用兩個證書進行雙向驗證,以及網絡請求
import UIKit
import Foundation
class ViewController: UIViewController, NSURLSessionDelegate {
override func viewDidLoad() {
super.viewDidLoad()
//獲取數據
httpGet(NSMutableURLRequest(URL: NSURL(string: "https://192.168.1.101:8443")!))
}
// 使用NSURLSession請求數據
func httpGet(request: NSMutableURLRequest!) {
let configuration =
NSURLSessionConfiguration.defaultSessionConfiguration()
let session = NSURLSession(configuration: configuration,
delegate: self, delegateQueue:NSOperationQueue.mainQueue())
let dataTask = session.dataTaskWithRequest(request,
completionHandler: {(data, response, error) -> Void in
if error != nil{
print(error?.code)
print(error?.description)
}else{
let str = NSString(data: data!, encoding: NSUTF8StringEncoding)
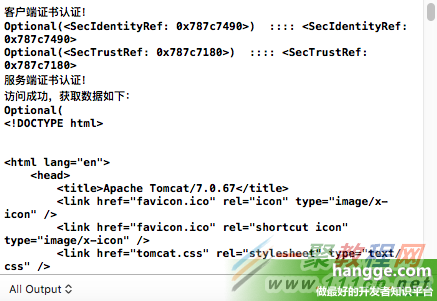
print("訪問成功,獲取數據如下:")
print(str)
}
}) as NSURLSessionTask
//使用resume方法啟動任務
dataTask.resume()
}
// 在訪問資源的時候,如果服務器返回需要授權(提供一個NSURLCredential對象)
// 那麼該方法就回被調用(這個是NSURLSessionDelegate代理方法)
func URLSession(session: NSURLSession,
didReceiveChallenge challenge: NSURLAuthenticationChallenge,
completionHandler: (NSURLSessionAuthChallengeDisposition, NSURLCredential?)
-> Void) {
//認證服務器證書
if challenge.protectionSpace.authenticationMethod
== (NSURLAuthenticationMethodServerTrust) {
print("服務端證書認證!")
let serverTrust:SecTrustRef = challenge.protectionSpace.serverTrust!
let certificate = SecTrustGetCertificateAtIndex(serverTrust, 0)!
let remoteCertificateData
= CFBridgingRetain(SecCertificateCopyData(certificate))!
let cerPath = NSBundle.mainBundle().pathForResource("tomcat",
ofType: "cer")!
let localCertificateData = NSData(contentsOfFile:cerPath)!
if (remoteCertificateData.isEqualToData(localCertificateData) == true) {
let credential = NSURLCredential(forTrust: serverTrust)
challenge.sender?.useCredential(credential,
forAuthenticationChallenge: challenge)
completionHandler(NSURLSessionAuthChallengeDisposition.UseCredential,
NSURLCredential(forTrust: challenge.protectionSpace.serverTrust!))
} else {
completionHandler(.CancelAuthenticationChallenge, nil)
}
}
//認證客戶端證書
else if challenge.protectionSpace.authenticationMethod
== NSURLAuthenticationMethodClientCertificate
{
print("客戶端證書認證!")
//獲取客戶端證書相關信息
let identityAndTrust:IdentityAndTrust = self.extractIdentity();
let urlCredential:NSURLCredential = NSURLCredential(
identity: identityAndTrust.identityRef,
certificates: identityAndTrust.certArray as? [AnyObject],
persistence: NSURLCredentialPersistence.ForSession);
completionHandler(.UseCredential, urlCredential);
}
// 其它情況(不接受認證)
else {
print("其它情況(不接受認證)")
completionHandler(.CancelAuthenticationChallenge, nil);
}
}
//獲取客戶端證書相關信息
func extractIdentity() -> IdentityAndTrust {
var identityAndTrust:IdentityAndTrust!
var securityError:OSStatus = errSecSuccess
let path: String = NSBundle.mainBundle().pathForResource("mykey", ofType: "p12")!
let PKCS12Data = NSData(contentsOfFile:path)!
let key : NSString = kSecImportExportPassphrase as NSString
let options : NSDictionary = [key : "123456"] //客戶端證書密碼
//create variable for holding security information
//var privateKeyRef: SecKeyRef? = nil
var items : CFArray?
securityError = SecPKCS12Import(PKCS12Data, options, &items)
if securityError == errSecSuccess {
let certItems:CFArray = items as CFArray!;
let certItemsArray:Array = certItems as Array
let dict:AnyObject? = certItemsArray.first;
if let certEntry:Dictionary = dict as? Dictionary<String, AnyObject> {
// grab the identity
let identityPointer:AnyObject? = certEntry["identity"];
let secIdentityRef:SecIdentityRef = identityPointer as! SecIdentityRef!;
print("\(identityPointer) :::: \(secIdentityRef)")
// grab the trust
let trustPointer:AnyObject? = certEntry["trust"];
let trustRef:SecTrustRef = trustPointer as! SecTrustRef;
print("\(trustPointer) :::: \(trustRef)")
// grab the cert
let chainPointer:AnyObject? = certEntry["chain"];
identityAndTrust = IdentityAndTrust(identityRef: secIdentityRef,
trust: trustRef, certArray: chainPointer!);
}
}
return identityAndTrust;
}
}
//定義一個結構體,存儲認證相關信息
struct IdentityAndTrust {
var identityRef:SecIdentityRef
var trust:SecTrustRef
var certArray:AnyObject
}
控制台打印輸出如下:
4,只使用一個客戶端證書
由於我們使用的是自簽名的證書,那麼對服務器的認證全由客戶端這邊判斷。也就是說其實使用一個客戶端證書“mykey.p12”也是可以的(項目中也只需導入一個證書)。
當對服務器進行驗證的時候,判斷服務主機地址是否正確,是的話信任即可(代碼高亮部分)
import UIKit
import Foundation
class ViewController: UIViewController, NSURLSessionDelegate {
//自簽名網站地址
let selfSignedHosts = ["192.168.1.101", "www.hangge.com"]
override func viewDidLoad() {
super.viewDidLoad()
//獲取數據
httpGet(NSMutableURLRequest(URL: NSURL(string: "https://192.168.1.101:8443")!))
}
// 使用NSURLSession請求數據
func httpGet(request: NSMutableURLRequest!) {
let configuration =
NSURLSessionConfiguration.defaultSessionConfiguration()
let session = NSURLSession(configuration: configuration,
delegate: self, delegateQueue:NSOperationQueue.mainQueue())
let dataTask = session.dataTaskWithRequest(request,
completionHandler: {(data, response, error) -> Void in
if error != nil{
print(error?.code)
print(error?.description)
}else{
let str = NSString(data: data!, encoding: NSUTF8StringEncoding)
print("訪問成功,獲取數據如下:")
print(str)
}
}) as NSURLSessionTask
//使用resume方法啟動任務
dataTask.resume()
}
// 在訪問資源的時候,如果服務器返回需要授權(提供一個NSURLCredential對象)
// 那麼該方法就回被調用(這個是NSURLSessionDelegate代理方法)
func URLSession(session: NSURLSession,
didReceiveChallenge challenge: NSURLAuthenticationChallenge,
completionHandler: (NSURLSessionAuthChallengeDisposition, NSURLCredential?)
-> Void) {
//認證服務器(這裡不使用服務器證書認證,只需地址是我們定義的幾個地址即可信任)
if challenge.protectionSpace.authenticationMethod
== NSURLAuthenticationMethodServerTrust
&& self.selfSignedHosts.contains(challenge.protectionSpace.host) {
print("服務器認證!")
let credential = NSURLCredential(forTrust:
challenge.protectionSpace.serverTrust!)
credential.certificates
completionHandler(.UseCredential, credential)
}
//認證客戶端證書
else if challenge.protectionSpace.authenticationMethod
== NSURLAuthenticationMethodClientCertificate
{
print("客戶端證書認證!")
//獲取客戶端證書相關信息
let identityAndTrust:IdentityAndTrust = self.extractIdentity();
let urlCredential:NSURLCredential = NSURLCredential(
identity: identityAndTrust.identityRef,
certificates: identityAndTrust.certArray as? [AnyObject],
persistence: NSURLCredentialPersistence.ForSession);
completionHandler(.UseCredential, urlCredential);
}
// 其它情況(不接受認證)
else {
print("其它情況(不接受認證)")
completionHandler(.CancelAuthenticationChallenge, nil);
}
}
//獲取客戶端證書相關信息
func extractIdentity() -> IdentityAndTrust {
var identityAndTrust:IdentityAndTrust!
var securityError:OSStatus = errSecSuccess
let path: String = NSBundle.mainBundle().pathForResource("mykey", ofType: "p12")!
let PKCS12Data = NSData(contentsOfFile:path)!
let key : NSString = kSecImportExportPassphrase as NSString
let options : NSDictionary = [key : "123456"] //客戶端證書密碼
//create variable for holding security information
//var privateKeyRef: SecKeyRef? = nil
var items : CFArray?
securityError = SecPKCS12Import(PKCS12Data, options, &items)
if securityError == errSecSuccess {
let certItems:CFArray = items as CFArray!;
let certItemsArray:Array = certItems as Array
let dict:AnyObject? = certItemsArray.first;
if let certEntry:Dictionary = dict as? Dictionary<String, AnyObject> {
// grab the identity
let identityPointer:AnyObject? = certEntry["identity"];
let secIdentityRef:SecIdentityRef = identityPointer as! SecIdentityRef!;
print("\(identityPointer) :::: \(secIdentityRef)")
// grab the trust
let trustPointer:AnyObject? = certEntry["trust"];
let trustRef:SecTrustRef = trustPointer as! SecTrustRef;
print("\(trustPointer) :::: \(trustRef)")
// grab the cert
let chainPointer:AnyObject? = certEntry["chain"];
identityAndTrust = IdentityAndTrust(identityRef: secIdentityRef,
trust: trustRef, certArray: chainPointer!);
}
}
return identityAndTrust;
}
}
//定義一個結構體,存儲認證相關信息
struct IdentityAndTrust {
var identityRef:SecIdentityRef
var trust:SecTrustRef
var certArray:AnyObject
}