iOS開發系列--告訴與音訊機制詳解
概述
在少數挪動使用中任何時分都只能有一個使用順序處於活潑形態,假如其他使用此刻發作了一些用戶感興味的那麼經過告訴機制就可以通知用戶此時發作的事情。IOS中告訴機制又叫音訊機制,其包括兩類:一類是本地告訴;另一類是推送告訴,也叫近程告訴。兩種告訴在IOS中的表現分歧,可以經過橫幅或許彈出提示兩種方式通知用戶,並且點擊告訴可以會翻開使用順序,但是完成原理卻完全不同。明天就和大家一塊去看一下如何在IOS中完成這兩種機制,並且在文章前面會補充告訴中心的內容防止初學者對兩種概念的混雜。
本地告訴
本地告訴是由本地使用觸發的,它是基於時間行為的一種告訴方式,例如鬧鐘定時、待辦事項提示,又或許一個使用在一段時分後不運用通常會提示用戶運用此使用等都是本地告訴。創立一個本地告訴通常分為以下幾個步驟:
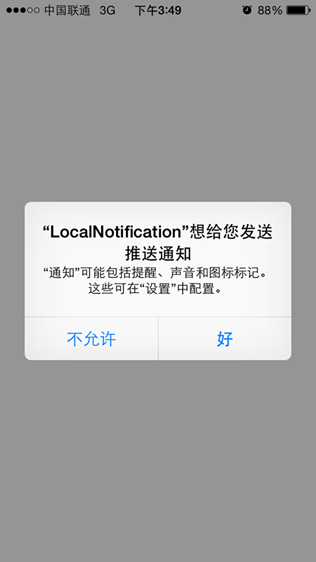
創立UILocalNotification。 設置處置告訴的時間fireDate。 配置告訴的內容:告訴主體、告訴聲響、圖標數字等。 配置告訴傳遞的自定義數據參數userInfo(這一步可選)。 調用告訴,可以運用scheduleLocalNotification:按方案調度一個告訴,也可以運用presentLocalNotificationNow立刻調用告訴。上面就以一個順序更新後用戶臨時沒有運用的提示為例對本地告訴做一個復雜的理解。在這個進程中並沒有牽扯太多的界面操作,一切的邏輯都在AppDelegate中:進入使用後假如沒有注冊告訴,需求首先注冊告訴懇求用戶允許告訴;一旦調用完注冊辦法,無論用戶能否選擇允許告訴此刻都會調用使用順序的- (void)application:(UIApplication *)application didRegisterUserNotificationSettings:(UIUserNotificationSettings *)notificationSettings代理辦法,在這個辦法中依據用戶的選擇:假如是允許告訴則會依照後面的步驟創立告訴並在一定時間後執行。
AppDelegate.m
//
// AppDelegate.m
// LocalNotification
//
// Created by Kenshin Cui on 14/03/28.
// Copyright (c) 2014年 Kenshin Cui. All rights reserved.
//
#import "AppDelegate.h"
#import "KCMainViewController.h"
@interface AppDelegate ()
@end
@implementation AppDelegate
#pragma mark - 使用代理辦法
- (BOOL)application:(UIApplication *)application didFinishLaunchingWithOptions:(NSDictionary *)launchOptions {
_Window=[[UIWindow alloc]initWithFrame:[UIScreen mainScreen].bounds];
_Window.backgroundColor =[UIColor colorWithRed:249/255.0 green:249/255.0 blue:249/255.0 alpha:1];
//設置全局導航條作風和顏色
[[UINavigationBar appearance] setBarTintColor:[UIColor colorWithRed:23/255.0 green:180/255.0 blue:237/255.0 alpha:1]];
[[UINavigationBar appearance] setBarStyle:UIBarStyleBlack];
KCMainViewController *mainController=[[KCMainViewController alloc]init];
_window.rootViewController=mainController;
[_window makeKeyAndVisible];
//假如曾經取得發送告訴的受權則創立本地告訴,否則懇求受權(留意:假如不懇求受權在設置中是沒有對應的告訴設置項的,也就是說假如歷來沒有發送過懇求,即便經過設置也打不開音訊允許設置)
if ([[UIApplication sharedApplication]currentUserNotificationSettings].types!=UIUserNotificationTypeNone) {
[self addLocalNotification];
}else{
[[UIApplication sharedApplication]registerUserNotificationSettings:[UIUserNotificationSettings settingsForTypes:UIUserNotificationTypeAlert|UIUserNotificationTypeBadge|UIUserNotificationTypeSound categories:nil]];
}
return YES;
}
#pragma mark 調用過用戶注冊告訴辦法之後執行(也就是調用完registerUserNotificationSettings:辦法之後執行)
-(void)application:(UIApplication *)application didRegisterUserNotificationSettings:(UIUserNotificationSettings *)notificationSettings{
if (notificationSettings.types!=UIUserNotificationTypeNone) {
[self addLocalNotification];
}
}
#pragma mark 進入前台後設置音訊信息
-(void)applicationWillEnterForeground:(UIApplication *)application{
[[UIApplication sharedApplication]setApplicationIconBadgeNumber:0];//進入前台取消使用音訊圖標
}
#pragma mark - 公有辦法
#pragma mark 添加本地告訴
-(void)addLocalNotification{
//定義本地告訴對象
UILocalNotification *notification=[[UILocalNotification alloc]init];
//設置調用時間
notification.fireDate=[NSDate dateWithTimeIntervalSinceNow:10.0];//告訴觸發的時間,10s當前
notification.repeatInterval=2;//告訴反復次數
//notification.repeatCalendar=[NSCalendar currentCalendar];//以後日歷,運用前最好設置時區等信息以便可以自動同步時間
//設置告訴屬性
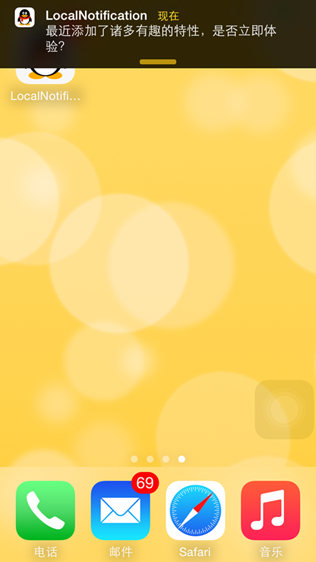
notification.alertBody=@"最近添加了諸多風趣的特性,能否立刻體驗?"; //告訴主體
notification.applicationIconBadgeNumber=1;//使用順序圖標右上角顯示的音訊數
notification.alertAction=@"翻開使用"; //待機界面的滑動舉措提示
notification.alertLaunchImage=@"Default";//經過點擊告訴翻開使用時的啟動圖片,這裡運用順序啟動圖片
//notification.soundName=UILocalNotificationDefaultSoundName;//收到告訴時播放的聲響,默許音訊聲響
notification.soundName=@"msg.caf";//告訴聲響(需求真機才干聽到聲響)
//設置用戶信息
notification.userInfo=@{@"id":@1,@"user":@"Kenshin Cui"};//綁定到告訴上的其他附加信息
//調用告訴
[[UIApplication sharedApplication] scheduleLocalNotification:notification];
}
#pragma mark 移除本地告訴,在不需求此告訴時記得移除
-(void)removeNotification{
[[UIApplication sharedApplication] cancelAllLocalNotifications];
}
@end
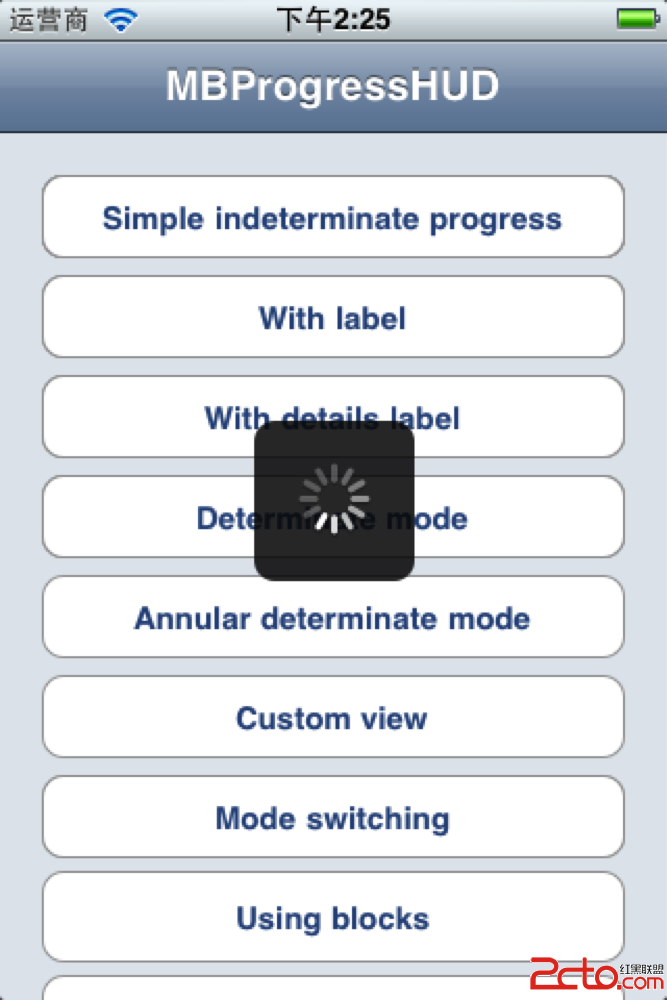
懇求取得用戶允許告訴的效果:
使用加入到後彈出告訴的效果:
鎖屏形態下的告訴效果(從這個界面可以看到alertAction配置為“翻開使用”):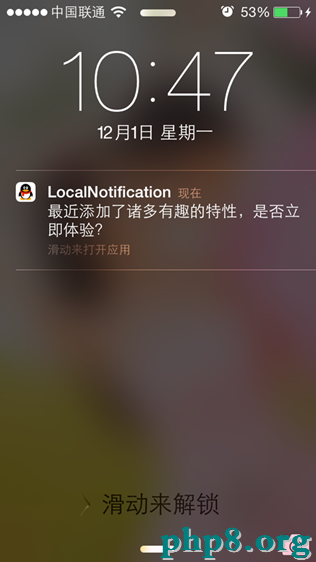
留意:
在運用告訴之前必需注冊告訴類型,假如用戶不允許使用順序發送告訴,則當前就無法發送告訴,除非用戶手動到iOS設置中翻開告訴。 本地告訴是有操作零碎一致調度的,只要在使用加入到後台或許封閉才干收到告訴。(留意:這一點關於前面的推送告訴也是完全適用的。 ) 告訴的聲響是由iOS零碎播放的,格式必需是Linear PCM、MA4(IMA/ADPCM)、µLaw、aLaw中的一種,並且播放時間必需在30s內,否則將被零碎聲響交換,同時自定義聲響文件必需放到main boundle中。 本地告訴的數量是無限制的,最近的本地告訴最多只能有64個,超越這個數量將被零碎疏忽。 假如想要移除本地告訴可以調用UIApplication的cancelLocalNotification:或cancelAllLocalNotifications移除指定告訴或一切告訴。從下面的順序可以看到userInfo這個屬性我們設置了參數,那麼這個參數如何接納呢?
在iOS中假如點擊一個彈出告訴(或許鎖屏界面滑動檢查告訴),默許會自動翻開以後使用。由於告訴由零碎調度那麼此時進入使用有兩種狀況:假如使用順序曾經完全加入那麼此時會調用- (BOOL)application:(UIApplication *)application didFinishLaunchingWithOptions:(NSDictionary *)launchOptions辦法;假如此時使用順序還在運轉(無論是在前台還是在後台)則會調用-(void)application:(UIApplication *)application didReceiveLocalNotification:(UILocalNotification *)notification辦法接納音訊參數。當然假如是後者自然不用多說,由於參數中曾經可以拿到notification對象,只需讀取userInfo屬性即可。假如是前者的話則可以訪問launchOptions中鍵為UIApplicationLaunchOptionsLocalNotificationKey的對象,這個對象就是發送的告訴,由此對象再去訪問userInfo。為了演示這個進程在上面的順序中將userInfo的內容寫入文件以便模仿封閉順序後再經過點擊告訴翻開使用獲取userInfo的進程。
AppDelegate.m
//
// AppDelegate.m
// LocalNotification
//
// Created by Kenshin Cui on 14/03/28.
// Copyright (c) 2014年 Kenshin Cui. All rights reserved.
//

#import "AppDelegate.h"
#import "KCMainViewController.h"

@interface AppDelegate ()

@end

@implementation AppDelegate

#pragma mark - 使用代理辦法
- (BOOL)application:(UIApplication *)application didFinishLaunchingWithOptions:(NSDictionary *)launchOptions {

  _window=[[UIWindow alloc]initWithFrame:[UIScreen mainScreen].bounds];

  _window.backgroundColor =[UIColor colorWithRed:249/255.0 green:249/255.0 blue:249/255.0 alpha:1];

  //設置全局導航條作風和顏色
  [[UINavigationBar appearance] setBarTintColor:[UIColor colorWithRed:23/255.0 green:180/255.0 blue:237/255.0 alpha:1]];
  [[UINavigationBar appearance] setBarStyle:UIBarStyleBlack];

  KCMainViewController *mainController=[[KCMainViewController alloc]init];
  _window.rootViewController=mainController;

  [_window makeKeyAndVisible];

  //添加告訴
  [self addLocalNotification];

  //接納告訴參數
  UILocalNotification *notification=[launchOptions valueForKey:UIApplicationLaunchOptionsLocalNotificationKey];
  NSDictionary *userInfo= notification.userInfo;

  [userInfo writeToFile:@"/Users/kenshincui/Desktop/didFinishLaunchingWithOptions.txt" atomically:YES];
  NSLog(@"didFinishLaunchingWithOptions:The userInfo is %@.",userInfo);

  return YES;
}

#pragma mark 接納本地告訴時觸發
-(void)application:(UIApplication *)application didReceiveLocalNotification:(UILocalNotification *)notification{
  NSDictionary *userInfo=notification.userInfo;
  [userInfo writeToFile:@"/Users/kenshincui/Desktop/didReceiveLocalNotification.txt" atomically:YES];
  NSLog(@"didReceiveLocalNotification:The userInfo is %@",userInfo);
}

#pragma mark 調用過用戶注冊告訴辦法之後執行(也就是調用完registerUserNotificationSettings:辦法之後執行)
-(void)application:(UIApplication *)application didRegisterUserNotificationSettings:(UIUserNotificationSettings *)notificationSettings{
  if (notificationSettings.types!=UIUserNotificationTypeNone) {
    [self addLocalNotification];
  }
}

#pragma mark 進入前台後設置音訊信息
-(void)applicationWillEnterForeground:(UIApplication *)application{
  [[UIApplication sharedApplication]setApplicationIconBadgeNumber:0];//進入前台取消使用音訊圖標
}

#pragma mark - 公有辦法
#pragma mark 添加本地告訴
-(void)addLocalNotification{

  //定義本地告訴對象
  UILocalNotification *notification=[[UILocalNotification alloc]init];
  //設置調用時間
  notification.fireDate=[NSDate dateWithTimeIntervalSinceNow:10.0];//告訴觸發的時間,10s當前
  notification.repeatInterval=2;//告訴反復次數
  //notification.repeatCalendar=[NSCalendar currentCalendar];//以後日歷,運用前最好設置時區等信息以便可以自動同步時間

  //設置告訴屬性
  notification.alertBody=@"最近添加了諸多風趣的特性,能否立刻體驗?"; //告訴主體
  notification.applicationIconBadgeNumber=1;//使用順序圖標右上角顯示的音訊數
  notification.alertAction=@"翻開使用"; //待機界面的滑動舉措提示
  notification.alertLaunchImage=@"Default";//經過點擊告訴翻開使用時的啟動圖片
  //notification.soundName=UILocalNotificationDefaultSoundName;//收到告訴時播放的聲響,默許音訊聲響
  notification.soundName=@"msg.caf";//告訴聲響(需求真機)

  //設置用戶信息
  notification.userInfo=@{@"id":@1,@"user":@"Kenshin Cui"};//綁定到告訴上的其他額定信息

  //調用告訴
  [[UIApplication sharedApplication] scheduleLocalNotification:notification];
}
@end
下面的順序可以分為兩種狀況去運轉:一種是啟動順序封閉順序,等到接納到告訴之後點擊告訴重新進入順序;另一種是啟動順序後,進入後台(其真實前台也可以,但是為了分明的體驗這個進程建議進入後台),接納到告訴後點擊告訴進入使用。另種狀況會辨別依照後面說的狀況調用不同的辦法接納到userInfo寫入本地文件零碎。有了userInfo普通來說就可以依據這個信息停止一些處置,例如可以依據不同的參數信息導航到不同的界面,假定是更新的告訴則可以導航到更新內容界面等。
推送告訴
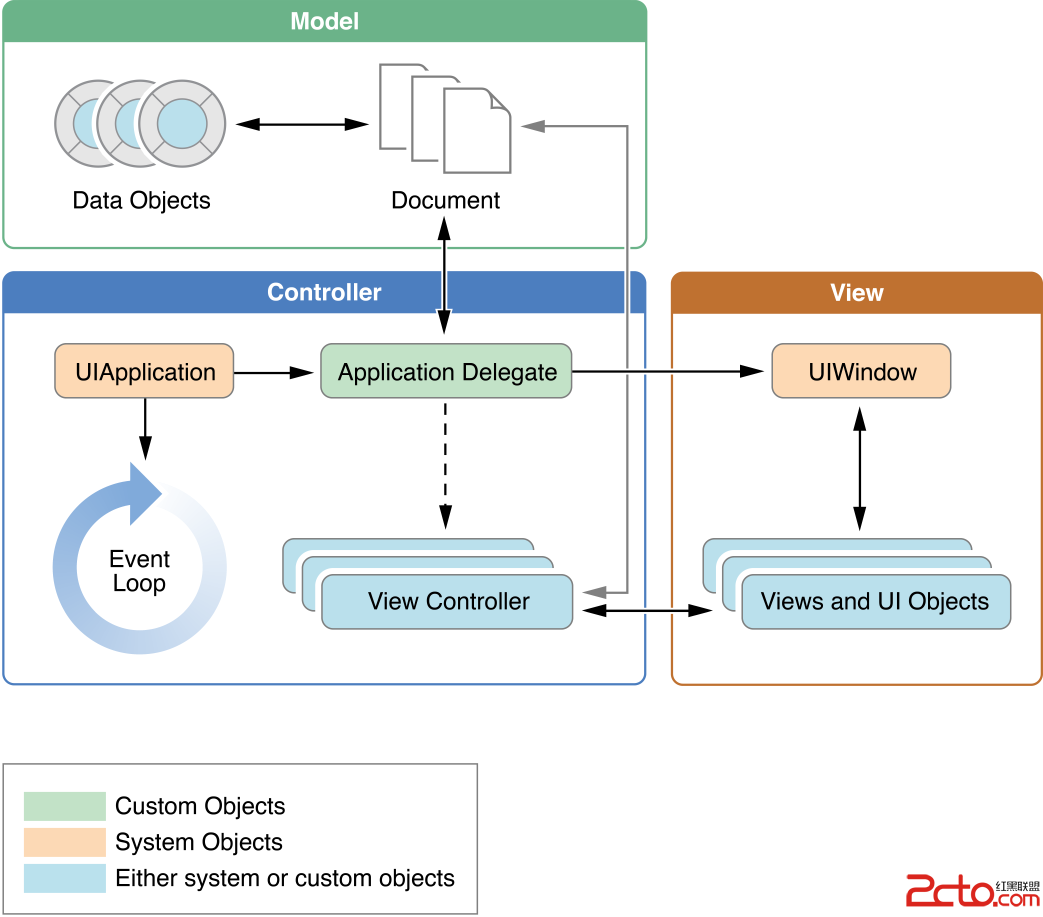
和本地告訴不同,推送告訴是由使用服務提供商發起的,經過蘋果的APNs(Apple Push Notification Server)發送到使用客戶端。上面是蘋果官方關於推送告訴的進程表示圖:
 推送告訴的進程可以分為以下幾步:
-
使用服務提供商從服務器端把要發送的音訊和設備令牌(device token)發送給蘋果的音訊推送服務器APNs。
APNs依據設備令牌在已注冊的設備(iPhone、iPad、iTouch、mac等)查找對應的設備,將音訊發送給相應的設備。
客戶端設備接將接納到的音訊傳遞給相應的使用順序,使用順序依據用戶設置彈出告訴音訊。
當然,這只是一個復雜的流程,有了這個流程我們還無從下手編寫順序,將下面的流程細化可以失掉如下流程圖(圖片來自互聯網),在這個進程中會也會提到如何在順序中完成這些步驟:
1.使用順序注冊APNs推送音訊。
闡明:
a.只要注冊過的使用才有能夠接納到音訊,順序中通常經過UIApplication的registerUserNotificationSettings:辦法注冊,iOS8中告訴注冊的辦法發作了改動,假如是iOS7及之前版本的iOS請參考其他代碼。
b.注冊之前有兩個前提條件必需預備好:開發配置文件(provisioning profile,也就是.mobileprovision後綴的文件)的App ID不能運用通配ID必需運用指定APP ID並且生成配置文件中選擇Push Notifications服務,普通的開發配置文件無法完成注冊;使用順序的Bundle Identifier必需和生成配置文件運用的APP ID完全分歧。
2.iOS從APNs接納device token,在使用順序獲取device token。
闡明:
a.在UIApplication的-(void)application:(UIApplication *)application didRegisterForRemoteNotificationsWithDeviceToken:(NSData *)deviceToken代理辦法中獲取令牌,此辦法發作在注冊之後。
b.假如無法正確取得device token可以在UIApplication的-(void)application:(UIApplication *)application didFailToRegisterForRemoteNotificationsWithError:(NSError *)error代理辦法中檢查詳細錯誤信息,此辦法發作在獲取device token失敗之後。
c.必需真機調試,模仿器無法獲取device token。
3.iOS使用將device token發送給使用順序提供商,通知服務器端以後設備允許接納音訊。
闡明:
a.device token的生成算法只要Apple掌握,為了確保算法發作變化後依然可以正常接納服務器端發送的告訴,每次使用順序啟動都重新取得device token(留意:device token的獲取不會形成功能問題,蘋果官方曾經做過優化)。
b.通常可以創立一個網絡銜接發送給使用順序提供商的服務器端, 在這個進程中最好將上一次取得的device token存儲起來,防止反復發送,一旦發現device token發作了變化最好將原有的device token一塊發送給服務器端,服務器端刪除原有令牌存儲新令牌防止服務器端發送有效音訊。
4.使用順序提供商在服務器端依據後面發送過去的device token組織信息發送給APNs。
闡明:
a.發送時指定device token和音訊內容,並且完全依照蘋果官方的音訊格式組織音訊內容,通常狀況下可以借助其他第三方音訊推送框架來完成。
5.APNs依據音訊中的device token查找已注冊的設備推送音訊。
闡明:
a.正常狀況下可以依據device token將音訊成功推送到客戶端設備中,但是也不掃除用戶卸載順序的狀況,此時推送音訊失敗,APNs會將這個錯誤音訊告訴服務器端以防止資源糜費(服務器端此時可以依據錯誤刪除曾經存儲的device token,下次不再發送)。
上面將復雜演示一下推送告訴的復雜流程:
首先,看一下iOS客戶端代碼:
//
// AppDelegate.m
// pushnotification
//
// Created by Kenshin Cui on 14/03/27.
// Copyright (c) 2014年 Kenshin Cui. All rights reserved.
//

#import "AppDelegate.h"
#import "KCMainViewController.h"

@interface AppDelegate ()

@end

@implementation AppDelegate

#pragma mark - 使用順序代理辦法
#pragma mark 使用順序啟動之後
- (BOOL)application:(UIApplication *)application didFinishLaunchingWithOptions:(NSDictionary *)launchOptions {

  _window=[[UIWindow alloc]initWithFrame:[UIScreen mainScreen].bounds];

  _window.backgroundColor =[UIColor colorWithRed:249/255.0 green:249/255.0 blue:249/255.0 alpha:1];

  //設置全局導航條作風和顏色
  [[UINavigationBar appearance] setBarTintColor:[UIColor colorWithRed:23/255.0 green:180/255.0 blue:237/255.0 alpha:1]];
  [[UINavigationBar appearance] setBarStyle:UIBarStyleBlack];

  KCMainViewController *mainController=[[KCMainViewController alloc]init];
  _window.rootViewController=mainController;

  [_window makeKeyAndVisible];

  //注冊推送告訴(留意iOS8注冊辦法發作了變化)
  [application registerUserNotificationSettings:[UIUserNotificationSettings settingsForTypes:UIUserNotificationTypeAlert|UIUserNotificationTypeBadge|UIUserNotificationTypeSound categories:nil]];
  [application registerForRemoteNotifications];

  return YES;
}
#pragma mark 注冊推送告訴之後
//在此接納設備令牌
-(void)application:(UIApplication *)application didRegisterForRemoteNotificationsWithDeviceToken:(NSData *)deviceToken{
  [self addDeviceToken:deviceToken];
  NSLog(@"device token:%@",deviceToken);
}

#pragma mark 獲取device token失敗後
-(void)application:(UIApplication *)application didFailToRegisterForRemoteNotificationsWithError:(NSError *)error{
  NSLog(@"didFailToRegisterForRemoteNotificationsWithError:%@",error.localizedDescription);
  [self addDeviceToken:nil];
}

#pragma mark 接納到推送告訴之後
-(void)application:(UIApplication *)application didReceiveRemoteNotification:(NSDictionary *)userInfo{
  NSLog(@"receiveRemoteNotification,userInfo is %@",userInfo);
}

#pragma mark - 公有辦法
/**
 * 添加設備令牌到服務器端
 *
 * @param deviceToken 設備令牌
 */
-(void)addDeviceToken:(NSData *)deviceToken{
  NSString *key=@"DeviceToken";
  NSData *oldToken= [[NSUserDefaults standardUserDefaults]objectForKey:key];
  //假如偏好設置中的已存儲設備令牌和新獲取的令牌不同則存儲新令牌並且發送給服務器端
  if (![oldToken isEqualToData:deviceToken]) {
    [[NSUserDefaults standardUserDefaults] setObject:deviceToken forKey:key];
    [self sendDeviceTokenWidthOldDeviceToken:oldToken newDeviceToken:deviceToken];
  }
}

-(void)sendDeviceTokenWidthOldDeviceToken:(NSData *)oldToken newDeviceToken:(NSData *)newToken{
  //留意一定確保真機可以正常訪問上面的地址
  NSString *urlStr=@"http://192.168.1.101/RegisterDeviceToken.aspx";
  urlStr=[urlStr stringByAddingPercentEscapesUsingEncoding:NSUTF8StringEncoding];
  NSURL *url=[NSURL URLWithString:urlStr];
  NSMutableURLRequest *requestM=[NSMutableURLRequest requestWithURL:url cachePolicy:0 timeoutInterval:10.0];
  [requestM setHTTPMethod:@"POST"];
  NSString *bodyStr=[NSString stringWithFormat:@"oldToken=%@&newToken=%@",oldToken,newToken];
  NSData *body=[bodyStr dataUsingEncoding:NSUTF8StringEncoding];
  [requestM setHTTPBody:body];
  NSURLSession *session=[NSURLSession sharedSession];
  NSURLSessionDataTask *dataTask= [session dataTaskWithRequest:requestM completionHandler:^(NSData *data, NSURLResponse *response, NSError *error) {
    if (error) {
      NSLog(@"Send failure,error is :%@",error.localizedDescription);
    }else{
      NSLog(@"Send Success!");
    }

  }];
  [dataTask resume];
}
@end
iOS客戶端代碼的代碼比擬復雜,注冊推送告訴,獲取device token存儲到偏好設置中,並且假如新獲取的device token不同於偏好設置中存儲的數據則發送給服務器端,更新服務器端device token列表。
其次,由於device token需求發送給服務器端,這裡運用一個Web使用作為服務器端接納device token,這裡運用了asp.NET順序來處置令牌接納注冊任務,當然你運用其他技術異樣沒有問題。上面是對應的後台代碼:
using System;
using System.Collections.Generic;
using System.Web;
using System.Web.UI;
using System.Web.UI.WebControls;
using CMJ.Framework.Data;

namespace WebServer
{
  public partial class RegisterDeviceToken : System.Web.UI.Page
  {
    private string _appID = @"com.cmjstudio.pushnotification";
    private SqlHelper _helper = new SqlHelper();
    protected void Page_Load(object sender, EventArgs e)
    {
      try
      {
        string oldToken = Request["oldToken"] + "";
        string newToken = Request["newToken"] + "";
        string sql = "";
        //假如傳遞舊的設備令牌則刪除舊令牌添加新令牌
        if (oldToken != "")
        {
          sql = string.Format("DELETE FROM dbo.Device WHERE AppID='{0}' AND DeviceToken='{1}';", _appID, oldToken);
        }
        sql += string.Format(@"IF NOT EXISTS (SELECT ID FROM dbo.Device WHERE AppID='{0}' AND DeviceToken='{1}')
                    INSERT INTO dbo.Device ( AppID, DeviceToken ) VALUES ( N'{0}', N'{1}');", _appID, newToken);
        _helper.ExecuteNonQuery(sql);
        Response.Write("注冊成功!");
      }
      catch(Exception ex)
      {
        Response.Write("注冊失敗,錯誤概況:"+ex.ToString());
      }
    }
  }
}
這個進程次要就是保管device token到數據庫中,當然假如同時傳遞舊的設備令牌還需求先刪除就的設備令牌,這裡復雜的在數據庫中創立了一張Device表來保管設備令牌,其中記載了使用順序Id和設備令牌。
第三步就是服務器端發送音訊,假如要給APNs發送音訊就必需依照Apple的規范音訊格式組織音訊內容。但是好在目前曾經有很多開源的第三方類庫供我們運用,詳細音訊如何包裝完全不必自己組織,這裡運用一個開源的類庫Push Sharp來給APNs發送音訊 ,除了可以給Apple設備推送音訊,Push Sharp還支持Android、Windows Phone等多種設備,更多詳細內容大家可以參照官方闡明。後面說過假如要開發音訊推送使用不能運用普通的開發配置文件,這裡還需求留意:假如服務器端要給APNs發送音訊其秘鑰也必需是經過APNs Development iOS類型的證書來導出的,普通的iOS Development 類型的證書導出的秘鑰無法用作服務器端發送秘鑰。上面經過在一個復雜的WinForm順序中調用Push Sharp給APNs發送音訊,這裡讀取之前Device表中的一切設備令牌循環發送音訊:
using System;
using System.IO;
using System.Collections.Generic;
using System.ComponentModel;
using System.Data;
using System.Drawing;
using System.Text;
using System.Windows.Forms;
using PushSharp;
using PushSharp.Apple;
using CMJ.Framework.Data;
using CMJ.Framework.Logging;
using CMJ.Framework.Windows.Forms;

namespace PushNotificationServer
{
  public partial class frmMain : PersonalizeForm
  {
    private string _appID = @"com.cmjstudio.pushnotification";
    private SqlHelper _helper = new SqlHelper();
    public frmMain()
    {
      InitializeComponent();
    }

    private void btnClose_Click(object sender, EventArgs e)
    {
      this.Close();
    }

    private void btnSend_Click(object sender, EventArgs e)
    {
      List<string> deviceTokens = GetDeviceToken();
      SendMessage(deviceTokens, tbMessage.Text);
    }

    #region 發送音訊
    /// <summary>
    /// 獲得一切設備令牌
    /// </summary>
    /// <returns>設備令牌</returns>
    private List<string> GetDeviceToken()
    {
      List<string> deviceTokens = new List<string>();
      string sql = string.Format("SELECT DeviceToken FROM dbo.Device WHERE AppID='{0}'",_appID);
      DataTable dt = _helper.GetDataTable(sql);
      if(dt.Rows.Count>0)
      {
        foreach(DataRow dr in dt.Rows)
        {
          deviceTokens.Add((dr["DeviceToken"]+"").TrimStart('<').TrimEnd('>').Replace(" ",""));
        }
      }
      return deviceTokens;
    }

    /// <summary>
    /// 發送音訊
    /// </summary>
    /// <param name="deviceToken">設備令牌</param>
    /// <param name="message">音訊內容</param>
    private void SendMessage(List<string> deviceToken, string message)
    {
      //創立推送對象
      var pusher = new PushBroker();
      pusher.OnNotificationSent += pusher_OnNotificationSent;//發送成功事情
      pusher.OnNotificationFailed += pusher_OnNotificationFailed;//發送失敗事情
      pusher.OnChannelCreated += pusher_OnChannelCreated;
      pusher.OnChannelDestroyed += pusher_OnChannelDestroyed;
      pusher.OnChannelException += pusher_OnChannelException;
      pusher.OnDeviceSubscriptionChanged += pusher_OnDeviceSubscriptionChanged;
      pusher.OnDeviceSubscriptionExpired += pusher_OnDeviceSubscriptionExpired;
      pusher.OnNotificationRequeue += pusher_OnNotificationRequeue;
      pusher.OnServiceException += pusher_OnServiceException;
      //注冊推送服務
      byte[] certificateData = File.ReadAllBytes(@"E:\KenshinCui_Push.p12");
      pusher.RegisterAppleService(new ApplePushChannelSettings(certificateData, "123"));
      foreach (string token in deviceToken)
      {
        //給指定設備發送音訊
        pusher.QueueNotification(new AppleNotification()
          .ForDeviceToken(token)
          .WithAlert(message)
          .WithBadge(1)
          .WithSound("default"));
      }
    }

    void pusher_OnServiceException(object sender, Exception error)
    {
      Console.WriteLine("音訊發送失敗,錯誤概況:" + error.ToString());
      PersonalizeMessageBox.Show(this, "音訊發送失敗,錯誤概況:" + error.ToString(), "零碎提示");
    }

    void pusher_OnNotificationRequeue(object sender, PushSharp.Core.NotificationRequeueEventArgs e)
    {
      Console.WriteLine("pusher_OnNotificationRequeue");
    }

    void pusher_OnDeviceSubscriptionExpired(object sender, string expiredSubscriptionId, DateTime expirationDateUtc, PushSharp.Core.INotification notification)
    {
      Console.WriteLine("pusher_OnDeviceSubscriptionChanged");
    }

    void pusher_OnDeviceSubscriptionChanged(object sender, string oldSubscriptionId, string newSubscriptionId, PushSharp.Core.INotification notification)
    {
      Console.WriteLine("pusher_OnDeviceSubscriptionChanged");
    }

    void pusher_OnChannelException(object sender, PushSharp.Core.IPushChannel pushChannel, Exception error)
    {
      Console.WriteLine("音訊發送失敗,錯誤概況:" + error.ToString());
      PersonalizeMessageBox.Show(this, "音訊發送失敗,錯誤概況:" + error.ToString(), "零碎提示");
    }

    void pusher_OnChannelDestroyed(object sender)
    {
      Console.WriteLine("pusher_OnChannelDestroyed");
    }

    void pusher_OnChannelCreated(object sender, PushSharp.Core.IPushChannel pushChannel)
    {
      Console.WriteLine("pusher_OnChannelCreated");
    }

    void pusher_OnNotificationFailed(object sender, PushSharp.Core.INotification notification, Exception error)
    {
      Console.WriteLine("音訊發送失敗,錯誤概況:" + error.ToString());
      PersonalizeMessageBox.Show(this, "音訊發送失敗,錯誤概況:"+error.ToString(), "零碎提示");
    }

    void pusher_OnNotificationSent(object sender, PushSharp.Core.INotification notification)
    {
      Console.WriteLine("音訊發送成功!");
      PersonalizeMessageBox.Show(this, "音訊發送成功!", "零碎提示");
    }
    #endregion
  }
}
服務器端音訊發送使用運轉效果:

iOS客戶端接納的音訊的效果:
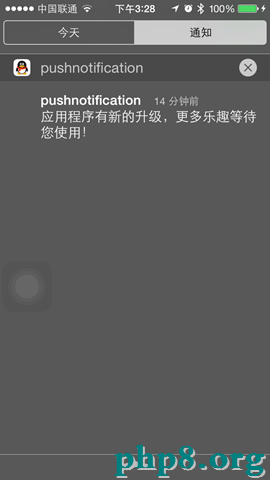
到目前為止經過服務器端使用可以順利發送音訊給APNs並且iOS使用曾經成功接納推送音訊。
補充--iOS開發證書、秘鑰
iOS開發進程中假如需求停止真機調試、發布需求注冊請求很多證書,關於初學者往往困惑不解,再加上明天的文章中會牽扯到一些特殊配置,這裡就復雜的對iOS開發的常用證書和秘鑰等做一闡明。
證書
iOS常用的證書包括開發證書和發布證書,無論是真機調試還是最終發布使用到App Store這兩個證書都是必需的,它是iOS開發的根本證書。
a.開發證書:開發證書又分為普通開發證書和推送證書,假如僅僅是普通的使用則前者即可滿足,但是假如開發推送使用則必需運用推送證書。
b.發布證書:發布證書又可以分為普通發布證書、推送證書、Pass Type ID證書、站點發布證書、VoIP服務證書、蘋果領取證書。異樣的,關於需求運用特殊服務的使用則必需選擇對應的證書。
使用標識
App ID,使用順序的獨一標識,對應iOS使用的Bundle Identifier,App ID在蘋果開發者中心中分為通配使用ID和明白的使用ID,前者普通用於普通使用開發,一個ID可以適用於多個不同標識的使用;但是關於運用音訊推送、Passbook、站點發布、iCloud等服務的使用必需配置明白的使用ID。
設備標識
UDID,用於標識每一台硬件設備的標示符。留意它不是device token,device token是依據UDID運用一個只要Apple自己才知道的算法生成的一組標示符。
配置簡介
Provisioning Profiles,平常又稱為PP文件。將UDID、App ID、開發證書打包在一同的配置文件,異樣分為開發和發布兩類配置文件。
秘鑰
在請求開發證書時必需要首先提交一個秘鑰懇求文件,關於生成秘鑰懇求文件的mac,假如要做開發則只需求下載證書和配置簡介即可開發。但是假如要想在其他機器上做開發則必需將證書中的秘鑰導出(導出之後是一個.p12文件),然後導入其他機器。同時關於相似於推送服務器端使用假如要給APNs發送音訊,異樣需求運用.p12秘鑰文件,並且這個秘鑰文件需求是推送證書導出的對應秘鑰。
補充--告訴中心
關於很多初學者往往會把iOS中的本地告訴、推送告訴和iOS告訴中心的概念弄混。其實二者之間並沒有任何關系,現實上它們都不屬於一個框架,前者屬於UIKit框架,後者屬於Foundation框架。
告訴中心實踐上是iOS順序外部之間的一種音訊播送機制,次要為理解決使用順序外部不同對象之間解耦而設計。它是基於察看者形式設計的,不能跨使用順序進程通訊,當告訴中心接納到音訊之後會依據外部的音訊轉發表,將音訊發送給訂閱者。上面是一個復雜的流程表示圖: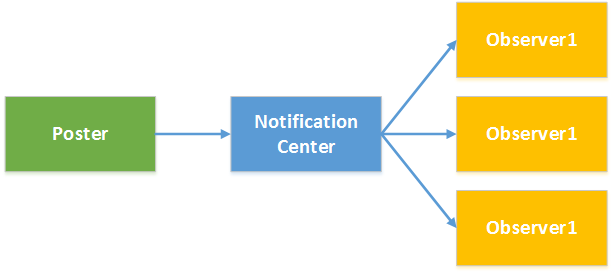
理解告訴中心需求熟習NSNotificationCenter和NSNotification兩個類:
NSNotificationCenter:是告訴零碎的中心,用於注冊和發送告訴,下表列出常用的辦法。
observer:監聽者
selector:監聽辦法(監聽者監聽到告訴後執行的辦法)
name:監聽的告訴稱號
object:告訴的發送者(假如指定nil則監聽任何對象發送的告訴)
- (id <NSObject>)addObserverForName:(NSString *)name object:(id)obj queue:(NSOperationQueue *)queue usingBlock:(void (^)(NSNotification *note))block
添加監聽,參數:
name:監聽的告訴稱號
object:告訴的發送者(假如指定nil則監聽任何對象發送的告訴)
queue:操作隊列,假如制定非客隊線程隊列則可以異步執行block
block:監聽到告訴後執行的操作
- (void)postNotification:(NSNotification *)notification
發送告訴,參數:
notification:告訴對象
- (void)postNotificationName:(NSString *)aName object:(id)anObject
發送告訴,參數:
aName:告訴稱號
anObject:告訴發送者
- (void)postNotificationName:(NSString *)aName object:(id)anObject userInfo:(NSDictionary *)aUserInfo
發送告訴,參數:
aName:告訴稱號
anObject:告訴發送者
aUserInfo:告訴參數
- (void)removeObserver:(id)observer
移除監聽,參數:
observer:監聽對象
- (void)removeObserver:(id)observer name:(NSString *)aName object:(id)anObject
移除監聽,參數:
observer:監聽對象
aName:告訴稱號
anObject:告訴發送者
NSNotification:代表告訴內容的載體,次要有三個屬性:name代表告訴稱號,object代表告訴的發送者,userInfo代表告訴的附加信息。
雖然後面的文章中從未提到過告訴中心,但是其實告訴中心我們並不生疏,後面文章中很多內容都是經過告訴中心來停止使用中各個組件通訊的,只是沒有獨自拿出來說而已。例如後面的文章中討論的使用順序生命周期問題,當使用順序啟動後、進入後台、進入前台、取得焦點、得到焦點,窗口大小改動、隱藏等都會發送告訴。這個告訴可以經過後面NSNotificationCenter停止訂閱即可接納對應的音訊,上面的示例演示了如何添加監聽取得UIApplication的進入後台和取得焦點的告訴:
//
// KCMainViewController.m
// NotificationCenter
//
// Created by Kenshin Cui on 14/03/27.
// Copyright (c) 2014年 cmjstudio. All rights reserved.
//

#import "KCMainViewController.h"

@interface KCMainViewController ()

@end

@implementation KCMainViewController

- (void)viewDidLoad {
  [super viewDidLoad];

  [self addObserverToNotificationCenter];

}

#pragma mark 添加監聽
-(void)addObserverToNotificationCenter{
  /*添加使用順序進入後台監聽
   * observer:監聽者
   * selector:監聽辦法(監聽者監聽到告訴後執行的辦法)
   * name:監聽的告訴稱號(上面的UIApplicationDidEnterBackgroundNotification是一個常量)
   * object:告訴的發送者(假如指定nil則監聽任何對象發送的告訴)
   */
  [[NSNotificationCenter defaultCenter] addObserver:self selector:@selector(applicationEnterBackground) name:UIApplicationDidEnterBackgroundNotification object:[UIApplication sharedApplication]];

  /* 添加使用順序取得焦點的告訴監聽
   * name:監聽的告訴稱號
   * object:告訴的發送者(假如指定nil則監聽任何對象發送的告訴)
   * queue:操作隊列,假如制定非客隊線程隊列則可以異步執行block
   * block:監聽到告訴後執行的操作
   */
  NSOperationQueue *operationQueue=[[NSOperationQueue alloc]init];
  [[NSNotificationCenter defaultCenter] addObserverForName:UIApplicationDidBecomeActiveNotification object:[UIApplication sharedApplication] queue:operationQueue usingBlock:^(NSNotification *note) {
    NSLog(@"Application become active.");
  }];
}

#pragma mark 使用順序啟動監聽辦法
-(void)applicationEnterBackground{
  NSLog(@"Application enter background.");
}
@end
當然很多時分運用告訴中心是為了添加自定義告訴,並取得自定義告訴音訊。在後面的文章“iOS開發系列--視圖切換”中提到過如何停止多視圖之間參數傳遞,其實應用自定義告訴也可以停止參數傳遞。通常一個使用登錄後會顯示用戶信息,而登錄信息可以經過登錄界面獲取。上面就以這樣一種場景為例,在主界面中添加監聽,在登錄界面發送告訴,一旦登錄成功將向告訴中心發送成功登錄的告訴,此時主界面中由於曾經添加告訴監聽所以會收到告訴並更新UI界面。
主界面KCMainViewController.m:
//
// KCMainViewController.m
// NotificationCenter
//
// Created by Kenshin Cui on 14/03/27
// Copyright (c) 2014年 cmjstudio. All rights reserved.
//

#import "KCMainViewController.h"
#import "KCLoginViewController.h"
#define UPDATE_LGOGIN_INFO_NOTIFICATION @"updateLoginInfo"

@interface KCMainViewController (){
  UILabel *_lbLoginInfo;
  UIButton *_btnLogin;
}

@end

@implementation KCMainViewController

- (void)viewDidLoad {
  [super viewDidLoad];

  [self setupUI];
}

-(void)setupUI{
  UILabel *label =[[UILabel alloc]initWithFrame:CGRectMake(0, 100,320 ,30)];
  label.textAlignment=NSTextAlignmentCenter;
  label.textColor=[UIColor colorWithRed:23/255.0 green:180/255.0 blue:237/255.0 alpha:1];
  _lbLoginInfo=label;
  [self.view addSubview:label];

  UIButton *button=[UIButton buttonWithType:UIButtonTypeSystem];
  button.frame=CGRectMake(60, 200, 200, 25);
  [button setTitle:@"登錄" forState:UIControlStateNormal];
  [button addTarget:self action:@selector(loginOut) forControlEvents:UIControlEventTouchUpInside];
  _btnLogin=button;

  [self.view addSubview:button];
}

-(void)loginOut{
  //添加監聽
  [self addObserverToNotification];

  KCLoginViewController *loginController=[[KCLoginViewController alloc]init];

  [self presentViewController:loginController animated:YES completion:nil];
}

/**
 * 添加監聽
 */
-(void)addObserverToNotification{
  [[NSNotificationCenter defaultCenter] addObserver:self selector:@selector(updateLoginInfo:) name:UPDATE_LGOGIN_INFO_NOTIFICATION object:nil];
}

/**
 * 更新登錄信息,留意在這裡可以取得告訴對象並且讀取附加信息
 */
-(void)updateLoginInfo:(NSNotification *)notification{
  NSDictionary *userInfo=notification.userInfo;
  _lbLoginInfo.text=userInfo[@"loginInfo"];
  _btnLogin.titleLabel.text=@"登記";
}

-(void)dealloc{
  //移除監聽
  [[NSNotificationCenter defaultCenter] removeObserver:self];
}
@end
登錄界面KCLoginViewController.m:

//
// KCLoginViewController.m
// NotificationCenter
//
// Created by Kenshin Cui on 14/03/27.
// Copyright (c) 2014年 cmjstudio. All rights reserved.
//

#import "KCLoginViewController.h"
#define UPDATE_LGOGIN_INFO_NOTIFICATION @"updateLoginInfo"

@interface KCLoginViewController (){
  UITextField *_txtUserName;
  UITextField *_txtPassword;
}

@end

@implementation KCLoginViewController

- (void)viewDidLoad {
  [super viewDidLoad];

  [self setupUI];
}

/**
 * UI規劃
 */
-(void)setupUI{
  //用戶名
  UILabel *lbUserName=[[UILabel alloc]initWithFrame:CGRectMake(50, 150, 100, 30)];
  lbUserName.text=@"用戶名:";
  [self.view addSubview:lbUserName];

  _txtUserName=[[UITextField alloc]initWithFrame:CGRectMake(120, 150, 150, 30)];
  _txtUserName.borderStyle=UITextBorderStyleRoundedRect;
  [self.view addSubview:_txtUserName];

  //密碼
  UILabel *lbPassword=[[UILabel alloc]initWithFrame:CGRectMake(50, 200, 100, 30)];
  lbPassword.text=@"密碼:";
  [self.view addSubview:lbPassword];

  _txtPassword=[[UITextField alloc]initWithFrame:CGRectMake(120, 200, 150, 30)];
  _txtPassword.secureTextEntry=YES;
  _txtPassword.borderStyle=UITextBorderStyleRoundedRect;
  [self.view addSubview:_txtPassword];

  //登錄按鈕
  UIButton *btnLogin=[UIButton buttonWithType:UIButtonTypeSystem];
  btnLogin.frame=CGRectMake(70, 270, 80, 30);
  [btnLogin setTitle:@"登錄" forState:UIControlStateNormal];
  [self.view addSubview:btnLogin];
  [btnLogin addTarget:self action:@selector(login) forControlEvents:UIControlEventTouchUpInside];

  //取消登錄按鈕
  UIButton *btnCancel=[UIButton buttonWithType:UIButtonTypeSystem];
  btnCancel.frame=CGRectMake(170, 270, 80, 30);
  [btnCancel setTitle:@"取消" forState:UIControlStateNormal];
  [self.view addSubview:btnCancel];
  [btnCancel addTarget:self action:@selector(cancel) forControlEvents:UIControlEventTouchUpInside];
}

#pragma mark 登錄操作
-(void)login{
  if ([_txtUserName.text isEqualToString:@"kenshincui"] && [_txtPassword.text isEqualToString:@"123"] ) {
    //發送告訴
    [self postNotification];
    [self dismissViewControllerAnimated:YES completion:nil];
  }else{
    //登錄失敗彈出提示信息
    UIAlertView *alertView=[[UIAlertView alloc]initWithTitle:@"零碎信息" message:@"用戶名或密碼錯誤,請重新輸出!" delegate:nil cancelButtonTitle:@"取消" otherButtonTitles:nil];
    [alertView show];
  }

}

#pragma mark 點擊取消
-(void)cancel{
  [self dismissViewControllerAnimated:YES completion:nil];
}

/**
 * 添加告訴,留意這裡設置了附加信息
 */
-(void)postNotification{
  NSDictionary *userInfo=@{@"loginInfo":[NSString stringWithFormat:@"Hello,%@!",_txtUserName.text]};
  NSLog(@"%@",userInfo);
  NSNotification *notification=[NSNotification notificationWithName:UPDATE_LGOGIN_INFO_NOTIFICATION object:self userInfo:userInfo];
  [[NSNotificationCenter defaultCenter] postNotification:notification];
//也可直接采用上面的辦法
//  [[NSNotificationCenter defaultCenter] postNotificationName:UPDATE_LGOGIN_INFO_NOTIFICATION object:self userInfo:userInfo];

}
@end
運轉效果:

留意:
經過下面的引見大家應該可以發現其實告訴中心是一種低耦合設計,和後面文章中提到的代理形式有異曲同工之妙。絕對於後者而言,告訴中心可以將一個告訴發送給多個監聽者,而每個對象的代理卻只能有一個。當然代理也有其優點,例如運用代理代碼散布構造愈加明晰,它不像告訴一樣隨處都可以添加訂閱等,實踐運用進程中需求依據實踐狀況而定。
以上就是本文的全部內容,希望對大家的學習有所協助,也希望大家多多支持本站。
【iOS開發系列--告訴與音訊機制詳解】的相關資料介紹到這裡,希望對您有所幫助! 提示:不會對讀者因本文所帶來的任何損失負責。如果您支持就請把本站添加至收藏夾哦!