ISO7 二維碼具體引見及應用辦法
編輯:IOS開發綜合
應用體系自帶生成/掃描二維碼
IOS7開端蘋果集成了二維碼的生成的掃描 ### 生成二維碼的步調
導入CoreImage框架 #import <CoreImage/CoreImage.h>
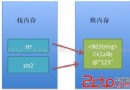
經由過程濾鏡CIFilte生成二維碼 ### 二維碼的內容(傳統的條形碼只能放數字)
純文本
咭片
URL
生成二維碼
// 1.創立過濾器
  CIFilter *filter = [CIFilter filterWithName:@"CIQRCodeGenerator"];

  // 2.恢復默許
  [filter setDefaults];

  // 3.給過濾器添加數據(正則表達式/賬號和暗碼)
  NSString *dataString = @"http://www.520it.com";
  NSData *data = [dataString dataUsingEncoding:NSUTF8StringEncoding];
  [filter setValue:data forKeyPath:@"inputMessage"];

  // 4.獲得輸入的二維碼
  CIImage *outputImage = [filter outputImage];

  //由於生成的二維碼隱約,所以經由過程createNonInterpolatedUIImageFormCIImage:outputImage來取得高清的二維碼圖片

  // 5.顯示二維碼
  self.imageView.image = [self createNonInterpolatedUIImageFormCIImage:outputImage withSize:300];
 /**
 * 依據CIImage生成指定年夜小的UIImage
 *
 * @param image CIImage
 * @param size 圖片寬度
 */
- (UIImage *)createNonInterpolatedUIImageFormCIImage:(CIImage *)image withSize:(CGFloat) size
{
  CGRect extent = CGRectIntegral(image.extent);
  CGFloat scale = MIN(size/CGRectGetWidth(extent), size/CGRectGetHeight(extent));

  // 1.創立bitmap;
  size_t width = CGRectGetWidth(extent) * scale;
  size_t height = CGRectGetHeight(extent) * scale;
  CGColorSpaceRef cs = CGColorSpaceCreateDeviceGray();
  CGContextRef bitmapRef = CGBitmapContextCreate(nil, width, height, 8, 0, cs, (CGBitmapInfo)kCGImageAlphaNone);
  CIContext *context = [CIContext contextWithOptions:nil];
  CGImageRef bitmapImage = [context createCGImage:image fromRect:extent];
  CGContextSetInterpolationQuality(bitmapRef, kCGInterpolationNone);
  CGContextScaleCTM(bitmapRef, scale, scale);
  CGContextDrawImage(bitmapRef, extent, bitmapImage);

  // 2.保留bitmap到圖片
  CGImageRef scaledImage = CGBitmapContextCreateImage(bitmapRef);
  CGContextRelease(bitmapRef);
  CGImageRelease(bitmapImage);
  return [UIImage imageWithCGImage:scaledImage];
}
掃描二維碼
// 1.創立捕獲會話
  AVCaptureSession *session = [[AVCaptureSession alloc] init];
  self.session = session;

  // 2.添加輸出裝備(數據從攝像頭輸出)
  AVCaptureDevice *device = [AVCaptureDevice defaultDeviceWithMediaType:AVMediaTypeVideo];
  AVCaptureDeviceInput *input = [AVCaptureDeviceInput deviceInputWithDevice:device error:nil];
  [session addInput:input];

  // 3.添加輸入數據(示例對象-->類對象-->元類對象-->根元類對象)
  AVCaptureMetadataOutput *output = [[AVCaptureMetadataOutput alloc] init];
  [output setMetadataObjectsDelegate:self queue:dispatch_get_main_queue()];
  [session addOutput:output];

  // 3.1.設置輸出元數據的類型(類型是二維碼數據)
  [output setMetadataObjectTypes:@[AVMetadataObjectTypeQRCode]];

  // 4.添加掃描圖層
  AVCaptureVideoPreviewLayer *layer = [AVCaptureVideoPreviewLayer layerWithSession:session];
  layer.frame = self.view.bounds;
  [self.view.layer addSublayer:layer];
  self.layer = layer;

  // 5.開端掃描
  [session startRunning];
掃描會挪用的辦法
// 當掃描到數據時就會履行該辦法
- (void)captureOutput:(AVCaptureOutput *)captureOutput didOutputMetadataObjects:(NSArray *)metadataObjects fromConnection:(AVCaptureConnection *)connection
{
  if (metadataObjects.count > 0) {
    //取得掃描數據,最初一個時最新掃描的數據
    AVMetadataMachineReadableCodeObject *object = [metadataObjects lastObject];
    NSLog(@"%@", object.stringValue);

    // 停滯掃描
    [self.session stopRunning];

    // 將預覽圖層移除
    [self.layer removeFromSuperlayer];
  } else {
    NSLog(@"沒有掃描到數據");
  }
}
以上就是對IOS 二維碼的材料整頓,後續持續彌補相干材料,感謝年夜家對本站的支撐!
【ISO7 二維碼具體引見及應用辦法】的相關資料介紹到這裡,希望對您有所幫助! 提示:不會對讀者因本文所帶來的任何損失負責。如果您支持就請把本站添加至收藏夾哦!

相關文章
+- iOS開辟之UIScrollView控件詳解
- iOS簡略登錄LoginViewController、注冊RegisterViewController等功效完成辦法
- 處理JSON數據由於null招致數據加載掉敗的辦法
- iOS App通訊之local socket示例
- iOS App之間的通訊 local socket
- IOS開辟收集篇—Socket編程詳解
- iOS中應用UISearchBar控件限制輸出字數的完成辦法
- 在Swift中應用JSONModel 實例代碼
- iOS App開辟中的UIStackView堆疊視圖應用教程
- iOS App開辟中的UISegmentedControl分段組件用法總結
- 經由過程UIKit坐標系來周全控制iOS中的UIScrollView組件
- iOS運用中應用AsyncSocket庫處置Socket通訊的用法講授
- iOS中的UISearchBar搜刮框組件基本應用指南
- 詳解iOS App中UISwitch開關組件的根本創立及應用辦法
- iOS運用法式中經由過程dispatch隊列掌握線程履行的辦法