ios仿側邊抽屜後果完成代碼
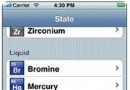
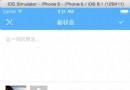
後果圖以下

代碼完成和思緒上面剖析:
代碼創立導航掌握器
Appdelegate.m中
#import "AppDelegate.h"
#import "ViewController.h"
@interface AppDelegate ()

@end

@implementation AppDelegate


- (BOOL)application:(UIApplication *)application didFinishLaunchingWithOptions:(NSDictionary *)launchOptions {

  self.Window = [[UIWindow alloc] initWithFrame:[UIScreen mainScreen].bounds];
  ViewController * vc = [[ViewController alloc] init];
//必需要初始化導航掌握器的根掌握器
  UINavigationController * nav = [[UINavigationController alloc] initWithRootViewController:vc];
  self.window.rootViewController = nav;
  [self.window makeKeyAndVisible];
  return YES;
}
viewcontroller.m中
//
// ViewController.m
// PBSliedMenu
//
// Created by 裴波波 on 16/4/21.
// Copyright © 2016年 裴波波. All rights reserved.
//

#import "ViewController.h"
#define kScreenH [UIScreen mainScreen].bounds.size.height
#define kScreenW [UIScreen mainScreen].bounds.size.width
#define kNavW 64
@interface ViewController ()<UITableViewDelegate,UITableViewDataSource>

@property (nonatomic, strong) UITableView *tableView;
/** 記載能否翻開側邊欄 */
@property (nonatomic, assign) BOOL openSlide;
/** 側欄按鈕 */
@property (nonatomic, strong) UIBarButtonItem *btnLeft;

@end
用一個bool值來記載左邊view是翻開照樣封閉狀況.每次點擊都要轉變記載tableView狀況的值
用屬性保留 側欄 按鈕,用來當左邊tableView正在彈出或許發出履行動畫進程中禁用.
@implementation ViewController

#pragma mark - 選中某個cell署理辦法
-(void)tableView:(UITableView *)tableView didSelectRowAtIndexPath:(NSIndexPath *)indexPath{

  UITableViewCell * cell = [tableView cellForRowAtIndexPath:indexPath];
  NSLog(@"%@",cell.textLabel.text);
  //選中cell後立刻撤消選中
  [tableView deselectRowAtIndexPath:indexPath animated:YES];
}


#pragma mark - tableView數據源
-(NSInteger)tableView:(UITableView *)tableView numberOfRowsInSection:(NSInteger)section{

  return 20;
}

-(UITableViewCell *)tableView:(UITableView *)tableView cellForRowAtIndexPath:(NSIndexPath *)indexPath{
  static NSString * ID = @"cell";
  UITableViewCell * cell = [tableView dequeueReusableCellWithIdentifier:ID forIndexPath:indexPath];
  cell.textLabel.text = [NSString stringWithFormat:@"我是%zd",indexPath.row];
  cell.backgroundColor = [UIColor orangeColor];
  return cell;
}

- (void)viewDidLoad {

  [super viewDidLoad];
  self.view.backgroundColor = [UIColor whiteColor];
  [self initLeftBarButton];
  //注冊cell
  [self.tableView registerClass:[UITableViewCell class] forCellReuseIdentifier:@"cell"];
}
留意:注冊cell的同時挪用了 self.tableView 則挪用了懶加載,此時tableView曾經創立了.必需要先創立,不然有一個小bug就是,當tableView第一次彈出的時刻會從屏幕的(0,0)點彈出,而不是全部tableView從左邊彈出.
#pragma mark - 初始化側欄按鈕
-(void)initLeftBarButton{

  UIButton * btnLeft = [[UIButton alloc] init];
  btnLeft.frame = CGRectMake(0, 0, 90, 40);
  [btnLeft setTitle:@"側欄" forState:UIControlStateNormal];
  [btnLeft setTitleColor:[UIColor blackColor] forState:UIControlStateNormal];
  [btnLeft addTarget:self action:@selector(didLeftBtn) forControlEvents:UIControlEventTouchUpInside];
  self.navigationItem.leftBarButtonItem = [[UIBarButtonItem alloc] initWithCustomView:btnLeft];
  self.btnLeft = self.navigationItem.leftBarButtonItem;
}

#pragma mark - 懶加載tableView
-(UITableView *)tableView{

  if (_tableView == nil) {
    _tableView = [[UITableView alloc] init];
    _tableView.delegate = self;
    _tableView.dataSource = self;
    _tableView.backgroundColor = [UIColor orangeColor];
    //第一次點擊tableView從左上角彈出,優化計劃--先創立出tableView
    CGFloat hight = kScreenH;
    CGFloat x = 0;
    CGFloat y = kNavW;
    CGFloat width = 0;
    _tableView.frame = CGRectMake(x, y, width, hight);
    //撤消顯示豎直轉動條
    _tableView.showsVerticalScrollIndicator = NO;
  }
  return _tableView;
}
懶加載的時刻直接創立tableView,讓其寬度 == 0 便可.
#pragma mark - 點擊側欄按鈕彈出tableView
-(void)didLeftBtn{

  //禁用button期待動畫履行終了再啟用button
  self.btnLeft.enabled = NO;
  CGFloat hight = kScreenH;
  CGFloat x = 0;
  CGFloat y = kNavW;
  if (!self.openSlide) {
    //添加動畫
    [UIView animateWithDuration:0.3 animations:^{
      CGFloat width = kScreenW / 3;
      self.tableView.frame = CGRectMake(x, y, width, hight);
    }];
    [self.view addSubview:self.tableView];
  } else {
    [UIView animateWithDuration:0.3 animations:^{
      CGFloat width = 0;
      self.tableView.frame = CGRectMake(x, y, width, hight);
    }];
  }
  //履行終了動畫 撤消禁用button
  [self performSelector:@selector(setBtnLeftEnabled) withObject:nil afterDelay:0.3];
  //監督側欄能否翻開
  if (self.openSlide == YES) {
    self.openSlide = NO;
  } else {
    self.openSlide = YES;
  }
}
點擊 側欄 按鈕彈出tableView,此進程中讓其動畫履行,不會顯得僵硬.讓tableView的寬度從0---> 屏幕寬度的三分之一
記載tableView翻開的狀況.
履行動畫的進程中禁用 側欄 按鈕,因為代碼履行時光的剎時完成的,動畫履行時光是0.3s,則延遲0.3s撤消禁用 側欄 按鈕.
//不消重復創立tableView
//#pragma mark - 移除tableView
//-(void)removeSliedView{
//
//  [self.tableView removeFromSuperview];
//  self.btnLeft.enabled = YES;
//}
#pragma mark - 動畫履行終了啟用"側欄"按鈕
-(void)setBtnLeftEnabled{

  self.btnLeft.enabled = YES;
  //動畫履行終了讓第一個cell顯示在最頂端
  self.tableView.contentOffset = CGPointMake(0, 0);
}


- (void)didReceiveMemoryWarning {
  [super didReceiveMemoryWarning];
  // Dispose of any resources that can be recreated.
}

@end
之前犯過一個毛病就是點擊 側欄 按鈕創立tableView,再點擊 燒毀 tableView,如許比擬耗機能.經由過程懶加載先創立tableView,發出tableView的時刻讓其寬度 == 0 便可.
上圖演示的可以看出,當滑動tableView的時刻,再次點擊出來tableView照樣滑動的地位,不會恢復到開端 下標為 0 的cell為最下面顯示的cell.優化計劃:讓tableView的偏移contentOffset等於 0便可.代碼不克不及寫在 彈出tableView 與 發出 tableView的動畫代碼中,由於如許會讓人看出來.寫在動畫履行終了後的代碼中.
源代碼地址:https://git.oschina.net/alexpei/PBSliedMenu.git
以上就是本文的全體內容,願望對年夜家的進修有所贊助。
【ios仿側邊抽屜後果完成代碼】的相關資料介紹到這裡,希望對您有所幫助! 提示:不會對讀者因本文所帶來的任何損失負責。如果您支持就請把本站添加至收藏夾哦!
- 上一頁:iOS開辟之離線地圖焦點代碼
- 下一頁:iOS自界說鍵盤切換後果