IOS手勢操作(拖動、捏合、旋轉、點按、長按、輕掃、自定義)
下面通過圖文並茂的方式給大家分享下IOS手勢操作(拖動、捏合、旋轉、點按、長按、輕掃、自定義)的相關內容。
1、UIGestureRecognizer 介紹
手勢識別在 iOS 中非常重要,他極大地提高了移動設備的使用便捷性。
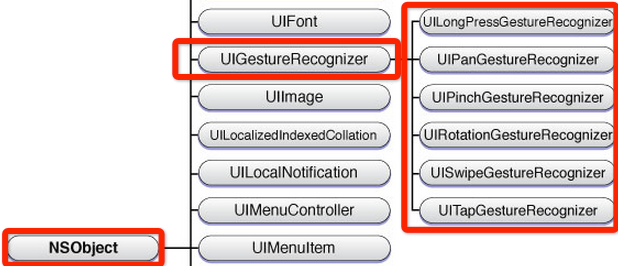
iOS 系統在 3.2 以後,他提供了一些常用的手勢(UIGestureRecognizer 的子類),開發者可以直接使用他們進行手勢操作。
UIPanGestureRecognizer(拖動)
UIPinchGestureRecognizer(捏合)
UIRotationGestureRecognizer(旋轉)
UITapGestureRecognizer(點按)
UILongPressGestureRecognizer(長按)
UISwipeGestureRecognizer(輕掃)
另外,可以通過繼承 UIGestureRecognizer 類,實現自定義手勢(手勢識別器類)。
PS:自定義手勢時,需要 #import <UIKit/UIGestureRecognizerSubclass.h>,一般需實現如下方法:
復制代碼 代碼如下:
- (void)reset;
- (void)touchesBegan:(NSSet *)touches withEvent:(UIEvent *)event;
- (void)touchesMoved:(NSSet *)touches withEvent:(UIEvent *)event;
- (void)touchesEnded:(NSSet *)touches withEvent:(UIEvent *)event;
- (void)touchesCancelled:(NSSet *)touches withEvent:(UIEvent *)event;
//以上方法在分類 UIGestureRecognizer (UIGestureRecognizerProtected) 中聲明,更多方法聲明請自行查看
UIGestureRecognizer 的繼承關系如下:
2、手勢狀態
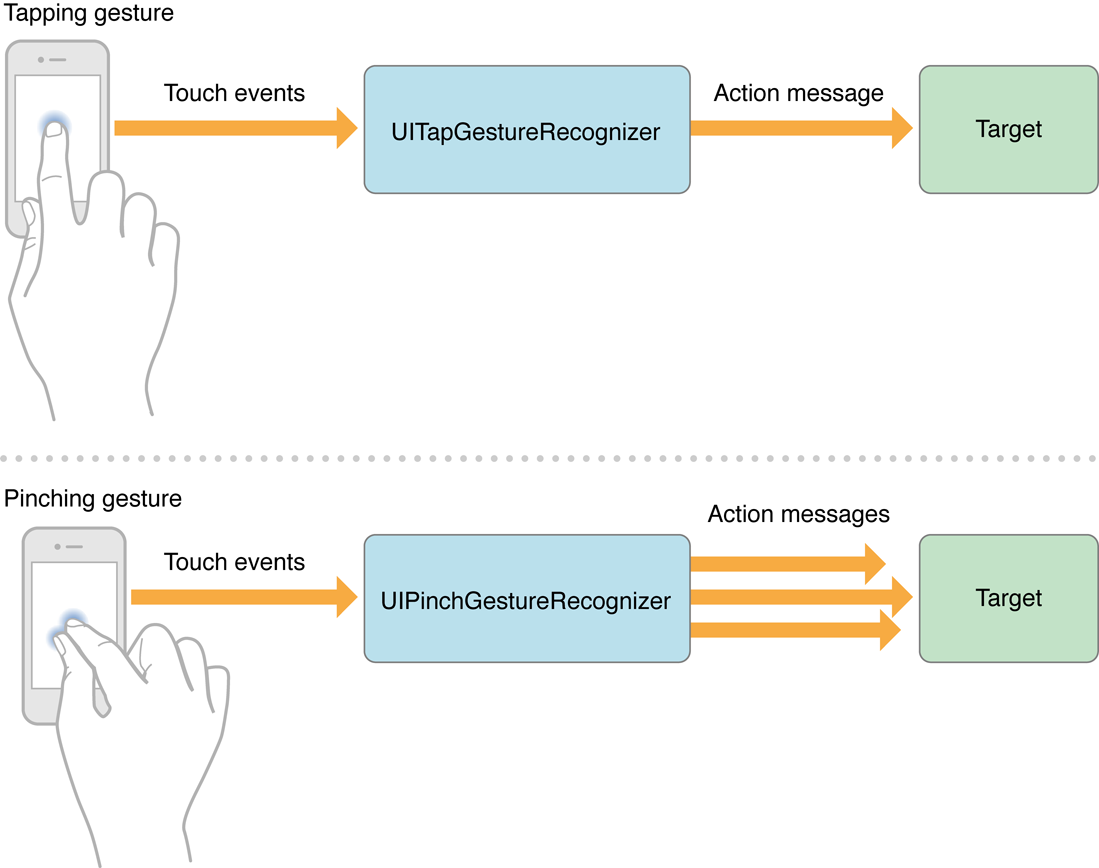
在六種手勢識別中,只有一種手勢是離散型手勢,他就是 UITapGestureRecognizer。
離散型手勢的特點就是:一旦識別就無法取消,而且只會調用一次手勢操作事件(初始化手勢時指定的回調方法)。
換句話說其他五種手勢是連續型手勢,而連續型手勢的特點就是:會多次調用手勢操作事件,而且在連續手勢識別後可以取消手勢。從下圖可以看出兩者調用操作事件的次數是不同的:
手勢狀態枚舉如下:
復制代碼 代碼如下:
typedef NS_ENUM(NSInteger, UIGestureRecognizerState) {
UIGestureRecognizerStatePossible, // 尚未識別是何種手勢操作(但可能已經觸發了觸摸事件),默認狀態
UIGestureRecognizerStateBegan, // 手勢已經開始,此時已經被識別,但是這個過程中可能發生變化,手勢操作尚未完成
UIGestureRecognizerStateChanged, // 手勢狀態發生轉變
UIGestureRecognizerStateEnded, // 手勢識別操作完成(此時已經松開手指)
UIGestureRecognizerStateCancelled, // 手勢被取消,恢復到默認狀態
UIGestureRecognizerStateFailed, // 手勢識別失敗,恢復到默認狀態
UIGestureRecognizerStateRecognized = UIGestureRecognizerStateEnded // 手勢識別完成,同UIGestureRecognizerStateEnded
};
對於離散型手勢 UITapGestureRecgnizer 要麼被識別,要麼失敗,點按(假設點按次數設置為1,並且沒有添加長按手勢)下去一次不松開則此時什麼也不會發生,松開手指立即識別並調用操作事件,並且狀態為3(已完成)。
但是連續型手勢要復雜一些,就拿旋轉手勢來說,如果兩個手指點下去不做任何操作,此時並不能識別手勢(因為我們還沒旋轉)但是其實已經觸發了觸摸開始事件,此時處於狀態0;如果此時旋轉會被識別,也就會調用對應的操作事件,同時狀態變成1(手勢開始),但是狀態1只有一瞬間;緊接著狀態變為2(因為我們的旋轉需要持續一會),並且重復調用操作事件(如果在事件中打印狀態會重復打印2);松開手指,此時狀態變為3,並調用1次操作事件。
3、使用手勢的步驟
使用手勢很簡單,分為三步:
創建手勢識別器對象實例。創建時,指定一個回調方法,當手勢開始,改變、或結束時,執行回調方法。
設置手勢識別器對象實例的相關屬性(可選部分)
添加到需要識別的 View 中。每個手勢只對應一個 View,當屏幕觸摸在 View 的邊界內時,如果手勢和預定的一樣,那就會執行回調方法。
PS:一個手勢只能對應一個 View,但是一個 View 可以有多個手勢。建議在真機上測試這些手勢,模擬器操作不太方便,可能導致認為手勢失效的情況。(模擬器測試捏合和旋轉手勢時,按住 option 鍵,再用觸摸板或鼠標操作)
4、舉例說明
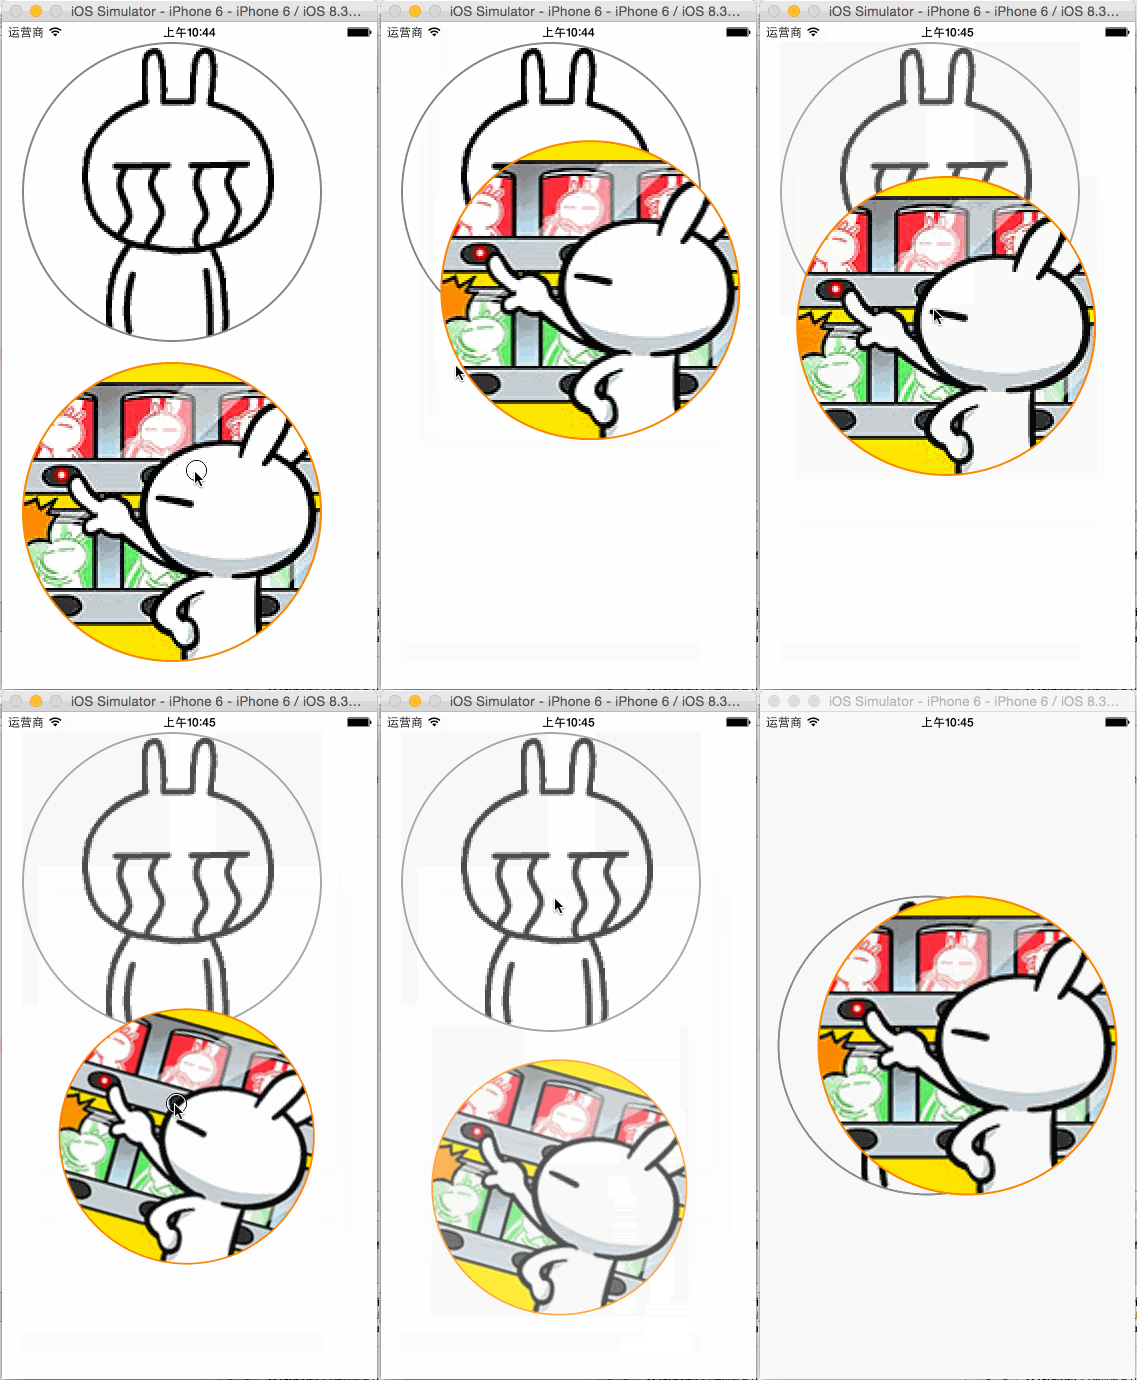
功能描述:
附加到兩個圖片視圖 UIImageView 的有『拖動』、『捏合』、『旋轉』、『點按』;
而『輕掃』和『自定義手勢 KMGestureRecognizer』附加在根視圖 UIView 中。
拖動:進行當前圖片視圖位置移動
捏合:進行當前圖片視圖縮放
旋轉:進行當前圖片視圖角度旋轉
點按:雙擊恢復當前圖片視圖的縮放、角度旋轉、不透明度
長按:設置當前圖片視圖的不透明度為0.7
輕掃:左右輕掃設置兩個圖片視圖為居中,同時以垂直居中的特定偏移量定位
自定義手勢:撓癢功能,左右掃動共3次或以上,設置兩個圖片視圖為居中,同時以水平居中的特定偏移量定位
效果如下:
KMGestureRecognizer.h

 #import <UIKit/UIKit.h>

 typedef NS_ENUM(NSUInteger, Direction) {
  DirectionUnknown,
  DirectionLeft,
  DirectionRight
 };

 @interface KMGestureRecognizer : UIGestureRecognizer
 @property (assign, nonatomic) NSUInteger tickleCount; //撓癢次數
 @property (assign, nonatomic) CGPoint currentTickleStart; //當前撓癢開始坐標位置
 @property (assign, nonatomic) Direction lastDirection; //最後一次撓癢方向

 @end
KMGestureRecognizer.m

 #import "KMGestureRecognizer.h"
 #import <UIKit/UIGestureRecognizerSubclass.h>

 @implementation KMGestureRecognizer
 #define kMinTickleSpacing 20.0
 #define kMaxTickleCount 3

 - (void)reset {
  _tickleCount = 0;
  _currentTickleStart = CGPointZero;
  _lastDirection = DirectionUnknown;

  if (self.state == UIGestureRecognizerStatePossible) {
   self.state = UIGestureRecognizerStateFailed;
  }
 }

 - (void)touchesBegan:(NSSet *)touches withEvent:(UIEvent *)event {
  UITouch *touch = [touches anyObject];
  _currentTickleStart = [touch locationInView:self.view]; //設置當前撓癢開始坐標位置
 }

 - (void)touchesMoved:(NSSet *)touches withEvent:(UIEvent *)event {
  //『當前撓癢開始坐標位置』和『移動後坐標位置』進行 X 軸值比較,得到是向左還是向右移動
  UITouch *touch = [touches anyObject];
  CGPoint tickleEnd = [touch locationInView:self.view];
  CGFloat tickleSpacing = tickleEnd.x - _currentTickleStart.x;
  Direction currentDirection = tickleSpacing < 0 ? DirectionLeft : DirectionRight;

  //移動的 X 軸間距值是否符合要求,足夠大
  if (ABS(tickleSpacing) >= kMinTickleSpacing) {
   //判斷是否有三次不同方向的動作,如果有則手勢結束,將執行回調方法
   if (_lastDirection == DirectionUnknown ||
    (_lastDirection == DirectionLeft && currentDirection == DirectionRight) ||
    (_lastDirection == DirectionRight && currentDirection == DirectionLeft)) {
    _tickleCount++;
    _currentTickleStart = tickleEnd;
    _lastDirection = currentDirection;

    if (_tickleCount >= kMaxTickleCount && self.state == UIGestureRecognizerStatePossible) {
     self.state = UIGestureRecognizerStateEnded;
     //NSLog(@"自定義手勢成功,將執行回調方法");
    }
   }
  }
 }

 - (void)touchesEnded:(NSSet *)touches withEvent:(UIEvent *)event {
  [self reset];
 }

 - (void)touchesCancelled:(NSSet *)touches withEvent:(UIEvent *)event {
  [self reset];
 }

 @end

ViewController.h
#import <UIKit/UIKit.h>
#import "KMGestureRecognizer.h"

@interface ViewController : UIViewController
@property (strong, nonatomic) UIImageView *imgV;
@property (strong, nonatomic) UIImageView *imgV2;
@property (strong, nonatomic) KMGestureRecognizer *customGestureRecognizer;

@end
ViewController.m

 #import "ViewController.h"

 @interface ViewController ()
 - (void)handlePan:(UIPanGestureRecognizer *)recognizer;
 - (void)handlePinch:(UIPinchGestureRecognizer *)recognizer;
 - (void)handleRotation:(UIRotationGestureRecognizer *)recognizer;
 - (void)handleTap:(UITapGestureRecognizer *)recognizer;
 - (void)handleLongPress:(UILongPressGestureRecognizer *)recognizer;
 - (void)handleSwipe:(UISwipeGestureRecognizer *)recognizer;
 - (void)handleCustomGestureRecognizer:(KMGestureRecognizer *)recognizer;

 - (void)bindPan:(UIImageView *)imgVCustom;
 - (void)bindPinch:(UIImageView *)imgVCustom;
 - (void)bindRotation:(UIImageView *)imgVCustom;
 - (void)bindTap:(UIImageView *)imgVCustom;
 - (void)bindLongPress:(UIImageView *)imgVCustom;
 - (void)bindSwipe;
 - (void)bingCustomGestureRecognizer;
 - (void)layoutUI;
 @end

 @implementation ViewController

 - (void)viewDidLoad {
  [super viewDidLoad];

  [self layoutUI];
 }

 - (void)didReceiveMemoryWarning {
  [super didReceiveMemoryWarning];
  // Dispose of any resources that can be recreated.
 }

 #pragma mark - 處理手勢操作
 /**
 * 處理拖動手勢
 *
 * @param recognizer 拖動手勢識別器對象實例
 */
 - (void)handlePan:(UIPanGestureRecognizer *)recognizer {
  //視圖前置操作
  [recognizer.view.superview bringSubviewToFront:recognizer.view];

  CGPoint center = recognizer.view.center;
  CGFloat cornerRadius = recognizer.view.frame.size.width / 2;
  CGPoint translation = [recognizer translationInView:self.view];
  //NSLog(@"%@", NSStringFromCGPoint(translation));
  recognizer.view.center = CGPointMake(center.x + translation.x, center.y + translation.y);
  [recognizer setTranslation:CGPointZero inView:self.view];

  if (recognizer.state == UIGestureRecognizerStateEnded) {
  //計算速度向量的長度,當他小於200時,滑行會很短
  CGPoint velocity = [recognizer velocityInView:self.view];
  CGFloat magnitude = sqrtf((velocity.x * velocity.x) + (velocity.y * velocity.y));
  CGFloat slideMult = magnitude / 200;
  //NSLog(@"magnitude: %f, slideMult: %f", magnitude, slideMult); //e.g. 397.973175, slideMult: 1.989866

  //基於速度和速度因素計算一個終點
  float slideFactor = 0.1 * slideMult;
  CGPoint finalPoint = CGPointMake(center.x + (velocity.x * slideFactor),
          center.y + (velocity.y * slideFactor));
  //限制最小[cornerRadius]和最大邊界值[self.view.bounds.size.width - cornerRadius],以免拖動出屏幕界限
  finalPoint.x = MIN(MAX(finalPoint.x, cornerRadius),
       self.view.bounds.size.width - cornerRadius);
  finalPoint.y = MIN(MAX(finalPoint.y, cornerRadius),
       self.view.bounds.size.height - cornerRadius);

  //使用 UIView 動畫使 view 滑行到終點
  [UIView animateWithDuration:slideFactor*2
       delay:0
       options:UIViewAnimationOptionCurveEaseOut
      animations:^{
       recognizer.view.center = finalPoint;
      }
      completion:nil];
 }
}

/**
* 處理捏合手勢
*
* @param recognizer 捏合手勢識別器對象實例
*/
- (void)handlePinch:(UIPinchGestureRecognizer *)recognizer {
 CGFloat scale = recognizer.scale;
 recognizer.view.transform = CGAffineTransformScale(recognizer.view.transform, scale, scale); //在已縮放大小基礎下進行累加變化;區別於:使用 CGAffineTransformMakeScale 方法就是在原大小基礎下進行變化
 recognizer.scale = 1.0;
}

/**
* 處理旋轉手勢
*
* @param recognizer 旋轉手勢識別器對象實例
*/
- (void)handleRotation:(UIRotationGestureRecognizer *)recognizer {
 recognizer.view.transform = CGAffineTransformRotate(recognizer.view.transform, recognizer.rotation);
 recognizer.rotation = 0.0;
 }

 /**
 * 處理點按手勢
 *
 * @param recognizer 點按手勢識別器對象實例
 */
 - (void)handleTap:(UITapGestureRecognizer *)recognizer {
  UIView *view = recognizer.view;
  view.transform = CGAffineTransformMakeScale(1.0, 1.0);
  view.transform = CGAffineTransformMakeRotation(0.0);
  view.alpha = 1.0;
 }

 /**
 * 處理長按手勢
 *
 * @param recognizer 點按手勢識別器對象實例
 */
 - (void)handleLongPress:(UILongPressGestureRecognizer *)recognizer {
  //長按的時候,設置不透明度為0.7
  recognizer.view.alpha = 0.7;
 }

 /**
 * 處理輕掃手勢
 *
 * @param recognizer 輕掃手勢識別器對象實例
 */
 - (void)handleSwipe:(UISwipeGestureRecognizer *)recognizer {
  //代碼塊方式封裝操作方法
  void (^positionOperation)() = ^() {
   CGPoint newPoint = recognizer.view.center;
   newPoint.y -= 20.0;
   _imgV.center = newPoint;

   newPoint.y += 40.0;
   _imgV2.center = newPoint;
  };

  //根據輕掃方向,進行不同控制
  switch (recognizer.direction) {
   case UISwipeGestureRecognizerDirectionRight: {
    positionOperation();
    break;
   }
   case UISwipeGestureRecognizerDirectionLeft: {
    positionOperation();
    break;
   }
   case UISwipeGestureRecognizerDirectionUp: {
    break;
   }
   case UISwipeGestureRecognizerDirectionDown: {
    break;
   }
  }
 }

 /**
 * 處理自定義手勢
 *
 * @param recognizer 自定義手勢識別器對象實例
 */
 - (void)handleCustomGestureRecognizer:(KMGestureRecognizer *)recognizer {
  //代碼塊方式封裝操作方法
  void (^positionOperation)() = ^() {
   CGPoint newPoint = recognizer.view.center;
   newPoint.x -= 20.0;
   _imgV.center = newPoint;

   newPoint.x += 40.0;
   _imgV2.center = newPoint;
  };

  positionOperation();
 }


 #pragma mark - 綁定手勢操作
 /**
 * 綁定拖動手勢
 *
 * @param imgVCustom 綁定到圖片視圖對象實例
 */
 - (void)bindPan:(UIImageView *)imgVCustom {
  UIPanGestureRecognizer *recognizer = [[UIPanGestureRecognizer alloc] initWithTarget:self
                     action:@selector(handlePan:)];
  [imgVCustom addGestureRecognizer:recognizer];
 }

 /**
 * 綁定捏合手勢
 *
 * @param imgVCustom 綁定到圖片視圖對象實例
 */
 - (void)bindPinch:(UIImageView *)imgVCustom {
  UIPinchGestureRecognizer *recognizer = [[UIPinchGestureRecognizer alloc] initWithTarget:self
                      action:@selector(handlePinch:)];
  [imgVCustom addGestureRecognizer:recognizer];
  //[recognizer requireGestureRecognizerToFail:imgVCustom.gestureRecognizers.firstObject];
 }

 /**
 * 綁定旋轉手勢
 *
 * @param imgVCustom 綁定到圖片視圖對象實例
 */
 - (void)bindRotation:(UIImageView *)imgVCustom {
  UIRotationGestureRecognizer *recognizer = [[UIRotationGestureRecognizer alloc] initWithTarget:self
                       action:@selector(handleRotation:)];
  [imgVCustom addGestureRecognizer:recognizer];
 }

 /**
 * 綁定點按手勢
 *
 * @param imgVCustom 綁定到圖片視圖對象實例
 */
 - (void)bindTap:(UIImageView *)imgVCustom {
  UITapGestureRecognizer *recognizer = [[UITapGestureRecognizer alloc] initWithTarget:self
                     action:@selector(handleTap:)];
  //使用一根手指雙擊時,才觸發點按手勢識別器
  recognizer.numberOfTapsRequired = 2;
  recognizer.numberOfTouchesRequired = 1;
  [imgVCustom addGestureRecognizer:recognizer];
 }

 /**
 * 綁定長按手勢
 *
 * @param imgVCustom 綁定到圖片視圖對象實例
 */
 - (void)bindLongPress:(UIImageView *)imgVCustom {
  UILongPressGestureRecognizer *recognizer = [[UILongPressGestureRecognizer alloc] initWithTarget:self action:@selector(handleLongPress:)];
  recognizer.minimumPressDuration = 0.5; //設置最小長按時間;默認為0.5秒
  [imgVCustom addGestureRecognizer:recognizer];
 }

 /**
 * 綁定輕掃手勢;支持四個方向的輕掃,但是不同的方向要分別定義輕掃手勢
 */
 - (void)bindSwipe {
  //向右輕掃手勢
  UISwipeGestureRecognizer *recognizer = [[UISwipeGestureRecognizer alloc] initWithTarget:self
                      action:@selector(handleSwipe:)];
  recognizer.direction = UISwipeGestureRecognizerDirectionRight; //設置輕掃方向;默認是 UISwipeGestureRecognizerDirectionRight,即向右輕掃
  [self.view addGestureRecognizer:recognizer];
  [recognizer requireGestureRecognizerToFail:_customGestureRecognizer]; //設置以自定義撓癢手勢優先識別

  //向左輕掃手勢
  recognizer = [[UISwipeGestureRecognizer alloc] initWithTarget:self
               action:@selector(handleSwipe:)];
  recognizer.direction = UISwipeGestureRecognizerDirectionLeft;
  [self.view addGestureRecognizer:recognizer];
  [recognizer requireGestureRecognizerToFail:_customGestureRecognizer]; //設置以自定義撓癢手勢優先識別
 }

 /**
 * 綁定自定義撓癢手勢;判斷是否有三次不同方向的動作,如果有則手勢結束,將執行回調方法
 */
 - (void)bingCustomGestureRecognizer {
  //當 recognizer.state 為 UIGestureRecognizerStateEnded 時,才執行回調方法 handleCustomGestureRecognizer:

  //_customGestureRecognizer = [KMGestureRecognizer new];
  _customGestureRecognizer = [[KMGestureRecognizer alloc] initWithTarget:self
                  action:@selector(handleCustomGestureRecognizer:)];
  [self.view addGestureRecognizer:_customGestureRecognizer];
 }

 - (void)layoutUI {
  //圖片視圖 _imgV
  UIImage *img = [UIImage imageNamed:@"Emoticon_tusiji_icon"];
  CGFloat cornerRadius = img.size.width;
  _imgV = [[UIImageView alloc] initWithImage:img];
  _imgV.frame = CGRectMake(20.0, 20.0,
        cornerRadius * 2, cornerRadius * 2);
  _imgV.userInteractionEnabled = YES;
  _imgV.layer.masksToBounds = YES;
  _imgV.layer.cornerRadius = cornerRadius;
  _imgV.layer.borderWidth = 2.0;
  _imgV.layer.borderColor = [UIColor grayColor].CGColor;
  [self.view addSubview:_imgV];

  //圖片視圖 _imgV2
  img = [UIImage imageNamed:@"Emoticon_tusiji_icon2"];
  cornerRadius = img.size.width;
  _imgV2 = [[UIImageView alloc] initWithImage:img];
  _imgV2.frame = CGRectMake(20.0, 40.0 + _imgV.frame.size.height,
        cornerRadius * 2, cornerRadius * 2);
  _imgV2.userInteractionEnabled = YES;
  _imgV2.layer.masksToBounds = YES;
  _imgV2.layer.cornerRadius = cornerRadius;
  _imgV2.layer.borderWidth = 2.0;
  _imgV2.layer.borderColor = [UIColor orangeColor].CGColor;
  [self.view addSubview:_imgV2];


  [self bindPan:_imgV];
  [self bindPinch:_imgV];
  [self bindRotation:_imgV];
  [self bindTap:_imgV];
  [self bindLongPress:_imgV];

  [self bindPan:_imgV2];
  [self bindPinch:_imgV2];
  [self bindRotation:_imgV2];
  [self bindTap:_imgV2];
  [self bindLongPress:_imgV2];

  //為了處理手勢識別優先級的問題,這裡需先綁定自定義撓癢手勢
  [self bingCustomGestureRecognizer];
  [self bindSwipe];
 }

 @end
以上代碼就是關於IOS手勢操作(拖動、捏合、旋轉、點按、長按、輕掃、自定義)的詳解,希望對大家有所幫助。

