iOS開發中WebView的基本使用方法簡介
1、使用UIWebView加載網頁
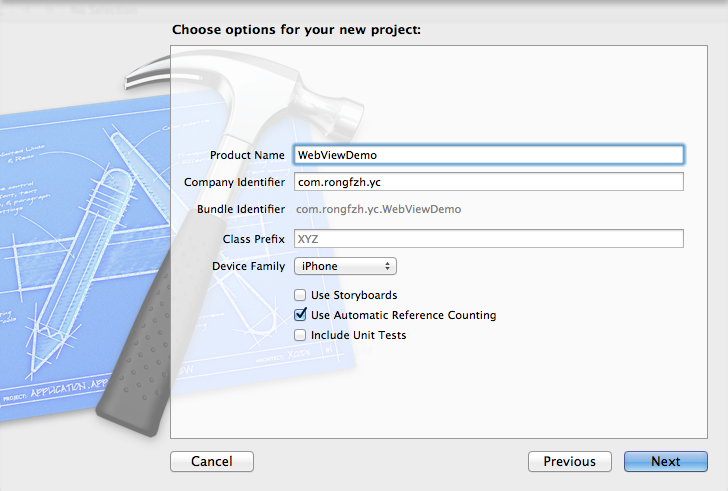
運行XCode 4.3,新建一個Single View Application,命名為WebViewDemo。
2、加載WebView
在ViewController.h添加WebView成員變量和在ViewController.m添加實現
復制代碼 代碼如下:
#import <UIKit/UIKit.h>
@interface ViewController : UIViewController
{
UIWebView *webView;
}
@end
ViewController.m
- (void)viewDidLoad
{
[super viewDidLoad];
webView = [[UIWebView alloc] initWithFrame:CGRectMake(0, 0, 320, 480)];
NSURLRequest *request =[NSURLRequest requestWithURL:[NSURL URLWithString:@"http://www.baidu.com"]];
[self.view addSubview: webView];
[webView loadRequest:request];
}
運行,這樣百度網頁就打開了

手機的網絡環境是實時變化的,網絡慢的時候,怎麼提示用戶網頁正在打開呢?在網頁打開出錯的時候怎麼提示用戶呢?這時候我們就需要知道網頁什麼時候打開的,
什麼時候加載完成,什麼時候出錯了。那麼我們需要實現這個<UIWebViewDelegate>協議
3、實現協議,在ViewController.h修改如下:
復制代碼 代碼如下:
#import <UIKit/UIKit.h>
@interface ViewController : UIViewController<UIWebViewDelegate>
{
UIWebView *webView;
}
@end
按住control+command+向上鍵,切換到ViewController.m文件,這是我們在文件中打入- (void) webView,就能看到如下實現方法:

4、UIWebView主要有下面幾個委托方法:
1、- (void)webViewDidStartLoad:(UIWebView *)webView;開始加載的時候執行該方法。
2、- (void)webViewDidFinishLoad:(UIWebView *)webView;加載完成的時候執行該方法。
3、- (void)webView:(UIWebView *)webView didFailLoadWithError:(NSError *)error;加載出錯的時候執行該方法。
我們可以將activityIndicatorView放置到前面兩個委托方法中。
復制代碼 代碼如下:
- (void)webViewDidStartLoad:(UIWebView *)webView
{
[activityIndicatorView startAnimating] ;
}
- (void)webViewDidFinishLoad:(UIWebView *)webView
{
[activityIndicatorView stopAnimating];
}
buttonPress方法很簡單,調用我們開始定義好的loadWebPageWithString方法就行了:
復制代碼 代碼如下:
- (IBAction)buttonPress:(id) sender
{
[textField resignFirstResponder];
[self loadWebPageWithString:textField.text];
}
當請求頁面出現錯誤的時候,我們給予提示:
復制代碼 代碼如下:
- (void)webView:(UIWebView *)webView didFailLoadWithError:(NSError *)error
{
UIAlertView *alterview = [[UIAlertView alloc] initWithTitle:@"" message:[error localizedDescription] delegate:nil cancelButtonTitle:nil otherButtonTitles:@"OK", nil];
[alterview show];
[alterview release];
}
5、加載等待界面
為了給用戶更直觀的界面效果,我們加上等待的loading界面試試
在webViewDidStartLoad加入等待
復制代碼 代碼如下:
<strong>- (void) webViewDidStartLoad:(UIWebView *)webView
{
//創建UIActivityIndicatorView背底半透明View
UIView *view = [[UIView alloc] initWithFrame:CGRectMake(0, 0, 320, 480)];
[view setTag:108];
[view setBackgroundColor:[UIColor blackColor]];
[view setAlpha:0.5];
[self.view addSubview:view];
activityIndicator = [[UIActivityIndicatorView alloc] initWithFrame:CGRectMake(0.0f, 0.0f, 32.0f, 32.0f)];
[activityIndicator setCenter:view.center];
[activityIndicator setActivityIndicatorViewStyle:UIActivityIndicatorViewStyleWhite];
[view addSubview:activityIndicator];
[activityIndicator startAnimating];
</strong>
加載完成或失敗時,去掉loading效果
復制代碼 代碼如下:
<strong>- (void) webViewDidFinishLoad:(UIWebView *)webView
{
[activityIndicator stopAnimating];
UIView *view = (UIView*)[self.view viewWithTag:108];
[view removeFromSuperview];
NSLog(@"webViewDidFinishLoad");
}
- (void) webView:(UIWebView *)webView didFailLoadWithError:(NSError *)error
{
[activityIndicator stopAnimating];
UIView *view = (UIView*)[self.view viewWithTag:108];
[view removeFromSuperview];
</strong>
運行效果: