Android開發筆記之簡單基站定位程序的實現
經過學習,已經對Android程序的開發流程有了個大體的了解,為了提高我們的學習興趣,在這一節我們將編寫一個簡單的基站定位程序。現在LBS(Location Based Service,基於位置的服務)移動應用相當流行(如:微信,切客,嘀咕,街旁等),基站定位是這類程序用到的關鍵性技術之一,我們來揭開它的神秘面紗吧。
在這一節裡,我們會接觸到事件、TelephonyManager、HTTP通信、JSON的使用等知識點。
在Android操作系統下,基站定位其實很簡單,先說一下實現流程:
調用SDK中的API(TelephonyManager)獲得MCC、MNC、LAC、CID等信息,然後通過google的API獲得所在位置的經緯度,最後再通過google map的API獲得實際的地理位置。(google真牛!)
有同學會問:MNC、MCC、LAC、CID都是些什麼東西?google又怎麼通過這些東西就獲得經緯度了呢?
我們一起來學習一下:
MCC,Mobile Country Code,移動國家代碼(中國的為460);
MNC,Mobile Network Code,移動網絡號碼(中國移動為00,中國聯通為01);
LAC,Location Area Code,位置區域碼;
CID,Cell Identity,基站編號,是個16位的數據(范圍是0到65535)。
了解了這幾個名詞的意思,相信有些朋友已經知道後面的事了:google存儲了這些信息,直接查詢就能得到經緯度了。(至於google怎麼得到移動、聯通的基站信息,這就不得而知了,反正google免費提供接口,直接調用就是)
下面開始動手。
一、設置界面
我們在上一節的程序的基礎上進行開發,在DemoActivity的界面上實現這個功能。
首先我們將DemoActivity使用的布局修改一下:
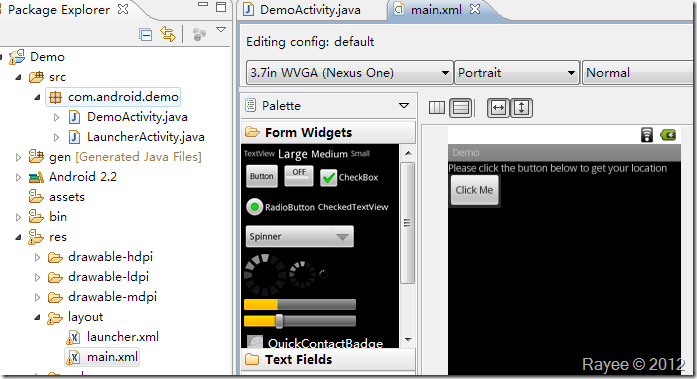
第1行為TextView,顯示提示文字;第2行為一個Button,觸發事件;第3行、第4行分別顯示基站信息和地理位置(現在為空,看不到)。
layout/main.xml文件內容如下:
<?xml version="1.0" encoding="utf-8"?>
<LinearLayout xmlns:android="http://schemas.android.com/apk/res/android"
  android:layout_width="fill_parent"
  android:layout_height="fill_parent"
  android:orientation="vertical" >

  <TextView
    android:layout_width="fill_parent"
    android:layout_height="wrap_content"
    android:text="Please click the button below to get your location" />

  <Button
    android:id="@+id/button1"
    android:layout_width="wrap_content"
    android:layout_height="wrap_content"
    android:text="Click Me" />

  <TextView
    android:id="@+id/cellText"
    android:layout_width="wrap_content"
    android:layout_height="wrap_content"
    android:text="" />

  <TextView
    android:id="@+id/lacationText"
    android:layout_width="wrap_content"
    android:layout_height="wrap_content"
    android:text="" />

</LinearLayout>
接下來我們打開DemoActivity.java編寫代碼。
二、為按鈕綁定事件
我們在Activity創建時綁定事件,將以下代碼添加到setContentView(R.layout.main);後:
/** 為按鈕綁定事件 */
Button btnGetLocation = (Button)findViewById(R.id.button1);
btnGetLocation.setOnClickListener(new OnClickListener() {
  @Override
  public void onClick(View arg0) {
    // TODO Auto-generated method stub
    onBtnClick();
  }
});
同時還需要在頭部import相關組件:
import android.view.View;
import android.widget.Button;
import android.view.View.OnClickListener;
我們來分析一下這段代碼:
首先我們通過findViewById(R.id.button1)找到按鈕這個對象,前面加(Button)表示顯示的轉換為Button對象;
然後設置按鈕點擊事件的監聽器,參數為OnClickListener對象,再重載這個類的onClick方法,調用onBtnClick方法(這個方法得由我們自己去寫,他在點擊按鈕時被調用)。
好了,調用方法寫好了,我們來寫實現(調用後需要做什麼事)。動手編碼之前先在腦中整理好思路,養成好習慣。
我們需要在DemoActivty類中添加如下私有方法:
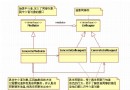
我們需要剛剛提到的onBtnClick回調方法,被調用時實現取得基站信息、獲取經緯度、獲取地理位置、顯示的功能。但是很顯然,全部揉到一個方法裡面並不是個好主意,我們將它分割為幾個方法;
- 添加獲取基站信息的方法getCellInfo,返回基站信息;
- 添加獲取經緯度的方法getItude,傳入基站信息,返回經緯度;
- 添加獲取地理位置的方法getLocation,傳入經緯度,返回地理位置;
- 添加顯示結果的方法showResult,傳入得到的信息在界面上顯示出來。
好了,先將方法添上,完整代碼如下:
package com.android.demo;

import android.R.bool;
import android.R.integer;
import android.app.Activity;
import android.os.Bundle;
import android.view.View;
import android.widget.Button;
import android.view.View.OnClickListener;

public class DemoActivity extends Activity {
  /** Called when the activity is first created. */
  @Override
  public void onCreate(Bundle savedInstanceState) {
    super.onCreate(savedInstanceState);
    setContentView(R.layout.main);

    /** 為按鈕綁定事件 */
    Button btnGetLocation = (Button)findViewById(R.id.button1);
    btnGetLocation.setOnClickListener(new OnClickListener() {
      @Override
      public void onClick(View arg0) {
        // TODO Auto-generated method stub
        onBtnClick();
      }
    });
  }

  /** 基站信息結構體 */
  public class SCell{
    public int MCC;
    public int MNC;
    public int LAC;
    public int CID;
  }

  /** 經緯度信息結構體 */
  public class SItude{
    public String latitude;
    public String longitude;
  }

  /** 按鈕點擊回調函數 */
  private void onBtnClick(){

  }

  /** 獲取基站信息 */
  private SCell getCellInfo(){

  }

  /** 獲取經緯度 */
  private SItude getItude(SCell cell){

  }

  /** 獲取地理位置 */
  private String getLocation(SItude itude){

  }

  /** 顯示結果 */
  private void showResult(SCell cell, String location){

  }
}
現在在onBtnClick方法中編碼,依次調用後面幾個方法,代碼如下:
/** 按鈕點擊回調函數 */
private void onBtnClick(){
  /** 彈出一個等待狀態的框 */
  ProgressDialog mProgressDialog = new ProgressDialog(this);
  mProgressDialog.setMessage("正在獲取中...");
  mProgressDialog.setProgressStyle(ProgressDialog.STYLE_SPINNER);
  mProgressDialog.show();

  try {
    /** 獲取基站數據 */
    SCell cell = getCellInfo();

    /** 根據基站數據獲取經緯度 */
    SItude itude = getItude(cell);

    /** 獲取地理位置 */
    String location = getLocation(itude);

    /** 顯示結果 */
    showResult(cell, location);

    /** 關閉對話框 */
    mProgressDialog.dismiss();
  }catch (Exception e) {
    /** 關閉對話框 */
    mProgressDialog.dismiss();
    /** 顯示錯誤 */
    TextView cellText = (TextView)findViewById(R.id.cellText);
    cellText.setText(e.getMessage());
  }
}
按鈕相關的工作就完成了,接下來編寫獲取基站信息的方法。
三、獲取基站信息
獲取基站信息我們需要調用SDK提供的API中的TelephonyManager,需要在文件頭部引入:
import android.telephony.TelephonyManager;
import android.telephony.gsm.GsmCellLocation;
完整代碼為:
/**
 * 獲取基站信息
 *
 * @throws Exception
 */
private SCell getCellInfo() throws Exception {
  SCell cell = new SCell();

  /** 調用API獲取基站信息 */
  TelephonyManager mTelNet = (TelephonyManager) getSystemService(Context.TELEPHONY_SERVICE);
  GsmCellLocation location = (GsmCellLocation) mTelNet.getCellLocation();
  if (location == null)
    throw new Exception("獲取基站信息失敗");

  String operator = mTelNet.getNetworkOperator();
  int mcc = Integer.parseInt(operator.substring(0, 3));
  int mnc = Integer.parseInt(operator.substring(3));
  int cid = location.getCid();
  int lac = location.getLac();

  /** 將獲得的數據放到結構體中 */
  cell.MCC = mcc;
  cell.MNC = mnc;
  cell.LAC = lac;
  cell.CID = cid;

  return cell;
}
如果獲得的位置信息為null將拋出錯誤,不再繼續執行。最後將獲取的基站信息封裝為結構體返回。
四、獲取經緯度
在這一步,我們需要采用HTTP調用google的API以獲取基站所在的經緯度。
Android作為一款互聯網手機,聯網的功能必不可少。Android提供了多個接口供我們使用,這裡我們使用DefaultHttpClient。
完整的方法代碼如下:
/**
 * 獲取經緯度
 *
 * @throws Exception
 */
private SItude getItude(SCell cell) throws Exception {
  SItude itude = new SItude();

  /** 采用Android默認的HttpClient */
  HttpClient client = new DefaultHttpClient();
  /** 采用POST方法 */
  HttpPost post = new HttpPost("http://www.google.com/loc/json");
  try {
    /** 構造POST的JSON數據 */
    JSONObject holder = new JSONObject();
    holder.put("version", "1.1.0");
    holder.put("host", "maps.google.com");
    holder.put("address_language", "zh_CN");
    holder.put("request_address", true);
    holder.put("radio_type", "gsm");
    holder.put("carrier", "HTC");

    JSONObject tower = new JSONObject();
    tower.put("mobile_country_code", cell.MCC);
    tower.put("mobile_network_code", cell.MNC);
    tower.put("cell_id", cell.CID);
    tower.put("location_area_code", cell.LAC);

    JSONArray towerarray = new JSONArray();
    towerarray.put(tower);
    holder.put("cell_towers", towerarray);

    StringEntity query = new StringEntity(holder.toString());
    post.setEntity(query);

    /** 發出POST數據並獲取返回數據 */
    HttpResponse response = client.execute(post);
    HttpEntity entity = response.getEntity();
    BufferedReader buffReader = new BufferedReader(new InputStreamReader(entity.getContent()));
    StringBuffer strBuff = new StringBuffer();
    String result = null;
    while ((result = buffReader.readLine()) != null) {
      strBuff.append(result);
    }

    /** 解析返回的JSON數據獲得經緯度 */
    JSONObject json = new JSONObject(strBuff.toString());
    JSONObject subjosn = new JSONObject(json.getString("location"));

    itude.latitude = subjosn.getString("latitude");
    itude.longitude = subjosn.getString("longitude");

    Log.i("Itude", itude.latitude + itude.longitude);

  } catch (Exception e) {
    Log.e(e.getMessage(), e.toString());
    throw new Exception("獲取經緯度出現錯誤:"+e.getMessage());
  } finally{
    post.abort();
    client = null;
  }

  return itude;
}
在這裡采用POST方法將JSON數據發送到googleAPI,google返回JSON數據,我們得到數據後解析,得到經緯度信息。
五、獲取物理位置
得到經緯度後,我們將之轉換為物理地址。
我們仍然使用DefaultHttpClient來調用google地圖的API,獲得物理信息,不過在這裡我們使用GET方法。
完整的方法代碼如下:
/**
 * 獲取地理位置
 *
 * @throws Exception
 */
private String getLocation(SItude itude) throws Exception {
  String resultString = "";

  /** 這裡采用get方法,直接將參數加到URL上 */
  String urlString = String.format("http://maps.google.cn/maps/geo?key=abcdefg&q=%s,%s", itude.latitude, itude.longitude);
  Log.i("URL", urlString);

  /** 新建HttpClient */
  HttpClient client = new DefaultHttpClient();
  /** 采用GET方法 */
  HttpGet get = new HttpGet(urlString);
  try {
    /** 發起GET請求並獲得返回數據 */
    HttpResponse response = client.execute(get);
    HttpEntity entity = response.getEntity();
    BufferedReader buffReader = new BufferedReader(new InputStreamReader(entity.getContent()));
    StringBuffer strBuff = new StringBuffer();
    String result = null;
    while ((result = buffReader.readLine()) != null) {
      strBuff.append(result);
    }
    resultString = strBuff.toString();

    /** 解析JSON數據,獲得物理地址 */
    if (resultString != null && resultString.length() > 0) {
      JSONObject jsonobject = new JSONObject(resultString);
      JSONArray jsonArray = new JSONArray(jsonobject.get("Placemark").toString());
      resultString = "";
      for (int i = 0; i < jsonArray.length(); i++) {
        resultString = jsonArray.getJSONObject(i).getString("address");
      }
    }
  } catch (Exception e) {
    throw new Exception("獲取物理位置出現錯誤:" + e.getMessage());
  } finally {
    get.abort();
    client = null;
  }

  return resultString;
}
GET方法就比POST方法簡單多了,得到的數據同樣為JSON格式,解析一下得到物理地址。
六、顯示結果
好了,我們已經得到我們想要的信息了,我們把它顯示出來,方法代碼如下:
/** 顯示結果 */
private void showResult(SCell cell, String location) {
  TextView cellText = (TextView) findViewById(R.id.cellText);
  cellText.setText(String.format("基站信息:mcc:%d, mnc:%d, lac:%d, cid:%d",
      cell.MCC, cell.MNC, cell.LAC, cell.CID));

  TextView locationText = (TextView) findViewById(R.id.lacationText);
  locationText.setText("物理位置:" + location);
}
七、運行程序
我們的編碼工作已經完成了。在上面的代碼中有些地方需要的引入代碼沒有提到,下面把完整的代碼貼出來:
package com.android.demo;

import java.io.BufferedReader;
import java.io.InputStreamReader;

import org.apache.http.HttpEntity;
import org.apache.http.HttpResponse;
import org.apache.http.client.HttpClient;
import org.apache.http.client.methods.HttpGet;
import org.apache.http.client.methods.HttpPost;
import org.apache.http.entity.StringEntity;
import org.apache.http.impl.client.DefaultHttpClient;

import org.json.JSONArray;
import org.json.JSONObject;

import android.app.Activity;
import android.app.ProgressDialog;
import android.content.Context;
import android.os.Bundle;
import android.telephony.TelephonyManager;
import android.telephony.gsm.GsmCellLocation;
import android.util.Log;
import android.view.View;
import android.widget.Button;
import android.widget.TextView;
import android.view.View.OnClickListener;

public class DemoActivity extends Activity {
  /** Called when the activity is first created. */
  @Override
  public void onCreate(Bundle savedInstanceState) {
    super.onCreate(savedInstanceState);
    setContentView(R.layout.main);

    /** 為按鈕綁定事件 */
    Button btnGetLocation = (Button) findViewById(R.id.button1);
    btnGetLocation.setOnClickListener(new OnClickListener() {
      @Override
      public void onClick(View arg0) {
        // TODO Auto-generated method stub
        onBtnClick();
      }
    });
  }

  /** 基站信息結構體 */
  public class SCell{
    public int MCC;
    public int MNC;
    public int LAC;
    public int CID;
  }

  /** 經緯度信息結構體 */
  public class SItude{
    public String latitude;
    public String longitude;
  }

  /** 按鈕點擊回調函數 */
  private void onBtnClick() {
    /** 彈出一個等待狀態的框 */
    ProgressDialog mProgressDialog = new ProgressDialog(this);
    mProgressDialog.setMessage("正在獲取中...");
    mProgressDialog.setProgressStyle(ProgressDialog.STYLE_SPINNER);
    mProgressDialog.show();

    try {
      /** 獲取基站數據 */
      SCell cell = getCellInfo();

      /** 根據基站數據獲取經緯度 */
      SItude itude = getItude(cell);

      /** 獲取地理位置 */
      String location = getLocation(itude);

      /** 顯示結果 */
      showResult(cell, location);

      /** 關閉對話框 */
      mProgressDialog.dismiss();
    } catch (Exception e) {
      /** 關閉對話框 */
      mProgressDialog.dismiss();
      /** 顯示錯誤 */
      TextView cellText = (TextView) findViewById(R.id.cellText);
      cellText.setText(e.getMessage());
      Log.e("Error", e.getMessage());
    }
  }

  /**
   * 獲取基站信息
   *
   * @throws Exception
   */
  private SCell getCellInfo() throws Exception {
    SCell cell = new SCell();

    /** 調用API獲取基站信息 */
    TelephonyManager mTelNet = (TelephonyManager) getSystemService(Context.TELEPHONY_SERVICE);
    GsmCellLocation location = (GsmCellLocation) mTelNet.getCellLocation();
    if (location == null)
      throw new Exception("獲取基站信息失敗");

    String operator = mTelNet.getNetworkOperator();
    int mcc = Integer.parseInt(operator.substring(0, 3));
    int mnc = Integer.parseInt(operator.substring(3));
    int cid = location.getCid();
    int lac = location.getLac();

    /** 將獲得的數據放到結構體中 */
    cell.MCC = mcc;
    cell.MNC = mnc;
    cell.LAC = lac;
    cell.CID = cid;

    return cell;
  }

  /**
   * 獲取經緯度
   *
   * @throws Exception
   */
  private SItude getItude(SCell cell) throws Exception {
    SItude itude = new SItude();

    /** 采用Android默認的HttpClient */
    HttpClient client = new DefaultHttpClient();
    /** 采用POST方法 */
    HttpPost post = new HttpPost("http://www.google.com/loc/json");
    try {
      /** 構造POST的JSON數據 */
      JSONObject holder = new JSONObject();
      holder.put("version", "1.1.0");
      holder.put("host", "maps.google.com");
      holder.put("address_language", "zh_CN");
      holder.put("request_address", true);
      holder.put("radio_type", "gsm");
      holder.put("carrier", "HTC");

      JSONObject tower = new JSONObject();
      tower.put("mobile_country_code", cell.MCC);
      tower.put("mobile_network_code", cell.MNC);
      tower.put("cell_id", cell.CID);
      tower.put("location_area_code", cell.LAC);

      JSONArray towerarray = new JSONArray();
      towerarray.put(tower);
      holder.put("cell_towers", towerarray);

      StringEntity query = new StringEntity(holder.toString());
      post.setEntity(query);

      /** 發出POST數據並獲取返回數據 */
      HttpResponse response = client.execute(post);
      HttpEntity entity = response.getEntity();
      BufferedReader buffReader = new BufferedReader(new InputStreamReader(entity.getContent()));
      StringBuffer strBuff = new StringBuffer();
      String result = null;
      while ((result = buffReader.readLine()) != null) {
        strBuff.append(result);
      }

      /** 解析返回的JSON數據獲得經緯度 */
      JSONObject json = new JSONObject(strBuff.toString());
      JSONObject subjosn = new JSONObject(json.getString("location"));

      itude.latitude = subjosn.getString("latitude");
      itude.longitude = subjosn.getString("longitude");

      Log.i("Itude", itude.latitude + itude.longitude);

    } catch (Exception e) {
      Log.e(e.getMessage(), e.toString());
      throw new Exception("獲取經緯度出現錯誤:"+e.getMessage());
    } finally{
      post.abort();
      client = null;
    }

    return itude;
  }

  /**
   * 獲取地理位置
   *
   * @throws Exception
   */
  private String getLocation(SItude itude) throws Exception {
    String resultString = "";

    /** 這裡采用get方法,直接將參數加到URL上 */
    String urlString = String.format("http://maps.google.cn/maps/geo?key=abcdefg&q=%s,%s", itude.latitude, itude.longitude);
    Log.i("URL", urlString);

    /** 新建HttpClient */
    HttpClient client = new DefaultHttpClient();
    /** 采用GET方法 */
    HttpGet get = new HttpGet(urlString);
    try {
      /** 發起GET請求並獲得返回數據 */
      HttpResponse response = client.execute(get);
      HttpEntity entity = response.getEntity();
      BufferedReader buffReader = new BufferedReader(new InputStreamReader(entity.getContent()));
      StringBuffer strBuff = new StringBuffer();
      String result = null;
      while ((result = buffReader.readLine()) != null) {
        strBuff.append(result);
      }
      resultString = strBuff.toString();

      /** 解析JSON數據,獲得物理地址 */
      if (resultString != null && resultString.length() > 0) {
        JSONObject jsonobject = new JSONObject(resultString);
        JSONArray jsonArray = new JSONArray(jsonobject.get("Placemark").toString());
        resultString = "";
        for (int i = 0; i < jsonArray.length(); i++) {
          resultString = jsonArray.getJSONObject(i).getString("address");
        }
      }
    } catch (Exception e) {
      throw new Exception("獲取物理位置出現錯誤:" + e.getMessage());
    } finally {
      get.abort();
      client = null;
    }

    return resultString;
  }

  /** 顯示結果 */
  private void showResult(SCell cell, String location) {
    TextView cellText = (TextView) findViewById(R.id.cellText);
    cellText.setText(String.format("基站信息:mcc:%d, mnc:%d, lac:%d, cid:%d",
        cell.MCC, cell.MNC, cell.LAC, cell.CID));

    TextView locationText = (TextView) findViewById(R.id.lacationText);
    locationText.setText("物理位置:" + location);
  }
}
我們連上手機在手機上運行程序看看。
不出意外的話程序運行起來了,自動跳轉到了主界面。點擊“Click Me”,出錯了!
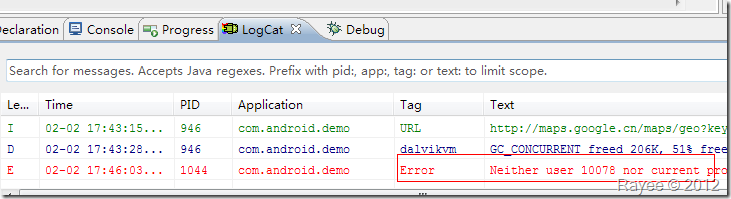
詳細的錯誤信息為:Neither user 10078 nor current process has android.permission.ACCESS_COARSE_LOCATION.
原來是沒有權限,經過前面的學習,我們知道Android在應用的安全上下了一番功夫,要用一些特殊功能必須先報告,安裝應用的時候列給用戶看,必須要得到用戶的允許。這裡我們用了獲取基站信息的功能,涉及到用戶的隱私了,所以我們必須申明一下。
打開AndroidManifest.xml配置文件,在裡面添加相應的配置信息:
<uses-permission android:name="android.permission.ACCESS_FINE_LOCATION"></uses-permission>
我們繼續把網絡連接的權限申明也加上:
<uses-permission android:name="android.permission.INTERNET"></uses-permission>
再編譯運行看看(點擊“Click Me”後程序會卡住,等待一段時間才有反應,取決於網絡情況):
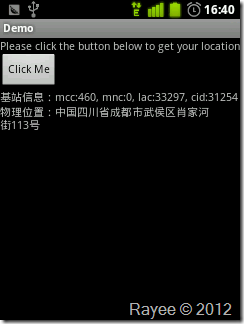
成功啦!
可能有的同學還是出現錯誤,沒有成功:
█ 提示“www.google.com…”什麼的錯誤
請確認你的手機能訪問互聯網,調用google的API是必須聯網的。
█ 提示獲取不到基站信息
你確定你是在手機上測試的嗎?模擬器可不行哦。或者你的手機使用的CMDA網絡?這個例子只支持GSM網絡…
█ 獲取不到經緯度
很有可能你中獎了,你所在的基站還沒納入google的數據庫…(話說我之前也遇到過,怎麼查就是查不出經緯度來,返回數據為空)
█ 獲取到的地理地址不正確
這個可能程序出錯了,可能google出錯了?
其實google map API返回的數據中還包含了很多其他信息,我們可以用來開發一些更有趣的功能,如制作我們專屬的地圖軟件、足跡記錄軟件等,充分發揮你的創造力:)
八、總結
這個程序基本實現了基站定位功能,但還有很多問題,如:點擊了按鈕後界面會卡住(訪問網絡時阻塞了進程)、未對異常進一步處理、不兼容CMDA網絡等。
另外這個程序的精度也不夠,獲得的位置實際上是基站的物理位置,與人所在的位置還有一定差距。在城市裡面,一般采用密集型的小功率基站,精度一般在幾百米范圍內,而在郊區常為大功率基站,密度很小,精度一般在幾千米以上。
想要取得更高的精度需要通過一些其他的算法來實現,如果大家有興趣的話我們可以一起來研究一下,再專門寫篇筆記。
可見寫一段程序和做一個實際的產品是有很大差別的。
結尾
這一節基本實現了最簡單的基站定位,只是作為學習的例子,遠遠達不到產品的要求,請大家見諒。
我們進一步熟悉了JAVA編碼,之前沒怎麼接觸JAVA看起來有點吃力的同學建議找點JAVA基礎的書來看看。
以上就是本文的全部內容,希望對大家的學習有所幫助,也希望大家多多支持本站。

- Mac Android Studio快捷鍵整頓
- iOS 和 Android 哪一個更利於賺錢?
- Android中getActivity()為null的處理方法
- iOS的CoreAnimation開辟框架中的Layer層動畫制造解析
- 實例講授iOS中的CATransition轉場動畫應用
- IOS CoreAnimation中layer動畫閃耀的處理辦法
- iOS中UIActivityIndicatorView的用法及齒輪期待動畫實例
- iOS圖片縮小的方法(transform和frame)
- IOS UI進修教程之辨別NSBundle和NSURL(讀取文件、寫入文件)
- iOS運用開辟中視圖控件UIWindow的根本應用教程
- 簡略控制iOS運用開辟中sandbox沙盒的應用
- 解析iOS開辟中的FirstResponder第一呼應對象
- 深刻懂得iOS開辟中UIWindow的相干應用
- 詳解iOS設計中的UIWindow應用
- resource fork, Finder information, or similar detritus not allowed錯誤處置步驟