
iOS中UIAlertView警告框組件的使用教程
1. 最簡單的用法
初始化方法:
復制代碼 代碼如下:
- (instancetype)initWithTitle:(NSString *)title message:(NSString *)message delegate:(id /*<UIAlertViewDelegate>*/)delegate cancelButtonTitle:(NSString *)cancelButtonTitle otherButtonTitles:(NSString *)otherButtonTitles, ...;
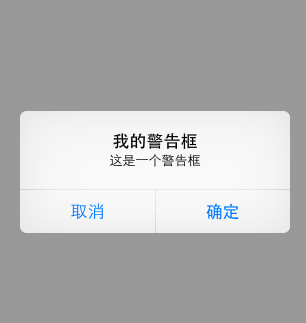
這個方法通過設置一個標題,內容,代理和一些按鈕的標題創建警告框,代碼示例如下:
UIAlertView * alert = [[UIAlertView alloc]initWithTitle:@"我的警告框" message:@"這是一個警告框" delegate:self cancelButtonTitle:@"取消" otherButtonTitles:@"確定", nil];
[alert show];
效果如下:
注意:如果按鈕數超過兩個,將會創建成如下樣子:
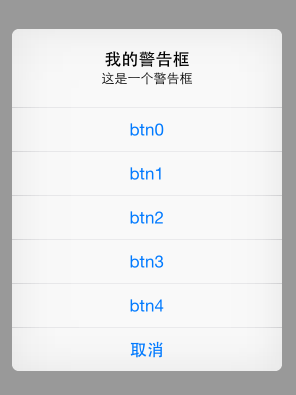
如果按鈕數量超出屏幕顯示范圍,則會創建類似tableView的效果。
2. 為UIAlertView添加多個按鈕
復制代碼 代碼如下:
UIAlertView*alert = [[UIAlertView alloc]initWithTitle:@"提示"
message:@"請選擇一個按鈕:"
delegate:nil
cancelButtonTitle:@"取消"
otherButtonTitles:@"按鈕一", @"按鈕二", @"按鈕三",nil];
[alert show];
[alert release];
3. 如何判斷用戶點擊的按鈕
UIAlertView有一個委托(代理)UIAlertViewDelegate ,繼承該委托來實現點擊事件
頭文件:
復制代碼 代碼如下:
@interface MyAlertViewViewController : UIViewController {
}
(void)alertView:(UIAlertView *)alertView clickedButtonAtIndex:(NSInteger)buttonIndex;
-(IBAction) buttonPressed;
@end
源文件:
復制代碼 代碼如下:
-(IBAction) buttonPressed
{
UIAlertView*alert = [[UIAlertView alloc]initWithTitle:@"提示"
message:@"請選擇一個按鈕:"
delegate:self
cancelButtonTitle:@"取消"
otherButtonTitles:@"按鈕一", @"按鈕二", @"按鈕三",nil];
[alert show];
[alert release];
}
(void)alertView:(UIAlertView *)alertView clickedButtonAtIndex:(NSInteger)buttonIndex
{
NSString* msg = [[NSString alloc] initWithFormat:@"您按下的第%d個按鈕!",buttonIndex];
UIAlertView* alert = [[UIAlertView alloc]initWithTitle:@"提示"
message:msg
delegate:nil
cancelButtonTitle:@"確定"
otherButtonTitles:nil];
[alert show];
[alert release];
[msg release];
}
點擊“取消”,“按鈕一”,“按鈕二”,“按鈕三”的索引buttonIndex分別是0,1,2,3
4. 手動的取消對話框
復制代碼 代碼如下:
[alertdismissWithClickedButtonIndex:0 animated:YES];
5. 為UIAlertView添加子視圖
在為UIAlertView對象太添加子視圖的過程中,有點是需要注意的地方,如果刪除按鈕,也就是取消UIAlerView視圖中所有的按鈕的時候,可能會導致整個顯示結構失衡。按鈕占用的空間不會消失,我們也可以理解為這些按鈕沒有真正的刪除,僅僅是他不可見了而已。如果在UIAlertview對象中僅僅用來顯示文本,那麼,可以在消息的開頭添加換行符(@"\n)有助於平衡按鈕底部和頂部的空間。
下面的代碼用來演示如何為UIAlertview對象添加子視圖的方法。
復制代碼 代碼如下:
UIAlertView*alert = [[UIAlertView alloc]initWithTitle:@"請等待"
message:nil
delegate:nil
cancelButtonTitle:nil
otherButtonTitles:nil];
[alert show];
UIActivityIndicatorView*activeView = [[UIActivityIndicatorView alloc]initWithActivityIndicatorStyle:UIActivityIndicatorViewStyleWhiteLarge];
activeView.center = CGPointMake(alert.bounds.size.width/2.0f, alert.bounds.size.height-40.0f);
[activeView startAnimating];
[alert addSubview:activeView];
[activeView release];
[alert release];
6. 其他
UIAlertView默認情況下所有的text是居中對齊的。 那如果需要將文本向左對齊或者添加其他控件比如輸入框時該怎麼辦呢? 不用擔心, iPhone SDK還是很靈活的, 有很多delegate消息供調用程序使用。 所要做的就是在
復制代碼 代碼如下:
(void)willPresentAlertView:(UIAlertView *)alertView
中按照自己的需要修改或添加即可, 比如需要將消息文本左對齊,下面的代碼即可實現:
復制代碼 代碼如下:
-(void) willPresentAlertView:(UIAlertView *)alertView
{
for( UIView * view in alertView.subviews )
{
if( [view isKindOfClass:[UILabel class]] )
{
UILabel* label = (UILabel*) view;
label.textAlignment=UITextAlignmentLeft;
}
}
}
這段代碼很簡單, 就是在消息框即將彈出時,遍歷所有消息框對象,將其文本對齊屬性修改為 UITextAlignmentLeft即可。
添加其他部件也如出一轍, 如下代碼添加兩個UITextField:
復制代碼 代碼如下:
-(void) willPresentAlertView:(UIAlertView *)alertView
{
CGRect frame = alertView.frame;
frame.origin.y -= 120;
frame.size.height += 80;
alertView.frame = frame;
for( UIView * viewin alertView.subviews )
{
if( ![viewisKindOfClass:[UILabelclass]] )
{
CGRect btnFrame = view.frame;
btnFrame.origin.y += 70;
view.frame = btnFrame;
}
}
UITextField* accoutName = [[UITextFieldalloc] init];
UITextField* accoutPassword = [[UITextFieldalloc] init];
accoutName.frame = CGRectMake( 10, frame.origin.y + 40,frame.size.width - 20, 30 );
accoutPassword.frame = CGRectMake( 10, frame.origin.y + 80,frame.size.width -20, 30 );
accoutName.placeholder = @"請輸入賬號";
accoutPassword.placeholder = @"請輸入密碼";
accoutPassword.secureTextEntry = YES;
[alertView addSubview:accoutPassword];
[alertView addSubview:accoutName];
[accoutName release];
[accoutPassword release];
}
顯示將消息框固有的button和label移位, 不然添加的text field會將其遮蓋住。 然後添加需要的部件到相應的位置即可。
對於UIActionSheet其實也是一樣的, 在
復制代碼 代碼如下:
(void)willPresentActionSheet:(UIActionSheet *)actionSheet
中做同樣的處理一樣可以得到自己想要的界面。


- 《Motion Design for iOS》(三十二)
- iOS延遲執行辦法詳解
- iOS之Xcode 8.0真機調試運轉:This ** is running iOS 10.1.1 (14B100), which may not be supported
- iOS的CoreAnimation開辟框架中的Layer層動畫制造解析
- iOS開發系列--告訴與音訊機制詳解
- 簡單介紹iOS開發中關於category的應用
- iOS10從app跳轉到WiFi設置界面
- 詳解iOS多線程GCD的使用
- CGContextSaveGState: invalid context 0x0
- ios開發navigationController pushViewController 方式多次跳轉返回到最上層返回到指定的某一層的實現方法