iOS實現列表與網格兩種視圖的相互切換
編輯:IOS開發綜合
下圖為京東商城的截圖
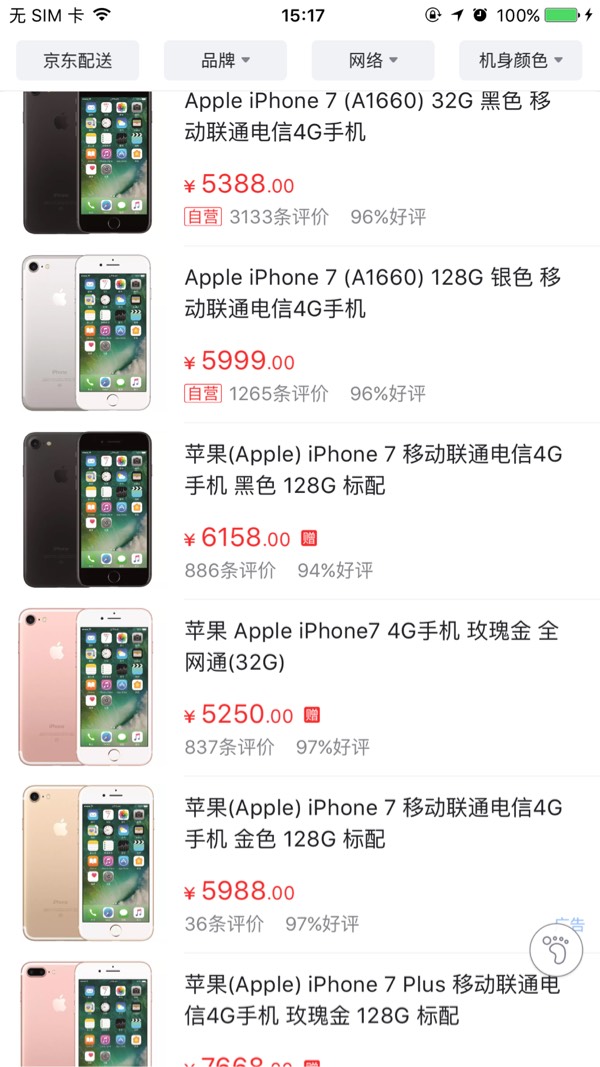
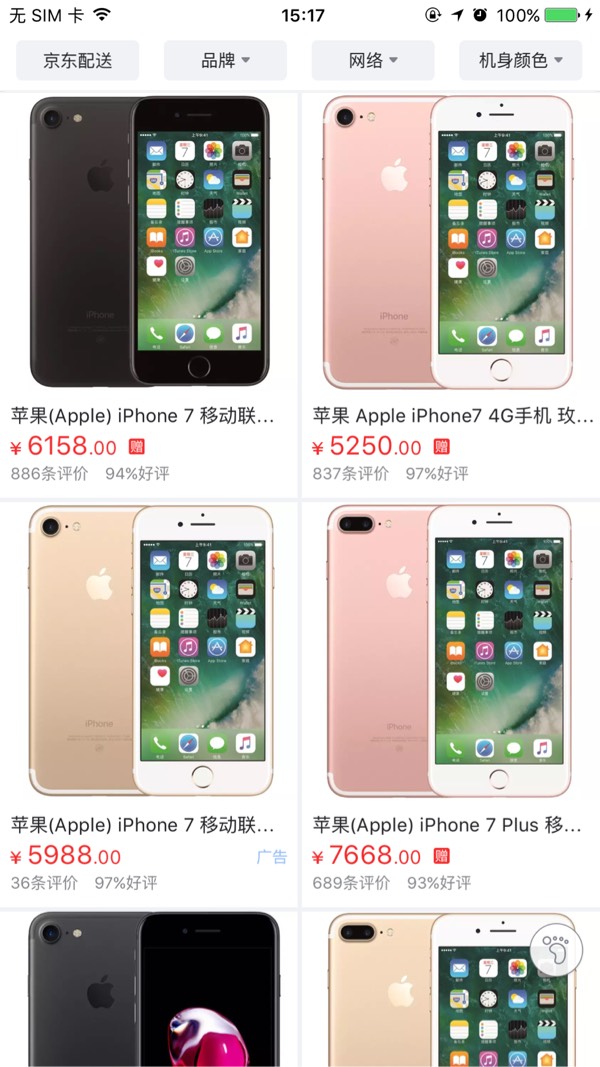
很多人看到這個,第一眼想到的是用TableView和CollectionView來做切換,筆者剛開始也是認為這麼做,後來發現還有一個非常的簡單方法,就可以實現這個功能。
實現代碼
1、首先創建一個CollectionView。
- (UICollectionView *)collectionView
{
  if (!_collectionView)
  {
    UICollectionViewFlowLayout *flowlayout = [[UICollectionViewFlowLayout alloc] init];
    //設置滾動方向
    [flowlayout setScrollDirection:UICollectionViewScrollDirectionVertical];
    //左右間距
    flowlayout.minimumInteritemSpacing = 2;
    //上下間距
    flowlayout.minimumLineSpacing = 2;
    _collectionView = [[UICollectionView alloc] initWithFrame:CGRectMake(2 , 2 , self.view.bounds.size.width - 4, self.view.bounds.size.height - 4) collectionViewLayout:flowlayout];
    _collectionView.delegate = self;
    _collectionView.dataSource = self;
    _collectionView.showsVerticalScrollIndicator = NO;
    _collectionView.showsHorizontalScrollIndicator = NO;
    [_collectionView setBackgroundColor:[UIColor clearColor]];
    //注冊cell
    [_collectionView registerClass:[GridListCollectionViewCell class] forCellWithReuseIdentifier:kCellIdentifier_CollectionViewCell];
  }
  return _collectionView;
}
然後去京東商城抓取json數據,再去解析數據裝入模型,objectWithDictionary:是將字典轉化為模型,這個工具是我用 Runtime 寫的,一行代碼解析數據。
- (void)viewDidLoad
{
  [super viewDidLoad];
  // Do any additional setup after loading the view, typically from a nib.

  // 默認列表視圖
  _isGrid = NO;

  NSString *path = [[NSBundle mainBundle] pathForResource:@"product" ofType:@"json"];
  NSData *data = [NSData dataWithContentsOfFile:path];
  NSDictionary *dict = [NSJSONSerialization JSONObjectWithData:data options:NSJSONReadingAllowFragments error:nil];

  [self.view addSubview:self.collectionView];

  NSArray *products = dict[@"wareInfo"];
  for (id obj in products) {
    [self.dataSource addObject:[GridListModel objectWithDictionary:obj]];
  }
}
再去自定義CollectionViewCell,給cell添加一個屬性isGrid,用來判斷是列表還是格子視圖。
.h文件:
#import <UIKit/UIKit.h>

#define kCellIdentifier_CollectionViewCell @"GridListCollectionViewCell"

@class GridListModel;

@interface GridListCollectionViewCell : UICollectionViewCell

/**
 0:列表視圖,1:格子視圖
 */
@property (nonatomic, assign) BOOL isGrid;

@property (nonatomic, strong) GridListModel *model;

@end
.m文件
#import "GridListCollectionViewCell.h"
#import "GridListModel.h"
#import "UIImageView+WebCache.h"

#define ScreenWidth ([UIScreen mainScreen].bounds.size.width)

@interface GridListCollectionViewCell ()

@property (nonatomic, strong) UIImageView *imageV;
@property (nonatomic, strong) UILabel *titleLabel;
@property (nonatomic, strong) UILabel *priceLabel;

@end

@implementation GridListCollectionViewCell

- (instancetype)initWithFrame:(CGRect)frame
{
  self = [super initWithFrame:frame];
  if (self) {
    [self configureUI];
  }
  return self;
}

- (void)configureUI
{
  _imageV = [[UIImageView alloc] initWithFrame:CGRectZero];
  [self.contentView addSubview:_imageV];

  _titleLabel = [[UILabel alloc] initWithFrame:CGRectZero];
  _titleLabel.numberOfLines = 0;
  _titleLabel.font = [UIFont boldSystemFontOfSize:14];
  [self.contentView addSubview:_titleLabel];

  _priceLabel = [[UILabel alloc] initWithFrame:CGRectZero];
  _priceLabel.textColor = [UIColor redColor];
  _priceLabel.font = [UIFont systemFontOfSize:16];
  [self.contentView addSubview:_priceLabel];
}

- (void)setIsGrid:(BOOL)isGrid
{
  _isGrid = isGrid;

  if (isGrid) {
    _imageV.frame = CGRectMake(5, 5, self.bounds.size.width - 60, self.bounds.size.width - 60);
    _titleLabel.frame = CGRectMake(5, self.bounds.size.width - 45, ScreenWidth/2, 20);
    _priceLabel.frame = CGRectMake(5, self.bounds.size.width - 20, ScreenWidth/2, 20);
  } else {
    _imageV.frame = CGRectMake(5, 5, self.bounds.size.height - 10, self.bounds.size.height - 10);
    _titleLabel.frame = CGRectMake(self.bounds.size.height + 10, 0, ScreenWidth/2, self.bounds.size.height - 20);;
    _priceLabel.frame = CGRectMake(self.bounds.size.height + 10, self.bounds.size.height - 30, ScreenWidth/2, 20);;
  }
}

- (void)setModel:(GridListModel *)model
{
  _model = model;

  [_imageV sd_setImageWithURL:[NSURL URLWithString:model.imageurl]];
  _titleLabel.text = model.wname;
  _priceLabel.text = [NSString stringWithFormat:@"¥%.2f",model.jdPrice];
}

@end
再添加一個切換視圖的按鈕,按鈕的點擊事件如下:
#pragma mark - Action

- (IBAction)onBtnClick:(id)sender
{
  _isGrid = !_isGrid;
  [self.collectionView reloadData];

  if (_isGrid) {
    [self.swithBtn setImage:[UIImage imageNamed:@"product_list_grid_btn"] forState:0];
  } else {
    [self.swithBtn setImage:[UIImage imageNamed:@"product_list_list_btn"] forState:0];
  }
}
最後還要設置一下切換時的CollectionView的ItemSize。
- (CGSize)collectionView:(UICollectionView *)collectionView layout:(UICollectionViewLayout *)collectionViewLayout sizeForItemAtIndexPath:(NSIndexPath *)indexPath
{
  if (_isGrid) {
    return CGSizeMake((ScreenWidth - 6) / 2, (ScreenWidth - 6) / 2 + 40);
  } else {
    return CGSizeMake(ScreenWidth - 4, (ScreenWidth - 6) / 4 + 20);
  }
}
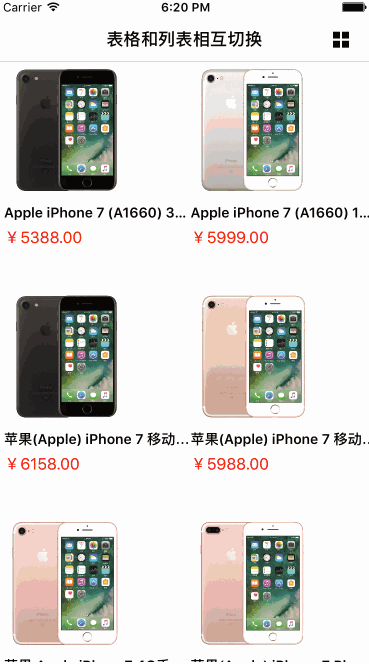
這樣子就大體實現了列表視圖和網格視圖的相互切換,是不是很簡單。
總結
以上就是這篇文章的全部內容了,可能由於筆者水平有限,文中如果有錯誤的地方,還望大家能夠指出。或者有更好的方法和建議,我們也可以一起交流。希望這篇文章的內容對大家能有所幫助。


相關文章
+