使用CADisplayLink實現果凍效果動畫
編輯:IOS開發基礎
CADisplayLink是什麼
根據Apple的doc:
A CADisplayLink object is a timer object that allows your application to synchronize its drawing to the refresh rate of the display.
比起NSTimer,CADisplayLink可以確保系統渲染每一幀的時候我們的方法都被調用,從而保證了動畫的流暢性。
Demo
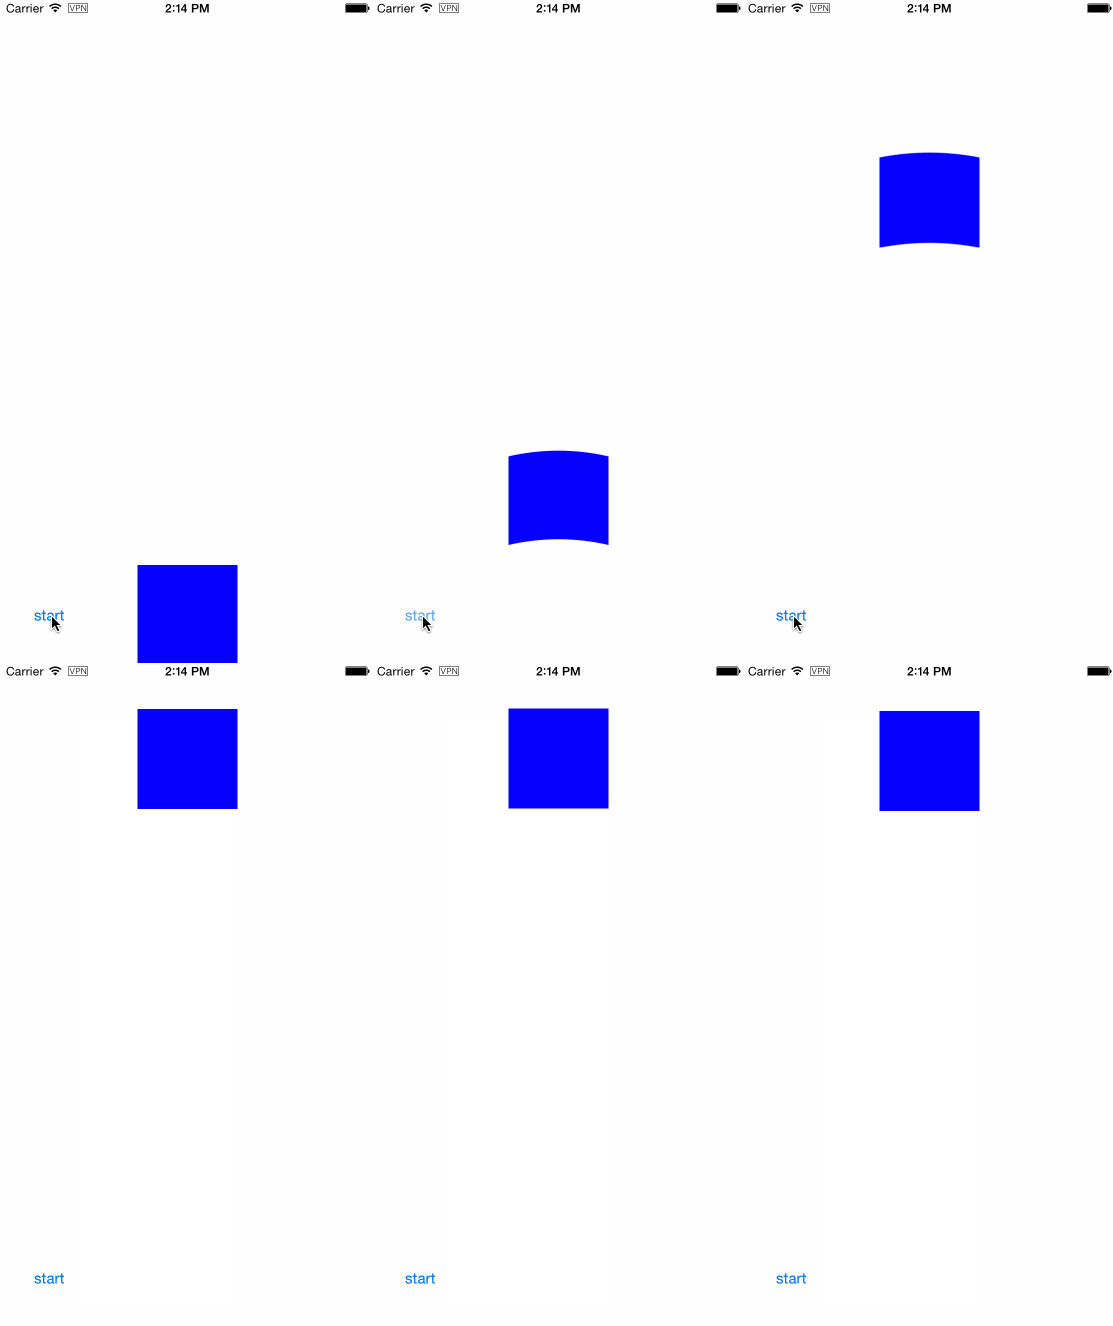
我們希望在animate一個view的時候給它加上果凍效果:

我們會把所有的邏輯都封裝到一個BlockView裡,在這個view裡首先申明一個property:
@property (strong, nonatomic) CADisplayLink *displayLink;
在動畫開始的時候,初始化displayLink,指定tick方法:
- (void)startAnimation
{
    if (self.displayLink == nil) {
        self.displayLink = [CADisplayLink displayLinkWithTarget:self selector:@selector(tick:)];
        [self.displayLink addToRunLoop:[NSRunLoop currentRunLoop]
                               forMode:NSDefaultRunLoopMode];
    }
}
動畫結束的時候invalidate displayLink:
- (void)completeAnimation
{
    [self.displayLink invalidate];
    self.displayLink = nil;
}
每個tick中,我們需要根據當前的位置重繪邊緣,所以只需調用setNeedsDisplay即可:
- (void)tick:(CADisplayLink *)displayLink
{
    [self setNeedsDisplay];
}
在drawRect中,我們計算當前動畫的progress,然後進行繪制。需要注意的是,我們需要通過self.layer.presentationLayer來獲取動畫過程中的位置信息。
- (void)drawRect:(CGRect)rect
{
    CALayer *layer = self.layer.presentationLayer;
    CGFloat progress = 1 - (layer.position.y - self.to) / (self.from - self.to);
    CGFloat height = CGRectGetHeight(rect);
    CGFloat deltaHeight = height / 2 * (0.5 - fabs(progress - 0.5));
    CGPoint topLeft = CGPointMake(0, deltaHeight);
    CGPoint topRight = CGPointMake(CGRectGetWidth(rect), deltaHeight);
    CGPoint bottomLeft = CGPointMake(0, height);
    CGPoint bottomRight = CGPointMake(CGRectGetWidth(rect), height);
    UIBezierPath* path = [UIBezierPath bezierPath];
    [[UIColor blueColor] setFill];
    [path moveToPoint:topLeft];
    [path addQuadCurveToPoint:topRight controlPoint:CGPointMake(CGRectGetMidX(rect), 0)];
    [path addLineToPoint:bottomRight];
    [path addQuadCurveToPoint:bottomLeft controlPoint:CGPointMake(CGRectGetMidX(rect), height - deltaHeight)];
    [path closePath];
    [path fill];
}
最後,我們只需要這樣animate這個BlockView:
    [self.blockView startAnimationFrom:from to:to];
    [UIView animateWithDuration:1 delay:0 usingSpringWithDamping:0.85 initialSpringVelocity:0 options:0 animations:^{
        self.blockView.center = CGPointMake(self.blockView.center.x, to);
    } completion:^(BOOL finished) {
        [self.blockView completeAnimation];
    }];
Demo Project
- 蘋果iOS9正式版:升級前的注意事項匯總!
- iPhone保養五個誤區全面解答
- iphone怎麼在低功耗模式下打開Night Shift模式
- iPhone6s和三星Galaxy S6 Edge Plus哪個好
- iOS9.2.1對比iOS9.2 哪個更流暢點?
- 用IOS做一個界面切換的效果(登錄界面和注冊界面和找回密碼界面的切換)(用封裝好的lable和textf創建界面)
- iOS 9 學習系列:Storyboard References
- iOS8.1 Handoff iMassage 同步 Mac 功能
- iPhone 7和7Plus哪個好?iPhone 7和7Plus配置參數對比
- Core Data的使用
相關文章
+- iOS應用CALayer完成動畫加載的後果
- Mac Android Studio快捷鍵整頓
- 值得珍藏的iOS開辟經常使用代碼塊
- iOS10告訴框架UserNotification懂得與運用
- iOS10 App適配權限 Push Notifications 字體Frame 碰到的成績
- iPhone/iPad開辟經由過程LocalNotification完成iOS准時當地推送功效
- iOS推送之當地告訴UILocalNotification
- iOS10添加當地推送(Local Notification)實例
- iOS突變圓環扭轉動畫CAShapeLayer CAGradientLayer
- IOS 粒子體系 (CAEmitterLayer)實例詳解
- iOS 開辟經常使用宏總結
- iOS Remote Notification長途新聞推送處置
- iOS App通訊之local socket示例
- iOS App之間的通訊 local socket
- iOS經常使用加密算法引見和代碼理論


