iOS實現帶文字的圓形頭像效果
編輯:IOS開發綜合
下面就來實現一下這種效果 圓形頭像的繪制
先來看一下效果圖
分析一下:
1、首先是需要畫帶有背景色的圓形頭像
2、然後是需要畫文字
3、文字是截取的字符串的一部分
4、不同的字符串,圓形的背景色是不一樣的
5、對於中英文同樣處理,英文的一個字符和中文的一個漢字同樣算作一個字符
6、文字總是居中顯示
好 有了這樣幾點 我們就可以開始畫圖了
看一下最終實現的效果圖

首先 ,我們需要自定義一個view當做自定義頭像,在view的drawRect方法中進行圖像的繪制
@interface RoundHeadView()
@property (nonatomic, copy) NSString *title;//需要繪制的標題
@property (nonatomic, assign) CGFloat colorPoint;//用戶後面計算顏色的隨機值
//設置文字
- (void)setTitle:(NSString *)title;
@end
@implementation RoundHeadView
-(instancetype)initWithFrame:(CGRect)frame{
  self = [super initWithFrame:frame];
  if (self) {
    self.backgroundColor = [UIColor clearColor];
  }
  return self;
}
@end
首先畫一個帶有背景顏色的圓形
-(void)drawRect:(CGRect)rect{

  //一個不透明類型的Quartz 2D繪畫環境,相當於一個畫布,你可以在上面任意繪畫
   CGContextRef context = UIGraphicsGetCurrentContext();
   [self caculateColor];//計算顏色

  /*畫圓*/
   CGContextSetRGBFillColor (context,_colorPoint, 0.5, 0.5, 1.0);//設置填充顏色 顏色這裡隨機設置的,後面會根據文字來計算顏色

  //填充圓,無邊框
  CGContextAddArc(context, self.frame.size.width/2.0, self.frame.size.width/2.0, self.frame.size.width/2.0, 0, 2*M_PI, 0); //添加一個圓
  CGContextDrawPath(context, kCGPathFill);//繪制填充
  }
得到了不帶文字的圓形頭像

接下來 我們來畫文字
首先需要計算一下文字的尺寸
將文字設置進來
- (void)setTitle:(NSString *)title{
  _title = [[self subStringWithLendth:2 string:title] copy];
  [self setNeedsDisplay];//調用這個方法 進行重新繪制 view會重新調用drawRect方法
}
截取文字
/**
 截取字符串,截取字符串最開始的兩個 漢子和英文一樣處理
 @param length 截取的字符長度(漢子和英文同樣計算)
 @param string 需要截取的字符串
 @return 返回截取的字符串
 */
-(NSString *)subStringWithLendth:(int)length string:(NSString *)string{

  NSString *copyStr = [string copy];
  NSMutableString *realStr = [[NSMutableString alloc] init];

  for(int i = 0; i < copyStr.length; i++){
    if(length == 0){
      break;
    }
    unichar ch = [copyStr characterAtIndex:0];
    if (0x4e00 < ch && ch < 0x9fff)//如何判斷是漢字
    {
      //如果是漢子需要做其他處理 可以在這裡做處理
    }
    //若為漢字
    [realStr appendString:[copyStr substringWithRange:NSMakeRange(i,1)]];

    length = length - 1;
  }
  return realStr;
}
/**
 計算文字的尺寸,在繪制圖像時,保證文字總是處於圖像的正中
 文字的尺寸可以自己計算 這裡定義的是 寬度的1/3 我看使用起來比較合適 當然
 你可以自己定義的
 @return 文字的寬高
 */
- (CGSize)caculateLableSize{
  UILabel *lable = [[UILabel alloc] initWithFrame:CGRectZero];
  lable.font = [UIFont fontWithName:@"Arial-BoldMT" size:self.frame.size.width/3.0];
  lable.text = self.title;
  [lable sizeToFit];
  CGSize size = lable.frame.size;
  return size;
}
最後得到了 需要繪制在圖像上的title
還需要做一步處理 就是根據文字的拼音或者其他的什麼東西 來定義圖像的背景色 我這裡就用拼音了
首先需要做的是獲取拼音
/**
 獲取漢子拼音
 @param originalStr 原始中文字符
 @return 漢子的全拼
 */
- (NSString *)pinyin: (NSString *)originalStr{
  NSMutableString *str = [originalStr mutableCopy];
  CFStringTransform(( CFMutableStringRef)str, NULL, kCFStringTransformMandarinLatin, NO);
  CFStringTransform((CFMutableStringRef)str, NULL, kCFStringTransformStripDiacritics, NO);
  return [str stringByReplacingOccurrencesOfString:@" " withString:@""];
}
根據拼音計算顏色,隨即一個顏色 這個方法 我自己瞎想的 一個顏色 當然你可以自己定義一個方法來計算顏色
/**
 隨機一個顏色
 填充圓形頭像的底色
 根據字符的拼音計算出的顏色
 */
- (void)caculateColor{
  if (_title.length == 0) {
    return;
  }
  if (_title.length>1) {
    NSString *firstStr = [_title substringWithRange:NSMakeRange(0,1)];
    NSString *secondStr = [_title substringWithRange:NSMakeRange(1, 1)];
    NSString *firstPinyin = [self pinyin:firstStr];
    NSString *secondPinyin = [self pinyin:secondStr];
    NSUInteger count = firstPinyin.length+secondPinyin.length;
    if (count>10) {
      count-=10;
      self.colorPoint = count/10.0;
    }else{
      self.colorPoint = count/10.0;
    }
  }else{
    NSString *firstStr = [_title substringWithRange:NSMakeRange(0,1)];
    NSString *firstPinyin = [self pinyin:firstStr];
    NSUInteger count = firstPinyin.length;
    self.colorPoint = count/10.0;
  }
}
需要的 我們都處理好了 這下可以直接畫文字了 還是在drawRect方法中
-(void)drawRect:(CGRect)rect{

  //一個不透明類型的Quartz 2D繪畫環境,相當於一個畫布,你可以在上面任意繪畫
  CGContextRef context = UIGraphicsGetCurrentContext();
  [self caculateColor];//計算顏色

  /*畫圓*/
  CGContextSetRGBFillColor (context,_colorPoint, 0.5, 0.5, 1.0);//設置填充顏色
  //  CGContextSetRGBStrokeColor(context,red,green,blue,1.0);//畫筆線的顏色

  //填充圓,無邊框
  CGContextAddArc(context, self.frame.size.width/2.0, self.frame.size.width/2.0, self.frame.size.width/2.0, 0, 2*M_PI, 0); //添加一個圓
  CGContextDrawPath(context, kCGPathFill);//繪制填充


  /*寫文字*/
  //  CGContextSetRGBFillColor (context, 1, 0, 0, 1.0);//設置填充顏色
  NSDictionary* dic = [NSDictionary dictionaryWithObjectsAndKeys:[UIFont fontWithName:@"Arial-BoldMT" size:self.frame.size.width/3.0], NSFontAttributeName,[UIColor whiteColor],NSForegroundColorAttributeName, nil];
  CGSize size = [self caculateLableSize];
  CGFloat X = (self.frame.size.width-size.width)/2.0;
  CGFloat Y = (self.frame.size.height-size.height)/2.0;
  [self.title drawInRect:CGRectMake(X, Y, self.frame.size.width, self.frame.size.width) withAttributes:dic];
}
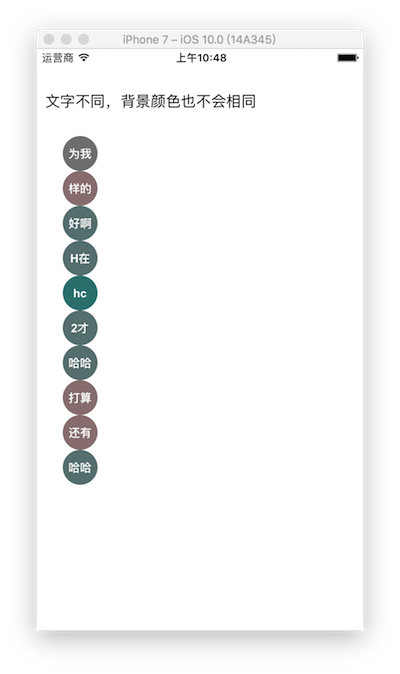
測試一下
UILabel *label = [[UILabel alloc] initWithFrame:CGRectMake(10, 50, 300, 20)];
label.text = @"文字不同,背景顏色也不會相同";
[self.view addSubview:label];
NSArray *strs = @[@"為我",@"樣的",@"好啊",@"H在",@"hc",@"2才",@"哈哈",@"打算打算打算的",@"還有人v",@"哈哈"];
for (int i=0; i<10; i++) {
  RoundHeadView *head = [[RoundHeadView alloc] initWithFrame:CGRectMake(30, 100+(40*i), 40, 40)];
  [head setTitle:strs[i]];
  [self.view addSubview:head];
}
總結
好了,到這就大功告成了,大家都學會了嗎?希望本文的內容對各位iOS開發者們能有所幫助,如果有疑問大家可以留言交流。謝謝大家對本站的支持。
- 上一頁:iOS集成微信支付開發
- 下一頁:iOS中解決Xcode 8控制台亂碼的方式
相關文章
+