iOS之UI編程--霓虹燈的實現
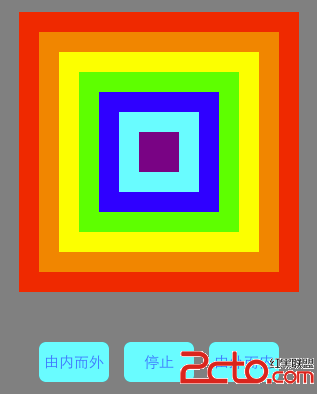
學習UI編程已經有三四天了,這幾天學習了一些初級的視圖和控件,比如UIView,UIlabel以及UIButton.,學習UI編程,有一點樂趣就是自己寫的代碼可以看到效果了。這一點和C語言以及OC區別很大。於是我就嘗試做了一個簡單視圖顏色變換的應用,也就是霓虹燈。實現的功能可以由裡而外,也可以由外到裡,還可以暫停。由於水平有限,再加上還沒有學習NSTimer,只是從網上了解到了簡單地應用,所以代碼實現上可能會有些問題,算法不是最優的,還望大神們批評指點。貼上一張截圖:
 vcnPtPrC68q1z9ajujwvcD4KPHA+PC9wPgo8cHJlIGNsYXNzPQ=="brush:java;">#import "ZZAppDelegate.h"
@interface ZZAppDelegate ()
{
UIView *_containerView;
NSTimer *_timer;
}
@end
@implementation ZZAppDelegate
- (BOOL)application:(UIApplication *)application didFinishLaunchingWithOptions:(NSDictionary *)launchOptions
{
self.window = [[UIWindow alloc] initWithFrame:[[UIScreen mainScreen] bounds]];
// Override point for customization after application launch.
self.window.backgroundColor = [UIColor grayColor];
_containerView = [[UIView alloc] initWithFrame:CGRectMake(0, 0, 320, 568)];
_containerView.backgroundColor = [UIColor clearColor];
[self.window addSubview:_containerView];
[_containerView release];
// 視圖布局
NSArray *array = [NSArray arrayWithObjects:[UIColor redColor], [UIColor orangeColor], [UIColor yellowColor], [UIColor greenColor], [UIColor blueColor], [UIColor cyanColor], [UIColor purpleColor], nil];
for (int i = 0; i < 7; i++) {
UIView *view = [[UIView alloc] initWithFrame:CGRectMake(20 + i * 20, 120 + i * 20, 280 - i * 40, 280 - i * 40)];
view.backgroundColor = array[i];
view.tag = i + 200;
NSLog(@"%ld", (long)view.tag);
[_containerView addSubview:view];
[view release];
}
// 創建由內而外按鈕
UIButton *button1 = [UIButton buttonWithType:UIButtonTypeSystem
];
button1.frame = CGRectMake(40, 450, 70, 40);
button1.backgroundColor = [UIColor cyanColor];
[button1 setTitle:@"由內而外" forState:UIControlStateNormal];
[button1 addTarget:self action:@selector(changeFromInToOut) forControlEvents:UIControlEventTouchUpInside];
button1.layer.cornerRadius = 7;
[_containerView addSubview:button1];
// 創建停止按鈕
UIButton *button2 = [UIButton buttonWithType:UIButtonTypeSystem
];
button2.frame = CGRectMake(125, 450, 70, 40);
button2.backgroundColor = [UIColor cyanColor];
[button2 setTitle:@"停止" forState:UIControlStateNormal];
[button2 addTarget:self action:@selector(stop) forControlEvents:UIControlEventTouchUpInside];
button2.layer.cornerRadius = 7;
[_containerView addSubview:button2];
// 創建由外而內按鈕
UIButton *button3 = [UIButton buttonWithType:UIButtonTypeSystem
];
button3.frame = CGRectMake(210, 450, 70, 40);
button3.backgroundColor = [UIColor cyanColor];
[button3 setTitle:@"由外而內" forState:UIControlStateNormal];
[button3 addTarget:self action:@selector(changeFromOutToIn) forControlEvents:UIControlEventTouchUpInside];
button3.layer.cornerRadius = 7;
[_containerView addSubview:button3];
[self.window makeKeyAndVisible];
return YES;
}
// 由內而外按鈕觸發事件
- (void)changeFromInToOut
{
_timer = [NSTimer scheduledTimerWithTimeInterval:0.3 target:self selector:@selector(changeInToOut) userInfo:nil repeats:YES];
}
// 由外而內按鈕出觸發事件
- (void)changeFromOutToIn
{
_timer = [NSTimer scheduledTimerWithTimeInterval:0.3 target:self selector:@selector(changeOutToIn) userInfo:nil repeats:YES];
}
// 暫停計時器
- (void)stop
{
[_timer invalidate];
}
// 由內而外循環交換顏色
- (void)changeInToOut
{
UIView *temp = [[UIView alloc] init];
int i = 200;
temp.backgroundColor = [_containerView viewWithTag:200].backgroundColor;
for (i = 200; i < 207; i++) {
[_containerView viewWithTag:i].backgroundColor = [_containerView viewWithTag: i + 1].backgroundColor;
}
[_containerView viewWithTag:206].backgroundColor =temp.backgroundColor;
[temp release];
}
// 由外而內循環交換顏色
- (void)changeOutToIn
{
UIView *temp = [[UIView alloc] init];
int i = 206;
temp.backgroundColor = [_containerView viewWithTag:206].backgroundColor;
for (i = 206; i >= 0; i--) {
[_containerView viewWithTag:i].backgroundColor = [_containerView viewWithTag: i - 1].backgroundColor;
}
[_containerView viewWithTag:200].backgroundColor =temp.backgroundColor;
[temp release];
}
- (void)dealloc
{
[_window release];
[super dealloc];
}
@end
vcnPtPrC68q1z9ajujwvcD4KPHA+PC9wPgo8cHJlIGNsYXNzPQ=="brush:java;">#import "ZZAppDelegate.h"
@interface ZZAppDelegate ()
{
UIView *_containerView;
NSTimer *_timer;
}
@end
@implementation ZZAppDelegate
- (BOOL)application:(UIApplication *)application didFinishLaunchingWithOptions:(NSDictionary *)launchOptions
{
self.window = [[UIWindow alloc] initWithFrame:[[UIScreen mainScreen] bounds]];
// Override point for customization after application launch.
self.window.backgroundColor = [UIColor grayColor];
_containerView = [[UIView alloc] initWithFrame:CGRectMake(0, 0, 320, 568)];
_containerView.backgroundColor = [UIColor clearColor];
[self.window addSubview:_containerView];
[_containerView release];
// 視圖布局
NSArray *array = [NSArray arrayWithObjects:[UIColor redColor], [UIColor orangeColor], [UIColor yellowColor], [UIColor greenColor], [UIColor blueColor], [UIColor cyanColor], [UIColor purpleColor], nil];
for (int i = 0; i < 7; i++) {
UIView *view = [[UIView alloc] initWithFrame:CGRectMake(20 + i * 20, 120 + i * 20, 280 - i * 40, 280 - i * 40)];
view.backgroundColor = array[i];
view.tag = i + 200;
NSLog(@"%ld", (long)view.tag);
[_containerView addSubview:view];
[view release];
}
// 創建由內而外按鈕
UIButton *button1 = [UIButton buttonWithType:UIButtonTypeSystem
];
button1.frame = CGRectMake(40, 450, 70, 40);
button1.backgroundColor = [UIColor cyanColor];
[button1 setTitle:@"由內而外" forState:UIControlStateNormal];
[button1 addTarget:self action:@selector(changeFromInToOut) forControlEvents:UIControlEventTouchUpInside];
button1.layer.cornerRadius = 7;
[_containerView addSubview:button1];
// 創建停止按鈕
UIButton *button2 = [UIButton buttonWithType:UIButtonTypeSystem
];
button2.frame = CGRectMake(125, 450, 70, 40);
button2.backgroundColor = [UIColor cyanColor];
[button2 setTitle:@"停止" forState:UIControlStateNormal];
[button2 addTarget:self action:@selector(stop) forControlEvents:UIControlEventTouchUpInside];
button2.layer.cornerRadius = 7;
[_containerView addSubview:button2];
// 創建由外而內按鈕
UIButton *button3 = [UIButton buttonWithType:UIButtonTypeSystem
];
button3.frame = CGRectMake(210, 450, 70, 40);
button3.backgroundColor = [UIColor cyanColor];
[button3 setTitle:@"由外而內" forState:UIControlStateNormal];
[button3 addTarget:self action:@selector(changeFromOutToIn) forControlEvents:UIControlEventTouchUpInside];
button3.layer.cornerRadius = 7;
[_containerView addSubview:button3];
[self.window makeKeyAndVisible];
return YES;
}
// 由內而外按鈕觸發事件
- (void)changeFromInToOut
{
_timer = [NSTimer scheduledTimerWithTimeInterval:0.3 target:self selector:@selector(changeInToOut) userInfo:nil repeats:YES];
}
// 由外而內按鈕出觸發事件
- (void)changeFromOutToIn
{
_timer = [NSTimer scheduledTimerWithTimeInterval:0.3 target:self selector:@selector(changeOutToIn) userInfo:nil repeats:YES];
}
// 暫停計時器
- (void)stop
{
[_timer invalidate];
}
// 由內而外循環交換顏色
- (void)changeInToOut
{
UIView *temp = [[UIView alloc] init];
int i = 200;
temp.backgroundColor = [_containerView viewWithTag:200].backgroundColor;
for (i = 200; i < 207; i++) {
[_containerView viewWithTag:i].backgroundColor = [_containerView viewWithTag: i + 1].backgroundColor;
}
[_containerView viewWithTag:206].backgroundColor =temp.backgroundColor;
[temp release];
}
// 由外而內循環交換顏色
- (void)changeOutToIn
{
UIView *temp = [[UIView alloc] init];
int i = 206;
temp.backgroundColor = [_containerView viewWithTag:206].backgroundColor;
for (i = 206; i >= 0; i--) {
[_containerView viewWithTag:i].backgroundColor = [_containerView viewWithTag: i - 1].backgroundColor;
}
[_containerView viewWithTag:200].backgroundColor =temp.backgroundColor;
[temp release];
}
- (void)dealloc
{
[_window release];
[super dealloc];
}
@end