
iOS學習筆記36-Masonry自動布局
編輯:IOS開發綜合
一、Masonry介紹
之前我們在屏幕適配的章節中學習過AutoLayout的使用,但那都是在可視化界面上進行添加約束完成的,我們很多時候都需要在代碼中使用AutoLayout約束,蘋果也為我們提供了實現,使用NSLayoutConstraint類表示約束,但使用起來比較復雜,代碼量比較大,例如創建一個約束的方法:
+ (id)constraintWithItem:(id)view1 /* 一個UIView */
               attribute:(NSLayoutAttribute)attribute1 /* 屬性 */
               relatedBy:(NSLayoutRelation)relation /* 關系 */
                  toItem:(id)view2 /* 另一個UIView */
               attribute:(NSLayoutAttribute)attribute2 /* 屬性 */
              multiplier:(CGFloat)multiplier /* 倍數 */
                constant:(CGFloat)constant; /* 偏移 */
如果約束一多,這個方法調用次數就會越多,代碼就會變得很長。
實際上我們可以使用第三方框架Masonry,該框架是一個輕量級的布局框架,封裝了AutoLayout,擁有自己的描述語法,采用更優雅的鏈式語法,簡潔明了,並具有高可讀性。
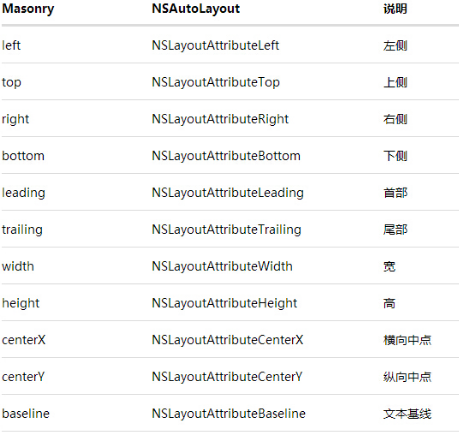
Masonry基本支持AutoLayout的所有屬性:
@property(nonatomic,strong,readonly)MASConstraint*left;
@property(nonatomic,strong,readonly)MASConstraint*top;
@property(nonatomic,strong,readonly)MASConstraint*right;
@property(nonatomic,strong,readonly)MASConstraint*bottom;
@property(nonatomic,strong,readonly)MASConstraint*leading;
@property(nonatomic,strong,readonly)MASConstraint*trailing;
@property(nonatomic,strong,readonly)MASConstraint*width;
@property(nonatomic,strong,readonly)MASConstraint*height;
@property(nonatomic,strong,readonly)MASConstraint*centerX;
@property(nonatomic,strong,readonly)MASConstraint*centerY;
@property(nonatomic,strong,readonly)MASConstraint*baseline;
這些屬性與NSLayoutAttrubute的對照表如下:
二、Masonry使用
Masonry的大部分方法都為UIView實現了分類,使我們可以十分簡單的使用
下面是Masonry添加約束的方法:
/* 添加新約束,只負責新增約束,不能同時存在兩條針對於同一對象的約束,否則會報錯 */
-(NSArray*)mas_makeConstraints:(void(^)(MASConstraintMaker*make))block;
/* 更新原有的約束,針對上面的情況,會更新在block中出現的約束,不會導致出現兩個相同約束的情況 */
-(NSArray*)mas_updateConstraints:(void(^)(MASConstraintMaker*make))block;
/* 刪除之前約???,重新添加約束,會清除之前的所有約束,僅保留最新的約束 */
-(NSArray*)mas_remakeConstraints:(void(^)(MASConstraintMaker*make))block;
上面三個方法不僅只有UIView可以調用,存有UIView的NSArray數組也可以調用,表示遍歷數組中所有UIView進行調用
下面是Block中使用的常見約束語法,[attribute]表示屬性,[value]表示值:
/*
   屬性attribute可以連用,比如top.right.bottom.left
   加mas_前綴和沒有mas_前綴效果差不多,只是加mas_前綴會對參數裝箱,
   參數有結構體的時候,需要使用mas_前綴,沒有mas_前綴的參數必須為對象
*/
/* 數值約束,top對應NSInteger,center對應NSPoint,size對應NSSize */
make.[attribute].mas_equalTo([value]);
/* 等於約束,兩個view之間比較,注意:沒有other.edges的屬性,edges對應otherView */
make.[attribute].equalTo(otherView.[attribute]);
/* 大於等於約束,兩個view之間比較 */
make.[attribute].greaterThanOrEqualTo(otherView.[attribute]);
/* 小於等於約束,兩個view之間比較 */
make.[attribute].lessThanOrEqualTo(otherView.[attribute]);
/* 偏移約束 */
make.[attribute].equalTo(otherView.[attribute]).offset([value]);
/* 邊界約束,有上、下、左、右邊界 */
make.edges.equalTo(otherView).insets(UIEdgeInsetsMake([topValue],[leftValue],[bottomValue],[rightValue]));
/* Margin約束 */
make.[attribute].equalTo(otherView.[attribute]Margin);
注意:
添加約束前,必須先把
UIView添加到父視圖中,否則會閃退
下面我們通過幾個實例來理解:
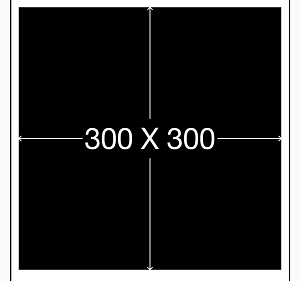
1. 實例一[基礎]:居中顯示一個view
- (void)viewDidLoad {
    [super viewDidLoad];
    UIView *sv = [[UIView alloc] init];
    sv.backgroundColor = [UIColor blackColor];
    //一定要先將view添加到superView上,否則會出錯
    [self.view addSubview:sv];
    //Masonry的autolayout添加約束
    __weak ViewController *weakSelf = self;
    [sv mas_makeConstraints:^(MASConstraintMaker *make) {
        make.center.equalTo(weakSelf.view);//將sv居中
        make.size.mas_equalTo(CGSizeMake(300,300));//將sv的尺寸設置為(300,300)
    }];
}
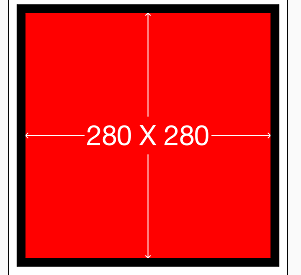
2. 實例二[初級]:讓一個view略小於其superView(邊距為10)
UIView *sv = [[UIView alloc] init];
sv.backgroundColor = [UIColor blackColor];
//一定要先將view添加到superView上,否則會出錯
[self.view addSubview:sv];
//Masonry的autolayout添加約束
__weak ViewController *weakSelf = self;
[sv mas_makeConstraints:^(MASConstraintMaker *make) {
    make.center.equalTo(weakSelf.view);//將sv居中
    make.size.mas_equalTo(CGSizeMake(300,300));//將sv的尺寸設置為(300,300)
}];
UIView *sv1 = [[UIView alloc] init];
sv1.backgroundColor = [UIColor redColor];
//一定要先將view添加到superView上,否則會出錯
[sv addSubview:sv1];
//Masonry的autolayout添加約束
[sv1 mas_makeConstraints:^(MASConstraintMaker *make) {
    make.edges.equalTo(sv).with.insets(UIEdgeInsetsMake(10, 10, 10, 10));
    /*等價於
    make.top.equalTo(sv).with.offset(10);
    make.left.equalTo(sv).with.offset(10);
    make.bottom.equalTo(sv).with.offset(-10);
    make.right.equalTo(sv).with.offset(-10);
    */
    /*也等價於
    make.top.left.bottom.and.right.equalTo(sv).with.insets(UIEdgeInsetsMake(10,10,10,10));
    */
}];
實際上and和with這兩個方法什麼事情都沒做:
-(MASConstraint*)with{
    returnself;
}
-(MASConstraint*)and{
    return self;
}
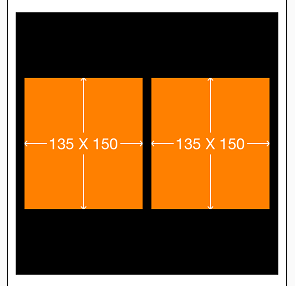
3. 實例三[初級]:讓兩個高度為150的view垂直居中且等寬且等間隔排列,間隔為10(自動計算其寬度)
UIView *sv = [[UIView alloc] init];
sv.backgroundColor = [UIColor blackColor];
//一定要先將view添加到superView上,否則會出錯
[self.view addSubview:sv];
//Masonry的autolayout添加約束
__weak ViewController *weakSelf = self;
[sv mas_makeConstraints:^(MASConstraintMaker *make) {
    make.center.equalTo(weakSelf.view);//將sv居中
    make.size.mas_equalTo(CGSizeMake(300,300));//將sv的尺寸設置為(300,300)
}];
int padding1 = 10;
UIView *leftView = [[UIView alloc] init];
leftView.backgroundColor = [UIColor orangeColor];
[sv addSubview:leftView];
UIView *rightView = [[UIView alloc] init];
rightView.backgroundColor = [UIColor orangeColor];
[sv addSubview:rightView];
//Masonry的autolayout添加約束
[leftView mas_makeConstraints:^(MASConstraintMaker*make){
    make.centerY.mas_equalTo(sv.mas_centerY);//中心Y軸和sv中心Y軸相等
    make.left.equalTo(sv.mas_left).with.offset(padding1);//左邊距離sv的左邊界10
    make.right.equalTo(rightView.mas_left).with.offset(-padding1);//右邊距離rightView的左邊界-10
    make.height.mas_equalTo(@150);//高度150
    make.width.equalTo(rightView);//寬度等於rightView
}];
[rightView mas_makeConstraints:^(MASConstraintMaker*make){
    make.centerY.mas_equalTo(sv.mas_centerY);//中心Y軸和sv中心Y軸相等
    make.left.equalTo(leftView.mas_right).with.offset(padding1);//左邊距離leftView的右邊界10
    make.right.equalTo(sv.mas_right).with.offset(-padding1);//右邊距離sv的右邊界-10
    make.height.mas_equalTo(@150);//高度150
    make.width.equalTo(leftView);//寬度等於leftView
}];
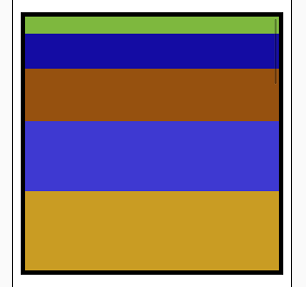
4. 實例四[中級]:在UIScrollView順序排列一些view並自動計算contentSize
UIView *sv = [[UIView alloc] init];
sv.backgroundColor = [UIColor blackColor];
//一定要先將view添加到superView上,否則會出錯
[self.view addSubview:sv];
//Masonry的autolayout添加約束
__weak ViewController *weakSelf = self;
[sv mas_makeConstraints:^(MASConstraintMaker *make) {
    make.center.equalTo(weakSelf.view);//將sv居中
    make.size.mas_equalTo(CGSizeMake(300,300));//將sv的尺寸設置為(300,300)
}];
/* 創建ScrollView */
UIScrollView *scrollView = [[UIScrollView alloc] init];
scrollView.backgroundColor = [UIColor whiteColor];
[sv addSubView:scrollView];
[scrollView mas_makeConstraints:^(MASConstraintMaker *make) {
    //設置邊界約束
    make.edges.equalTo(sv).with.insets(UIEdgeInsetsMake(5,5,5,5));
}];
//創建ScrollView子視圖容器視圖
UIView *container = [[UIView alloc] init];
[scrollView addSubView:container];
//添加container約束
[container mas_makeConstraints:^(MASConstraintMaker *make) {
    make.edges.equalTo(scrollView);//邊界緊貼ScrollView邊界
    make.width.equalTo(scrollView);//寬度和ScrollView相等
}];
//向container添加多個View
int count = 10;
UIView *lastView = nil;
for(int i = 1;i <= count;++i ){
    //創建一個View
    UIView *subView = [[UIView alloc] init];
    [container addSubView:subView];
    //顏色隨機
    subView.backgroundColor = [UIColor colorWithRed:( arc4random() % 256 / 256.0 )
                                              green:( arc4random() % 256 / 256.0 )
                                               blue:( arc4random() % 256 / 256.0 )
                                              alpha:1];
    //向subView添加約束
    [subView mas_makeConstraints:^(MASConstraintMaker *make) {
        make.left.and.right.equalTo(container);//左右邊界和container緊貼
        make.height.mas_equalTo(@(20*i));//高度隨i遞增
        //判斷是否有前一個子View
        if ( lastView ) {
            //如果有前一個View,上邊界和前一個View的下邊界緊貼
            make.top.mas_equalTo(lastView.mas_bottom);
        } else {
            //如果沒有前一個View,上邊界和container的下邊界緊貼
            make.top.mas_equalTo(container.mas_top);
        }
    }];
    //保存前一個View
    lastView = subView;
}
//添加container的最後一個約束
[container mas_makeConstraints:^(MASConstraintMaker *make) {
    //container的下邊界和最後一個View的下邊界緊貼
    make.bottom.equalTo(lastView.mas_bottom);
}];
三、Masonry進階
Masonry為NSArray實現了2個特殊的分類方法:
/*
    該方法只有存有UIView的NSArray數組可以調用,NSArray裡面的UIView必須有共同的spuerView
    該方法作用是UIView之間的水平等寬定距約束,或者垂直等高定距約束。
    先確定間距,寬度或高度不確定,但相等
    axisType只有MASAxisTypeHorizontal(水平間距類型)和MASAxisTypeVertical(垂直間距類型)
    fixedSpacing是UIView兩兩之間的間距大小
    leadSpacing是第一個UIView距離superView左(或上)邊界的間距大小
    tailSpacing是最後一個UIView距離superView右(或下)邊界的間距大小
    數組裡的所有UIView水平寬度相等,或者垂直高度相等
*/
- (void)mas_distributeViewsAlongAxis:(MASAxisType)axisType
                    withFixedSpacing:(CGFloat)fixedSpacing
                         leadSpacing:(CGFloat)leadSpacing
                         tailSpacing:(CGFloat)tailSpacing;

/*
    該方法只有存有UIView的NSArray數組可以調用,NSArray裡面的UIView必須有共同的spuerView
    該方法作用是UIView之間的水平定寬等距約束,或者垂直定高等距約束。
    先確定寬度或高度,間距不確定,但相等
    axisType只有MASAxisTypeHorizontal(水平間距類型)和MASAxisTypeVertical(垂直間距類型)
    fixedSpacing是UIView兩兩之間的間距大小
    leadSpacing是第一個UIView距離superView左(或上)邊界的間距大小
    tailSpacing是最後一個UIView距離superView右(或下)邊界的間距大小
    數組裡的所有UIView間距相等
*/
- (void)mas_distributeViewsAlongAxis:(MASAxisType)axisType
                 withFixedItemLength:(CGFloat)fixedItemLength
                         leadSpacing:(CGFloat)leadSpacing
                         tailSpacing:(CGFloat)tailSpacing;
下面是等間距方法的使用實例:
/*
    設置水平等寬定距
    UIView之間水平間距為20,第一個UIView距離superView左邊6,
    最後一個UIView距離superView右邊7,UIView高度為60,距離頂部40
*/
[array mas_distributeViewsAlongAxis:MASAxisTypeHorizontal
                   withFixedSpacing:20
                        leadSpacing:6
                        tailSpacing:7];
[array mas_makeConstraints:^(MASConstraintMaker *make) {
    make.top.equalTo(@40);
    make.height.equalTo(@60);
}];
/*
    設置水平定寬等距
    所有UIView的寬度為20,第一個UIView距離superView左邊6,
    最後一個UIView距離superView右邊7,UIView高度為60,距離頂部40
*/
[array mas_distributeViewsAlongAxis:MASAxisTypeHorizontal
                withFixedItemLength:20
                        leadSpacing:6
                        tailSpacing:7];
[array mas_makeConstraints:^(MASConstraintMaker *make) {
    make.top.equalTo(@40);
    make.height.equalTo(@60);
}];
相關文章
+