OC&&IOS開發小技巧總結
1.數組遍歷的三種方式
2. 使用 [obj class]屬性獲得類名成,利用類名稱創建對象
3.給一個UIImageView 添加一個動畫數組,可以設置動畫時間,循環次數
4.利用[UIImage animatedImageNamed:@“” duration:]可以達到蝴蝶翩翩飛過,的效果,不過要開一個定時器,才能讓圖片橫向的移動5. 給Button設置背景圖片,並且button的大小跟圖片的大小一樣大
6.用addViewController做類似於導航控制器的作用
7.打電話
8.給導航欄添加圖片
9.生成二維碼圖片(包含鏈接),並且添加視圖上
10.給一個View設置層的邊框顏色,邊框寬度,變的圓角,
11.給一個Lable添加NSAttributeString,包含設置字體,字的間距,字體的顏色,字體的大小
12獲得改字符串的大小
13.一個視圖控制器退出的時候,要隱藏系統的底部的導航欄
14.創建前後顏色不同的字符串15.給UITableView去掉分割線
16.給某個View的下方添加波浪線
17.獲得IP地址及Mac地址 18.創建一個UIImageView,並且設置漸變色
19.設置UITableView的某個cell不可選
21.隱藏和現實導航欄,只管本視圖控制器的navagationController的顯示和隱藏,不影響其他的視圖控制器22.原生的給設置tabBarItem設置圖片,字體,以及設置,文字和圖片之間距離
23.給字符串添加下劃線
24.給導航欄的標題設置文字的顏色,字體的大小
25,斷網的判斷及處理,要包含Reachability.h的頭文件
25,斷網的判斷及處理,要包含Reachability.h的頭文件
26.動態將UITableViewCell滾動到指定的cell
27.一段文字設置行間距
28.簽到動畫
29.給城市排序按照拼音
30.發郵件,打電話,發短信,打開網址
31.ios 判斷app程序第一次啟動方法
32.判斷手機網絡運營商
33 NSData同步請求網絡數據
34view和window之間坐標轉換
35.ViewController的生命周期
36程序啟動原理
37.UITableViewCell 文字位置調整
38.ios帶圓角圖片的拉伸
39自定義UINavigtion
1.數組遍歷的三種方式(for ,for in ,枚舉器)
int main(int argc, const char * argv[])
{
    @autoreleasepool {
        //創建一個Car類,兩個屬性:名字,顏色
        //創建3個對象,加到數組裡
        //輸出數組
        Car *car1 = [[Car alloc] initWithName:@"寶馬汽車" andColor:'R'];
        Car *car2 = [[Car alloc] initWithName:@"奔馳汽車" andColor:'B'];
        Car *car3 = [[Car alloc] initWithName:@"奧迪汽車" andColor:'W'];
        NSArray *array = [NSArray arrayWithObjects:car1,car2,car3, nil];


        //循環遍歷數組
        [[array objectAtIndex:0] setName:@"拖拉機"];

//        for(int i = 0; i < [array count]; i++)
//        {
//            NSLog(@"%@",[array objectAtIndex:i]);
//        }

        //for in
        //快速遍歷數組
        //從前往後 完整遍歷
        //數組中有多種對象的時候用id
        //可變數組的時候,並且要改變數組長度的時候不要用
        for(Car *obj in array)
        {
            NSLog(@"%@",obj);
        }

        //枚舉器用來遍歷數組
        //- (NSEnumerator *)objectEnumerator;

        //1 2 3 4 5 6

        //把數組的所有元素依次存放到枚舉器
        NSEnumerator *enumerator = [array objectEnumerator];
        enumerator = [array reverseObjectEnumerator];
        id obj = nil;
        while(obj = [enumerator nextObject]){
            NSLog(@"%@",obj);
        }

        while(obj = [enumerator nextObject])
        {
            NSLog(@"%@",obj);
        }

   枚舉器block
  [moduleArray enumerateObjectsUsingBlock:^(id     _Nonnull obj, NSUInteger idx, BOOL * _Nonnull stop) {

    }];
    }
    return 0;
}
2. 使用 [obj class]屬性獲得類名成,利用類名稱創建對象
#import#import "mybuton.h" int main(int argc, const char * argv[]) { @autoreleasepool { mybuton*btn=[mybuton creatBtn:SJX]; [btn showType]; } return 0; } #import typedef enum { SJX, YX }BtnType; @interface mybuton : NSObject -(void)showType; +(instancetype)creatBtn:(BtnType)type; @end #import "mybuton.h" #import"mybuton_SJX.h" #import "mybuton_YX.h" @implementation mybuton -(void)showType { NSLog(@"我是一個按鈕"); } +(instancetype)creatBtn:(BtnType)type { Class myclass[]={[mybuton_SJX class],[mybuton_YX class]}; mybuton*btn=[[myclass[type]alloc]init]; return btn; } @end #import "mybuton.h" @interface mybuton_SJX : mybuton @end #import "mybuton_SJX.h" @implementation mybuton_SJX -(void)showType{ NSLog(@"我是一個三角形按鈕"); } @end
3.給一個UIImageView 添加一個動畫數組,可以設置動畫時間,循環次數
images = [NSArray arrayWithObjects:
 [UIImage imageNamed:@"1.jpg"],
 [UIImage imageNamed:@"2.jpg"],
 [UIImage imageNamed:@"3.jpg"],
 [UIImage imageNamed:@"4.jpg"],
 [UIImage imageNamed:@"5.jpg"], nil];
        // 設置iv控件需要動畫顯示的圖片為images集合元素
        self.iv.animationImages = images;
        // 設置動畫持續時間
        self.iv.animationDuration = 12;
        // 設置動畫重復次數
        self.iv.animationRepeatCount = 999999;
        // 讓iv控件開始播放動畫
        [self.iv startAnimating];
 可以每隔2.4s動畫,更新圖片,循環99999次
4.利用[UIImage animatedImageNamed:@“” duration:]可以達到蝴蝶翩翩飛過,的效果,不過要開一個定時器,才能讓圖片橫向的移動
// 定義顯示圖片的UIImageView控件
UIImageView* iv;
// 定義定時器
NSTimer* timer;
- (void)viewDidLoad
{
 [super viewDidLoad];
 // 設置背景色為白色
 self.view.backgroundColor = [UIColor whiteColor];
 // 創建UIImageView控件
 iv = [[UIImageView alloc]
   initWithFrame:CGRectMake(0 , 30 , 41 , 43)];
 // 使用UIImageView加載文件名以butterfly_f開頭的多張圖片
 iv.image = [UIImage animatedImageNamed:@"butterfly_f"
 duration:0.6];
 // 將UIImageView添加到系統界面上
 [self.view addSubview: iv];
 // 啟動NSTimer定時器來改變UIImageView的位置
 timer = [NSTimer scheduledTimerWithTimeInterval:0.1
 target:self selector:@selector(changePos)
 userInfo:nil repeats:YES];
}
- (void) changePos
{
 CGPoint curPos = iv.center;
 // 計算一個-4~5之間隨機數
 int y = arc4random() % 10 - 4;
 // 當curPos的x坐標已經超過了屏幕的寬度
 if(curPos.x > [UIScreen mainScreen].bounds.size.width)
 {
 // 控制蝴蝶再次從屏幕左側開始移動
 iv.center = CGPointMake(0, 30);
 }
 else
 {
 // 通過修改iv的center屬性來改變iv控件的位置
 iv.center = CGPointMake(curPos.x + 4, curPos.y + y);
 }
}
5. 給Button設置背景圖片,並且button的大小跟圖片的大小一樣大
 UIImage* backImg = [UIImage imageNamed:@"back_white"];
    UIButton* btn = [[UIButton alloc] initWithFrame:CGRectMake(0, 0, backImg.size.width, backImg.size.height)];
    [btn addTarget:self action:@selector(backClick) forControlEvents:UIControlEventTouchUpInside];
    [btn setImage:backImg forState:UIControlStateNormal];
    //[btn setImage:backImg forState:UIControlStateHighlighted];
    self.navigationItem.leftBarButtonItem = [[UIBarButtonItem alloc] initWithCustomView:btn];
6.用addViewController做類似於導航控制器的作用
ResultViewController *result = [[ResultViewController alloc] initWithNibName:@"ResultViewController" bundle:nil];
    [self.parentViewController addChildViewController:result];
    [self.parentViewController.view addSubview:result.view];
    result.view.frame = CGRectMake(WIDTH, 0, WIDTH, HEIGHT);

    [UIView
     animateWithDuration:0.3
     delay:0.0
     options:UIViewAnimationOptionCurveEaseInOut
     animations:^{
         CATransition *animation = [CATransition animation];
         [animation setDuration:0.3];
         [animation setType:kCATransitionPush];
         [animation setTimingFunction:[CAMediaTimingFunction functionWithName:kCAMediaTimingFunctionEaseInEaseOut]];
         [animation setSubtype:kCATransitionFromRight];
         [self.navigationController.view.layer addAnimation:animation forKey:nil];
          result.view.frame = CGRectMake(0, 0, WIDTH, HEIGHT);
     }
     completion:^(BOOL finished) {
     }];
7.打電話
如果是飛行模式,手機系統會彈出是否停用飛行模式
如果沒有卡,也會提示
如果有卡,並且不是飛行模式,程序會自動進入後台,前台會彈出撥號的界面
#pragma mark - 打電話
- (void)actionSheet:(UIActionSheet *)actionSheet clickedButtonAtIndex:(NSInteger)buttonIndex{
    NSLog(@"打電話");
    if (buttonIndex==0) {
        [[UIApplication sharedApplication] openURL:[NSURL URLWithString:[NSString stringWithFormat:@"tel://%@",@"4008-230-950"]]];
    }
}
8.給導航欄添加圖片
 UIImageView *imageView=[[UIImageView alloc]initWithFrame:CGRectMake(0, 0, ViewWidth*0.3, 22)];
    imageView.image=[UIImage imageNamed:@"tapmoney"];
    self.navigationItem.titleView=imageView;
9.生成二維碼圖片(包含鏈接),並且添加視圖上
前提是要導入ZBar.h和QRCodeGenerator.h頭文件
UIImageView *twoDimensionCode=[WNController createImageViewWithFrame:CGRectMake(ViewWidth*0.2, ViewHeight*0.02, ViewWidth*0.5, ViewHeight*0.20) ImageName:nil];
    twoDimensionCode.image=[QRCodeGenerator qrImageForString:@"www.baidu.com" imageSize:400];
    [view addSubview:twoDimensionCode];
10.給一個View設置層的邊框顏色,邊框寬度,變的圓角,
UIView *view=[[UIView alloc]initWithFrame:CGRectMake(ViewWidth*0.05, 10, ViewWidth*0.9, ViewHeight*0.4)];
    view.layer.borderColor=[[UIColor blackColor]CGColor];
    view.layer.borderWidth=0.5;
    view.layer.cornerRadius=5;
    view.layer.masksToBounds=YES;
    [self.view addSubview:view];
11.給一個Lable添加NSAttributeString,包含設置字體,字的間距,字體的顏色,字體的大小
 NSAttributedString *attriStrTodayEarn =[[NSAttributedString alloc] initWithString:@"Today's earn" attributes:@{NSForegroundColorAttributeName : [UIColor whiteColor],NSKernAttributeName : @(-1.3f),NSFontAttributeName:[UIFont fontWithName:@"Gill Sans" size:1.8*NormalFont]}];
    [todayEarn setAttributedText:attriStrTodayEarn];
12獲得改字符串的大小
CGSize size=[middleLabel.text boundingRectWithSize:CGSizeMake(ViewWidth*0.7,NormalFont*3) options:NSStringDrawingUsesLineFragmentOrigin|NSStringDrawingUsesFontLeading attributes:@{NSFontAttributeName:middleLabel.font} context:nil].size;
13.一個視圖控制器退出的時候,要隱藏系統的底部的導航欄
vc.hidesBottomBarWhenPushed=YES;
14.創建前後顏色不同的字符串
- (NSMutableAttributedString *)createAttributeStringWithStr:(NSString *)foreString withStr:(NSString *)afterString
{
    NSString * joinstr = foreString;
    NSString * text = afterString;
    NSString *jointext = [NSString stringWithFormat:@"%@%@",joinstr,text];

    NSDictionary *textDic = @{NSForegroundColorAttributeName:[UIColor colorWithRed:0.13f green:0.65f blue:0.00f alpha:1.00f],NSFontAttributeName:[UIFont systemFontOfSize:NormalFont ]};
    NSMutableAttributedString *attributeString = [[NSMutableAttributedString alloc]initWithString:jointext];
    [attributeString addAttributes:textDic range:NSMakeRange(joinstr.length, text.length)];
    return attributeString;
//本質是NSMutableAttributedString 給一定范圍的字符做顏色屬性的改變

}
15.給UITableView去掉分割線
_tableView.separatorStyle=UITableViewCellSeparatorStyleNone;
cell.selectionStyle=UITableViewCellSelectionStyleNone;
16.給某個View的下方添加波浪線
-(void)drawRect:(CGRect)rect{
    CGRect frame=self.frame;
    CGFloat height=frame.size.height;
    // CGFloat width =frame.size.width;
    UIColor *color = [UIColor whiteColor];
    [color set]; //設置線條顏
    UIBezierPath* aPath = [UIBezierPath bezierPath];
    aPath.lineWidth = 0.5;
     aPath.lineCapStyle = kCGLineCapRound; //線條拐角
    aPath.lineJoinStyle = kCGLineCapRound; //終點處理
    aPath.lineCapStyle = kCGLineCapRound; //線條拐角
    aPath.lineJoinStyle = kCGLineCapRound; //終點處理
    for (int i=0; i<50; ++i) {
        [aPath moveToPoint:CGPointMake(0+frame.size.width/50*i, height)];

        [aPath addQuadCurveToPoint:CGPointMake(frame.size.width/50*(i+1), height) controlPoint:CGPointMake(frame.size.width/100+frame.size.width/50*i, height-5)];
        [aPath fill];
    }
17.獲得IP地址及Mac地址 前提要包含
#import#import #include #include #include #include +(NSString *)getMACAddress{ int mib[6]; size_t len; char *buf; unsigned char *ptr; struct if_msghdr *ifm; struct sockaddr_dl *sdl; mib[0] = CTL_NET; mib[1] = AF_ROUTE; mib[2] = 0; mib[3] = AF_LINK; mib[4] = NET_RT_IFLIST; if ((mib[5] = if_nametoindex("en0")) == 0) { printf("Error: if_nametoindex error/n"); return NULL; } if (sysctl(mib, 6, NULL, &len, NULL, 0) < 0) { printf("Error: sysctl, take 1/n"); return NULL; } if ((buf = malloc(len)) == NULL) { printf("Could not allocate memory. error!/n"); return NULL; } if (sysctl(mib, 6, buf, &len, NULL, 0) < 0) { printf("Error: sysctl, take 2"); return NULL; } ifm = (struct if_msghdr *)buf; sdl = (struct sockaddr_dl *)(ifm + 1); ptr = (unsigned char *)LLADDR(sdl); NSString *outstring = [NSString stringWithFormat:@"%02x:%02x:%02x:%02x:%02x:%02x", *ptr, *(ptr+1), *(ptr+2), *(ptr+3), *(ptr+4), *(ptr+5)]; free(buf); return [outstring uppercaseString]; } +(NSString *)getIPAddress{ NSString *address = @"error"; struct ifaddrs *interfaces = NULL; struct ifaddrs *temp_addr = NULL; int success = 0; // retrieve the current interfaces - returns 0 on success success = getifaddrs(&interfaces); if (success == 0) { //Loop through linked list of interfaces temp_addr = interfaces; while(temp_addr != NULL) { if(temp_addr->ifa_addr->sa_family == AF_INET) { // Check if interface is en0 which is the wifi connection on the iPhone if([[NSString stringWithUTF8String:temp_addr->ifa_name] isEqualToString:@"en0"]) { // Get NSString from C String address = [NSString stringWithUTF8String:inet_ntoa(((struct sockaddr_in *)temp_addr->ifa_addr)->sin_addr)]; } } temp_addr = temp_addr->ifa_next; } } // Free memory freeifaddrs(interfaces); return address; }
18.創建一個UIImageView,並且設置漸變色
+(UIImageView *)progressiveImageframe:(CGRect)frame beginColor:(CGFloat *)Bcomponent endColor:(CGFloat*)Ecomponent {
    UIImageView *imageView=[[UIImageView alloc]initWithFrame:frame];

    UIGraphicsBeginImageContext(imageView.frame.size);
        [imageView.image drawInRect:CGRectMake(0, 0, imageView.frame.size.width, imageView.frame.size.height)];
        CGContextSetLineCap(UIGraphicsGetCurrentContext(), kCGLineCapRound);  //設置線條終點形狀

        CGContextRef context =UIGraphicsGetCurrentContext();
        CGColorSpaceRef colorSpaceRef = CGColorSpaceCreateDeviceRGB();
        // 創建起點顏色  (CGFloat[]){0, 0.61, 0.81, 1}  (CGFloat[]){0.87, 0.61, 0, 1}

        CGColorRef beginColor = CGColorCreate(colorSpaceRef,Bcomponent );
        // 創建終點顏色
        CGColorRef endColor = CGColorCreate(colorSpaceRef, Ecomponent);
        // 創建顏色數組
        CFArrayRef colorArray = CFArrayCreate(kCFAllocatorDefault, (const void*[]){beginColor, endColor}, 2, nil);
        // 創建漸變對象
        CGGradientRef gradientRef = CGGradientCreateWithColors(colorSpaceRef, colorArray, (CGFloat[]){
            0.0f,    // 對應起點顏色位置
            1.0f // 對應終點顏色位置
        });
        // 釋放顏色數組
        CFRelease(colorArray);
        // 釋放起點和終點顏色
        CGColorRelease(beginColor);
        CGColorRelease(endColor);
        // 釋放色彩空間
        CGColorSpaceRelease(colorSpaceRef);
        CGContextDrawLinearGradient(context, gradientRef, CGPointMake(0, 0), CGPointMake(0, frame.size.height), 0);
        CGGradientRelease(gradientRef);
        imageView.image=UIGraphicsGetImageFromCurrentImageContext();
    return imageView;
}
19.設置UITableView的某個cell不可選
為了徹底避免UITableViewCell選擇,讓UITableViewDelegate實現tableView:willSelectRowAtIndexPath:。如果你不希望選中行,從那個函數可以返回nil
- (NSIndexPath *)tableView:(UITableView *)tv willSelectRowAtIndexPath:(NSIndexPath *)path
{
     //根據 NSIndexPath判定行是否可選。

     if (rowIsSelectable)
     {
         returnpath;
     }

     returnnil;
}
20.自定義一個CustomView給一個UIImageView添加一個點擊的block
#import@interface CustomImageView : UIImageView @property(nonatomic,copy)void(^touchImage)(); @end #import "CustomImageView.h" @implementation CustomImageView - (id)initWithFrame:(CGRect)frame { self = [super initWithFrame:frame]; if (self) { self.userInteractionEnabled=YES; } return self; } -(void)touchesBegan:(NSSet *)touches withEvent:(UIEvent *)event{ if (self.touchImage) { self.touchImage(); } } @end
21.隱藏和現實導航欄,只管本視圖控制器的navagationController的顯示和隱藏,不影響其他的視圖控制器
-(void)viewWillAppear:(BOOL)animated{
    [super viewDidAppear:YES];
    self.navigationController.navigationBarHidden=YES;
}
-(void)viewWillDisappear:(BOOL)animated{
    self.navigationController.navigationBarHidden=NO;
}
22.原生的給設置tabBarItem設置圖片,字體,以及設置,文字和圖片之間距離
nc.tabBarItem = [[UITabBarItem alloc]initWithTitle:titles[i] image:[[UIImage imageNamed:imageArr[i]] imageWithRenderingMode:UIImageRenderingModeAlwaysOriginal] selectedImage:[[UIImage imageNamed:selectedImageArr[i]] imageWithRenderingMode:UIImageRenderingModeAlwaysOriginal]];
         [nc.tabBarItem setTitlePositionAdjustment:UIOffsetMake(0, -4)];
        [[UITabBarItem appearance] setTitleTextAttributes:[NSDictionary dictionaryWithObjectsAndKeys:[UIColor lightGrayColor], NSForegroundColorAttributeName,[UIFont systemFontOfSize:SmallFont*0.9] ,NSFontAttributeName,nil] forState:UIControlStateNormal];
        [[UITabBarItem appearance] setTitleTextAttributes:
  [NSDictionary dictionaryWithObjectsAndKeys:[UIColor orangeColor],NSForegroundColorAttributeName, nil]forState:UIControlStateSelected];
23.給字符串添加下劃線
  UILabel * standardF =  [self createSingleLabelWithFrame:CGRectMake(space*4, CGRectGetMaxY(standard.frame)+space, ViewWidth-space*4, space*3) withAttributedString:@"亞馬遜禮品卡使用協議"];
    [self.view addSubview:standardF];
   UILabel * standardW =  [self createSingleLabelWithFrame:CGRectMake(space*4, CGRectGetMaxY(standardF.frame), ViewWidth-space*4, space*3) withAttributedString: @"個人資料隱私及保護協議"];
     [self.view addSubview:standardW];
}
- (UILabel *)createSingleLabelWithFrame:(CGRect)frame withAttributedString:(NSString *)text
{
    NSMutableAttributedString *attributedStr = [[NSMutableAttributedString alloc]initWithString:text];
    [attributedStr addAttribute:NSUnderlineStyleAttributeName value:[NSNumber numberWithInteger:NSUnderlineStyleSingle] range:NSMakeRange(0, attributedStr.length)];
    UILabel *label = [WNController createLabelWithFrame:frame Font:NormalFont Text:nil];
    label.attributedText = attributedStr;
    label.textColor = [UIColor orangeColor];
    return label;
}
24.給導航欄的標題設置文字的顏色,字體的大小
self.title = @"檢查新版本";
 //標題欄
        [[UINavigationBar appearance] setBackgroundImage:[UIImage imageNamed:@"topback.png"] forBarMetrics:UIBarMetricsDefault];
        NSDictionary *navbarTitleTextAttributes = [NSDictionary dictionaryWithObjectsAndKeys:KDefaultTitleViewTitleColor, NSForegroundColorAttributeName,
                                                   KDefaultTitleViewTitleFont, NSFontAttributeName, nil];
        [[UINavigationBar appearance] setTitleTextAttributes:navbarTitleTextAttributes]
25,斷網的判斷及處理,要包含Reachability.h的頭文件
    Reachability *reach = [Reachability reachabilityWithHostName:@"www.baidu.com"];
    NetworkStatus status = [reach currentReachabilityStatus];
    if (status == NotReachable)
    {
        //沒有連接到網絡就彈出提實況
        [[[UIAlertView alloc] initWithTitle:@"提示" message:@"網絡連接失敗,請稍後再試!" delegate:nil cancelButtonTitle:@"確認" otherButtonTitles:nil, nil] show];
        return;
    }
26.動態將UITableViewCell滾動到指定的cell
[_tableViewscrollToRowAtIndexPath:[NSIndexPathindexPathForRow:_messageArray.count-1inSection:0]atScrollPosition:UITableViewScrollPositionNoneanimated:YES]; 27.一段文字設置行間距 commentLabel.textColor=UIColorFromRGB(0x333333,1.0);//設置行間距
NSMutableAttributedString*attributedString = [[NSMutableAttributedStringalloc]initWithString:commentLabel.text];
NSMutableParagraphStyle*paragraphStyle = [[NSMutableParagraphStylealloc]init];
[paragraphStylesetLineSpacing:lineSpace];
[attributedStringaddAttribute:NSParagraphStyleAttributeNamevalue:paragraphStylerange:NSMakeRange(0, [attributedStringlength])];
//設置昵稱顏色為橘黃色
28.簽到動畫
-(void)reallyStartAnimation
{
    if ( !self.isCheckingIn )
    {
        self.checkImageView.image = [UIImage imageNamed:@"checkin-2"];
        [self.checkBtn setTitle:@"簽到中.." forState:UIControlStateNormal];
        [self startAnimation];
        self.isCheckingIn = YES;
    }
}
-(void) startAnimation
{
    [UIView beginAnimations:nil context:nil];
    [UIView setAnimationDuration:0.01];
    [UIView setAnimationDelegate:self];
    [UIView setAnimationDidStopSelector:@selector(endAnimation)];
    self.checkImageView.transform = CGAffineTransformMakeRotation(self.angle * (M_PI / 180.0f));
    [UIView commitAnimations];
}
-(void)endAnimation
{
    self.angle += 10;
    [self startAnimation];
}
29.給城市排序安裝拼音
-(void)buildUpFirstLetterDictionary
{
    self.citySortedCommunityDic = [[NSMutableDictionary alloc] initWithCapacity:16];
    self.citySortedHeaderTitleIndexDic = [[NSMutableDictionary alloc] initWithCapacity:16];
    for (City* city in self.cityDataSource.citys)
    {
        NSMutableArray* originalCommunityArray = [[NSMutableArray alloc] initWithCapacity:16];
        for ( Community* community in city.communitys.communitys )
        {
            [originalCommunityArray addObject:community.name];
        }
        NSDictionary* dic = [originalCommunityArray sortedArrayUsingFirstLetter];
        [self.citySortedCommunityDic setObject:dic forKey:city.name];
        //因為字典的無序,將所有的key取出來之後,重新輸出
        NSArray *keys = [[dic allKeys] sortedArrayUsingSelector:@selector(compare:)];
        [self.citySortedHeaderTitleIndexDic setObject:keys forKey:city.name];
   }
}

/////
#import "NSArray+FirstLetterArray.h"
#import "pinyin.h"
@implementation NSArray (FirstLetterArray)
- (NSDictionary *)sortedArrayUsingFirstLetter
{
    NSMutableDictionary *mutDic = [NSMutableDictionary dictionary];
    const char *letterPoint = NULL;
    NSString *firstLetter = nil;
    for (NSString *str in self) {
        //檢查 str 是不是 NSString 類型
        if (![str isKindOfClass:[NSString class]]) {
            assert(@"object in array is not NSString");
#ifdef DEBUG
            NSLog(@"object in array is not NSString, it's [%@]", NSStringFromClass([str class]));
#endif
            continue;
        }
        letterPoint = [str UTF8String];
       //如果開頭不是大小寫字母則讀取 首字符
        if (!(*letterPoint > 'a' && *letterPoint < 'z') &&
            !(*letterPoint > 'A' && *letterPoint < 'Z')) {
            //漢字或其它字符
            char letter = pinyinFirstLetter([str characterAtIndex:0]);
            letterPoint = &letter;
        }
        //首字母轉成大寫
        firstLetter = [[NSString stringWithFormat:@"%c", *letterPoint] uppercaseString];
        //首字母所對應的 姓名列表
        NSMutableArray *mutArray = [mutDic objectForKey:firstLetter];
        if (mutArray == nil) {
            mutArray = [NSMutableArray array];
            [mutDic setObject:mutArray forKey:firstLetter];
        }
        [mutArray addObject:str];
    }
    //字典是無序的,數組是有序的,
    //將數組排序
    for (NSString *key in [mutDic allKeys]) {
        NSArray *nameArray = [[mutDic objectForKey:key] sortedArrayUsingSelector:@selector(compare:)];
        [mutDic setValue:nameArray forKey:key];
    }
    return mutDic;
}
@end
30.發郵件,打電話,發短信,打開網址
30.1、調用 自帶mail [[UIApplication sharedApplication] openURL:[NSURL URLWithString:@"mailto://[email protected]”]]; 30.2、調用 電話phone [[UIApplication sharedApplication] openURL:[NSURL URLWithString:@"tel://8008808888"]]; iOS應用內撥打電話結束後返回應用 一般在應用中撥打電話的方式是: [[UIApplication sharedApplication] openURL:[NSURL URLWithString:@"tel://123456789"]]; 使用這種方式撥打電話時,當用戶結束通話後,iphone界面會停留在電話界面。 用如下方式,可以使得用戶結束通話後自動返回到應用: UIWebView*callWebview =[[UIWebView alloc] init]; NSURL *telURL =[NSURL URLWithString:@"tel:10086"];// 貌似tel:// 或者 tel: 都行 [callWebview loadRequest:[NSURLRequest requestWithURL:telURL]]; //記得添加到view上 [self.view addSubview:callWebview]; 還有一種私有方法:(可能不能通過審核) [[UIApplication sharedApplication] openURL:[NSURL URLWithString:@"telprompt://10086"]]; 30.3、調用 SMS [[UIApplication sharedApplication] openURL:[NSURL URLWithString:@"sms://800888"]]; 30.4、調用自帶 浏覽器 safari [[UIApplication sharedApplication] openURL:[NSURL URLWithString:@"http://www.hzlzh.com"]]; 調用phone可以傳遞號碼,調用SMS 只能設定號碼,不能初始化SMS內容。 若需要傳遞內容可以做如下操作: 加入:MessageUI.framework #import實現代理:MFMessageComposeViewControllerDelegate 調用sendSMS函數 //內容,收件人列表 - (void)sendSMS:(NSString *)bodyOfMessage recipientList:(NSArray *)recipients { MFMessageComposeViewController *controller = [[[MFMessageComposeViewController alloc] init] autorelease]; if([MFMessageComposeViewController canSendText]) { controller.body = bodyOfMessage; controller.recipients = recipients; controller.messageComposeDelegate = self; [self presentModalViewController:controller animated:YES]; } } // 處理發送完的響應結果 - (void)messageComposeViewController:(MFMessageComposeViewController *)controller didFinishWithResult:(MessageComposeResult)result { [self dismissModalViewControllerAnimated:YES]; if (result == MessageComposeResultCancelled) NSLog(@"Message cancelled") else if (result == MessageComposeResultSent) NSLog(@"Message sent") else NSLog(@"Message failed") } 默認發送短信的界面為英文的,解決辦法為: 在.xib 中的Localization添加一組chinese就ok了
31.ios 判斷app程序第一次啟動方法
if(![[NSUserDefaults standardUserDefaults] boolForKey:@"firstStart"]){
        [[NSUserDefaults standardUserDefaults] setBool:YES forKey:@"firstStart"];
        NSLog(@"第一次啟動");
    }else{
        NSLog(@"不是第一次啟動");
    }
32.判斷手機運營商
- (BOOL)checkChinaMobile
{
    BOOL ret = NO;
    CTTelephonyNetworkInfo *info = [[CTTelephonyNetworkInfo alloc] init];
    CTCarrier *carrier = [info subscriberCellularProvider];
    if (carrier == nil)
    {
        [info release];
        return NO;
    }

    NSString *code = [carrier mobileNetworkCode];
    if (code == nil)
    {
        [info release];

        return NO;
    }

    if ([code isEqualToString:@"00"] || [code isEqualToString:@"02"] || [code isEqualToString:@"07"])
    {
        ret = YES;
    }
       [info release];
   return ret;
}
其它網絡判斷參考下表:
33 NSData同步請求網絡數據
+ (id)dataWithContentsOfURL:(NSURL *)url;
+ (id)dataWithContentsOfURL:(NSURL *)url options:(NSDataReadingOptions)readOptionsMask error:(NSError **)errorPtr;
其中NSDataReadingOptions可以附加一個參數。NSDataReadingMappedIfSaf  e參數。使用這個參數後,iOS就不會把整個文件全部讀取的內存了,而是將文件映射到進程的地址空間中,這麼做並不會占用實際內存。這樣就可以解決內存滿的問題。

補充:
url包含中文時,直接使用會出錯,需要如下轉換
NSURL *url = [NSURL URLWithString:[self.curTaskData.urlstringByAddingPercentEscapesUsingEncoding:NSUTF8StringEncoding]];
34view和window之間坐標轉換
在某UIView子函數內部,將centerPoint從子view坐標轉換成appDelegate.window內的坐標:
CGPointcenterPoint = [selfgetCenterPointByCurPressPoint:pressPointer];
centerPoint = [selfconvertPoint:centerPointtoView:appDelegate.window];
35.ViewController的生命周期
loadView和viewDidLoad的區別就是,loadView時view還沒有生成,viewDidLoad時,view已經生成了,loadView只會被調用一次,而viewDidLoad可能會被調用多次(View可能會被多次加載),當view被添加到其他view中之前,會調用viewWillAppear,之後會調用viewDidAppear。當view從其他view中移除之前,調用viewWillDisAppear,移除之後會調用viewDidDisappear。當view不再使用時,受到內存警告時,ViewController會將view釋放並將其指向為nil。
ViewController的生命周期中各方法執行流程如下:
init—>loadView—>viewDidLoad—>viewWillApper—>viewDidApper—>viewWillDisapper—>viewDidDisapper—>viewWillUnload->viewDidUnload—>dealloc
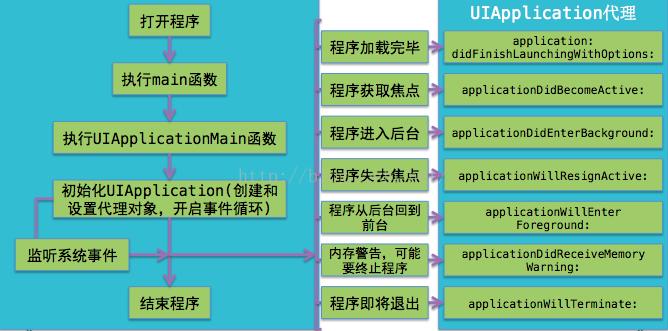
36程序啟動原理
UIApplication和delegate
所有的移動操作系統都有個致命的缺點:app很容易受到打擾.比如一個來電或者鎖屏會導致app進入後台甚至被終止;
還有很多其他類似的情況會導致app受到干擾,在app受到干擾時,會產生一些系統事件,這時UIApplication會通知它的delegate對象,讓delegate來處理這些系統事件.
delegate可處理的事件包括:
1> 應用程序的生命周期事件(如程序的啟動和關閉);
2> 系統事件(如來電);
3> 內存警告...
UIWindow的獲得:
? 1[UIApplicationsharedApplication].windows
在本應用中打開的UIWindow列表,這樣就可以接觸應用中的任何一個UIView對象(平時輸入文字彈出的鍵盤,就處在一個新的UIWindow中).
? 1[UIApplicationsharedApplication].keyWindow
用來接收鍵盤以及非觸摸類的消息事件的UIWindow,而且程序中每時每刻只能有一個UIWindow是keyWindow.如果某個UIWindow內部的文本框不能輸入文字,可能是因為這個UIWindow不是keyWindow.
? 1view.window
獲得某個UIView所在的UIWindow.
37.UITableViewCell 文字位置調整 繼承UITableViewCell,然後實現layoutSubviews函數,如下代碼把textlabel下移了10個像素:
- (void) layoutSubviews
{
[superlayoutSubviews];
intcellHeight =self.frame.size.height;
intcellWidth =self.frame.size.width;
self.textLabel.frame=CGRectMake(0,10,cellWidth, cellHeight-10);
}
38.ios帶圓角圖片的拉伸
UIImage* aImage =[[UIImageimageNamed:@"xxx.png"]stretchableImageWithLeftCapWidth:3topCapHeight:3];
原圖邊框內的3個像素不拉伸,中間部分按需要拉伸,可以保持圓角不被破壞
39自定義UINavigtion
1如果只是要更改left button 或者right button 的背景顏色:
UINavigationBar* aNavigationBar = self.navigationController.navigationBar;
aNavigationBar.tintColor = [UIColor lightGrayColor];

2,如果要自定義left button 或者right button 的背景圖片:
UIButton* backButton = [customNavigationBar backButtonWith:[UIImage imageNamed:@"navigationBarBackButton.png"] highlight:nilleftCapWidth:14.0];
backButton.titleLabel.textColor = [UIColor colorWithRed:254.0/255.0 green:239.0/255.0 blue:218.0/225.0 alpha:0.5];
self.navigationItem.leftBarButtonItem = [[[UIBarButtonItem alloc] initWithCustomView:backButton] autorelease];

3,如果要自定義navigation整個的背景圖片:
1,自定義navigationbar,然後在這個自定義類中實現如下函數
- (void)drawRect:(CGRect)rect
{
  if (navigationBarBackgroundImage)
    [navigationBarBackgroundImage drawInRect:rect];
  else
    [super drawRect:rect];,如果只是要更改left button 或者right button 的背景顏色:
UINavigationBar* aNavigationBar = self.navigationController.navigationBar;
aNavigationBar.tintColor = [UIColor lightGrayColor];

2,如果要自定義left button 或者right button 的背景圖片:
UIButton* backButton = [customNavigationBar backButtonWith:[UIImage imageNamed:@"navigationBarBackButton.png"] highlight:nilleftCapWidth:14.0];
backButton.titleLabel.textColor = [UIColor colorWithRed:254.0/255.0 green:239.0/255.0 blue:218.0/225.0 alpha:0.5];
self.navigationItem.leftBarButtonItem = [[[UIBarButtonItem alloc] initWithCustomView:backButton] autorelease];

3,如果要自定義navigation整個的背景圖片:
1,自定義navigationbar,然後在這個自定義類中實現如下函數
- (void)drawRect:(CGRect)rect
{
  if (navigationBarBackgroundImage)
    [navigationBarBackgroundImage drawInRect:rect];
  else
    [super drawRect:rect];

- 史上最具體的CocoaPods裝置教程(圖文)
- 2016 cocoapods的裝置和應用辦法和版本進級碰到的成績
- iOS中Block的回調應用息爭析詳解
- iPhone/iPad開辟經由過程LocalNotification完成iOS准時當地推送功效
- iOS推送之當地告訴UILocalNotification
- iOS10添加當地推送(Local Notification)實例
- iOS App通訊之local socket示例
- iOS App之間的通訊 local socket
- IOS開辟收集篇—Socket編程詳解
- IOS CocoaPods詳解之制造篇
- IOS CocoaPods具體應用辦法
- iOS開辟之用javascript挪用oc辦法而非url
- IOS游戲開辟之五子棋OC版
- IOS 處理推送當地國際化 loc-key 當地化掉敗的成績
- iOS運用中應用AsyncSocket庫處置Socket通訊的用法講授