IOS 10 推送
背景
iOS10 新特性一出,各個大神就早已研究新特性能給場景智能化所帶來的好處(唉,可惜我只是一個小白)。我也被安排適配iOS10的推送工作!
Apple 表示這是 iOS 有史以來最大的升級(our biggest release yet),更加智能開放的 Siri 、強化應用對 3D Touch 支持、 HomeKit 、電話攔截及全新設計的通知等等…
iOS 10 中將之前繁雜的推送通知統一成UserNotifications.framework 來集中管理和使用通知功能,還增加一些實用的功能——撤回單條通知、更新已展示通知、中途修改通知內容、在通知中顯示多媒體資源、自定義UI等功能,功能著實強大!
本文主要是針對iOS 10的消息通知做介紹,所以很多代碼沒有對iOS 10之前做添加適配。
基本原理
iOS推送分為Local Notifications(本地推送) 和 Remote Notifications(遠程推送)(原理圖來源於網絡,如有侵權請告知,我會添加來源,我怕我賠不起)
Local Notifications(本地推送)
Local Notifications.png App本地創建通知,加入到系統的Schedule裡,如果觸發器條件達成時會推送相應的消息內容Remote Notifications(遠程推送)
Remote Notifications1.jpg圖中,Provider是指某個iPhone軟件的Push服務器,這篇文章我將使用我花了12塊大洋(心疼)買的 APNS Pusher 作為我的推送源。
APNS 是Apple Push Notification Service(Apple Push服務器)的縮寫,是蘋果的服務器。
上圖可以分為三個階段:
第一階段:APNS Pusher應用程序把要發送的消息、目的iPhone的標識打包,發給APNS。
第二階段:APNS在自身的已注冊Push服務的iPhone列表中,查找有相應標識的iPhone,並把消息發到iPhone。
第三階段:iPhone把發來的消息傳遞給相應的應用程序, 並且按照設定彈出Push通知。
Remote Notifications2.jpeg從上圖我們可以看到:
首先是應用程序注冊消息推送。
IOS跟APNS Server要deviceToken。應用程序接受deviceToken。
應用程序將deviceToken發送給PUSH服務端程序。
服務端程序向APNS服務發送消息。
APNS服務將消息發送給iPhone應用程序。
基本配置和基本方法
如果只是簡單的本地推送,跳過1 2 步驟,直接到3
1、 如果你的App有遠端推送的話,那你需要開發者賬號的,需要新建一個對應你bundle的push 證書。證書這一塊我就不說了,如果針對證書有什麼問題可以給我留言,我會單獨把證書相關的知識點整理起來!如果你沒有賬號,可以到某寶買個,很便宜。
2、 Capabilities中打開Push Notifications 開關
在XCode7中這裡的開關不打開,推送也是可以正常使用的,但是在XCode8中,這裡的開關必須要打開,不然會報錯:
Error Domain=NSCocoaErrorDomain Code=3000 "未找到應用程序的“aps-environment”的授權字符串" UserInfo={NSLocalizedDescription=未找到應用程序的“aps-environment”的授權字符串}
打開後會自動在項目裡生成entitlements文件。
3、 推送的注冊
第一步: 導入 #import
且要遵守
這裡需要注意,我們最好寫成這種形式(防止低版本找不到頭文件出現問題)
#ifdef NSFoundationVersionNumber_iOS_9_x_Max
#import
#endif
第二步:我們需要在

- (BOOL)application:(UIApplication *)application didFinishLaunchingWithOptions:(NSDictionary *)launchOptions中注冊通知,代碼如下
  - (BOOL)application:(UIApplication *)application didFinishLaunchingWithOptions:(NSDictionary *)launchOptions {
    [self replyPushNotificationAuthorization:application];
    return YES;
}


#pragma mark - 申請通知權限
// 申請通知權限
- (void)replyPushNotificationAuthorization:(UIApplication *)application{

    if (IOS10_OR_LATER) {
        //iOS 10 later
        UNUserNotificationCenter *center = [UNUserNotificationCenter currentNotificationCenter];
        //必須寫代理,不然無法監聽通知的接收與點擊事件
        center.delegate = self;
        [center requestAuthorizationWithOptions:(UNAuthorizationOptionBadge | UNAuthorizationOptionSound | UNAuthorizationOptionAlert) completionHandler:^(BOOL granted, NSError * _Nullable error) {
            if (!error && granted) {
                //用戶點擊允許
                NSLog(@"注冊成功");
            }else{
                //用戶點擊不允許
                NSLog(@"注冊失敗");
            }
        }];

        // 可以通過 getNotificationSettingsWithCompletionHandler 獲取權限設置
        //之前注冊推送服務,用戶點擊了同意還是不同意,以及用戶之後又做了怎樣的更改我們都無從得知,現在 apple 開放了這個 API,我們可以直接獲取到用戶的設定信息了。注意UNNotificationSettings是只讀對象哦,不能直接修改!
        [center getNotificationSettingsWithCompletionHandler:^(UNNotificationSettings * _Nonnull settings) {
            NSLog(@"========%@",settings);
        }];
    }else if (IOS8_OR_LATER){
        //iOS 8 - iOS 10系統
        UIUserNotificationSettings *settings = [UIUserNotificationSettings settingsForTypes:UIUserNotificationTypeAlert | UIUserNotificationTypeBadge | UIUserNotificationTypeSound categories:nil];
        [application registerUserNotificationSettings:settings];
    }else{
        //iOS 8.0系統以下
        [application registerForRemoteNotificationTypes:UIRemoteNotificationTypeBadge | UIRemoteNotificationTypeAlert | UIRemoteNotificationTypeSound];
    }

    //注冊遠端消息通知獲取device token
    [application registerForRemoteNotifications];
}
上面需要注意:
1. 必須寫代理,不然無法監聽通知的接收與點擊事件
 center.delegate = self;

下面是我在項目裡定義的宏
#define IOS10_OR_LATER ([[[UIDevice currentDevice] systemVersion] floatValue] >= 10.0)
#define IOS9_OR_LATER ([[[UIDevice currentDevice] systemVersion] floatValue] >= 9.0)
#define IOS8_OR_LATER ([[[UIDevice currentDevice] systemVersion] floatValue] >= 8.0)
#define IOS7_OR_LATER ([[[UIDevice currentDevice] systemVersion] floatValue] >= 7.0)

2. 之前注冊推送服務,用戶點擊了同意還是不同意,以及用戶之後又做了怎樣的更改我們都無從得知,現在 apple 開放了這個 API,我們可以直接獲取到用戶的設定信息了。注意UNNotificationSettings是只讀對象哦,不能直接修改!只能通過以下方式獲取
 [center getNotificationSettingsWithCompletionHandler:^(UNNotificationSettings * _Nonnull settings) {
            NSLog(@"========%@",settings);
  }];
打印信息如下:
========
4、 遠端推送需要獲取設備的Device Token的方法是沒有變的,代碼如下
#pragma  mark - 獲取device Token
//獲取DeviceToken成功
- (void)application:(UIApplication *)application didRegisterForRemoteNotificationsWithDeviceToken:(NSData *)deviceToken{

    //解析NSData獲取字符串
    //我看網上這部分直接使用下面方法轉換為string,你會得到一個nil(別怪我不告訴你哦)
    //錯誤寫法
    //NSString *string = [[NSString alloc] initWithData:deviceToken encoding:NSUTF8StringEncoding];


    //正確寫法
    NSString *deviceString = [[deviceToken description] stringByTrimmingCharactersInSet:[NSCharacterSet characterSetWithCharactersInString:@"<>"]];
    deviceString = [deviceString stringByReplacingOccurrencesOfString:@" " withString:@""];

    NSLog(@"deviceToken===========%@",deviceString);
}

//獲取DeviceToken失敗
- (void)application:(UIApplication *)application didFailToRegisterForRemoteNotificationsWithError:(NSError *)error{
    NSLog(@"[DeviceToken Error]:%@\n",error.description);
}
5、這一步吊了,這是iOS 10系統更新時,蘋果給了我們2個代理方法來處理通知的接收和點擊事件,這兩個方法在
@protocol UNUserNotificationCenterDelegate

@optional

// The method will be called on the delegate only if the application is in the foreground. If the method is not implemented or the handler is not called in a timely manner then the notification will not be presented. The application can choose to have the notification presented as a sound, badge, alert and/or in the notification list. This decision should be based on whether the information in the notification is otherwise visible to the user.
- (void)userNotificationCenter:(UNUserNotificationCenter *)center willPresentNotification:(UNNotification *)notification withCompletionHandler:(void (^)(UNNotificationPresentationOptions options))completionHandler __IOS_AVAILABLE(10.0) __TVOS_AVAILABLE(10.0) __WATCHOS_AVAILABLE(3.0);

// The method will be called on the delegate when the user responded to the notification by opening the application, dismissing the notification or choosing a UNNotificationAction. The delegate must be set before the application returns from applicationDidFinishLaunching:.
- (void)userNotificationCenter:(UNUserNotificationCenter *)center didReceiveNotificationResponse:(UNNotificationResponse *)response withCompletionHandler:(void(^)())completionHandler __IOS_AVAILABLE(10.0) __WATCHOS_AVAILABLE(3.0) __TVOS_PROHIBITED;

@end
此外,蘋果把本地通知跟遠程通知合二為一。區分本地通知跟遠程通知的類是UNPushNotificationTrigger.h類中,UNPushNotificationTrigger的類型是新增加的,通過它,我們可以得到一些通知的觸發條件 ,解釋如下:
UNPushNotificationTrigger (遠程通知) 遠程推送的通知類型UNTimeIntervalNotificationTrigger (本地通知) 一定時間之後,重復或者不重復推送通知。我們可以設置timeInterval(時間間隔)和repeats(是否重復)。UNCalendarNotificationTrigger(本地通知) 一定日期之後,重復或者不重復推送通知 例如,你每天8點推送一個通知,只要dateComponents為8,如果你想每天8點都推送這個通知,只要repeats為YES就可以了。UNLocationNotificationTrigger (本地通知)地理位置的一種通知,

當用戶進入或離開一個地理區域來通知。

現在先提出來,後面我會一一代碼演示出每種用法。還是回到兩個很吊的代理方法吧
#pragma mark - iOS10 收到通知(本地和遠端) UNUserNotificationCenterDelegate

//App處於前台接收通知時
- (void)userNotificationCenter:(UNUserNotificationCenter *)center willPresentNotification:(UNNotification *)notification withCompletionHandler:(void (^)(UNNotificationPresentationOptions))completionHandler{

    //收到推送的請求
    UNNotificationRequest *request = notification.request;

    //收到推送的內容
    UNNotificationContent *content = request.content;

    //收到用戶的基本信息
    NSDictionary *userInfo = content.userInfo;

    //收到推送消息的角標
    NSNumber *badge = content.badge;

    //收到推送消息body
    NSString *body = content.body;

    //推送消息的聲音
    UNNotificationSound *sound = content.sound;

    // 推送消息的副標題
    NSString *subtitle = content.subtitle;

    // 推送消息的標題
    NSString *title = content.title;

    if([notification.request.trigger isKindOfClass:[UNPushNotificationTrigger class]]) {
        //此處省略一萬行需求代碼。。。。。。
        NSLog(@"iOS10 收到遠程通知:%@",userInfo);

    }else {
        // 判斷為本地通知
        //此處省略一萬行需求代碼。。。。。。
        NSLog(@"iOS10 收到本地通知:{\\\\nbody:%@,\\\\ntitle:%@,\\\\nsubtitle:%@,\\\\nbadge:%@,\\\\nsound:%@,\\\\nuserInfo:%@\\\\n}",body,title,subtitle,badge,sound,userInfo);
    }


    // 需要執行這個方法,選擇是否提醒用戶,有Badge、Sound、Alert三種類型可以設置
    completionHandler(UNNotificationPresentationOptionBadge|
                      UNNotificationPresentationOptionSound|
                      UNNotificationPresentationOptionAlert);

}


//App通知的點擊事件
- (void)userNotificationCenter:(UNUserNotificationCenter *)center didReceiveNotificationResponse:(UNNotificationResponse *)response withCompletionHandler:(void (^)())completionHandler{
    //收到推送的請求
    UNNotificationRequest *request = response.notification.request;

    //收到推送的內容
    UNNotificationContent *content = request.content;

    //收到用戶的基本信息
    NSDictionary *userInfo = content.userInfo;

    //收到推送消息的角標
    NSNumber *badge = content.badge;

    //收到推送消息body
    NSString *body = content.body;

    //推送消息的聲音
    UNNotificationSound *sound = content.sound;

    // 推送消息的副標題
    NSString *subtitle = content.subtitle;

    // 推送消息的標題
    NSString *title = content.title;

    if([response.notification.request.trigger isKindOfClass:[UNPushNotificationTrigger class]]) {
        NSLog(@"iOS10 收到遠程通知:%@",userInfo);
        //此處省略一萬行需求代碼。。。。。。

    }else {
        // 判斷為本地通知
        //此處省略一萬行需求代碼。。。。。。
        NSLog(@"iOS10 收到本地通知:{\\\\nbody:%@,\\\\ntitle:%@,\\\\nsubtitle:%@,\\\\nbadge:%@,\\\\nsound:%@,\\\\nuserInfo:%@\\\\n}",body,title,subtitle,badge,sound,userInfo);
    }

    //2016-09-27 14:42:16.353978 UserNotificationsDemo[1765:800117] Warning: UNUserNotificationCenter delegate received call to -userNotificationCenter:didReceiveNotificationResponse:withCompletionHandler: but the completion handler was never called.
    completionHandler(); // 系統要求執行這個方法
}
需要注意的:
1.下面這個代理方法,只會是app處於前台狀態 前台狀態 and 前台狀態下才會走,後台模式下是不會走這裡的
- (void)userNotificationCenter:(UNUserNotificationCenter *)center willPresentNotification:(UNNotification *)notification withCompletionHandler:(void (^)(UNNotificationPresentationOptions))completionHandler


2.下面這個代理方法,只會是用戶點擊消息才會觸發,如果使用戶長按(3DTouch)、彈出Action頁面等並不會觸發。點擊Action的時候會觸發!
- (void)userNotificationCenter:(UNUserNotificationCenter *)center didReceiveNotificationResponse:(UNNotificationResponse *)response withCompletionHandler:(void (^)())completionHandler

3.點擊代理最後需要執行:completionHandler(); // 系統要求執行這個方法
不然會報:
2016-09-27 14:42:16.353978 UserNotificationsDemo[1765:800117] Warning: UNUserNotificationCenter delegate received call to -userNotificationCenter:didReceiveNotificationResponse:withCompletionHandler: but the completion handler was never called.

4.不管前台後台狀態下。推送消息的橫幅都可以展示出來!後台狀態不用說,前台時需要在前台代理方法中設置 ,設置如下:
// 需要執行這個方法,選擇是否提醒用戶,有Badge、Sound、Alert三種類型可以設置
completionHandler(UNNotificationPresentationOptionBadge|
                  UNNotificationPresentationOptionSound|
                  UNNotificationPresentationOptionAlert);
6、 iOS 10之前接收通知的兼容方法
#pragma mark -iOS 10之前收到通知

- (void)application:(UIApplication *)application didReceiveRemoteNotification:(NSDictionary *)userInfo {
    NSLog(@"iOS6及以下系統,收到通知:%@", userInfo);
    //此處省略一萬行需求代碼。。。。。。
}

- (void)application:(UIApplication *)application didReceiveRemoteNotification:(NSDictionary *)userInfo fetchCompletionHandler:(void (^)(UIBackgroundFetchResult))completionHandler {
    NSLog(@"iOS7及以上系統,收到通知:%@", userInfo);
    completionHandler(UIBackgroundFetchResultNewData);
    //此處省略一萬行需求代碼。。。。。。
}
段結:是不是以為就結束了?NO NO NO(你以為離開了幻境,其實才剛剛踏入幻境!)上面的介紹了基本原理、基本配置以及基本方法說明,現在做完這些工作,我們的學習才剛剛開始!現在天時、地利、人和、可以開始下面推送coding的學習和測試了。
在用戶日常生活中會有很多種情形需要通知,比如:新聞提醒、定時吃藥、定期體檢、到達某個地方提醒用戶等等,這些功能在 UserNotifications 中都提供了相應的接口。
我們先學會基本的技能簡單的推送(爬),後面在學習進階定制推送(走),最後看看能不能高級推送(飛不飛起來看個人了,我是飛不起來):
基本Local Notifications(本地推送) 和 Remote Notifications(遠程推送)
基本Local Notifications(本地推送) 和 Remote Notifications(遠程推送)一、 基本的本地推送
本地推送生成主要流程就是:
1. 創建一個觸發器(trigger)
2. 創建推送的內容(UNMutableNotificationContent)
3. 創建推送請求(UNNotificationRequest)
4. 推送請求添加到推送管理中心(UNUserNotificationCenter)中
1、新功能trigger可以在特定條件觸發,有三類:UNTimeIntervalNotificationTrigger、UNCalendarNotificationTrigger、UNLocationNotificationTrigger
1.1、 UNTimeIntervalNotificationTrigger:一段時間後觸發(定時推送)
//timeInterval:單位為秒(s)  repeats:是否循環提醒
//50s後提醒
UNTimeIntervalNotificationTrigger *trigger1 = [UNTimeIntervalNotificationTrigger triggerWithTimeInterval:50 repeats:NO];
1.2 UNCalendarNotificationTrigger :調用

+ (instancetype)triggerWithDateMatchingComponents:(NSDateComponents *)dateComponents repeats:(BOOL)repeats;進行注冊;時間點信息用 NSDateComponents.(定期推送)
//在每周一的14點3分提醒
NSDateComponents *components = [[NSDateComponents alloc] init];
components.weekday = 2;
components.hour = 16;
components.minute = 3;
 // components 日期
UNCalendarNotificationTrigger *calendarTrigger = [UNCalendarNotificationTrigger triggerWithDateMatchingComponents:components repeats:YES];
1.3、UNLocationNotificationTrigger:調用

+ (instancetype)triggerWithRegion:(CLRegion *)region repeats:(BOOL)repeats;

進行注冊,地區信息使用CLRegion的子類CLCircularRegion,可以配置region屬性 notifyOnEntry和notifyOnExit,是在進入地區、從地區出來或者兩者都要的時候進行通知,這個測試過程專門從公司跑到家時刻關注手機有推送嘛,果然是有的(定點推送)
  //首先得導入#import ,不然會regin創建有問題。
  // 創建位置信息
  CLLocationCoordinate2D center1 = CLLocationCoordinate2DMake(39.788857, 116.5559392);
  CLCircularRegion *region = [[CLCircularRegion alloc] initWithCenter:center1 radius:500 identifier:@"經海五路"];
  region.notifyOnEntry = YES;
  region.notifyOnExit = YES;
  // region 位置信息 repeats 是否重復 (CLRegion 可以是地理位置信息)
  UNLocationNotificationTrigger *locationTrigger = [UNLocationNotificationTrigger triggerWithRegion:region repeats:YES];
2、創建推送的內容(UNMutableNotificationContent)

UNNotificationContent:屬性readOnly

UNMutableNotificationContent:屬性有title、subtitle、body、badge、sound、lauchImageName、userInfo、attachments、categoryIdentifier、threadIdentifier
本地消息內容內容限制大小展示titleNSString限制在一行,多出部分省略號subtitleNSString限制在一行,多出部分省略號bodyNSString通知欄出現時,限制在兩行,多出部分省略號;預覽時,全部展示注意點: body中printf風格的轉義字符,比如說要包含%,需要寫成%% 才會顯示,\同樣
    // 創建通知內容 UNMutableNotificationContent, 注意不是 UNNotificationContent ,此對象為不可變對象。
    UNMutableNotificationContent *content = [[UNMutableNotificationContent alloc] init];
    content.title = @"Dely 時間提醒 - title";
    content.subtitle = [NSString stringWithFormat:@"Dely 裝逼大會競選時間提醒 - subtitle"];
    content.body = @"Dely 裝逼大會總決賽時間到,歡迎你參加總決賽!希望你一統X界 - body";
    content.badge = @666;
    content.sound = [UNNotificationSound defaultSound];
    content.userInfo = @{@"key1":@"value1",@"key2":@"value2"};
3、創建完整的本地推送請求Demo
//定時推送
+ (void)createLocalizedUserNotification{

    // 設置觸發條件 UNNotificationTrigger
    UNTimeIntervalNotificationTrigger *timeTrigger = [UNTimeIntervalNotificationTrigger triggerWithTimeInterval:5.0f repeats:NO];

    // 創建通知內容 UNMutableNotificationContent, 注意不是 UNNotificationContent ,此對象為不可變對象。
    UNMutableNotificationContent *content = [[UNMutableNotificationContent alloc] init];
    content.title = @"Dely 時間提醒 - title";
    content.subtitle = [NSString stringWithFormat:@"Dely 裝逼大會競選時間提醒 - subtitle"];
    content.body = @"Dely 裝逼大會總決賽時間到,歡迎你參加總決賽!希望你一統X界 - body";
    content.badge = @666;
    content.sound = [UNNotificationSound defaultSound];
    content.userInfo = @{@"key1":@"value1",@"key2":@"value2"};

    // 創建通知標示
    NSString *requestIdentifier = @"Dely.X.time";

    // 創建通知請求 UNNotificationRequest 將觸發條件和通知內容添加到請求中
    UNNotificationRequest *request = [UNNotificationRequest requestWithIdentifier:requestIdentifier content:content trigger:timeTrigger];

    UNUserNotificationCenter* center = [UNUserNotificationCenter currentNotificationCenter];
    // 將通知請求 add 到 UNUserNotificationCenter
    [center addNotificationRequest:request withCompletionHandler:^(NSError * _Nullable error) {
        if (!error) {
            NSLog(@"推送已添加成功 %@", requestIdentifier);
            //你自己的需求例如下面:
            UIAlertController *alert = [UIAlertController alertControllerWithTitle:@"本地通知" message:@"成功添加推送" preferredStyle:UIAlertControllerStyleAlert];
            UIAlertAction *cancelAction = [UIAlertAction actionWithTitle:@"取消" style:UIAlertActionStyleCancel handler:nil];
            [alert addAction:cancelAction];
            [[UIApplication sharedApplication].keyWindow.rootViewController presentViewController:alert animated:YES completion:nil];
            //此處省略一萬行需求。。。。
        }
    }];

}
運行結果如下:
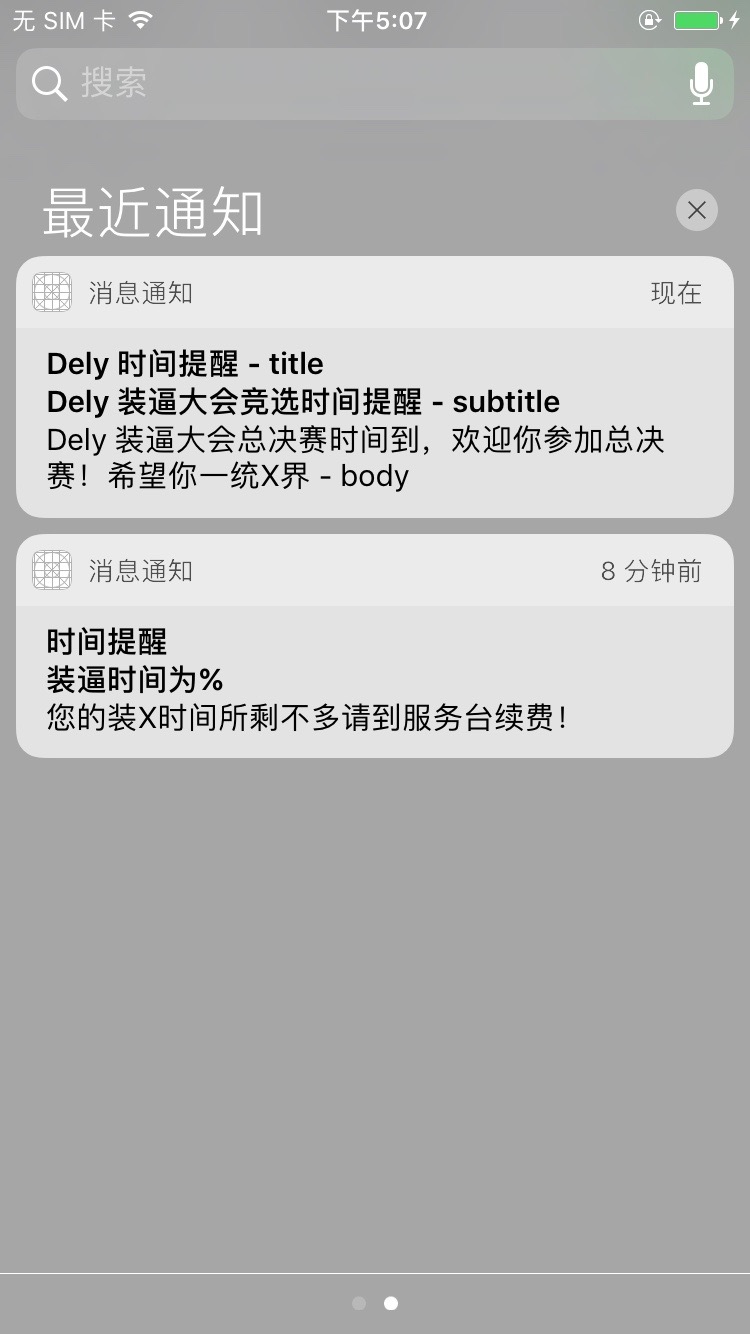
裝X決賽通知.jpg 二、 基本的遠端推送
如果你想模擬遠端推送,按照我前面介紹的配置基本環境、證書、push開關和基本方法就可以模擬遠端的基本遠端推送。
1、運行工程則會拿到設備的Device Token,後面會用到。
2、現在我們需要一個推送服務器給APNS發送信息。我前面說了我花了12塊大洋(心疼死我了)買了一個APNS pusher 來模擬遠端推送服務,當然你可以不花錢也可以用到,例如:

WPusher" target="_blank">NWPusher
3、你需要把你剛剛獲取的device token填到相應位置,同時你要配置好push證書哦。
4、需要添加aps內容了,然後點擊send就OK了
{
  "aps" : {
    "alert" : {
      "title" : "iOS遠程消息,我是主標題!-title",
      "subtitle" : "iOS遠程消息,我是主標題!-Subtitle",
      "body" : "Dely,why am i so handsome -body"
    },
    "badge" : "2"
  }
}
5、稍縱即逝你就收到了遠端消息了
6、Notification Management

對推送進行查、改、刪。都需要一個必需的參數requestIdentifier
1、更新通知
Local Notification需要通過更新request.相同的requestIdentifier,重新添加到推送center就可以了,說白了就是重新創建local Notification request(只要保證requestIdentifier就ok了),應用場景如圖
Remote Notification 更新需要通過新的字段apps-collapse-id來作為唯一標示,我前面用的APNS pusher暫不支持這個字段,不過github上有很多這樣的工具:

https://github.com/KnuffApp/Knuff

這樣remote 也可以更新推送消息
2、推送消息的查找和刪除
// Notification requests that are waiting for their trigger to fire
//獲取未送達的所有消息列表
- (void)getPendingNotificationRequestsWithCompletionHandler:(void(^)(NSArray *requests))completionHandler;
//刪除所有未送達的特定id的消息
- (void)removePendingNotificationRequestsWithIdentifiers:(NSArray *)identifiers;
//刪除所有未送達的消息
- (void)removeAllPendingNotificationRequests;

// Notifications that have been delivered and remain in Notification Center. Notifiations triggered by location cannot be retrieved, but can be removed.
//獲取已送達的所有消息列表
- (void)getDeliveredNotificationsWithCompletionHandler:(void(^)(NSArray *notifications))completionHandler __TVOS_PROHIBITED;
//刪除所有已送達的特定id的消息
- (void)removeDeliveredNotificationsWithIdentifiers:(NSArray *)identifiers __TVOS_PROHIBITED;
//刪除所有已送達的消息
- (void)removeAllDeliveredNotifications __TVOS_PROHIBITED;
測試如下:
+  (void)notificationAction{
    NSString *requestIdentifier = @"Dely.X.time";
    UNUserNotificationCenter* center = [UNUserNotificationCenter currentNotificationCenter];

    //刪除設備已收到的所有消息推送
   // [center removeAllDeliveredNotifications];

    //刪除設備已收到特定id的所有消息推送
   // [center removeDeliveredNotificationsWithIdentifiers:@[requestIdentifier]];

    //獲取設備已收到的消息推送
    [center getDeliveredNotificationsWithCompletionHandler:^(NSArray * _Nonnull notifications) {
    }];
}
段結: 收到通知時你需要在appdelegate裡面的代理方法裡處理你的需求邏輯,這個需要你自己寫了。到目前為止你掌握了基本的本地推送和基本的遠端推送!
不知不覺寫了這麼多字(全是TM廢話)、本來繼續打算寫進階的本地和遠端推送(Media Attachments、Notification Actions、自定義推送界面等),留著下一篇博客繼續分享吧,欲知後事如何,且聽下會裝X!