iOS 基礎UI
課程就要接近尾聲了所以我總結了一些關於iOS UI的一些基本知識點和屬性
DAY_01 UIKit框架-UIKit-UIView
創建window
在AppDelegate.m文件內實現
1.創建window對象
[UIScreen mainScreen]是一個單例,代表屏幕大小的一個單例
self.window = [[UIWindow alloc]initWithFrame:[UIScreenmainScreen].bounds];
2.設置window屬性
self.window.backgroundColor = [UIColor brownColor];
3.使創建的window對象成為主窗口且可見(一般來說一個應用程序只有一個主窗口)
[self.window makeKeyAndVisible];
4.創建視圖控制器
創建一個MainViewController類
MainViewController *mainVC = [[MainViewController alloc]init];
self.window.rootViewController = mainVC;
操控模擬器
回到主界面:shift+command+h
橫豎屏切換:command+方向鍵(左右)
縮放:optional+鼠標左鍵
每一個視圖控制器自帶一個視圖(view)
給視圖控制器的視圖設置屬性
self.view.backgroundColor = [UIColor whiteColor];
UI中所有可見的視圖都是UIView或者UIView的子類
視圖展示三部曲
1.創建對象
2.設置屬性
3.添加到父視圖上
1.創建對象
UIView *blackV = [[UIViewalloc]initWithFrame:CGRectMake(100,100,200,200)];
2.設置屬性
blackV.backgroundC-olor = [UIColor blackColor];
3.添加到父視圖上
[self.view addSubview:view];
view的屬性設置
a.設置背景顏色
blackV.backgroundColor = [UIColor blackColor];
b.設置透明度(0~1之間)
blackV.alpha = 0.8;
c.設置tag值(默認為0)
blackV.tag = 10;
d.根據tag值獲取相應的視圖
UIView *v = [self.view viewWithTag:10];
e.獲取子視圖
NSArray *arr = [self.view subviews];
f.獲取父視圖
UIView *superV = [view superview];
g.視圖的顯隱
blackV.hidden = YES;
frame,center,bounds的不同
frame既可以改變當前視圖的大小,也可以改變當前視圖的位置,它是相對於父視圖而言
center是改變當前視圖的位置
bounds可以改變當前視圖的大小和子視圖的位置,默認原點是(0,0)
bounds的point描述的就是當前視圖左上角點和原點的距離
point設置為整數那麼原點往左上角偏移
簡單來說就是將point看作是描述左上角點的坐標
視圖的添加和刪除
創建視圖redV和yellowV
視圖插入
a.將redV放在blackV下面
[self.view insertSubview:redV belowSubview:blackV];
b.將yellowV放在redV和blackV的中間(把yellowV放到redV上面)
[self.view insertSubview:yellowV aboveSubview:redV];
c.將yellowV通過下標插入到redV下面(把yellowV方法第一層)
[self.view insertSubview:yellowV atIndex:0];
將redV視圖放到最前面
[self.view bringSubViewToFront:redV];
將blackV視圖放到最後面
[self.view bringSubviewToBack:blackV];
將視圖從父視圖上移除
[yellow removeFromSuperview];
DAY_02 UILabel、UIButton、UITextField、UIImageView
一、UILabel:文本視圖
text:設置文本
textColor:文本顏色
numberOfLines:設置行數(設置為0自動換行)
font:文本字體
systemFontOfSize:文本字體顏色
textAlignment:文本對齊方式
shadowOffset:陰影偏移量
shadowColor:陰影顏色
layer.borderWidth:文本邊框寬度
layer.borderColor:文本邊框顏色
layer.cornerRadius:設置圓角
layer.masksToBounds:是否裁剪邊緣
二、UITextField:文本輸入框
placeholder:占位符
borderStyle:邊框風格(UITextBorderStyleRoundedRect:圓角)
clearButtonMode:清除按鈕顯示狀態
clearsOnBeginEditing:是否開始編輯的時候清除
leftView:左視圖
leftViewMode:左視圖模式
secureTextEntry:密文輸入
keyboardType:鍵盤樣式
設置代理
textField.delegate = self;
textField協議重寫方法
文本輸入框協議裡的方法
1、文本輸入框能否開始編輯
-(BOOL)textFieldShouldEndEditing:(UITextField *)textField;
2、文本輸入框已完成編輯(完成編譯時實現的方法寫在這裡)
-(void)textFieldDidEndEditing:(UITextField*)textField{
例如判斷輸入是否正確
}
3、文本輸入框是否按回車鍵
-(BOOL)textFieldShouldReturn:(UITextField *)textField;
(取消第一響應者,即光標移除)
resignFirstResponder
4、文本框限制輸入字數長度
-(BOOL)textField:(UITextField *)textFieldshouldChangeCharactersInRange:(NSRange)range replacementString:(NSString*)string{
將每一次輸入的字符進行拼接
判斷每一次拼接之後的字符是否超過限制
如果超過{
把拼接後的字符傳到textField裡
返回NO,表示文本輸入框內容不允許被添加
}
不超過就返回YES,表示文本輸入框內容可以添加
}
三、UIButton:按鈕控件
初始化方法:
buttonWithType
設置按鈕標題
setTitle:(NSString *) forState:(UIControlState)
設置按鈕標題顏色
setTitleColor:(NSString *) forState:(UIControlState)
點擊高亮
showsTouchWhenHighlighted = YES
背景圖片(按鈕的背景圖片)
setBackgroundImage:(UIImage *) forState:(UIControlState)
前景圖片(點擊前按鈕的背景圖片)
setImage:(UIImage *) forState:(UIControlState)
設置圖片位置
setImageEdgeInsets
setTitleEdgeInsets
四、UIImageView:圖片視圖
創建一張圖片
如果不是png格式就必須加後綴名
UIImage *image = [UIImage imageNamed:(NSString *)];
創建一個圖片視圖
添加圖片
imageView.image = image;
動畫效果
用一個數組把連續的圖片存儲起來(for)
添加動畫圖片
animationImages = (NSArray *);
動畫播放時間
animationDuration
動畫播放次數
animationRepeatCount
動畫開始
startAnimating
DAY_03 UIViewController、CustomView
customView:自定義視圖
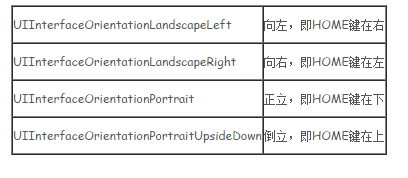
視圖的橫豎屏
-(void)layoutSubviews{
獲取屏幕當前方向
UIInterfaceOrientation ori= [UIApplication sharedApplication].statusBarOrientation;
}
視圖控制器的跳轉(用按鈕實現)
創建視圖控制器對象
模態出一個控制器
presentViewController:視圖控制器對象animated:是否開啟動畫效果completion:^{完成之後要實現的步驟(沒有直接寫nil)};
返回上一個控制器
[self dismissViewControllerAnimated:是否開啟動畫效果completion:nil];
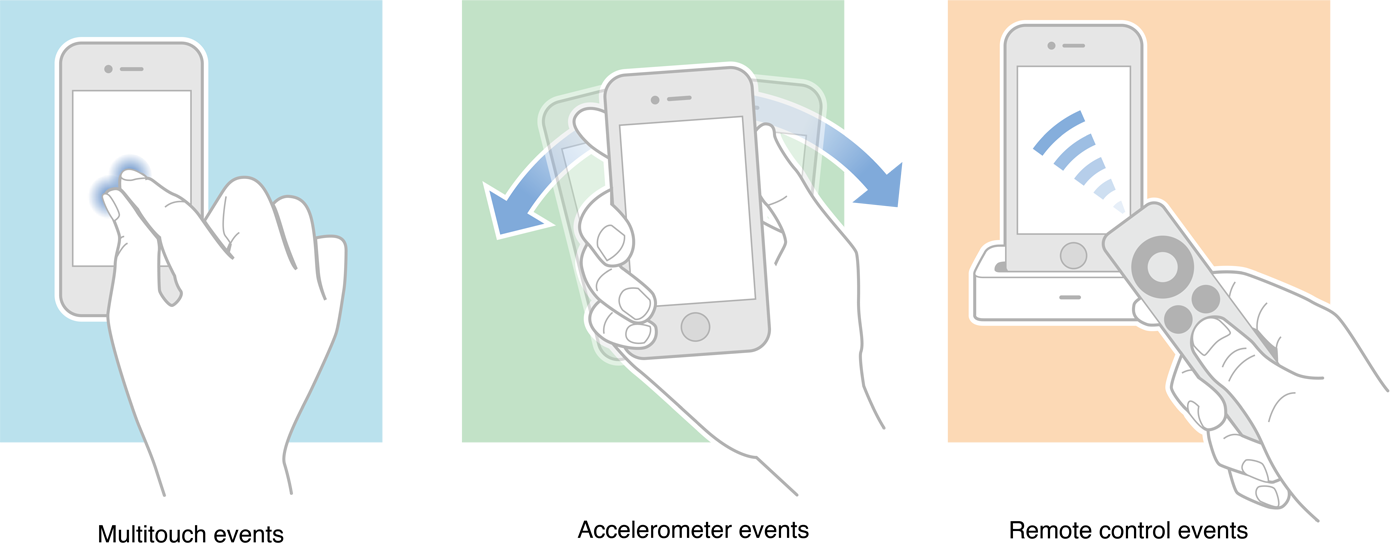
DAY_04 UIEvent 事件手勢
一、觸摸響應
觸摸事件的四個方法
touchesBegan:觸摸開始(觸摸點下去未松開的時候觸發)
touchesCancelled:觸摸取消(除非有電話打來強制取消觸摸)
touchesEnded:觸摸結束(觸摸松開的時候觸發)
touchesMoved:觸摸移動(觸摸移動的時候觸發)
//封裝的類
模仿button實現target action設計模式
@property (nonatomic,assign)id target;
@property (nonatomic,assign)SEL selector;
方法
[self.target performSelector:self.selector withObject:selfafterDelay:4];
二、響應者鏈
用戶交互開關
是一個屬性,BOOL值:userInteractionEnabled
事件檢測順序
application -> appDelegate -> window ->rootVC ->btn1-> btn2 -> btn3
事件響應順序
和檢測順序相反,一旦某個子視圖對視圖做出響應就不再傳遞
響應區域是子視圖在父視圖的區域
三、手勢
添加方法
addGestureRecognizer:
設置時應打開用戶交互
UITapGustureRecognizer:點擊手勢
numberOfTapsRequired:點擊次數
numberOfTouchesRequired:手指同時觸摸的數字
UIPinchGestureRecognizer:捏合手勢
scale:兩個手指之間的距離
改變大小(應該設置為每次放大縮小都是基於上一次的基礎作變化)
image.transform = CGAffineTransformScale(image.transform,pinch.scale, pinch.scale);
//偏移量重置
pinch.scale = 1;
UIRotationGestureRecognizer:旋轉手勢
rotation = 旋轉的弧度
image.transform = CGAffineTransformScale(image.transform,rotation.rotation);
//重置比例系數(弧度)
rotation.rotation = 0;
UISwipeGestureRecognizer:滑動手勢
direction:滑動的方向
判斷滑動方向以此執行相對應的方法
UIPanGestureRecognizer:拖動手勢
pan.view就是手勢所在的視圖
//根據拖動的偏移量重新設置視圖的位置
imageV.transform =CGAffineTransformTranslate(imageV.transform, [pantranslationInView:pan.view].x, [pan translationInView:pan.view].y);
//偏移量重新設置為0(CGPointZero)
[pan setTranslation:CGPointZero inView:pan.view];
UIScreenEdgePanGuestureRecognizer:屏幕邊緣輕掃手勢
edges:可以滑動的屏幕邊緣方向
UILongPressGestureRecognizer:長按手勢
minimumPressDuration:長按的時間,默認是0.5
numberOfTapsRequired:點擊次數,默認是0
numberOfTouchesRequired:同時觸摸的手指數量
DAY_05UIControl
(防止圖片被渲染的方法(有時候必須寫在設置圖片的同時))
imageWithRenderingMode:UIImageRenderingModeAlwaysOriginal
UIControl:具有控制功能的空間,例如UIButton,UISlider
改變值的觸發狀態:UIControlEventValueChanged
UISwitch:開關控件
on:開關狀態
setOn:animated:開關初始狀態和開場動畫
外觀:
onTintColor
tintColor
thumbTintColor
UISlider:滑動控件
continuous:是否停下來才確定值
minimumValue:設置最小值
maximumValue:設置最大值
UISegmentedControl:分段控件
initWithItems:(NSArray)items:初始化方法
momentary:是否開啟選中之後的效果
tintColor
UIPageControl:分頁空間(常和UIScrollView一起使用)
numberOfPages:分頁總頁數
currentPage:當前頁
defersCurrentPageDisplay:當前頁在控件上的顯示
DAY_06 UIScrollView
滾動視圖
在滾動視圖上添加圖片視圖
確定滾動視圖的滾動范圍
contentSize
滾動條是否顯示
橫向
showsHorizontalScrollIndicator
豎向
shwosVerticalScrollIndicator
是否整頁滾動
pagingEnabled
邊緣彈動(設置無限循環圖片時應開啟)
bounces
點擊狀態欄回到最上面
scrollsToTop
設置偏移量(滾動視圖偏移的多少)
contentOffset
實現代理
self.delegate = self;
縮放:(把每一個圖片視圖都添加到另外新建的滾動視圖,有圖片的滾動視圖實現縮放的方法,再把有圖片的滾動視圖都添加到一個滾動視圖,這個滾動視圖用來滾動展示圖片)
設置最小最大縮放比例
minimumZoomScale
maximumZoomScale
實現縮放的方法(指定哪個視圖可以被縮放)
viewForZommingInScrollView:(返回一個視圖)
和UIPageControl組合
page的方法
//屏幕偏移量(想展示哪個界面就設置為多少)
scrollView.contentOffset =CGPointMake(pageControl.currentPage*self.view.frame.size.width, 0);
UIScrollView的方法(寫在減速完成裡)
pageControll.currentPage =scrollView.contentOffset.x/self.view.frame.size.width;
DAY_07 UINavigationController:導航控制器
導航控制器:管理一個或多個視圖控制器
將rootVC作為導航控制器的根視圖控制器
initWithRootViewControll
將導航控制器作為window的根視圖控制器
rootViewController
設置導航欄標題
title
navigationItem.title
設置導航控制條的透明與否
如果透明,那麼視圖原點從屏幕左上角開始
如果不透明,那麼視圖原點則從導航欄左下角開始
導航欄高度:44,狀態欄高度:20
self.navigationController.navigationBar.translucent = (BOOL);
bar:導航欄
設置bar的背景顏色
self.navigationController.navigationBar.barTintColor
設置bar的背景圖片
如果圖片高度小於44(導航欄高度),圖片會填充狀態欄和導航欄
如果圖片高度等於44,圖片則剛好設置為導航欄的背景
如果圖片高度等於64,圖片則剛好為導航欄和狀態欄的背景
self.navigationController.navigationBar setBackgroundImage:(UIImage*) forBarMetrics:UIBarMetricsDefault];
設置bar上的空間顏色
tintColor
在導航欄上添加控件
1、按鈕為系統樣式
self.navigationItem.leftBarButtonItem = [[UIBarButtonItem alloc]initWithBarButtonSystemItem:UIBarButtonSystemItemAdd target:self action:@SEL];
2、自定義圖片樣式
添加圖片時設置不被渲染
intiWithImage
3、自定義文字樣式
initWithTitle
設置右邊多個按鈕
self.navigationItem.rightBarButtonItems = (NSArray *)
在中間添加分段空間
self.navigationItem.titleView = segmentControl
點擊右邊按鈕跳轉視圖控制器
push跳轉
導航控制器以棧的形式管理一個或者多個視圖控制器,第一個被加入的控制器稱之為根視圖控制器,處於棧底,一般處於棧頂得控制器就是當前正在被展示的控制器
push就是將控制器加入棧中
pop就是將控制器從棧中拿出來
self.navigationController pushViewController:控制器對象 animated:YES
在跳轉的控制器中實現返回
pop
1、返回到上一個控制器
[self.navigationController popViewControllerAnimated:YES];
2、返回到指定控制器
[self navigationController viewControllers]:棧裡所有的視圖控制器
3、返回到根視圖控制器
[self.navigationController popToRootViewControllerAnimated:YES];
DAY_09 UITabBarController:標簽欄控制器
設置標簽欄控制器:
第一步 創建視圖控制器
第二步 將視圖控制器加入導航欄(一個標簽欄對應一個導航欄)
第三步 將導航欄加入到標簽欄
viewControllers:通過數值的形式添加
第四步 將標簽欄作為根視圖控制器
設置badgeValue(消息提醒)
如果視圖控制器加入了導航控制器,那麼我們設置標簽欄的標題和badgeValue需要通過導航控制器的屬性設置,而不是通過標簽控制器的屬性設置
設置標簽欄樣式
a、系統樣式
self.tabBarItem = [[UITabBarItem alloc]initWithTabBarSystemItem:UITabBarSystemItemFavoritestag:100]];
b、自定義樣式
self.tabBarItem = [[UITabBarItem alloc]initWithTitle:NSString *image:UIImage * selectedImage:UIImage *];
設置屬性
a、標簽標題
通過tabBarItem.title設置標簽標題
b、背景圖片
標簽欄的高度49,如果圖片高度超出標簽欄,圖片不會自動壓縮
設置默認選中的標簽欄
selectedIndex:標簽欄的坐標
設置標簽欄顏色
tabBar.barTintcolor
設置工程中所有tabBar的背景顏色
[[UITabBar appearance] setBarTintColor:[UIColor *]];
[UITabBar appearance]返回工程中所有的UITabBar
設置工程中所有導航欄的背景顏色(對導航欄有用)
設置字體屬性
NSDictionary *dic = @{NSForegroundColorAttributeName:[UIColor *],
NSFontAttributeName:[UIFontsystemFontOfSize:20]};
[[UITabBarItem appearance] setTitleTextAttributes:dicforState:UIControlStateNormal];
DAY_10UITableView基本使用
一、創建一個表視圖對象
UITableView *tab = [[UITableView alloc]initWithFrame:[UIScreen mainScreen].boundsstyle:UITableViewStylePlain];
有兩種風格的UITableView:
UITableViewStyleGrouped和UITableViewStylePlain
二、設置屬性
a、設置行高
tab.rowHeight
b、設置分割線顏色
tab.separatorColor
c、設置代理(delegate提供外觀設置,datasource提供數據源(主要給cell賦值))
遵循代理
三、添加到父視圖
代理必須實現的兩個方法:設置有多少分區,每個分區有多少行
tableView:cellForRowAtIndexPath:確定每個分區有多少行
tableView:numberOfRowsInSection:確定有多少個分區
確定有多少個分區,每個分區多少行之後,為每一行的cell配置數據
方法名:tableView:cellForRowAtIndexPath:
indexPath.section:當前顯示的分區(返回NSInteger)
indexPath.row:當前顯示的分區的行數(返回NSInteger)
1、設置重用符號
UITableViewCell *cell = [tableViewdequeueReusableCellWithIdentifier:@“reuse”];
2、判斷如果cell為空,創建cell
if(cell == nil){
cell = [[UITableViewCellalloc]initWithStyle:UITableViewCellStyleSubtitle reuseIdentifier:@“reuse”];
}
3、cell自帶了textLabel(標題標簽),detailTextLabel(詳細內容標簽),imageView(圖片視圖)
設置textLabel.text,detailTextLabel.text,imageView.image
4、返回cell
return cell;
代理的其他方法
1、設置分區的行的高度
tableView:heightForRowAtIndexPath:
返回CGFloat
2、設置分區頭標題
tableView:titleForHeaderInSection:
返回一個NSString
3、設置分區頭高度
tableView:heightForHeaderInSection:
返回一個CGFloat
4、設置分區頭視圖(可以在分區頭添加View)
tableView:viewForHeaderInSection:
返回一個視圖(label或者imageView等等)
5、設置右邊欄標題(通訊錄右邊的A-Z,通過點擊跳到對應的分區)
sectionIndexTitlesForTableView:
返回一個數組
6、選中某個單元格方法
tableView:didSelectRowAtIndexPath:
無返回值
用法:選中之後跳轉到詳細頁面
獲取plist文件的所有信息
NSString *s = [[NSBundle mainBundle]pathForResource:@“plist文件名” ofType:@“文件後綴”];
plist文件使用字典保存就用字典接收,用數組就用數組接收,使用對應的對象類型接收數據
NSDictionary *dic =[[NSDictionary alloc]initWithContextsOfFile:s];
DAY_11 UITableView編輯
添加編輯按鈕
self.navigationItem.rightBarButtonItem = self.editButtonItem;
tableView編輯分四步
1、使tableView處於編輯狀態
2、確定哪些cell可以被編輯
3、確定cell的編輯模式
4、完成編輯提交
刪除操作
先操作數據源,再操作UI
1、刪除數組中某一個元素
2、操作UI
刪除某一行
[self.tableView deleteRowsAtIndexPaths:@[indexPath]withRowsAnimation:UITableViewRowAnimationTop];
刪除某一分區
NSIndexSet *set = [NSIndexSetindexSetWithIndex:indexPath.section];
[self.tableView deleteSections:set withRowAnimation:2];
cell的移動
1、確定哪些單元格可以被移動
2、操作數據,移動完成
sourceIndexPath:起始坐標
destinationIndexPath:移動後到達的坐標
a、先添加後刪除
b、刷新整個UI
[self.tableView reloadData];
限制跨分區移動
//a 跨分區移動
- (NSIndexPath*)tableView:(UITableView *)tableView targetIndexPathForMoveFromRowAtIndexPath:(NSIndexPath*)sourceIndexPath toProposedIndexPath:(NSIndexPath *)proposedDestinationIndexPath{
//判斷目標路徑和起始路徑如果相同,移動,否則,不能移動
if(相同){
returnproposedDestinationIndexPath;
}else{
return sourceIndexPath;
}
}
DAY_12 UITableViewCell
數組裡面是字典,可以創建一個類作為model存儲數據,通過KVC賦值
步驟:
model裡面應實現setValue:forUndefinedKey:方法
1、遍歷數組
for (NSDictionary *dic in self.array)
2、創建類對象
Student *s = [[Student alloc]init];
3、給對象賦值
[s setValuesForKeysWithDictionary:dic];
創建一個類繼承於UITableViewCell(自定義Cell用來展示數據)
給類裡面的屬性實例化的時候把frame寫在layoutSubviews裡面
這個方法用來布局子視圖
方法被觸發的時機:
a、當子視圖被添加到父視圖上
b、屏幕做旋轉
c、滾動視圖
動態計算圖片高度(等比例縮放)
縮放比例:用圖片的寬度除以100(1比1的比例)
圖片視圖的高度:用圖片的高度除以縮放比例
影響文本高度的幾個因素:
文本內容的多少,文本所占寬度,文本字體的大小
NSDictionary *dic = @{UIFontAttributeName:[UIFontsystemFontOfSize:17]};
//17號字體
文本高度:
CGFloat h = [text boundingRectWithSize:CGSizeMake(200,10000)options:NSStringDrawingUsesLineFragmentOrigin attributes:dic context:nil].size.height;
DAY_13 UIKit-xib
找到對應的nib文件,利用nib文件注冊cell
UINib *nib = [UINibnibWithNibName:@“文件名" bundle:nil];
[self.tableView registerNib:nib forCellReuseIdentifier:@“重用標示符”];
視圖與視圖之間的對齊
Leading Edges:左對齊
Trailing Edges:右對齊
Top Edges:上對齊
Bottom Edges:下對齊
Horizontal Centers:縱向中心對齊
Vertical Centers:橫向中心對齊
BaseLines:基線對齊
視圖本身的位置
Horizontally in Container:以屏幕的縱向中心線對齊
Vertically in Container:以屏幕的橫向中心對齊
兩者結合就可以讓View以屏幕的中心點對齊
視圖的大小
Width:視圖的寬度
Height:視圖的高度
選中兩個視圖
Equal Width:兩個視圖等寬
Equal Height:兩個視圖等高
Aspect Ratio:設置寬高比
DAY_14 storyboard
sizeClass
iPhone4S,iPhone5/5s,iPhone6
豎屏:(w:Compacth:Regular)
橫屏:(w:Compact h:Compact)
iPhone6 Plus
豎屏:(w:Compacth:Regular)
橫屏:(w:Regular h:Compact)
iPad
豎屏:(w:Regular h:Regular)
橫屏:(w:Regular h:Regular)
DAY_15 UICollectionView
1、創建layout對象
2、創建UICollectionView
3、遵循代理
4、實現代理方法
5、注冊自定義cell類
registerClass
6、添加到父視圖上
DAY_16 UIImagePickerController
1、創建按鈕用來進入相冊
2、初始化UIImagePickerController
3、選擇調用相冊還是攝像頭
4、設置代理
5、allowEditing:允許編輯
6、用present方法彈出pick控制器
實現選中圖片後執行的方法
imagePickerController:didFinishPickimgMediaWithInfo:
用dismiss返回
編輯後的圖片
info[@“UIImagePickerControllerEditedImage"]