iOS開發中控制屏幕旋轉的編寫方法小結
在iOS5.1 和 之前的版本中, 我們通常利用 shouldAutorotateToInterfaceOrientation: 來單獨控制某個UIViewController的旋屏方向支持,比如:
復制代碼 代碼如下:
- (BOOL)shouldAutorotateToInterfaceOrientation:(UIInterfaceOrientation)interfaceOrientation
{
return (interfaceOrientation == UIInterfaceOrientationPortrait);
}
但是在iOS6中,這個方法被廢棄了,使用無效。
shouldAutorotateToInterfaceOrientation:
Returns a Boolean value indicating whether the view controller supports the specified orientation. (Deprecated in iOS 6.0. Override the supportedInterfaceOrientations andpreferredInterfaceOrientationForPresentation methods instead.)
實踐後會發現,通過supportedInterfaceOrientations的單獨控制是無法鎖定屏幕的。
復制代碼 代碼如下:
-(NSUInteger)supportedInterfaceOrientations
{
return UIInterfaceOrientationMaskPortrait;
}
多次實驗後總結出控制屏幕旋轉支持方向的方法如下:
子類化UINavigationController,增加方法
復制代碼 代碼如下:
- (BOOL)shouldAutorotate
{
return self.topViewController.shouldAutorotate;
}
- (NSUInteger)supportedInterfaceOrientations
{
return self.topViewController.supportedInterfaceOrientations;
}
並且設定其為程序入口,或指定為 self.window.rootViewController
隨後添加自己的view controller,如果想禁止某個view controller的旋屏:(支持全部版本的控制)
復制代碼 代碼如下:
- (BOOL)shouldAutorotateToInterfaceOrientation:(UIInterfaceOrientation)interfaceOrientation
{
return (interfaceOrientation == UIInterfaceOrientationPortrait);
}
-(BOOL)shouldAutorotate
{
return NO;
}
-(NSUInteger)supportedInterfaceOrientations
{
return UIInterfaceOrientationMaskPortrait;
}
如果想又開啟某個view controller的全部方向旋屏支持:
復制代碼 代碼如下:
- (BOOL)shouldAutorotateToInterfaceOrientation:(UIInterfaceOrientation)interfaceOrientation
{
return (interfaceOrientation != UIInterfaceOrientationPortraitUpsideDown);
}
-(NSUInteger)supportedInterfaceOrientations
{
return UIInterfaceOrientationMaskAllButUpsideDown;
}
-(BOOL)shouldAutorotate
{
return YES;
}
從而實現了對每個view controller的單獨控制。
順便提一下,如果整個應用所有view controller都不支持旋屏,那麼干脆:
復制代碼 代碼如下:
- (NSUInteger)application:(UIApplication *)application supportedInterfaceOrientationsForWindow:(UIWindow *)window
{
return UIInterfaceOrientationMaskPortrait;
}
橫豎屏切換,視圖亂了怎麼辦?
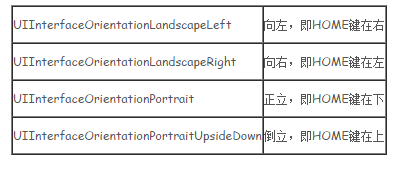
首先,我們必須了解一下下列4種狀態,它們被用來描述設備旋轉方向:
對於旋屏的處理,大致分為如下幾種情況和思路:
也許,你不需要旋屏支持,而希望鎖定屏幕
復制代碼 代碼如下:
-(BOOL)shouldAutorotateToInterfaceOrientation:(UIInterfaceOrientation)interfaceOrientation
{
return NO;
}
也許,你需要支持旋屏,或者支持部分方向的旋屏
復制代碼 代碼如下:
-(BOOL)shouldAutorotateToInterfaceOrientation:(UIInterfaceOrientation)interfaceOrientation {
return (interfaceOrientation != UIInterfaceOrientationPortraitUpsideDown);
}
也許,你的view有張背景圖,旋屏時系統幫助你拉伸了圖片,但是卻沒有管你的其它部件,比如button,你希望直接改變button的大小和位置
復制代碼 代碼如下:
-(void)willAnimateRotationToInterfaceOrientation:(UIInterfaceOrientation)toInterfaceOrientation duration:(NSTimeInterval)duration
{
if (UIInterfaceOrientationIsPortrait(toInterfaceOrientation)) {
NSLog(@"現在是豎屏");
[btn setFrame:CGRectMake(213, 442, 340, 46)];
}
if (UIInterfaceOrientationIsLandscape(toInterfaceOrientation)) {
NSLog(@"現在是橫屏");
[btn setFrame:CGRectMake(280, 322, 460, 35)];
}
}
也許,你並不希望用絕對坐標去約束控件,而是希望讓它通過旋轉自己適應屏幕的旋轉
復制代碼 代碼如下:
- (void)viewDidLoad
{
[super viewDidLoad];
// Do any additional setup after loading the view, typically from a nib.
UIDevice *device = [UIDevice currentDevice];
[device beginGeneratingDeviceOrientationNotifications];
//利用 NSNotificationCenter 獲得旋轉信號 UIDeviceOrientationDidChangeNotification
NSNotificationCenter *ncenter = [NSNotificationCenter defaultCenter];
[ncenter addObserver:self selector:@selector(orientationChanged) name:UIDeviceOrientationDidChangeNotification object:device];
}
- (BOOL)shouldAutorotateToInterfaceOrientation:(UIInterfaceOrientation)interfaceOrientation
{
return (interfaceOrientation != UIInterfaceOrientationPortraitUpsideDown);
}
-(void)rotation_btn:(float)n
{
UIButton *robtn = self.btn;
robtn.transform = CGAffineTransformMakeRotation(n*M_PI/180.0);
}
-(void)orientationChanged
{
UIDeviceOrientation orientaiton = [[UIDevice currentDevice] orientation];
switch (orientaiton) {
caseUIDeviceOrientationPortrait:
[self rotation_btn:0.0];
break;
caseUIDeviceOrientationPortraitUpsideDown:
[self rotation_btn:90.0*2];
break;
caseUIDeviceOrientationLandscapeLeft:
[self rotation_btn:90.0*3];
break;
caseUIDeviceOrientationLandscapeRight:
[self rotation_btn:90.0];
break;
default:
break;
}
}
也許,你需要autoresizesSubviews = YES
也許,你希望橫豎屏有不同的布局效果,需要准備2份Subview,在不同狀態去替換
當然不要忘記,需要調節設定圖示中的1、2處,
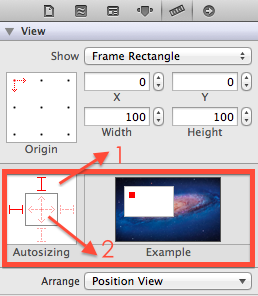
來幫助我們完成自己想要的適應效果。Example 動畫呈現的很清晰,^_^ 我就不再啰嗦了。