類型化卻不失靈活的 Table View Controller

原文:Typed, yet Flexible Table View Controller
作者:@Arkadiusz Holko
譯者:CocoaChina--kmyhy(博客)
對(幾乎)所有的 iOS 開發者來說,UITableView 就像是面包和黃油一樣必不可少。大部分情況下,我們用一個 UITableViewCell 展現一種數據類型,然後通過 Identifier 來重用單元格。在 objc.io 中介紹了這種技術。當我們想在一個 Table View 中使用多個不同類型的 cell 時,情況則復雜的多。cell 的不一致讓我們很難處理。
本文介紹了解決這個問題的三種途徑。每種方案都試圖修復前一種方案中導致的問題。第一種方法在許多 O-C 代碼庫中都很常見。第二種方法利用了枚舉,但仍然不是最好的解決辦法。第三種方法的實現使用了協議和泛型——它們是 Swift 提供給我們的神兵利器。
基礎
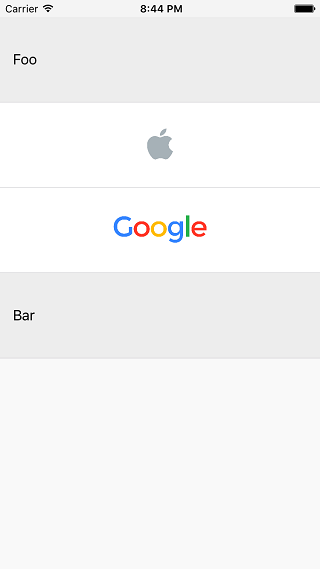
我會帶你完成一個 demo 項目(github 地址),在這個例子中,我們創建了一個包含兩種不同 cell 的 Table View:一種 cell 用於顯示文本,一種 cell 用於顯示圖片,如下圖所示:

顯示兩種數據(文字和圖片)的 UITableView
在渲染視圖時,我喜歡用值類型來封裝數據。我把這個稱作 view data。這裡,我們使用了兩個 view data:
struct TextCellViewData {
    let title: String
}

struct ImageCellViewData {
    let image: UIImage
}
(在真實項目中可能會有更多屬性;image 屬性應該聲明為 NSURL ,以免對 UIKit 產生依賴)。對應地,我們也需要兩種 cell 來展現這兩種 view data:
class TextTableViewCell: UITableViewCell {
    func updateWithViewData(viewData: TextCellViewData) {
        textLabel?.text = viewData.title
    }
}

class ImageTableViewCell: UITableViewCell {
    func updateWithViewData(viewData: ImageCellViewData) {
        imageView?.image = viewData.image
    }
}
然後,我們開始進入 View Controller 中。
第一種方法:簡單方法
我不喜歡一開始就講很復雜的東西,一開始,先講一個簡單的實現,用於顯示一點東西在屏幕上。
我們想讓 Table View 受數組中的數據驅動(准確地說是 items 數組)。因為我們的數據是完全不同的兩種結構體,所以數組的類型只能是 [Any]。在 registerCells() 方法中我們使用標准的 cell 重用機制提前注冊了 cell。在 tableView(_:cellForRowAtIndexPath:) 方法中我們根據指定 IndexPath 所對應的 view data 的類型來創建 cell。我們的 View Controller 的完整實現非常簡單(為簡便起見,我們用 ViewController 作為 Table View 的數據源。在真實項目中,我們可能需要將數據源抽離到一個單獨的對象中。):
class ViewController: UIViewController {

    @IBOutlet weak var tableView: UITableView!

    var items: [Any] = [
        TextCellViewData(title: "Foo"),
        ImageCellViewData(image: UIImage(named: "Apple")!),
        ImageCellViewData(image: UIImage(named: "Google")!),
        TextCellViewData(title: "Bar"),
    ]

    override func viewDidLoad() {
        super.viewDidLoad()

        tableView.dataSource = self
        registerCells()
    }

    func registerCells() {
        tableView.registerClass(TextTableViewCell.self, forCellReuseIdentifier: textCellIdentifier)
        tableView.registerClass(ImageTableViewCell.self, forCellReuseIdentifier: imageCellIdentifier)
    }
}

extension ViewController: UITableViewDataSource {

    func tableView(tableView: UITableView, numberOfRowsInSection section: Int) -> Int {
        return items.count
    }

    func tableView(tableView: UITableView, cellForRowAtIndexPath indexPath: NSIndexPath) -> UITableViewCell {
        let viewData = items[indexPath.row]

        if (viewData is TextCellViewData) {
            let cell = tableView.dequeueReusableCellWithIdentifier(textCellIdentifier) as! TextTableViewCell
            cell.updateWithViewData(viewData as! TextCellViewData)
            return cell
        } else if (viewData is ImageCellViewData) {
            let cell = tableView.dequeueReusableCellWithIdentifier(imageCellIdentifier) as! ImageTableViewCell
            cell.updateWithViewData(viewData as! ImageCellViewData)
            return cell
        }

        fatalError()
    }
}
這個方法是可行的,但至少有以下幾個原因讓我不太滿意:
我們無法重用這個 ViewController。如果我們想再加入一種新的 cell,比如用於顯示視頻,我們不得不在三個地方修改代碼:
1. 加入一個新的可重用 Identifier
2. 修改 registerCells() 方法
3. 修改 tableView(\_:cellForRowAtIndexPath:) 方法
如果我們修改 items,提供給它一種 view data,而這種 view data 類型是我們無法處理的,則我們會觸發 tableView(\_:cellForRowAtIndexPath:) 方法中的 fatalError()。
在 view data 和 cell 之間存在關聯性,但在類型系統中卻無法體現這種關聯性。
第二種方法:枚舉
我們可以添加一個 TableViewItem 枚舉類型來從某種程度上解決這些問題,在枚舉中,我們將 view data 所支持的所有類型都列舉進去:
enum TableViewItem {
    case Text(viewData: TextCellViewData)
    case Image(viewData: ImageCellViewData)
}
然後將 items 屬性的類型修改為 [TableViewItem]:
var items: [TableViewItem] = [
    .Text(viewData: TextCellViewData(title: "Foo")),
    .Image(viewData: ImageCellViewData(image: UIImage(named: "Apple")!)),
    .Image(viewData: ImageCellViewData(image: UIImage(named: "Google")!)),
    .Text(viewData: TextCellViewData(title: "Bar")),
]
再修改 registerCells() 方法:
func registerCells() {
    for item in items {
        let cellClass: AnyClass
        let identifier: String

        switch(item) {
        case .Text(viewData: _):
            cellClass = TextTableViewCell.self
            identifier = textCellIdentifier
        case .Image(viewData: _):
            cellClass = ImageTableViewCell.self
            identifier = imageCellIdentifier
        }

        tableView.registerClass(cellClass, forCellReuseIdentifier: identifier)
    }
}
最後,修改 tableView(_:cellForRowAtIndexPath:) 方法:
func tableView(tableView: UITableView, cellForRowAtIndexPath indexPath: NSIndexPath) -> UITableViewCell {
    let item = items[indexPath.row]

    switch(item) {
    case let .Text(viewData: viewData):
        let cell = tableView.dequeueReusableCellWithIdentifier(textCellIdentifier) as! TextTableViewCell
        cell.updateWithViewData(viewData)
        return cell
    case let .Image(viewData: viewData):
        let cell = tableView.dequeueReusableCellWithIdentifier(imageCellIdentifier) as! ImageTableViewCell
        cell.updateWithViewData(viewData)
        return cell
    }
}
不可否認,這種方法比上一種方法更好:
View Controller 只能提供枚舉中指定的 view data 類型。
用 switch 語句代替了煩人的 if 語句,同時可以去掉 fatalError()。
然後我們還可以改進這個實現,比如將單元格的重用和設置修改為:
func tableView(tableView: UITableView, cellForRowAtIndexPath indexPath: NSIndexPath) -> UITableViewCell {
    let item = items[indexPath.row]

    switch(item) {
    case let .Text(viewData: viewData):
        return tableView.dequeueCellWithViewData(viewData) as TextTableViewCell
    case let .Image(viewData: viewData):
        return tableView.dequeueCellWithViewData(viewData) as ImageTableViewCell
    }
}
但是悲催的是,我們得在所有的地方都要加入這些 switch 語句。到目前為止,我們只在兩個地方使用了 switch 語句,但不難想象絕不僅限於此。例如,當自動布局將變得不可用我們必須使用手動布局時,我們必須在 tableView(\_:heightForRowAtIndexPath:) 中再使用一個 switch 語句。
這個方法不是不可以使用,但我始終對那些 switch 語句耿耿於懷,於是我打算更進一步。
第三種(終極)方法:協議和泛型
讓我們徹底推翻前兩種解決辦法,另起爐灶。
聲明 Updatable 協議
我們的 cell 是根據 view data 來呈現不同界面的,因此我們定義一個 Updatable 協議,同時讓它和一個類型 ViewData 進行綁定:
protocol Updatable: class {
    typealias ViewData

    func updateWithViewData(viewData: ViewData)
}
然後讓我們的自定義單元格實現該協議:
extension TextTableViewCell: Updatable {
    typealias ViewData = TextCellViewData
}

extension ImageTableViewCell: Updatable {
    typealias ViewData = ImageCellViewData
}
看過前兩種方法之後,我們不難發現,對於 items 中的每個 view data 對象,我們都需要:
1. 找出要使用哪一種 cell 類
2. 找出要使用哪一個重用 Identifier
3. 用 veiw data 渲染 cell
定義 CellConfigurator 結構
因此,我們另外聲明一個結構來包裝 view data。用結構來提供更多的屬性和功能。不妨把這個結構命名為 CellConfigurator:
struct CellConfigurator {

    let viewData: Cell.ViewData
    let reuseIdentifier: String = NSStringFromClass(Cell)
    let cellClass: AnyClass = Cell.self

    ...
這個是一個泛型結構,使用類型參數 Cell。Cell 有兩個約束:首先必須實現了 Updatable 協議,其次它必須是 UITableViewCell 子類。
CellConfigurator 有三個屬性: viewData, reuseIdentifier 和 cellClass。viewData 的類型取決於 Cell 的類型,它沒有默認值。其他兩個屬性的值則取決於 Cell 的具體類型(這是 Swift 中的新特性,它真的很棒!)。
    ...
    // further part of CellConfigurator
    func updateCell(cell: UITableViewCell) {
        if let cell = cell as? Cell {
            cell.updateWithViewData(viewData)
        }
    }
}
最後,我們將 UITableViewCell 實例傳給 updateCell() 方法,就可以將 viewData 渲染到 cell 上。這裡,我們不需要用到 Cell 的類型,因為 UITableViewCell 對象是通過 dequeueReusableCellWithIdentifier(_:forIndexPath:) 方法返回的。呼,這麼短的實現,解釋起來這麼費勁。
然後,在 items 數組中生成 CellConfigurator 實例:
let items = [
    CellConfigurator(viewData: TextCellViewData(title: "Foo")),
    CellConfigurator(viewData: ImageCellViewData(image: UIImage(named: "Apple")!)),
    CellConfigurator(viewData: ImageCellViewData(image: UIImage(named: "Google")!)),
    CellConfigurator(viewData: TextCellViewData(title: "Bar")),
]
等等,怎麼回事?居然出現一個編譯時錯誤?
Type of expression is ambiguous without more context
那是因為 CellConfigurator 是泛型,但 Swift 數組只能保存相同類型,我們不能簡單地把 CellConfigurator
啊哈,稍等一會,馬上搞定。Cell 類型參數實際上只在聲明 viewData 的時候用到。因此,我們在 CellConfigurator 中可以不需要指明 Cell 的真實類型。新聲明一個非泛型協議:
protocol CellConfiguratorType {
    var reuseIdentifier: String { get }
    var cellClass: AnyClass { get }

    func updateCell(cell: UITableViewCell)
}
修改 CellConfigurator,讓它實現 CellConfiguratorType:
extension CellConfigurator: CellConfiguratorType {
}
現在可以將 items 的類型聲明為:
let items: [CellConfiguratorType]
編譯通過。
View Controller
我們現在開始修改 View Controller。 registerCells() 可以變得更簡單:
func registerCells() {
    for cellConfigurator in items {
        tableView.registerClass(cellConfigurator.cellClass, forCellReuseIdentifier: cellConfigurator.reuseIdentifier)
    }
}
tableView(_:cellForRowAtIndexPath:) 方法也變得更簡單了,這真是一個好消息:
func tableView(tableView: UITableView, cellForRowAtIndexPath indexPath: NSIndexPath) -> UITableViewCell {
    let cellConfigurator = items[indexPath.row]
    let cell = tableView.dequeueReusableCellWithIdentifier(cellConfigurator.reuseIdentifier, forIndexPath: indexPath)
    cellConfigurator.updateCell(cell)
    return cell
}
為能重用 View Controller,我們還必須再做一些工作。比如讓 items 能夠從類外部修改。這裡就不再多說了,你可以在 GitHub 上參考最終實現的這個框架和 demo:ConfigurableTableViewController
結束語
我們來看一下,最後一個方案和前兩種方案相比有什麼不同:
1. 當我們想增加一種新的 cell 時,不需要修改 View Controller
2. View Controller 是類型安全的。如果我們增加一種 cell 根本不支持的 view data 時,我們會得到一個編譯錯誤。
3. 刷新 cell 時不需要 switch 語句。
看來第三種方法解決了我們所有的問題。我想我們又前進了一步。一種更好的解決辦法往往是“眾裡尋它千百度,蓦然回首,那人卻在燈火闌刪處”。
感謝 Maciej Konieczny 和 Kamil Ko?odziejczyk 為本文審稿。
如果你喜歡本文,請關注我的 Twitter,或者訂閱我的 RSS。


