iOS 仿知乎
編輯:IOS開發基礎

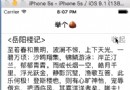
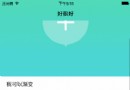
效果圖如上,簡單分析下
1.導航欄一開始是隱藏的,隨著scrollView滾動而漸變
2.導航欄左右兩邊的navigationItem是一直顯示的
3.導航欄參考了途家app,使用了毛玻璃效果,背景是一張圖片
4.下拉放大圖片效果
5.title文字動畫效果
通過簡單分析,系統的導航欄實現以上效果有點困難,直接自定義一個假的導航欄更容易點
分布拆解實現以上效果
一.下拉放大header圖片
- (void)viewDidLoad {
    [super viewDidLoad];
    [self.view addSubview:self.scaleImageView];

    // 設置展示圖片的約束
    [_scaleImageView mas_makeConstraints:^(MASConstraintMaker *make) {
        make.top.mas_equalTo(0);
        make.left.equalTo(self.view.mas_left);
        make.right.equalTo(self.view.mas_right);
        make.height.mas_equalTo(kHeardH);
    }];
}

// tableView懶加載
-(UITableView *)tableView{
    if(_tableView == nil){
        _tableView = [[UITableView alloc]initWithFrame:self.view.bounds style:UITableViewStylePlain];
        _tableView.contentInset = UIEdgeInsetsMake(kHeardH-35, 0, 0, 0);
        _tableView.delegate = self;
        _tableView.dataSource = self;
        _tableView.separatorStyle = UITableViewCellSeparatorStyleNone;
    }
    return _tableView;
}

// 圖片的懶加載
- (UIImageView *)scaleImageView
{
    if (!_scaleImageView) {
        _scaleImageView = [[UIImageView alloc] init];
        _scaleImageView.contentMode = UIViewContentModeScaleAspectFill;
        _scaleImageView.clipsToBounds = YES;
        _scaleImageView.image = [UIImage imageNamed:@"666"];

    }
    return _scaleImageView;
}

// 導航欄高度
#define kNavBarH 64.0f
// 頭部圖片的高度
#define kHeardH  260
#pragma mark - UIScrollViewDelegate
- (void)scrollViewDidScroll:(UIScrollView *)scrollView {

    // 計算當前偏移位置
    CGFloat offsetY = scrollView.contentOffset.y;
    CGFloat delta = offsetY - _lastOffsetY;
    DLog(@"delta=%f",delta);
    DLog(@"offsetY=%f",offsetY);
    CGFloat height = kHeardH - delta;
    if (height < kNavBarH) {
        height = kNavBarH;
    }

    [_scaleImageView mas_updateConstraints:^(MASConstraintMaker *make) {
        make.height.mas_equalTo(height);
    }];
}
二.導航欄左右兩邊的navigationItem是一直顯示的
- (void)viewDidLoad {
    [super viewDidLoad];

    // 直接添加到控制器的View上面,注意添加順序,在添加導航欄之後,否則會被遮蓋住
    [self configNavigationBar];
}

- (void)configNavigationBar{
    //左邊返回按鈕
    UIButton *backBtn = [[UIButton alloc]init];
    backBtn.frame = CGRectMake(0, 20, 44, 44);
    [backBtn setImage:[UIImage imageNamed:@"special_back"] forState:UIControlStateNormal];
    [backBtn addTarget:self action:@selector(back) forControlEvents:UIControlEventTouchUpInside];

    //右邊分享按鈕
    UIButton *shartBtn = [[UIButton alloc]init];
    shartBtn.frame = CGRectMake(SCREENWIDTH-44, 20, 44, 44);
    [shartBtn setImage:[UIImage imageNamed:@"special_share"] forState:UIControlStateNormal];
    [shartBtn addTarget:self action:@selector(shareBtnClick) forControlEvents:UIControlEventTouchUpInside];
    [self.view addSubview:backBtn];
    [self.view addSubview:shartBtn];
}
// 返回
-(void)back{
    [self.navigationController popViewControllerAnimated:YES];
}
三.自定義導航欄及毛玻璃效果及title文字動畫效果
// 隱藏系統導航欄
- (void)viewWillAppear:(BOOL)animated{
    [super viewWillAppear:animated];
    self.navigationController.navigationBar.hidden = YES;
}

- (void)viewDidLoad {
    [super viewDidLoad];

    self.navigationController.navigationBar.hidden = YES;
    self.lastOffsetY = - kHeardH+35;
    [self.view addSubview:self.tableView];
    self.tableView.backgroundColor = [UIColor clearColor];
    [self.view addSubview:self.navigationView];
    self.navigationController.navigationBar.barStyle = UIBarStyleBlack;
}


// 自定義導航欄
-(UIView *)navigationView{

    if(_navigationView == nil){
        _navigationView = [[UIView alloc]init];
        _navigationView.frame = CGRectMake(0, 0, SCREENWIDTH, kNavBarH);
        _navigationView.backgroundColor = [UIColor clearColor];
        _navigationView.alpha = 0.0;

        //添加子控件
        [self setNavigationSubView];
    }
    return _navigationView;
}

// 注意:毛玻璃效果API是iOS8的,適配iOS8以下的請用其他方法
-(void)setNavigationSubView{

    // 毛玻璃背景
    UIImageView *bgImgView = [[UIImageView alloc] initWithFrame:_navigationView.bounds];
    bgImgView.image = [UIImage imageNamed:@"666"];
    [_navigationView addSubview:bgImgView];

    /**  毛玻璃特效類型
     *   UIBlurEffectStyleExtraLight,
     *   UIBlurEffectStyleLight,
     *   UIBlurEffectStyleDark
     */
    UIBlurEffect * blurEffect = [UIBlurEffect effectWithStyle:UIBlurEffectStyleDark];
    //  毛玻璃視圖
    UIVisualEffectView * effectView = [[UIVisualEffectView alloc] initWithEffect:blurEffect];
    //添加到要有毛玻璃特效的控件中
    effectView.frame = bgImgView.bounds;
    [bgImgView addSubview:effectView];
    //設置模糊透明度
    effectView.alpha = 0.9f;

    //中間文本框
    UIView *centerTextView = [[UIView alloc]init];
    self.centerTextView = centerTextView;
    CGFloat centerTextViewX = 0;
    CGFloat centerTextViewY = 64;
    CGFloat centerTextViewW = 0;
    CGFloat centerTextViewH = 0;

    //文字大小
    NSString *title = @"Pg.lostk開啟後搖滾的新圖景";
    NSString *desc  = @"搖滾清心坊8套";
    CGSize titleSize = [title sizeWithAttributes:@{NSFontAttributeName:[UIFont systemFontOfSize:12]}];
    CGSize descSize = [desc sizeWithAttributes:@{NSFontAttributeName:[UIFont systemFontOfSize:11]}];
    centerTextViewW = titleSize.width > descSize.width ? titleSize.width : descSize.width;
    centerTextViewH = titleSize.height + descSize.height +10;
    centerTextViewX = (SCREENWIDTH - centerTextViewW) / 2;
    centerTextView.frame = CGRectMake(centerTextViewX, centerTextViewY, centerTextViewW, centerTextViewH);

    //文字label
    UILabel *titleLabel = [[UILabel alloc]init];
    titleLabel.text = title;
    titleLabel.font = [UIFont systemFontOfSize:12];
    titleLabel.textColor = [UIColor whiteColor];
    titleLabel.frame = CGRectMake(0,5, centerTextViewW, titleSize.height);

    UILabel *descLabel = [[UILabel alloc]init];
    descLabel.textAlignment = NSTextAlignmentCenter;
    descLabel.text = desc;
    descLabel.font = [UIFont systemFontOfSize:11];
    descLabel.textColor = [UIColor whiteColor];
    descLabel.frame = CGRectMake(0, titleSize.height + 5, centerTextViewW, descSize.height);

    [centerTextView addSubview:titleLabel];
    [centerTextView addSubview:descLabel];
    [_navigationView addSubview:centerTextView];
}
聲明控件
@property(nonatomic,strong) UIView *navigationView;       // 導航欄
@property(nonatomic,strong) UIView *centerTextView;       // title文字
@property (assign, nonatomic) CGFloat lastOffsetY;        // 記錄上一次位置
@property (nonatomic,strong) UIImageView *scaleImageView; // 頂部圖片
核心代碼
#pragma mark - ScrollViewDelegate
- (void)scrollViewDidScroll:(UIScrollView *)scrollView {

    // 計算當前偏移位置
    CGFloat offsetY = scrollView.contentOffset.y;
    CGFloat delta = offsetY - _lastOffsetY;
    DLog(@"delta=%f",delta);
    DLog(@"offsetY=%f",offsetY);
    CGFloat height = kHeardH - delta;
    if (height < kNavBarH) {
        height = kNavBarH;
    }
    CGFloat margin = 205;
    if (delta>margin && deltamargin+39) {
        self.centerTextView.y = 25;
        self.centerTextView.alpha = 1.0;
    }
    if (delta<=margin) {
        self.centerTextView.alpha = 0;
    }
    if (delta= 1.0) {
        alpha = 1.0;
    }
    self.navigationView.alpha = alpha;
}
由於是直接寫項目中,沒有demo可供下載,抱歉,如果有更好的方法實現,希望不吝賜教,共勉!!!

相關文章
+