
Swift 視頻錄制之調用攝像頭錄像,並保存到系統相冊例子
1,技術介紹
(1)AVFoundation.framework 框架提供了 AVCaptureSession 類。使用它可以實現視頻捕獲功能。
(2)使用 AVCaptureVideoPreviewLayer 可以將攝像頭拍攝的畫面實時顯示在 ViewController 上。
(3)對於捕獲到的視頻,我們使用 AVCaptureMovieFileOutput 將其輸出到文件中。
2,下面實現一個錄像功能
(1)點擊“開始”按鈕,開始錄制視頻。默認先保存到 Documents 目錄下,命名為 temp.mp4。
(2)點擊“停止”按鈕,停止視頻錄制。將錄制好的錄像再轉存到系統照片庫中。
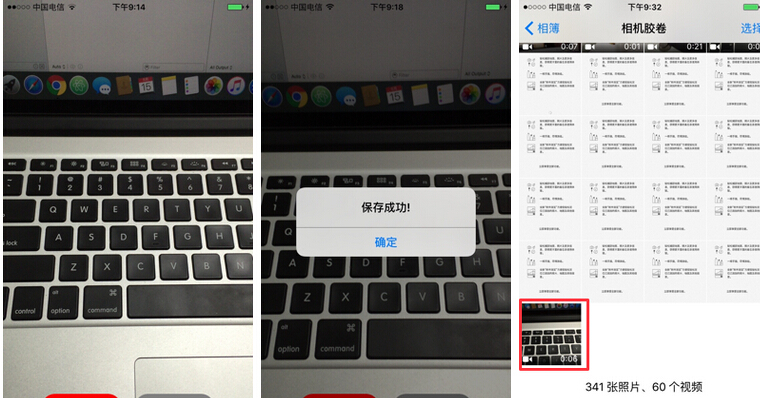
3,效果圖如下:
4,樣例代碼
import UIKit
import AVFoundation
import Photos
class ViewController: UIViewController , AVCaptureFileOutputRecordingDelegate {
//視頻捕獲會話。它是input和output的橋梁。它協調著intput到output的數據傳輸
let captureSession = AVCaptureSession()
//視頻輸入設備
let videoDevice = AVCaptureDevice.defaultDeviceWithMediaType(AVMediaTypeVideo)
//音頻輸入設備
let audioDevice = AVCaptureDevice.defaultDeviceWithMediaType(AVMediaTypeAudio)
//將捕獲到的視頻輸出到文件
let fileOutput = AVCaptureMovieFileOutput()
//開始、停止按鈕
var startButton, stopButton : UIButton!
//表示當時是否在錄像中
var isRecording = false
override func viewDidLoad() {
super.viewDidLoad()
//添加視頻、音頻輸入設備
let videoInput = try! AVCaptureDeviceInput(device: self.videoDevice)
self.captureSession.addInput(videoInput)
let audioInput = try! AVCaptureDeviceInput(device: self.audioDevice)
self.captureSession.addInput(audioInput);
//添加視頻捕獲輸出
self.captureSession.addOutput(self.fileOutput)
//使用AVCaptureVideoPreviewLayer可以將攝像頭的拍攝的實時畫面顯示在ViewController上
let videoLayer = AVCaptureVideoPreviewLayer(session: self.captureSession)
videoLayer.frame = self.view.bounds
videoLayer.videoGravity = AVLayerVideoGravityResizeAspectFill
self.view.layer.addSublayer(videoLayer)
//創建按鈕
self.setupButton()
//啟動session會話
self.captureSession.startRunning()
}
//創建按鈕
func setupButton(){
//創建開始按鈕
self.startButton = UIButton(frame: CGRectMake(0,0,120,50))
self.startButton.backgroundColor = UIColor.redColor();
self.startButton.layer.masksToBounds = true
self.startButton.setTitle("開始", forState: .Normal)
self.startButton.layer.cornerRadius = 20.0
self.startButton.layer.position = CGPoint(x: self.view.bounds.width/2 - 70,
y:self.view.bounds.height-50)
self.startButton.addTarget(self, action: #selector(onClickStartButton(_:)),
forControlEvents: .TouchUpInside)
//創建停止按鈕
self.stopButton = UIButton(frame: CGRectMake(0,0,120,50))
self.stopButton.backgroundColor = UIColor.grayColor();
self.stopButton.layer.masksToBounds = true
self.stopButton.setTitle("停止", forState: .Normal)
self.stopButton.layer.cornerRadius = 20.0
self.stopButton.layer.position = CGPoint(x: self.view.bounds.width/2 + 70,
y:self.view.bounds.height-50)
self.stopButton.addTarget(self, action: #selector(onClickStopButton(_:)),
forControlEvents: .TouchUpInside)
//添加按鈕到視圖上
self.view.addSubview(self.startButton);
self.view.addSubview(self.stopButton);
}
//開始按鈕點擊,開始錄像
func onClickStartButton(sender: UIButton){
if !self.isRecording {
//設置錄像的保存地址(在Documents目錄下,名為temp.mp4)
let paths = NSSearchPathForDirectoriesInDomains(.DocumentDirectory,
.UserDomainMask, true)
let documentsDirectory = paths[0] as String
let filePath : String? = "\(documentsDirectory)/temp.mp4"
let fileURL : NSURL = NSURL(fileURLWithPath: filePath!)
//啟動視頻編碼輸出
fileOutput.startRecordingToOutputFileURL(fileURL, recordingDelegate: self)
//記錄狀態:錄像中...
self.isRecording = true
//開始、結束按鈕顏色改變
self.changeButtonColor(self.startButton, color: UIColor.grayColor())
self.changeButtonColor(self.stopButton, color: UIColor.redColor())
}
}
//停止按鈕點擊,停止錄像
func onClickStopButton(sender: UIButton){
if self.isRecording {
//停止視頻編碼輸出
fileOutput.stopRecording()
//記錄狀態:錄像結束
self.isRecording = false
//開始、結束按鈕顏色改變
self.changeButtonColor(self.startButton, color: UIColor.redColor())
self.changeButtonColor(self.stopButton, color: UIColor.grayColor())
}
}
//修改按鈕的顏色
func changeButtonColor(target: UIButton, color: UIColor){
target.backgroundColor = color
}
//錄像開始的代理方法
func captureOutput(captureOutput: AVCaptureFileOutput!,
didStartRecordingToOutputFileAtURL fileURL: NSURL!,
fromConnections connections: [AnyObject]!) {
}
//錄像結束的代理方法
func captureOutput(captureOutput: AVCaptureFileOutput!,
didFinishRecordingToOutputFileAtURL outputFileURL: NSURL!,
fromConnections connections: [AnyObject]!, error: NSError!) {
var message:String!
//將錄制好的錄像保存到照片庫中
PHPhotoLibrary.sharedPhotoLibrary().performChanges({
PHAssetChangeRequest.creationRequestForAssetFromVideoAtFileURL(outputFileURL)
}, completionHandler: { (isSuccess: Bool, error: NSError?) in
if isSuccess {
message = "保存成功!"
} else{
message = "保存失敗:\(error!.localizedDescription)"
}
dispatch_async(dispatch_get_main_queue(), {
//彈出提示框
let alertController = UIAlertController(title: message,
message: nil, preferredStyle: .Alert)
let cancelAction = UIAlertAction(title: "確定", style: .Cancel, handler: nil)
alertController.addAction(cancelAction)
self.presentViewController(alertController, animated: true, completion: nil)
})
})
}
}

- iOS10告訴框架UserNotification懂得與運用
- iOS Webview自順應現實內容高度的4種辦法詳解
- iOS10 App適配權限 Push Notifications 字體Frame 碰到的成績
- iOS獲得以後裝備WiFi信息的辦法
- iPhone/iPad開辟經由過程LocalNotification完成iOS准時當地推送功效
- iOS推送之當地告訴UILocalNotification
- iOS開辟之widget完成詳解
- iOS10添加當地推送(Local Notification)實例
- iOS Remote Notification長途新聞推送處置
- IOS上iframe的轉動條掉效的處理方法
- Swift 同享文件操作小結(iOS 8 +)
- Swift 2.1 為 UIView 添加點擊事宜和點擊後果
- 在Swift中應用JSONModel 實例代碼
- 應用Swift代碼完成iOS手勢解鎖、指紋解鎖實例詳解
- 詳解iOS App中UISwitch開關組件的根本創立及應用辦法
- 蘋果5s重置wifi密碼 iphone5s wifi密碼怎麼修改?
- 怎麼把將安卓(android)手機的通訊錄導入到iphone中
- 蘋果iphone5的桌面圖標進行排序方法
- Swift HTTP網絡操作庫Alamofire實現文件上傳詳解
- ios開發之Swift 使用NSURLSession通過HTTPS進行網絡請求,及證書的使用
- 蘋果5s ios7.1.2死機怎麼辦?5s更新ios7.1.2死機解決方法
- ipad air/ipad5下載軟件/游戲/電影教程
- 蘋果5s怎麼信任電腦?怎麼讓iPhone5s信任電腦?
- iphone打不開itunes store?無法連接itunes store解決辦法
- iphone5s怎麼開啟虛擬HOME鍵(ios7)