iOS中 數據持久化 UI高級_17
數據持久化的本質就是把數據由內寫到本地(硬盤中),在iOS指將數據寫到沙盒文件夾下;
沙盒機制:指的就是采用沙盒文件夾的形式管理應用程序的本地文件,而且沙盒文件夾的名字是隨機分配的,采用十六進制方法命名;
=======================關於沙盒目錄==========================
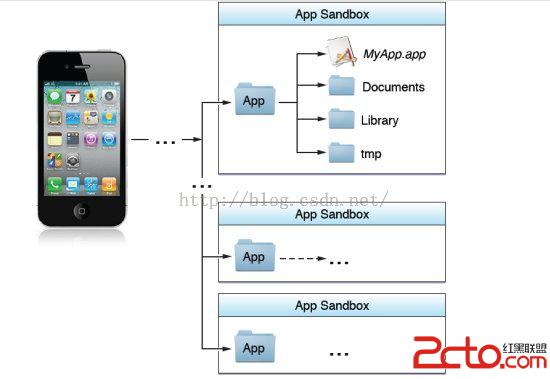
沙盒內部構造:
測試沙盒:
屬性:
@interface ViewController ()
@property (retain, nonatomic) IBOutlet UITextField *nameField;
@property (retain, nonatomic) IBOutlet UITextField *passwordField;
@property(nonatomic,retain)NSUserDefaults *user;
@end
//登錄按鈕
- (IBAction)handleLgin:(UIButton *)sender {
    //取出輸入框中的數據
    NSString *name = self.nameField.text;
    NSString *password = self.passwordField.text;
    //取出用戶偏好設置
    NSString *pName =  [self.user valueForKey:@name];
    NSString *pPassword = [self.user valueForKey:@password];
    //當輸入的內容和本地存儲的信息相同時顯示登錄成功
    if ([name isEqualToString:pName] && [password isEqualToString:pPassword]) {
        NSLog(@登陸成功);
    }else{
        NSLog(@登錄失敗,請注冊);
    }
}
//注冊按鈕
- (IBAction)handleRegister:(UIButton *)sender {

    NSString *name = self.nameField.text;
    NSString *password = self.passwordField.text;
    //當不輸入內容的時候提前結束方法
    if (name.length == 0 || password.length == 0) {
        NSLog(@賬戶名或者密碼為空,注冊失敗!);
        return;
    }

    //本地文件中設置用戶名和用戶密碼
    //設置用戶名
    [self.user setObject:name forKey:@name];
    //設置用戶密碼
    [self.user setObject:password forKey:@password];
    //同步數據
    [self.user synchronize];
    NSLog(@注冊成功);

}
記得釋放:
- (void)dealloc {
    [_nameField release];
    [_passwordField release];
    self.user = nil;
    [super dealloc];
}
測試結果:

————————————————————————
————————————————————————————
1.獲取沙盒文件夾的路徑
NSHomeDirectory() 沙盒文件的主目錄,在這個文件夾下放著三個文件Document,Libralay,Tmp,其中Library 中還有兩個文件Caches,Perference,系統幫我們創建五個文件存放在沙盒文件下,這五個是不能刪除的
NSLog(@%@,NSHomeDirectory());
Documents: 存放一些比較重要的文件,文件大小比較小,這些都是可以有副本,此文件夾中不能有太多東西,否則在上傳AppStore中會直接被拒,比如: 數據庫
獲取Documents 文件夾的路徑
第一個參數:文件夾的名字 64行
第二個參數:搜索域,有優先級:users -->local -->network -->system
第三個參數:相對路徑或者是絕對路徑 YES絕對路徑,NO代表相對路徑
此方法最早是應用在MAC端開發的,對於PC 端可以有很多的用戶,所以該方法的返回值是一個數組,但是現在這個方法應用在移動端(iOS端),而移動端用戶只有一個,所以獲取的路徑也只有一個
  NSString *documentsPath =   [NSSearchPathForDirectoriesInDomains(NSDocumentDirectory, NSUserDomainMask, YES)lastObject];
    NSLog(@%@,documentsPath);
Library 資源庫,存放的一些不太重要的文件,相對比較大,且其中有兩個子文件
    NSString *libraryPath =   [NSSearchPathForDirectoriesInDomains(NSLibraryDirectory, NSUserDomainMask, YES)lastObject];
    NSLog(@%@,libraryPath);
Caches 存放一些緩存的文件,如網頁緩存,圖片緩存,視頻緩存,視頻緩存,應用中清除緩存功能,清理的就是這個文件夾裡面的內容
//獲取Caches路徑
   NSString *cachesPath = [NSSearchPathForDirectoriesInDomains(NSCachesDirectory, NSUserDomainMask, YES)lastObject];
    NSLog(@%@,cachesPath);
//Perferences 偏好設置,存放一些用戶的信息
注意:路徑是找不到的,只能通過NSUserDefaults 訪問
NSUserDefaults *user = [NSUserDefaults standardUserDefaults];
//perferences 中存放的都是plist 文件,在第一次設置鍵值對的時候,會幫你創建plist文件,如果直接取值的時候,plist 文件是沒有的
賦值和取值:
//    [user setBool:YES forKey:@login];
    //取出BOOL值
//BOOL isLogin =  [user boolForKey:@login];
//    NSLog(@%d,isLogin);
//NSUserDefaults 支持的數據類型:array,dictionary,string,data,number,bool,integer等
//NSUserDefaults 中一般存儲數值類型的數據,不存放大型的數據
//模擬啟動用戶引導圖
    BOOL isFirstLogin = [user boolForKey:@login];
    if (NO == isFirstLogin) {
        NSLog(@第一次啟動);
        [user setBool:YES forKey:@login];
        [user synchronize];//立即同步
    }else{
        NSLog(@不是第一次啟動);
    }
//Tem 存放臨時文件 比如:壓縮包 zip ,解壓後就刪除處理了
獲取Tem的路徑
    NSTemporaryDirectory();
    NSLog(@%@,NSTemporaryDirectory()
NSFileManager 文件管理類,是一個文件管理工具,主要用於文件的的添加、刪除、拷貝,繼承自 NSObject
NSFileManager 也是一個單例類
NSFileManager *fileManger = [NSFileManager defaultManager];
=======================文件的創建==========================
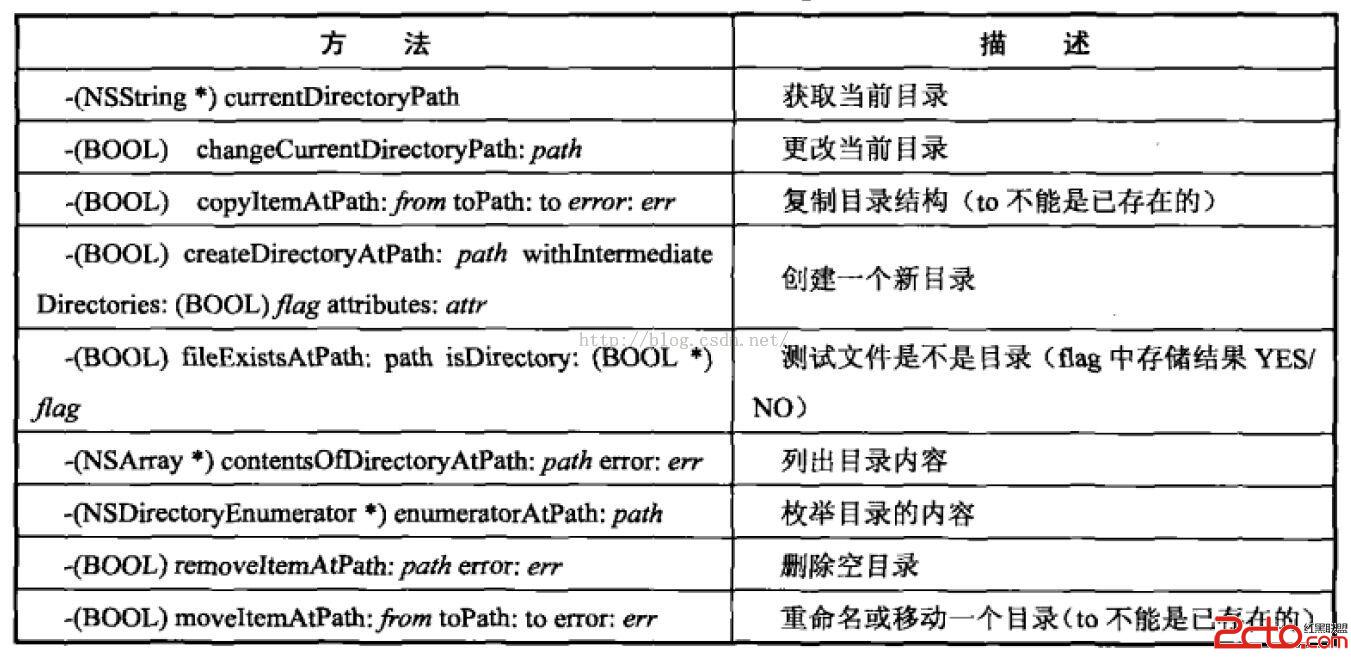
NSFileManager常用操作一覽表:
//在Document 文件下創建一個文件 av.text
1.獲取Documents 路徑
NSString *documentsPath = [NSSearchPathForDirectoriesInDomains(NSDocumentDirectory, NSUserDomainMask, YES)lastObject];
2.創建av.text 的路徑
//    stringByAppendingFormat 拼接上什麼就得到什麼
//    stringByAppendingString  拼接上什麼就得到什麼
//    stringByAppendingPathExtension  拼接的內容前加一個點
//    stringByAppendingPathComponent  拼接的內容前加一個 /
    NSString *avPath =   [documentsPath stringByAppendingPathComponent:@av];
    NSLog(@%@,avPath);
首先判斷文件是否存在
    if ([fileManger fileExistsAtPath:avPath]) {
        NSLog(@存在);
    }else{
        NSLog(@不存在);
        //創建 av.text文件
        //第二個參數詢問:如果路徑中沒有文件夾是否自動創建
   BOOL isSuccss = [fileManger createDirectoryAtPath:avPath withIntermediateDirectories:YES attributes:nil error:nil];
        if (isSuccss) {
            NSLog(@創建成功);
        }else{
            NSLog(@創建失敗);
        }
    }
=======================文件的刪除==========================
//刪除文件夾
1.先判斷有沒有要刪的文件夾存在
 if ([fileManger fileExistsAtPath:avPath]) {
        //如果存在就刪除
     BOOL isSuccess = [fileManger removeItemAtPath:avPath error:nil];
        NSLog(@%@,isSuccess ? @刪除成功:@刪除失敗);
    }
=======================文件的拷貝==========================
//把NB.plist 拷貝到 AV 文件夾下
//NSBundle 應用程序包,我們從AppStore下載的應用就是這個包
//獲取應用程序包的路徑
//iOS8.0 之後,**.app 單獨存放在一個文件內,**.app 這個文件只能讀,不能寫入,最終上傳到AppStore 的包就是這個包
  NSString *bundlePath = [[NSBundle mainBundle]bundlePath];
    NSLog(@%@,bundlePath);
    //1.獲取NB.plist 的路徑
    NSString *nbPath = [[NSBundle mainBundle]pathForResource:@NB.plist ofType:nil];
    //2.制造移動到沙盒Documents 文件夾下AV文件夾下NB.plist
    NSString *desPath = [avPath stringByAppendingPathComponent:@NB.plist];
    //3.文件拷貝
    if (![fileManger fileExistsAtPath:desPath]) {
        //第一個參數:copy之前的路徑
        //第二個參數:要拷貝到的位置
        BOOL isSucess = [fileManger copyItemAtPath:nbPath toPath:desPath error:nil];
        NSLog(@%@,isSucess ? @拷貝成功:@拷貝失敗);
    }
=======================文件的移動==========================
    //從AV文件夾下,移動到Library文件夾下
    //1.移動之前的路徑
    NSString *surcePath = desPath;
    //2.移動之後的路徑
    NSString *libraryPath = [NSSearchPathForDirectoriesInDomains(NSLibraryDirectory, NSUserDomainMask, YES)lastObject];

    NSString *toPath = [libraryPath stringByAppendingPathComponent:@NB.plist];
   //移動
    if (![fileManger fileExistsAtPath:toPath]) {
        BOOL isSuccess = [fileManger moveItemAtPath:surcePath toPath:toPath error:nil];
        NSLog(@%@,isSuccess ? @移動成功:@移動失敗);
    }


    //調用簡單對象的寫入和讀取
    [self simpleObjectWritwTpFileAndFromeFile];
    //調用歸檔和反檔
    [self archiverAndArchiver];

}
=======================簡單對象的寫入和讀取==========================
//簡單對象指的是:NSString ,NSDictionary,NSData以及他們的子類
//注意:集合(NSArray,NSDictionary)的元素,必須是上面的四種基本數據類型,不能放復雜對象,才能直接進行文件的寫入和讀取;
字符串的寫入與讀取:
    //1.字符串的寫入
    NSString *string = @小韓哥真帥;
    //2.在Documents 文件夾下創建一個文件text.text

    NSString *textPath = [[NSSearchPathForDirectoriesInDomains(NSDocumentDirectory, NSUserDomainMask, YES)lastObject] stringByAppendingPathComponent:@text.text];
//    NSLog(@%@,textPath);

    //3.字符串的寫入
    // 第一個參數:要寫入的文件路徑
    // 第二個參數: YES提供多線程的安全防護,NO則不提供安全防護
    // 第三個參數:編碼的格式
BOOL isSuccess = [string writeToFile:textPath atomically:YES encoding:NSUTF8StringEncoding error:nil];
    NSLog(@%@,isSuccess ? @寫入成功 :@寫入失敗);

    //4.字符串從文件中讀取數據
    //第一個參數:要讀取的文件路徑
    NSString *contentString = [NSString stringWithContentsOfFile:textPath encoding:NSUTF8StringEncoding error:nil];
    NSLog(@%@,contentString);
NSArray 的讀取和寫入:
    //1.准備數組
    NSArray *array = @[@小韓哥,@蔡國慶,@周傑倫];
    //2.將數組寫入到 caches 文件夾下 的array.text
    NSString *arrayPath = [[NSSearchPathForDirectoriesInDomains(NSCachesDirectory, NSUserDomainMask, YES)lastObject]stringByAppendingPathComponent:@array.text];
    //3.數組寫入 數組寫入後的文件是XML格式的
        isSuccess = [array writeToFile:arrayPath atomically:YES];
    NSLog(@%@,isSuccess ? @數組寫入成功:@數組寫入失敗);

    //數組的讀取
    NSArray *contentArray = [NSArray arrayWithContentsOfFile:arrayPath];
    NSLog(@%@,contentArray);
NSDictionary 的寫入和讀取 寫入之後變成xml格式:
    //1.准備字典
    NSDictionary *dic = @{@男:@小韓哥,@明星:@蔡國慶,@國家主席:@習大大};
    //2.tem 文件夾下創建一個Dictionary.text 文件
    NSString *dictionaryPath = [NSTemporaryDirectory()stringByAppendingPathComponent:@dictionary.text];
    //3.字典的寫入
    isSuccess = [dic writeToFile:dictionaryPath atomically:YES];
    NSLog(@%@,isSuccess ? @字典寫入成功:@字典寫入失敗);

    //4.字典的讀取
    NSDictionary *contentDic = [NSDictionary dictionaryWithContentsOfFile:dictionaryPath];
    NSLog(@%@,contentDic);
NSData 寫入和讀取:
    NSString *dataString = @我想對我身邊人說,你該洗腳了;
    //1.准備NSData 對象
    NSData *data = [dataString dataUsingEncoding:NSUTF8StringEncoding];
    //2.在library 中寫入 data.text 文件
    NSString *dataPath = [[NSSearchPathForDirectoriesInDomains(NSLibraryDirectory, NSUserDomainMask, YES)lastObject]stringByAppendingPathComponent:@data.text];
    //3.NSData 的寫入
    isSuccess = [data writeToFile:dataPath atomically:YES];
    NSLog(@%@,isSuccess ? @NSData寫入成功:@NSData寫入失敗);

    //4.NSData 的讀取
    NSData *contentData = [NSData dataWithContentsOfFile:dataPath];
    //將二進制流轉為字符串
    NSString *newString = [[[NSString alloc]initWithData:contentData encoding:NSUTF8StringEncoding]autorelease];
    NSLog(@%@,newString);
=======================復雜對象的寫入和讀取==========================
復雜對象,就是Fundation 框架下不存在的數據類,也就是我們自己定義類,就叫復雜對象,復雜對象不能直接寫入到文件,必須借助一些工具,NSKeyedArchiver(歸檔工具),讀取時必須借助工具類NSKeyedUnarchiver(反歸檔工具)
歸檔和反檔:
1.創建復雜對象Person
Person.h
#import@interface Person : NSObject //如果復雜對象想要完成歸檔和反歸檔,則這個對象必須遵循NSCoding協議 - (void)encodeWithCoder : (NSCoder *)aCoder; @property(nonatomic,copy)NSString *name;//姓名 @property(nonatomic,copy)NSString *gender;//性別 @property(nonatomic,assign)NSInteger age;//年齡 - (id)initWithName : (NSString *)name gender : (NSString *)gender age : (NSInteger )age; @end
Person.m
#import Person.h

@implementation Person
- (void)dealloc{
    self.name = nil;
    self.gender = nil;
    [super dealloc];

}

- (id)initWithName : (NSString *)name gender : (NSString *)gender age : (NSInteger )age{
    if (self = [super init]) {
        self.name = name;
        self.age = age;
        self.gender = gender;

    }
    return self;
}
-(NSString *)description{
    return [NSString stringWithFormat:@%@-%@-%ld,_name,_gender,_age];
}
//歸檔的協議方法
- (void)encodeWithCoder : (NSCoder *)aCoder{
    //不止這個對象要歸檔,它的屬性要被歸檔,此時要對它的屬性進行編碼
    [aCoder encodeObject:self.name forKey:@name];
    [aCoder encodeObject:self.gender forKey:@gender];
    [aCoder encodeObject:@(self.age) forKey:@age];


}
//反歸檔的協議方法
- (id)initWithCoder:(NSCoder *)aDecoder{
    if (self = [super init]) {
        //解碼
        self.name = [aDecoder decodeObjectForKey:@name];
        self.gender = [aDecoder decodeObjectForKey:@gender];
        self.age = [[aDecoder decodeObjectForKey:@age]integerValue];

    }
    return self;
}
@end
歸檔:
//1.創建復雜對象Person
    Person *p1 = [[[Person alloc]initWithName:@小韓哥 gender:@男 age:20]autorelease];
    //2.創建歸檔工具
    NSMutableData *data = [NSMutableData data];
    NSKeyedArchiver *archiver = [[NSKeyedArchiver alloc]initForWritingWithMutableData:data];
    //3.歸檔
    //第一個參數:要被歸檔的對象
    //第二個參數:給歸檔對象一個key值,作為 標識,方便反歸檔的時候把它找回來
    [archiver encodeObject:p1 forKey:@boyFriend];
    //4.完成歸檔
    [archiver finishEncoding];
    //5.釋放
    [archiver release];

    //6.將歸檔後的數據文件
    //將文件寫入到沙盒文件夾下
    NSString *personPath = [NSHomeDirectory() stringByAppendingPathComponent:@person.text];
    //7.將轉化的data數據寫入到文件中
    BOOL isSuccess = [data writeToFile:personPath atomically:YES];
    NSLog(@%@,isSuccess ? @寫入成功:@寫入失敗);
反歸檔:
    NSData *contentData = [NSData dataWithContentsOfFile:personPath];
    //1.創建反歸檔工具
    NSKeyedUnarchiver *unArchiver = [[NSKeyedUnarchiver alloc]initForReadingWithData:contentData];
    //2.讀取文件(需要執行歸檔方法)
 Person *p2 = [unArchiver decodeObjectForKey:@boyFriend];
    NSLog(@%@,p2);
    //3.停止反歸檔
    [unArchiver finishDecoding];
    //4.釋放
    [unArchiver release];
=======================數組和復雜對象結合==========================
創建數組:
    Person *p3 = [[Person alloc]initWithName:@小美女 gender:@女 age:21];
    Person *p4 = [[Person alloc]initWithName:@郭美美 gender:@女 age:19];
    NSArray *pArray = @[p3,p4];
    [p3 release];
    [p4 release];
//注意:復雜對象存入數組要想完成歸檔,那麼存入的復雜對象必須遵循NSCoding協議
//使用歸檔把數組寫入到文件
    //1.創建歸檔工具
    NSMutableData *aData = [NSMutableData data];
    NSKeyedArchiver *nArchvier = [[NSKeyedArchiver alloc]initForWritingWithMutableData:aData];
    //2.使用歸檔對象把數組歸檔
    [nArchvier encodeObject:pArray forKey:@array];
    //3.停止歸檔工具
    [nArchvier finishEncoding];
    //4.釋放
    [nArchvier release];
//文件寫入到Documents 文件夾下,array.tet
    NSString *arrayPath = [[NSSearchPathForDirectoriesInDomains(NSDocumentDirectory, NSUserDomainMask, YES)lastObject]stringByAppendingPathComponent:@array.text];
isSuccess =  [aData writeToFile:arrayPath atomically:YES];
    NSLog(@%@,isSuccess ? @復雜數組寫入成功:@復雜數組寫入失敗);
//復雜數組的讀取
 //復雜數組的讀取
    NSData *newData = [NSData dataWithContentsOfFile:arrayPath];
    //1.創建反歸檔工具
    NSKeyedUnarchiver *nUnarchvier = [[NSKeyedUnarchiver alloc]initForReadingWithData:newData];
    //2.通過key值將對象反歸檔
    NSArray *newArray = [nUnarchvier decodeObjectForKey:@array];
    //3.停止反歸檔工具
    [nUnarchvier finishDecoding];
    //4.釋放
    [nUnarchvier release];
    NSLog(@%@ %@,newArray[0],newArray[1]);