iOS開發中Date Picker和UITool Bar控件的使用簡介
一、Date Picker控件
1.簡單介紹:
Date Picker顯示時間的控件
有默認寬高,不用設置數據源和代理
如何改成中文的?
(1)查看當前系統是否為中文的,把模擬器改成是中文的
(2)屬性,locale選擇地區
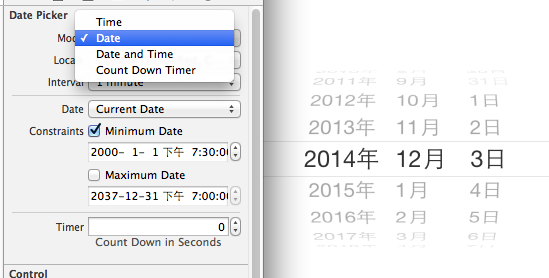
如果默認顯示不符合需求。時間有四種模式可以設置,在model中進行設置
時間可以自定義(custom)。
設置最小時間和最大時間,超過就會自動回到最小時間。
最大的用途在於自定義鍵盤:彈出一個日期選擇器出來,示例代碼如下:
2.示例代碼
復制代碼 代碼如下:
//
// YYViewController.m
// datepicker
//
// Created by apple on 14-6-3.
// Copyright (c) 2014年 itcase. All rights reserved.
//
#import "YYViewController.h"
@interface YYViewController ()
/**
* 文本輸入框
*/
@property (strong, nonatomic) IBOutlet UITextField *textfield;
@end
復制代碼 代碼如下:
@implementation YYViewController
- (void)viewDidLoad
{
[super viewDidLoad];
//1
//添加一個時間選擇器
UIDatePicker *date=[[UIDatePicker alloc]init];
/**
* 設置只顯示中文
*/
[date setLocale:[NSLocale localeWithLocaleIdentifier:@"zh-CN"]];
/**
* 設置只顯示日期
*/
date.datePickerMode=UIDatePickerModeDate;
// [self.view addSubview:date];
//當光標移動到文本框的時候,召喚時間選擇器
self.textfield.inputView=date;
//2
//創建工具條
UIToolbar *toolbar=[[UIToolbar alloc]init];
//設置工具條的顏色
toolbar.barTintColor=[UIColor brownColor];
//設置工具條的frame
toolbar.frame=CGRectMake(0, 0, 320, 44);
//給工具條添加按鈕
UIBarButtonItem *item0=[[UIBarButtonItem alloc]initWithTitle:@"上一個" style:UIBarButtonItemStylePlain target:self action:@selector(click) ];
UIBarButtonItem *item1=[[UIBarButtonItem alloc]initWithTitle:@"下一個" style:UIBarButtonItemStylePlain target:self action:@selector(click)];
UIBarButtonItem *item2=[[UIBarButtonItem alloc]initWithBarButtonSystemItem:UIBarButtonSystemItemFlexibleSpace target:nil action:nil];
UIBarButtonItem *item3=[[UIBarButtonItem alloc]initWithTitle:@"完成" style:UIBarButtonItemStylePlain target:self action:@selector(click)];
toolbar.items = @[item0, item1, item2, item3];
//設置文本輸入框鍵盤的輔助視圖
self.textfield.inputAccessoryView=toolbar;
}
-(void)click
{
NSLog(@"toolbar");
}
@end
實現效果:

二、UITool Bar
在上面可以添加子控件TOOLBAR中只能添加UIBarButtonItem子控件,其他子控件會被包裝秤這種類型的
上面的控件依次排放(空格————)
有樣式,可以指定樣式(可拉伸的),一般用來做工具欄。
使用toolbar做點菜的頭部標題
如何讓點菜系統居中?在ios6中是正的,在ios7中是歪的
在自定義鍵盤上加上一個工具欄。
數組裡什麼順序放的,就按照什麼順序顯示
toolbar.items = @[item0, item1, item2, item3];
//設置文本輸入框鍵盤的輔助視圖
self.textfield.inputAccessoryView=toolbar;
好,讓我們仔細來看一下UITool Bar的用法。
1.首先,我們看一下UIBbarButtonItem有哪些初始化方法,這也可以看出,它可以被定義為什麼東東,然後加到UIToolBar上面去。
根據SDK的文檔,我們可以發現UIBarButtonItem有如下幾種初始化的方法:
復制代碼 代碼如下:
-initWithTitle(添加button用這個)
-initWithImage
-initWithBarButtonSystemItem(添加系統自定義的button,形狀跟大小都已經固定了)下面鏈接裡面有按鈕圖片樣式
https://developer.apple.com/library/ios/#documentation/UIKit/Reference/UIBarButtonItem_Class/Reference/Reference.html
-initWithCustomView(添加除了button以外的View)
第4種方法就是我們添加各種作料的接口,所以今天的主角其它也是它。
2.在UIToolBar上面添加Title
復制代碼 代碼如下:
UIToolbar *myToolBar = [[UIToolbar alloc] initWithFrame:
CGRectMake(0.0f, 0.0f, 320.0f, 44.0f)];
NSMutableArray *myToolBarItems = [NSMutableArray array];
[myToolBarItems addObject:[[[UIBarButtonItem alloc]
initWithTitle:@"myTile"
style:UIBarButtonItemStylePlain
target:self
action:@selector(action)] autorelease]];
[myToolBar setItems:myToolBarItems animated:YES];
[myToolBar release];
[myToolBarItems];
setItems傳入值或者說items是一個對象數組。
3.在UIToolBar上面添加image
復制代碼 代碼如下:
[myToolBarItems addObject:[[[UIBarButtonItem alloc]
initWithImage:[UIImage imageNamed:@"myImage.png"]
style:UIBarButtonItemStylePlain
target:self
action:@selector(action)]];
4.在UIToolBar上面添加SystemItem
[myToolBarItems addObject:[[[UIBarButtonItem alloc]
initWithBarButtonSystemItem:UIBarButtonSystemItemPlay
target:self
action:@selector(action)] autorelease]];
Note:
initWithBarButtonSystemItem初始化:
復制代碼 代碼如下:
- (id)initWithBarButtonSystemItem:(UIBarButtonSystemItem)systemItem target:(id)target action:(SEL)action
Defines system defaults for commonly used items.
typedef enum {
UIBarButtonSystemItemDone,
UIBarButtonSystemItemCancel,
UIBarButtonSystemItemEdit,
UIBarButtonSystemItemSave,
UIBarButtonSystemItemAdd,
UIBarButtonSystemItemFlexibleSpace,
UIBarButtonSystemItemFixedSpace,
UIBarButtonSystemItemCompose,
UIBarButtonSystemItemReply,
UIBarButtonSystemItemAction,
UIBarButtonSystemItemOrganize,
UIBarButtonSystemItemBookmarks,
UIBarButtonSystemItemSearch,
UIBarButtonSystemItemRefresh,
UIBarButtonSystemItemStop,
UIBarButtonSystemItemCamera,
UIBarButtonSystemItemTrash,
UIBarButtonSystemItemPlay,
UIBarButtonSystemItemPause,
UIBarButtonSystemItemRewind,
UIBarButtonSystemItemFastForward,
UIBarButtonSystemItemUndo, // iPhoneOS 3.0
UIBarButtonSystemItemRedo, // iPhoneOS 3.0
} UIBarButtonSystemItem;
5.在UIToolBar上面添加其它各種控件,最自由意義,最有意思的,我把它放在最後來講。我們使用initWithCustomView來完成,
這裡需要看一下initWithCustomView的定義:
復制代碼 代碼如下:
- (id)initWithCustomView:(UIView *)customView
可以看出,它的參數是一個VIEW,所以我們給它的配料要正確哦才行哦,否則,你就等著時間DIDADIDA的流失吧.
A>加一個開關switch:
復制代碼 代碼如下:
[myToolBarItems addObject:[[[UIBarButtonItem alloc]
initWithCustomView:[[[UISwitch alloc] init] autorelease]]
autorelease]];
B>加一個按鈕UIBarButtonItem
復制代碼 代碼如下:
UIBarButtonItem *myButton = [[[UIBarButtonItem alloc]
initWithTitle:@"myButton"
style:UIBarButtonItemStyleBordered
target:self
action:@selector(action)]autorelease];
get1Button.width = 50;
[myToolBarItems addObject:myButton];
C>加一個文本Label
復制代碼 代碼如下:
view plaincopy to clipboardprint?
UILabel *myLabel = [[UILabel alloc] initWithFrame:CGRectMake(40.0f, 20.0f, 45.0f, 10.0f)];
myLabel.font=[UIFont systemFontOfSize:10];
//myLabel.backgroundColor = [UIColor clearColor];
//myLabel.textAlignment=UITextAlignmentCenter;
UIBarButtonItem *myButtonItem = [[UIBarButtonItem alloc]initWithCustomView:myLabel];
[myToolBarItems addObject: myButtonItem];
[mylabel release];
[myButtonItem release];
D>加一個進度條UIProgressView
復制代碼 代碼如下:
UIProgressView *myProgress = [[UIProgressView alloc] initWithFrame:CGRectMake(65.0f, 20.0f, 90.0f, 10.0f)];
UIBarButtonItem *myButtonItem = [[UIBarButtonItem alloc]initWithCustomView:myProgress];
[myToolBarItems addObject: myButtonItem];
[myProgress release];
[myButtonItem release];
可以加使用initWithCustomView制作各種button,這裡就不在這裡一個一個在加了。我想你應該也已經掌握了如何添加各種buttonItem的方法了。