iOS開發從入門到精通--導航控制器基礎
編輯:IOS開發綜合
導航控制器基礎
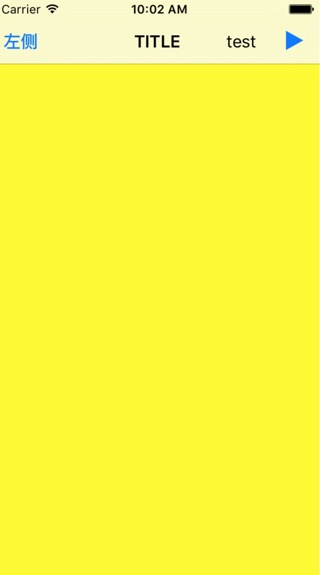
實現上面的導航欄,左側按鈕,中間的TITLE,還有右側的test按鈕,和一個播放的按鈕
重新創建一個VCRoot根視圖控制器
#import "AppDelegate.h"
#import "VCRoot.h"

@interface AppDelegate ()

@end

@implementation AppDelegate


- (BOOL)application:(UIApplication *)application didFinishLaunchingWithOptions:(NSDictionary *)launchOptions {
    // Override point for customization after application launch.
    self.window = [[UIWindow alloc] initWithFrame:[UIScreen mainScreen].bounds];
    //創建一個根視圖控制器
    VCRoot * root = [[VCRoot alloc]init];
    //創建導航控制器
    //導航控制器主要用來管理多個視圖控制器的切換
    //層級的方式來管理多個視圖控制器
    //創建控制器時,一定要有一個根視圖控制器
    //參數一:就是作為導航控制器的根視圖控制器
    UINavigationController *nav = [[UINavigationController alloc] initWithRootViewController:root];

    //將window的根視圖設置為導航控制器
    self.window.rootViewController =nav;

    [self.window makeKeyAndVisible];

    return YES;
}

- (void)applicationWillResignActive:(UIApplication *)application {
    // Sent when the application is about to move from active to inactive state. This can occur for certain types of temporary interruptions (such as an incoming phone call or SMS message) or when the user quits the application and it begins the transition to the background state.
    // Use this method to pause ongoing tasks, disable timers, and throttle down OpenGL ES frame rates. Games should use this method to pause the game.
}

- (void)applicationDidEnterBackground:(UIApplication *)application {
    // Use this method to release shared resources, save user data, invalidate timers, and store enough application state information to restore your application to its current state in case it is terminated later.
    // If your application supports background execution, this method is called instead of applicationWillTerminate: when the user quits.
}

- (void)applicationWillEnterForeground:(UIApplication *)application {
    // Called as part of the transition from the background to the inactive state; here you can undo many of the changes made on entering the background.
}

- (void)applicationDidBecomeActive:(UIApplication *)application {
    // Restart any tasks that were paused (or not yet started) while the application was inactive. If the application was previously in the background, optionally refresh the user interface.
}

- (void)applicationWillTerminate:(UIApplication *)application {
    // Called when the application is about to terminate. Save data if appropriate. See also applicationDidEnterBackground:.
}

@end
然後:
#import "VCRoot.h"

@interface VCRoot ()

@end

@implementation VCRoot

- (void)viewDidLoad {
    [super viewDidLoad];
    // Do any additional setup after loading the view.
    self.view.backgroundColor=[UIColor yellowColor];

    //設置導航欄的標題文字
    self.title =@"根視圖";
    //設置導航元素項目的標題
    //如果沒有設置navigationItem.title,為nil
    //系統會使用 self.title作為標題
    //如果self.navigationItem.titl不為空
    //將self.navigationItem.titl設置為標題內容
    self.navigationItem.title=@"TITLE";

    //創建一個導航欄左側的按鈕
    //根據title文字來創建按鈕
    //p1:按鈕上的文字
    //p2:按鈕風格
    //p3:事件擁有者
    //p4:按鈕事件
    UIBarButtonItem *leftBtn = [[UIBarButtonItem alloc] initWithTitle:@"左側" style:UIBarButtonItemStyleDone target:self action:@selector(pressLeft)];
    //將導航元素項的左側按鈕賦值
    self.navigationItem.leftBarButtonItem=leftBtn;


    //創建一個導航欄右側的按鈕
    //根據系統風格來創建按鈕
    //只需要指定風格樣式,系統風格的按鈕內容或標題文字不能改變
    //p1:按鈕風格UIBarButtonSystemItemAdd/UIBarButtonSystemItemPlay....
    //p2:事件擁有者
    //p3:按鈕事件

    UIBarButtonItem * rightBtn = [[UIBarButtonItem alloc] initWithBarButtonSystemItem:UIBarButtonSystemItemPlay target:self action:@selector(pressRight)];
    self.navigationItem.rightBarButtonItem=rightBtn;

    //標簽對象
    UILabel * label =[[UILabel alloc]initWithFrame:CGRectMake(10, 10, 50, 40)];
    label.text=@"test";
    label.textAlignment=NSTextAlignmentCenter;
    //將任何類型的控件添加到導航按鈕的方法
    UIBarButtonItem * item03 = [[UIBarButtonItem alloc]initWithCustomView:label];
    //創建按鈕數組
    NSArray * arrayBtn = [NSArray arrayWithObjects:rightBtn,item03, nil];
    //將右側按鈕數組賦值
    self.navigationItem.rightBarButtonItems=arrayBtn;


}

-(void) pressLeft{
    NSLog(@"左側按鈕被按下!");
}

-(void) pressRight{
    NSLog(@"右側按鈕被按下!");
}

- (void)didReceiveMemoryWarning {
    [super didReceiveMemoryWarning];
    // Dispose of any resources that can be recreated.
}

/*
#pragma mark - Navigation

// In a storyboard-based application, you will often want to do a little preparation before navigation
- (void)prepareForSegue:(UIStoryboardSegue *)segue sender:(id)sender {
    // Get the new view controller using [segue destinationViewController].
    // Pass the selected object to the new view controller.
}
*/

@end


相關文章
+