iOS中tableview實現編輯、全選及刪除等功能的方法示例
前言
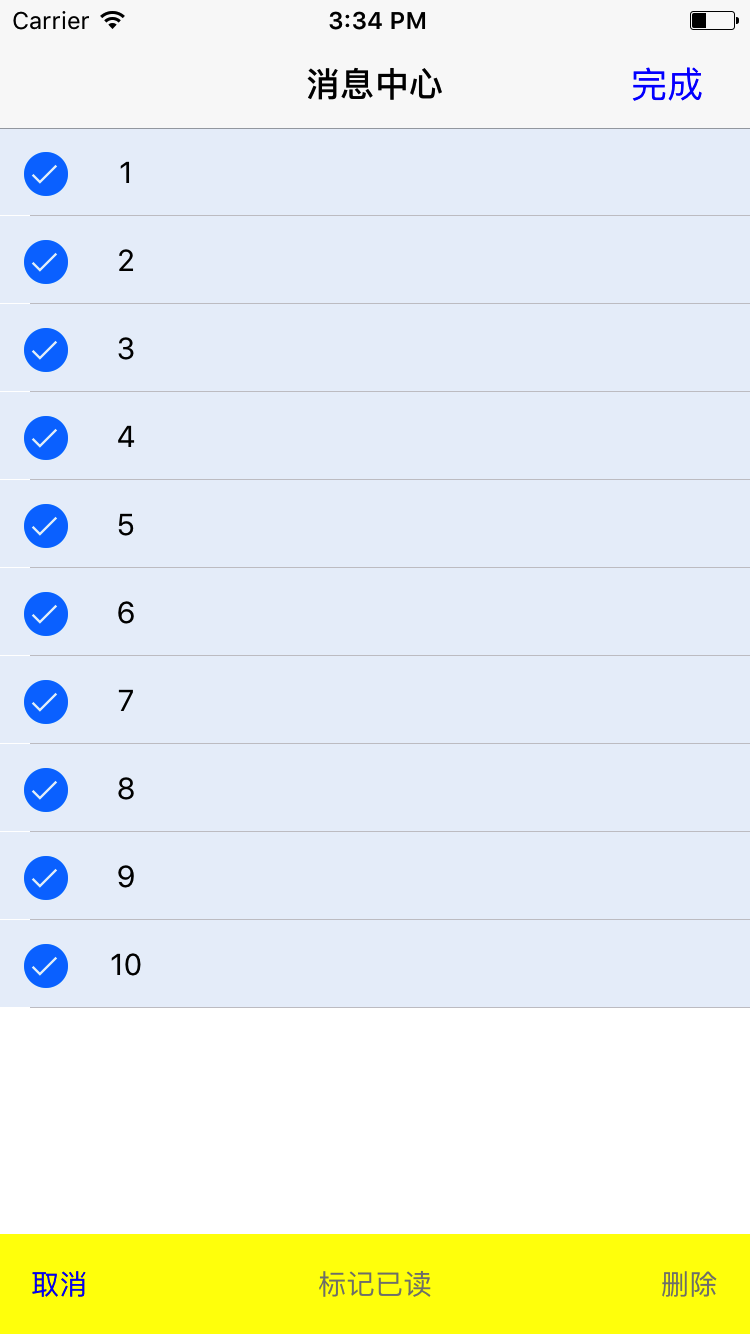
我們在日常開發過程中或多或少都會遇到tableview的各種功能,這裡簡單記錄一下tableview的刪除和全選刪除功能,廢話不多說先看一下效果圖

既然拿到了需求,就應該想一下如何去實現了,對照上面圖片的內容,應該如何實現呢?
看完上圖之後發現用到的幾個功能:
第一個:左滑刪除
第二個:全選刪除
左邊滑動刪除
實現幾個代理方法後就可以了
-(NSString *)tableView:(UITableView *)tableView titleForDeleteConfirmationButtonForRowAtIndexPath:(NSIndexPath *)indexPath {
 return @"刪除";
}
改變左滑後按鈕的文字
-(UITableViewCellEditingStyle)tableView:(UITableView *)tableView editingStyleForRowAtIndexPath:(NSIndexPath *)indexPath{
  return UITableViewCellEditingStyleDelete;
}
滑動刪除樣式,有多中可選,這裡返回刪除樣式
- (void)tableView:(UITableView*)tableView commitEditingStyle:(UITableViewCellEditingStyle)editingStyle forRowAtIndexPath:(NSIndexPath*)indexPath {
 if (editingStyle == UITableViewCellEditingStyleDelete) {
  [self.dataArray removeObjectAtIndex: indexPath.row];
  [self.tableView deleteRowsAtIndexPaths:[NSMutableArray arrayWithObject:indexPath]
        withRowAnimation:UITableViewRowAnimationFade];
  [self.tableView reloadData];

 }
}
刪除點擊方法,處理想要刪除的數據
這裡有一個需要注意點,一定要先更新數據源,在更新UI
左滑刪除就這些代碼了,是不是很easy,在來看全選的代碼
全選刪除
這裡我用的是全選功能是系統的方法,沒有自定義按鈕
點擊編輯按鈕的時候設置tableview
[_tableView setEditing:YES animated:YES];
返回全選的樣式
-(UITableViewCellEditingStyle)tableView:(UITableView *)tableView editingStyleForRowAtIndexPath:(NSIndexPath *)indexPath
{
  return UITableViewCellEditingStyleDelete|UITableViewCellEditingStyleInsert;
}
這樣就會出現左側的選中框
再來就是全選按鈕的實現方法
 for (int i = 0; i< self.dataArray.count; i++) {
   NSIndexPath *indexPath = [NSIndexPath indexPathForItem:i inSection:0];
   [_tableView selectRowAtIndexPath:indexPath animated:NO scrollPosition:UITableViewScrollPositionTop];
  }

  if (self.deleteArray.count >0) {
   [self.deleteArray removeAllObjects];
  }
  [self.deleteArray addObjectsFromArray:self.dataArray];

  [btn setTitle:@"取消" forState:UIControlStateNormal];
當然取消全選也有方法
 for (int i = 0; i< self.dataArray.count; i++) {
   NSIndexPath *indexPath = [NSIndexPath indexPathForItem:i inSection:0];
   [_tableView deselectRowAtIndexPath:indexPath animated:NO];

  }
通過全選按鈕實現的選中方法,需要在方法裡把所有數據都添加到想要刪除的數組裡面
通過點擊tableviewcell選擇刪除對象的時候需要把想要刪除的數據添加到刪除數組裡面
- (void)tableView:(UITableView *)tableView didSelectRowAtIndexPath:(NSIndexPath *)indexPath{

 if (self.btn.selected) {
   NSLog(@"選中");
  [self.deleteArray addObject:[self.dataArray objectAtIndex:indexPath.row]];

 }else{
  NSLog(@"跳轉下一頁");
 }
}
再次點擊取消選中的數據
- (void)tableView:(UITableView *)tableView didDeselectRowAtIndexPath:(NSIndexPath *)indexPath {

 if (self.btn.selected) {
  NSLog(@"撤銷");
  [self.deleteArray removeObject:[self.dataArray objectAtIndex:indexPath.row]];

 }else{
  NSLog(@"取消跳轉");
 }

}
問題一:
按照以上方法實現之後就可以實現想要的功能,但是還有UI的問題,那就是選擇之後會出現下圖的問題
會有一層背景色的覆蓋,想要了解的請看看這篇文章 http://www.jb51.net/article/117619.htm
問題二:
還有一個問題 ,在自定義的cell上面添加控件的時候一定要添加到self.contentView上面,否則會出現控件不隨cell移動的問題
[self.contentView addSubview:self.label];
結束
到這裡這篇文章的內容基本算完結了,如果還是有不明白的我在此留下Demo鏈接,裡面有更詳細的注釋,Demo沒有做UI適配,想看效果的畫在模擬器6,7上面運行最好
Demo地址:http://git.oschina.net/T1_mine/tableviewedit
本地下載地址:http://xiazai.jb51.net/201707/yuanma/tableviewedit(jb51.net).rar
總結
以上就是這篇文章的全部內容了,希望本文的內容對大家的學習或者工作能帶來一定的幫助,如有疑問大家可以留言交流,謝謝大家對本站的支持。