iOS App開辟中導航欄的創立及根本屬性設置教程
文件目次以下:根本導航次序: root -> First -> Second -> Third。個中,FirstViewController作為 navigation客棧的rootview

1、創立navigation
假如是想直接把navigation導航作為項目一開端的跟視圖,把RootViewController.h文件裡的nav屬性放到AppDelegate.h裡便可,再把RootViewController.m文件裡的action的代碼復制到 AppDelegate.m裡的didFinishLaunchingWithOptions 辦法裡,最初把 self.Window.rootViewController 設置 UINavigationController類型的屬性nav便可
在RootViewController.h文件
#import <UIKit/UIKit.h>
@class FirstViewController;
@interface RootViewController : UIViewController
@property (strong, nonatomic) UINavigationController *nav;
- (IBAction)btnClick:(UIButton *)sender;
@end
在RootViewController.m 文件裡的隨便一個自界說action裡:
- (IBAction)btnClick:(UIButton *)sender {
//創立一個viewcontroller
FirstViewController *fristview =[[[FirstViewController alloc] init] autorelease];
//初始化UINavigationController(方法一)
self.nav = [[[UINavigationController alloc] initWithRootViewController:fristview] autorelease];
//初始化UINavigationController(方法二)
// self.nav = [[[UINavigationController alloc] init] autorelease];
// [self.nav pushViewController:fristview animated:YES];
//初始化UINavigationController(方法三,掉敗,xib文件加載掉敗,緣由臨時不明)
// self.nav = [[[UINavigationController alloc] initWithNibName:@"FirstViewController" bundle:nil] autorelease];
//跳轉到FirstView頁面
[self presentViewController:self.nav animated:YES completion:nil];
//這類寫法普通用於往view裡添加一些小控件,如button label textField之類的,不合適用於頁面跳轉
// [self.view addSubview:self.nav.view];
}
2.navigation的經常使用屬性設置例子
我們的navigation就加載上去了今後,上面我們來設置navigation的屬性:
- (void)viewDidLoad
{
[super viewDidLoad];
// Do any additional setup after loading the view.
[self.navigationController.navigationBar setTranslucent:NO];//設置navigationbar的半通明
self.title = @"navigationcontroller";//設置navigationbar上顯示的題目
[self.navigationController.navigationBar setBarTintColor:[UIColor purpleColor]];//設置navigationbar的色彩
self.navigationItem.leftBarButtonItem = [[UIBarButtonItem alloc]initWithBarButtonSystemItem:UIBarButtonItemStyleDone target:self action:Nil];//設置navigationbar右邊按鈕
self.navigationItem.rightBarButtonItem = [[UIBarButtonItem alloc]initWithBarButtonSystemItem:UIBarButtonItemStylePlain target:self action:Nil];//設置navigationbar左邊按鈕
[self.navigationController.navigationBar setTintColor:[UIColor whiteColor]];//設置navigationbar上閣下按鈕字體色彩
}
後果圖以下:

這裡還有一個屬性經常使用,就是:
NSArray *arr = [NSArray arrayWithObjects:@"1",@"2", nil nil];
UISegmentedControl *segment = [[UISegmentedControl alloc]initWithItems:arr];
self.navigationItem.titleView = segment;//設置navigation上的titleview
後果以下:

對,我們看到中央的字釀成了兩個可選的按鈕,這就是navigation的另外一個屬性:navigationitem.titleview。
上面我們再樹立一個視圖,看一下兩個視圖之前是如何通訊的。
在第二個視圖中,我添加了一個button來顯示,並加了一個成員變量來吸收從第一個視圖中穿過去的值:
@interface SecondViewController : UIViewController
@property (copy,nonatomic) NSString *str;
@end
- (void)viewDidLoad
{
[super viewDidLoad];
// Do any additional setup after loading the view.
self.title = @"second";
UIButton *aBUTTON = [[UIButton alloc]initWithFrame:CGRectMake(30, 30, 50, 30)];
[aBUTTON setTitle:_str forState:UIControlStateNormal];
[aBUTTON addTarget:self action:@selector(clicked) forControlEvents:UIControlEventTouchUpInside];
[self.view addSubview:aBUTTON];
}
然後我將第一個視圖的左邊按鈕添加一個事宜,點擊按鈕,就會推出第二個視圖,並顯示我們傳過去的值:
- (void)clicked{
SecondViewController *second = [[SecondViewController alloc]init];
[self.navigationController pushViewController:second animated:YES];
second.str = @"hello!!";
[second release];
}
上面,我們來運轉一下:
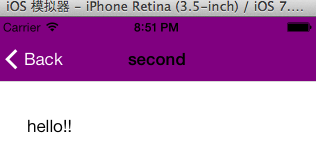
點進按鈕今後,我們的第二個視圖推出,button顯示了傳過去的值。
然後我們點擊回button,還有navigation別的一個辦法:
- (void)clicked{
[self.navigationController popViewControllerAnimated:YES];
}
如許便可以回到第一個視圖。
【iOS App開辟中導航欄的創立及根本屬性設置教程】的相關資料介紹到這裡,希望對您有所幫助! 提示:不會對讀者因本文所帶來的任何損失負責。如果您支持就請把本站添加至收藏夾哦!