iOS開辟中UITableview控件的根本應用及機能優化辦法
UITableview控件根本應用
1、一個簡略的豪傑展現法式
NJHero.h文件代碼(字典轉模子)
#import <Foundation/Foundation.h>
@interface NJHero : NSObject
/**
* 頭像
*/
@property (nonatomic, copy) NSString *icon;
/**
* 稱號
*/
@property (nonatomic, copy) NSString *name;
/**
* 描寫
*/
@property (nonatomic, copy) NSString *intro;
- (instancetype)initWithDict:(NSDictionary *)dict;
+ (instancetype)heroWithDict:(NSDictionary *)dict;
@end
NJViewController.m文件代碼
#import "NJViewController.h"
#import "NJHero.h"
@interface NJViewController ()<UITableViewDataSource, UITableViewDelegate>
/**
* 保留一切的豪傑數據
*/
@property (nonatomic, strong) NSArray *heros;
@property (weak, nonatomic) IBOutlet UITableView *tableView;
@end
@implementation NJViewController
#pragma mark - 懶加載
- (NSArray *)heros
{
if (_heros == nil) {
// 1.取得全途徑
NSString *fullPath = [[NSBundle mainBundle] pathForResource:@"heros" ofType:@"plist"];
// 2.更具全途徑加載數據
NSArray *dictArray = [NSArray arrayWithContentsOfFile:fullPath];
// 3.字典轉模子
NSMutableArray *models = [NSMutableArray arrayWithCapacity:dictArray.count];
for (NSDictionary *dict in dictArray) {
NJHero *hero = [NJHero heroWithDict:dict];
[models addObject:hero];
}
// 4.賦值數據
_heros = [models copy];
}
// 4.前往數據
return _heros;
}
- (void)viewDidLoad
{
[super viewDidLoad];
// 設置Cell的高度
// 當每行的cell高度分歧的時刻應用屬性設置cell的高度
self.tableView.rowHeight = 60;
self.tableView.delegate = self;
}
#pragma mark - UITableViewDataSource
// 前往若干組
- (NSInteger)numberOfSectionsInTableView:(UITableView *)tableView
{
return 1;
}
// 前往每組有若干行
- (NSInteger) tableView:(UITableView *)tableView numberOfRowsInSection:(NSInteger)section
{
return self.heros.count;
}
// 前往哪一組的哪一行顯示甚麼內容
- (UITableViewCell *)tableView:(UITableView *)tableView cellForRowAtIndexPath:(NSIndexPath *)indexPath
{
// 1.創立CELL
UITableViewCell *cell = [[UITableViewCell alloc] initWithStyle:UITableViewCellStyleSubtitle reuseIdentifier:nil];
// 2.設置數據
// 2.1掏出對應行的模子
NJHero *hero = self.heros[indexPath.row];
// 2.2賦值對應的數據
cell.textLabel.text = hero.name;
cell.detailTextLabel.text = hero.intro;
cell.imageView.image = [UIImage imageNamed:hero.icon];
// 3.前往cell
return cell;
}
#pragma mark - UITableViewDelegate
/*
// 當每行的cell的高度紛歧致的時刻就應用署理辦法設置cell的高度
- (CGFloat)tableView:(UITableView *)tableView heightForRowAtIndexPath:(NSIndexPath *)indexPath
{
if (1 == indexPath.row) {
return 180;
}
return 44;
}
*/
#pragma mark - 掌握狀況欄能否顯示
/**
* 前往YES代表隱蔽狀況欄, NO相反
*/
- (BOOL)prefeXmlRss/ target=_blank class=infotextkey>XmlRss/ target=_blank class=infotextkey>RsstatusBarHidden
{
return YES;
}
@end
完成後果:

代碼留意點:
(1)在字典轉模子的代碼處用上面的代碼,為可變數組分派dictArray.count個存儲空間,可以進步法式的機能
NSMutableArray *models = [NSMutableArrayarrayWithCapacity:dictArray.count];
(2)設置cell的高度
有三種方法可以設置cell的高度
1) 可以在初始加載辦法中設置,self.tableView.rowHeight = 60;這實用於當每行的cell高度分歧的時刻,應用屬性設置cell的高度。
2)在storyboard中設置,實用於高度分歧
3)當每行的cell的高度紛歧致的時刻就應用署理辦法設置cell的高度
- (CGFloat)tableView:(UITableView *)tableView heightForRowAtIndexPath:(NSIndexPath *)indexPath
{
if (1 == indexPath.row) {
return 180;
}
return 44;
}
2、cell的一些屬性
代碼示例:
#import "NJViewController.h"
#import "NJHero.h"
@interface NJViewController ()<UITableViewDataSource, UITableViewDelegate>
/**
* 保留一切的豪傑數據
*/
@property (nonatomic, strong) NSArray *heros;
@property (weak, nonatomic) IBOutlet UITableView *tableView;
@end
@implementation NJViewController
#pragma mark - 懶加載
- (NSArray *)heros
{
if (_heros == nil) {
// 1.取得全途徑
NSString *fullPath = [[NSBundle mainBundle] pathForResource:@"heros" ofType:@"plist"];
// 2.更具全途徑加載數據
NSArray *dictArray = [NSArray arrayWithContentsOfFile:fullPath];
// 3.字典轉模子
NSMutableArray *models = [NSMutableArray arrayWithCapacity:dictArray.count];
for (NSDictionary *dict in dictArray) {
NJHero *hero = [NJHero heroWithDict:dict];
[models addObject:hero];
}
// 4.賦值數據
_heros = [models copy];
}
// 4.前往數據
return _heros;
}
- (void)viewDidLoad
{
[super viewDidLoad];
// 設置Cell的高度
// 當每行的cell高度分歧的時刻應用屬性設置cell的高度
self.tableView.rowHeight = 60;
self.tableView.delegate = self;
}
#pragma mark - UITableViewDataSource
// 前往若干組
- (NSInteger)numberOfSectionsInTableView:(UITableView *)tableView
{
return 1;
}
// 前往每組有若干行
- (NSInteger) tableView:(UITableView *)tableView numberOfRowsInSection:(NSInteger)section
{
return self.heros.count;
}
// 前往哪一組的哪一行顯示甚麼內容
- (UITableViewCell *)tableView:(UITableView *)tableView cellForRowAtIndexPath:(NSIndexPath *)indexPath
{
// 1.創立CELL
UITableViewCell *cell = [[UITableViewCell alloc] initWithStyle:UITableViewCellStyleSubtitle reuseIdentifier:nil];
// 2.設置數據
// 2.1掏出對應行的模子
NJHero *hero = self.heros[indexPath.row];
// 2.2賦值對應的數據
cell.textLabel.text = hero.name;
cell.detailTextLabel.text = hero.intro;
cell.imageView.image = [UIImage imageNamed:hero.icon];
// 2.3設置cell的幫助視圖
// cell.AccessoryType = UITableViewCellAccessoryDisclosureIndicator;
if (0 == indexPath.row) {
cell.AccessoryView = [UIButton buttonWithType:UIButtonTypeContactAdd];
}else
{
cell.accessoryView = [[UISwitch alloc] init];
}
// UIButton *btn = [[UIButton alloc] init];
// btn.backgroundColor = [UIColor redColor];
// cell.accessoryView = btn;
// 2.4設置cell的配景色彩
cell.backgroundColor = [UIColor blueColor];
// 設置默許狀況的配景
// UIView *view = [[UIView alloc] init];
// view.backgroundColor = [UIColor blueColor];
// cell.backgroundView = view;
UIImageView *iv = [[UIImageView alloc] initWithImage:[UIImage imageNamed:@"buttondelete"]];
cell.backgroundView = iv;
// 設置選中狀況的配景
UIView *view2 = [[UIView alloc] init];
view2.backgroundColor = [UIColor purpleColor];
cell.selectedBackgroundView = view2;
// 3.前往cell
return cell;
}
#pragma mark - 掌握狀況欄能否顯示
/**
* 前往YES代表隱蔽狀況欄, NO相反
*/
- (BOOL)prefeXmlRss/ target=_blank class=infotextkey>XmlRss/ target=_blank class=infotextkey>RsstatusBarHidden
{
return YES;
}
@end
完成後果:

cell的一些屬性:
(1)設置cell的幫助視圖,設置cell.accessoryView(體系供給了列舉型,也能夠自界說@父類指針指向子類對象);
(2)設置cell的配景色彩,有兩種方法可以設置cell的配景色彩:
經由過程backgroundColor 和 backgroundView都可以設置cell的配景。然則backgroundView 的優先級比 backgroundColor的高,所以假如同時設置了backgroundColor和backgroundView, 那末backgroundView會蓋住backgroundColor
示例:cell.backgroundColor = [UIColorblueColor];
(3)設置cell默許狀況的配景
示例1:
UIView *view = [[UIView alloc] init];
view.backgroundColor = [UIColor blueColor];
cell.backgroundView = view;
示例2:
UIImageView *iv = [[UIImageViewalloc] initWithImage:[UIImageimageNamed:@"buttondelete"]];
cell.backgroundView = iv;(父類指針指向子類對象,可使用圖片用簡略的操作設置壯麗的後果)
(4)設置cell選中狀況的配景
示例:
UIView *view2 = [[UIView alloc] init];
view2.backgroundColor = [UIColorpurpleColor];
cell.selectedBackgroundView = view2;
3、tableview的一些屬性
代碼示例:
#import "NJViewController.h"
@interface NJViewController ()<UITableViewDataSource>
@end
@implementation NJViewController
- (void)viewDidLoad
{
[super viewDidLoad];
// 1.創立tableview
UITableView *tableview = [[UITableView alloc] init];
tableview.frame = self.view.bounds;
// 2.設置數據源
tableview.dataSource =self;
// 3.添加tableview到view
[self.view addSubview:tableview];
// 4.設置朋分線款式
// tableview.separatorStyle = UITableViewCellSeparatorStyleNone;
// 5.設置朋分線色彩
吸收的參數是色彩的比例值
tableview.separatorColor = [UIColor colorWithRed:0/255.0 green:255/255.0 blue:0/255.0 alpha:255/255.0];
// 設置tableview的頭部視圖
tableview.tableHeaderView = [UIButton buttonWithType:UIButtonTypeContactAdd];
tableview.tableFooterView = [[UISwitch alloc] init];
}
- (NSInteger)numberOfSectionsInTableView:(UITableView *)tableView
{
return 1;
}
- (NSInteger)tableView:(UITableView *)tableView numberOfRowsInSection:(NSInteger)section
{
return 10;
}
- (UITableViewCell *)tableView:(UITableView *)tableView cellForRowAtIndexPath:(NSIndexPath *)indexPath
{
// 1.創立cell
UITableViewCell *cell = [[UITableViewCell alloc] initWithStyle:UITableViewCellStyleDefault reuseIdentifier:nil];
// 2.設置cell的數據
cell.textLabel.text = [NSString stringWithFormat:@"%d", indexPath.row ];
// 3.前往cell
return cell;
}
- (BOOL)prefeXmlRss/ target=_blank class=infotextkey>RsstatusBarHidden
{
return YES;
}
@end
完成後果:

tableview的一些屬性:
(1)設置朋分款式(tableview.separatorStyle),這是個列舉類型
(2)設置朋分線的色彩,可以直接應用體系給出的色彩,假如體系給定的色彩不克不及知足需求時,也能夠自界說。
彌補:色彩分為24位和32位的,以下
24bit色彩
R 8bit 0 ~ 255
G 8bit 0 ~ 255
B 8bit 0 ~ 255
32bit色彩
A 8bit 0 ~ 255(tou)
R 8bit
G 8bit
B 8bit
#ff ff ff 白色
#00 00 00 黑色
#ff 00 00 白色
#255 00 00
設置為自界說色彩的實例: tableview.separatorColor = [UIColorcolorWithRed:0/255.0green:255/255.0blue:0/255.0alpha:255/255.0];
//吸收的參數是色彩的比例值
(3)設置頂部和底部視圖
tableview.tableHeaderView //頂部
tableview.tableFooterView //底部
UITableviewcell的機能成績
1、UITableviewcell的一些引見
UITableView的每行都是一個UITableViewCell,經由過程dataSource的 tableView:cellForRowAtIndexPath:辦法來初始化每⼀行
UITableViewCell外部有個默許的子視圖:contentView,contentView是UITableViewCell所顯示內容的父視圖,可顯示一些幫助指導視圖
幫助指導視圖的作⽤是顯示一個表現舉措的圖標,可以經由過程設置UITableViewCell的 accessoryType來顯示,默許是UITableViewCellAccessoryNone(不顯⽰示幫助指⽰示視圖), 其他值以下:
UITableViewCellAccessoryDisclosureIndicator
UITableViewCellAccessoryDetailDisclosureButton
UITableViewCellAccessoryCheckmark
還可以經由過程cell的accessoryView屬性來自界說幫助指導視圖(⽐如往左邊放一個開關)
2、成績
cell的任務:在法式履行的時刻,能看到若干條,它就創立若干條數據,假如視圖轉動那末再創立新顯示的內容。(體系主動挪用)。即當一個cell湧現在視野規模內的時刻,就會挪用創立一個cell。如許的邏輯看上去沒有甚麼成績,然則真的沒有任何成績嗎?
當創立挪用的時刻,我們應用nslog打印新聞,並打印創立的cell的地址。我們發明假如數據量異常年夜,用戶在短時光內往返轉動的話,那末會創立年夜量的cell,一向開拓空間,且假如是往回滾,經由過程打印地址,我們會發明它並沒有重用之前曾經創立的cell,而是從新創立,開拓新的存儲空間。
那有無甚麼好的處理方法呢?
3、cell的重用道理
(1) IOS裝備的內存無限,假如用UITableView顯示不計其數條數據,就須要不計其數 個UITableViewCell對象的話,那將會耗盡IOS裝備的內存。要處理該成績,須要重用UITableViewCell對象
(2)重⽤道理:當轉動列表時,部門UITableViewCell會移出窗口,UITableView會將窗口外的UITableViewCell放入一個對象池中,期待重用。當UITableView請求dataSource前往 UITableViewCell時,dataSource會先檢查這個對象池,假如池中有未應用的 UITableViewCell,dataSource則會用新的數據來設置裝備擺設這個UITableViewCell,然後前往給 UITableView,從新顯示到窗口中,從而防止創立新對象 。如許可讓創立的cell的數目保持在很低的程度,假如一個窗口中只能顯示5個cell,那末cell重用以後,只須要創立6個cell就夠了。
(3)留意點:還有⼀個異常主要的成績:有時刻須要自界說UITableViewCell(用⼀個子類繼 承UITableViewCell),並且每⼀行⽤的紛歧定是統一種UITableViewCell,所以一 個UITableView能夠具有分歧類型的UITableViewCell,對象池中也會有許多分歧類型的 UITableViewCell,那末UITableView在重⽤用UITableViewCell時能夠會獲得毛病類型的 UITableViewCell
處理⽅計劃:UITableViewCell有個NSString *reuseIdentifier屬性,可以在初始化UITableViewCell的時刻傳入一個特定的字符串標識來設置reuseIdentifier(普通用UITableViewCell的類名)。當UITableView請求dataSource前往UITableViewCell時,先 經由過程一個字符串標識到對象池中查找對應類型的UITableViewCell對象,假如有,就重用,假如沒有,就傳入這個字符串標識來初始化⼀一個UITableViewCell對象。
圖片示例:
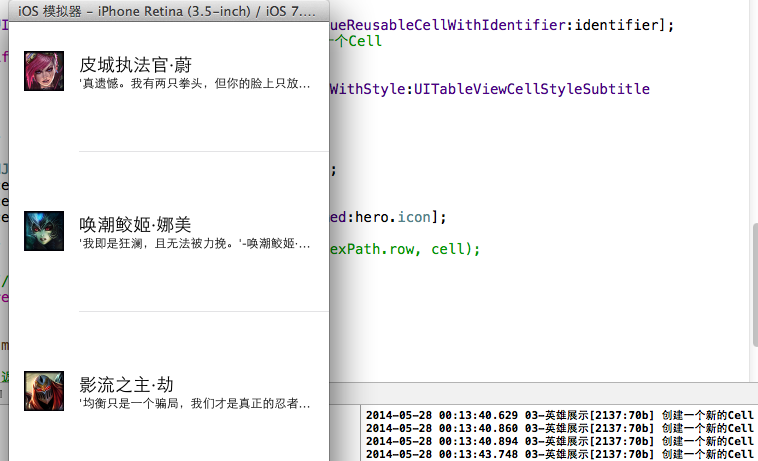
解釋:一個窗口放得下(可視)三個cell,全部法式只須要創立4個該類型的cell便可。
4、cell的優化代碼
代碼示例:
#import "NJViewController.h"
#import "NJHero.h"
// #define ID @"ABC"
@interface NJViewController ()<UITableViewDataSource, UITableViewDelegate>
/**
* 保留一切的豪傑數據
*/
@property (nonatomic, strong) NSArray *heros;
@property (weak, nonatomic) IBOutlet UITableView *tableView;
@end
@implementation NJViewController
#pragma mark - 懶加載
- (NSArray *)heros
{
if (_heros == nil) {
// 1.取得全途徑
NSString *fullPath = [[NSBundle mainBundle] pathForResource:@"heros" ofType:@"plist"];
// 2.更具全途徑加載數據
NSArray *dictArray = [NSArray arrayWithContentsOfFile:fullPath];
// 3.字典轉模子
NSMutableArray *models = [NSMutableArray arrayWithCapacity:dictArray.count];
for (NSDictionary *dict in dictArray) {
NJHero *hero = [NJHero heroWithDict:dict];
[models addObject:hero];
}
// 4.賦值數據
_heros = [models copy];
}
// 4.前往數據
return _heros;
}
- (void)viewDidLoad
{
[super viewDidLoad];
// 設置Cell的高度
// 當每行的cell高度分歧的時刻應用屬性設置cell的高度
self.tableView.rowHeight = 160;
}
#pragma mark - UITableViewDataSource
// 前往若干組
- (NSInteger)numberOfSectionsInTableView:(UITableView *)tableView
{
return 1;
}
// 前往每組有若干行
- (NSInteger) tableView:(UITableView *)tableView numberOfRowsInSection:(NSInteger)section
{
return self.heros.count;
}
// 當一個cell湧現視野規模內的時刻就會挪用
// 前往哪一組的哪一行顯示甚麼內容
- (UITableViewCell *)tableView:(UITableView *)tableView cellForRowAtIndexPath:(NSIndexPath *)indexPath
{
// 界說變量保留重用標志的值
static NSString *identifier = @"hero";
// 1.先去緩存池中查找能否有知足前提的Cell
UITableViewCell *cell = [tableView dequeueReusableCellWithIdentifier:identifier];
// 2.假如緩存池中沒有相符前提的cell,就本身創立一個Cell
if (cell == nil) {
// 3.創立Cell, 而且設置一個獨一的標志
cell = [[UITableViewCell alloc] initWithStyle:UITableViewCellStyleSubtitle reuseIdentifier:identifier];
NSLog(@"創立一個新的Cell");
}
// 4.給cell設置數據
NJHero *hero = self.heros[indexPath.row];
cell.textLabel.text = hero.name;
cell.detailTextLabel.text = hero.intro;
cell.imageView.image = [UIImage imageNamed:hero.icon];
// NSLog(@"%@ - %d - %p", hero.name, indexPath.row, cell);
// 3.前往cell
return cell;
}
#pragma mark - 掌握狀況欄能否顯示
/**
* 前往YES代表隱蔽狀況欄, NO相反
*/
- (BOOL)prefersStatusBarHidden
{
return YES;
}
@end
緩存優化的思緒:
(1)先去緩存池中查找能否有知足前提的cell,如有那就直接拿來
(2)若沒有,就本身創立一個cell
(3)創立cell,而且設置一個獨一的標志(把屬於“”的給蓋個章)
(4)給cell設置數據
留意點:
界說變量用來保留重用標志的值,這裡不推舉應用宏(#define來處置),由於該變量只在這個感化域的外部應用,且假如應用宏界說的話,界說和應用地位太疏散,晦氣於浏覽法式。因為其值不變,沒有需要每次都開拓一次,所以用static界說為一個靜態變量。
【iOS開辟中UITableview控件的根本應用及機能優化辦法】的相關資料介紹到這裡,希望對您有所幫助! 提示:不會對讀者因本文所帶來的任何損失負責。如果您支持就請把本站添加至收藏夾哦!