
iOS開辟中導航掌握器的根本應用教程
多掌握器和導航掌握器簡略引見
1、多掌握器
一個IOS的app很少只由一個掌握器構成,除非這個app極端簡略。當app中有多個掌握器的時刻,我們就須要對這些掌握器停止治理
有多個view時,可以用一個年夜的view去治理1個或許多個小view,掌握器也是如斯,用1個掌握器去治理其他多個掌握器
好比,用一個掌握器A去治理3個掌握器B、C、D。掌握器A被稱為掌握器B、C、D的“父掌握器”;掌握器B、C、D的被稱為掌握器A的“子掌握器”
為了便於治理掌握器,IOS供給了2個比擬特別的掌握器
- UINavigationController
- UITabBarController
2、導航掌握器
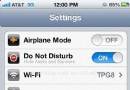
應用UINavigationController,可以輕松地治理多個掌握器,輕松完成掌握器之間的切換,典范例子就是體系自帶的“設置”運用
如圖:

3、UINavigationController的應用步調
(1)初始化UINavigationController
(2)設置UIWindow的rootViewController為UINavigationController
(3)依據詳細情形,經由過程push辦法添加對應個數的子掌握器
#import "YYAppDelegate.h"
#import "YYOneViewController.h"
@implementation YYAppDelegate
- (BOOL)application:(UIApplication *)application didFinishLaunchingWithOptions:(NSDictionary *)launchOptions
{
self.Window = [[UIWindow alloc] initWithFrame:[[UIScreen mainScreen] bounds]];
self.window.backgroundColor = [UIColor whiteColor];
//1.創立一個導航掌握器
UINavigationController *nav=[[UINavigationController alloc]init];
//2.設置導航掌握器為window的根視圖
self.window.rootViewController=nav;
//3.添加子掌握器到導航掌握器中
//創立一些掌握器
UIViewController *c1=[[UIViewController alloc]init];
//設置c1這個掌握器的視圖色彩
c1.view.backgroundColor=[UIColor redColor];
UIViewController *c2=[[UIViewController alloc]init];
c2.view.backgroundColor=[UIColor purpleColor];
UIViewController *c3=[[UIViewController alloc]init];
c3.view.backgroundColor=[UIColor brownColor];
//把這些掌握器添加到導航掌握器中
[nav pushViewController:c1 animated:YES];
[nav pushViewController:c2 animated:YES];
[nav pushViewController:c3 animated:YES];
[self.window makeKeyAndVisible];
return YES;
}
運轉模仿器,可以看到一個粗陋的有著三個子掌握器治理著頁面。
但出現在我們面前的只能有一個界面,我們沒有需要一次性創立三個掌握器在這裡等著。
請求:創立三個子掌握器,每一個子掌握器view的界面上放一個按鈕,點擊可以跳轉到下一個界面。
完成(完成三個頁面間經由過程按鈕停止簡略的跳轉):
解釋:這裡把第一個子掌握器的創立等代碼寫在了署理辦法中。
YYAppDelegate.m文件代碼
//
// YYAppDelegate.m
// 01-導航掌握器的應用1
//
// Created by apple on 14-6-4.
// Copyright (c) 2014年 itcase. All rights reserved.
//
#import "YYAppDelegate.h"
#import "YYOneViewController.h"
@implementation YYAppDelegate
- (BOOL)application:(UIApplication *)application didFinishLaunchingWithOptions:(NSDictionary *)launchOptions
{
self.window = [[UIWindow alloc] initWithFrame:[[UIScreen mainScreen] bounds]];
self.window.backgroundColor = [UIColor whiteColor];
//1.創立一個導航掌握器
UINavigationController *nav=[[UINavigationController alloc]init];
//2.設置導航掌握器為window的根視圖
self.window.rootViewController=nav;
//3.添加子掌握器到導航掌握器中
YYOneViewController *one=[[YYOneViewController alloc]init];
[nav pushViewController:one animated:YES];
[self.window makeKeyAndVisible];
return YES;
// //創立一些掌握器
// UIViewController *c1=[[UIViewController alloc]init];
// //設置c1這個掌握器的視圖色彩
// c1.view.backgroundColor=[UIColor redColor];
//
// UIViewController *c2=[[UIViewController alloc]init];
// c2.view.backgroundColor=[UIColor purpleColor];
//
// UIViewController *c3=[[UIViewController alloc]init];
// c3.view.backgroundColor=[UIColor brownColor];
//
////把這些掌握器添加到導航掌握器中
// [nav pushViewController:c1 animated:YES];
// [nav pushViewController:c2 animated:YES];
// [nav pushViewController:c3 animated:YES];
}
創立三個子控件類及對應的xib文件
YYOneViewController.m文件
//
// YYOneViewController.m
// 01-導航掌握器的應用1
//
// Created by apple on 14-6-4.
// Copyright (c) 2014年 itcase. All rights reserved.
//
#import "YYOneViewController.h"
#import "YYTwoViewController.h"
@interface YYOneViewController ()
/**
跳轉到第二個界面
*/
- (IBAction)jump2two:(id)sender;
@end
@implementation YYOneViewController
- (IBAction)jump2two:(id)sender {
//1.創立第二個子掌握器
YYTwoViewController *two=[[YYTwoViewController alloc]init];
//2.把子掌握器添加到導航掌握器中
//有甚麼方法可以或許拿到導航掌握器?
//只需以後掌握器是導航掌握器的子掌握器,那末便可以經由過程該屬性直接獲得到以後掌握器地點的導航掌握器
[self.navigationController pushViewController:two animated:YES];
}
@end
YYTwoViewController.m文件
//
// YYTwoViewController.m
// 01-導航掌握器的應用1
//
// Created by apple on 14-6-4.
// Copyright (c) 2014年 itcase. All rights reserved.
//
#import "YYTwoViewController.h"
#import "YYThreeViewController.h"
@interface YYTwoViewController ()
- (IBAction)jump2Three:(id)sender;
@end
@implementation YYTwoViewController
//跳轉到第三個子掌握器
- (IBAction)jump2Three:(id)sender {
//1.創立第三個子掌握器
YYThreeViewController *three=[[YYThreeViewController alloc]init];
//2.將子掌握器添加到導航掌握器中
[self.navigationController pushViewController:three animated:YES];
}
@end
示:只需以後掌握器是導航掌握器的子掌握器,那末便可以經由過程self.navigationController屬性直接獲得到以後掌握器地點的導航掌握器
項目文件構造和運轉後果:

導航掌握器屬性和根本應用
1、導航掌握器的一些屬性和根本應用
1.把子掌握器添加到導航掌握器中的四種辦法
(1)
1.創立一個導航掌握器
UINavigationController *nav=[[UINavigationControlleralloc]init];
2.設置導航掌握器為window的根視圖
self.window.rootViewController=nav;
3.添加
YYOneViewController *one = [[YYOneViewController alloc] init];
[nav pushViewController:one animated:YES];
(2)
1.創立一個導航掌握器
UINavigationController *nav=[[UINavigationControlleralloc]init];
2.設置導航掌握器為window的根視圖
self.window.rootViewController=nav;
3.添加
YYOneViewController *one = [[YYOneViewController alloc] init];
[nav addChildViewController:one];
(3)
1.創立一個導航掌握器
UINavigationController *nav=[[UINavigationControlleralloc]init];
2.設置導航掌握器為window的根視圖
self.window.rootViewController=nav;
3.添加
YYOneViewController *one = [[YYOneViewController alloc] init];
nav.viewControllers=@[one];(添加到導航掌握器的棧中)
解釋: nav.viewControllers;== nav.childViewControllers;留意該屬性是只讀的,是以不克不及像上面如許寫。
nav.childViewControllers = @[one];
(4)最經常使用的辦法
YYOneViewController *one=[[YYOneViewController alloc]init];
UINavigationController *nav=[[UINavigationController alloc]initWithRootViewController:one];
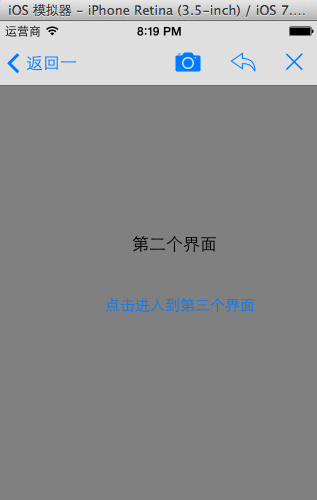
2.以後子掌握器界面導航欄的題目和對應前往題目的設置
self.navigationItem.title=@"第一個界面";
self.navigationItem.backBarButtonItem=[[UIBarButtonItemalloc]initWithTitle:@"前往一" style:UIBarButtonItemStylePlain target:nilaction:nil];
3.給導航欄添加按鈕
解釋:可添加一個,也能夠添加多個(數組)
添加導航欄右邊的按鈕(添加一個相機圖標的按鈕),會蓋失落前往
self.navigationItem.leftBarButtonItem=[[UIBarButtonItem alloc]initWithBarButtonSystemItem:UIBarButtonSystemItemCamera target:nil action:nil];
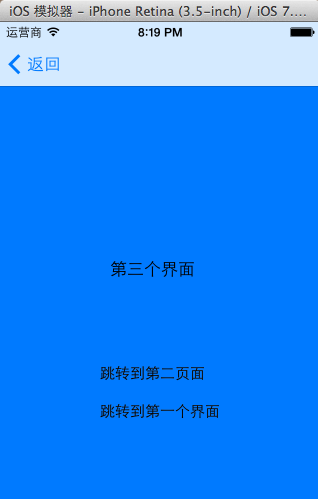
4.界面跳轉
跳轉到第二個界面(以後為第三個,移除以後棧頂的掌握器)
[self.navigationControllerpopViewControllerAnimated:YES];
移除處置棧底掌握器以外的一切掌握器
[self.navigationControllerpopToRootViewControllerAnimated:YES];
只需傳入棧中的某一個掌握器,就會跳轉到指定掌握器
[self.navigationController popToViewController:<#(UIViewController *)#> animated:<#(BOOL)#>];
2、代碼示例
YYAppDelegate.m文件
//
// YYAppDelegate.m
// 01-導航掌握器的應用1
//
// Created by apple on 14-6-4.
// Copyright (c) 2014年 itcase. All rights reserved.
//
#import "YYAppDelegate.h"
#import "YYOneViewController.h"
@implementation YYAppDelegate
//運用法式啟動終了即會挪用
- (BOOL)application:(UIApplication *)application didFinishLaunchingWithOptions:(NSDictionary *)launchOptions
{
self.window = [[UIWindow alloc] initWithFrame:[[UIScreen mainScreen] bounds]];
self.window.backgroundColor = [UIColor whiteColor];
//3.添加子掌握器到導航掌握器中
//第一種也是最經常使用的一種
// YYOneViewController *one=[[YYOneViewController alloc]init];
// UINavigationController *nav=[[UINavigationController alloc]initWithRootViewController:one];
//1.創立一個導航掌握器
UINavigationController *nav=[[UINavigationController alloc]init];
//2.設置導航掌握器為window的根視圖
self.window.rootViewController=nav;
//第二種
YYOneViewController *one = [[YYOneViewController alloc] init];
[nav pushViewController:one animated:YES];
//第三種
// [nav addChildViewController:one];
// 第四種(添加到導航掌握器的棧中)
// nav.viewControllers=@[one];
// 導航掌握器的棧
// nav.viewControllers;== nav.childViewControllers;
// 留意該屬性是只讀的,是以不克不及像上面如許寫
// nav.childViewControllers = @[one];
[self.window makeKeyAndVisible];
return YES;
}
@end
YYOneViewController.m文件
//
// YYOneViewController.m
// 01-導航掌握器的應用1
//
// Created by apple on 14-6-4.
// Copyright (c) 2014年 itcase. All rights reserved.
//
#import "YYOneViewController.h"
#import "YYTwoViewController.h"
@interface YYOneViewController ()
/**
跳轉到第二個界面
*/
- (IBAction)jump2two:(id)sender;
@end
@implementation YYOneViewController
- (IBAction)jump2two:(id)sender {
//1.創立第二個子掌握器
YYTwoViewController *two=[[YYTwoViewController alloc]init];
//2.把子掌握器添加到導航掌握器中
//有甚麼方法可以或許拿到導航掌握器?
//只需以後掌握器是導航掌握器的子掌握器,那末便可以經由過程該屬性直接獲得到以後掌握器地點的導航掌握器
[self.navigationController pushViewController:two animated:YES];
}
-(void)viewDidLoad
{
[super viewDidLoad];
//掌握以後掌握器對應的導航條顯示的內容
self.navigationItem.title=@"第一個界面";
//修正前往按鈕顯示的內容
self.navigationItem.backBarButtonItem=[[UIBarButtonItem alloc]initWithTitle:@"前往一" style:UIBarButtonItemStylePlain target:nil action:nil];
}
@end
YYTwoViewController.m文件
//
// YYTwoViewController.m
// 01-導航掌握器的應用1
//
// Created by apple on 14-6-4.
// Copyright (c) 2014年 itcase. All rights reserved.
//
#import "YYTwoViewController.h"
#import "YYThreeViewController.h"
@interface YYTwoViewController ()
- (IBAction)jump2Three:(id)sender;
@end
@implementation YYTwoViewController
//跳轉到第三個子掌握器
- (IBAction)jump2Three:(id)sender {
//1.創立第三個子掌握器
YYThreeViewController *three=[[YYThreeViewController alloc]init];
//2.將子掌握器添加到導航掌握器中
[self.navigationController pushViewController:three animated:YES];
}
-(void)viewDidLoad
{
[super viewDidLoad];
//給導航欄添加按鈕
//添加導航欄右邊的按鈕(添加一個相機圖標的按鈕),會蓋失落前往
// self.navigationItem.leftBarButtonItem=[[UIBarButtonItem alloc]initWithBarButtonSystemItem:UIBarButtonSystemItemCamera target:nil action:nil];
//為導航欄在左邊添加多個按鈕
//創立兩個按鈕
UIBarButtonItem *a=[[UIBarButtonItem alloc]initWithBarButtonSystemItem:UIBarButtonSystemItemStop target:nil action:nil];
UIBarButtonItem *b=[[UIBarButtonItem alloc]initWithBarButtonSystemItem:UIBarButtonSystemItemReply target:nil action:nil];
UIBarButtonItem *c=[[UIBarButtonItem alloc]initWithBarButtonSystemItem:UIBarButtonSystemItemCamera target:nil action:nil];
self.navigationItem.rightBarButtonItems=@[a,b,c];
//設置對應的導航條的前往(第三個界面導航條的前往)
self.navigationItem.backBarButtonItem=[[UIBarButtonItem alloc]initWithTitle:@"前往" style:UIBarButtonItemStyleBordered target:nil action:nil];
}
@end
YYThreeViewController.m文件
//
// YYThreeViewController.m
// 01-導航掌握器的應用1
//
// Created by apple on 14-6-4.
// Copyright (c) 2014年 itcase. All rights reserved.
//
#import "YYThreeViewController.h"
#import "YYTwoViewController.h"
@interface YYThreeViewController ()
//前往到第二個掌握器頁面
- (IBAction)jump2two:(id)sender;
//前往到第一個掌握器頁面
- (IBAction)jump2root:(id)sender;
@end
@implementation YYThreeViewController
- (IBAction)jump2two:(id)sender {
//跳轉到第二個界面(移除以後棧頂的掌握器)
[self.navigationController popViewControllerAnimated:YES];
}
- (IBAction)jump2root:(id)sender {
//移除處置棧底掌握器以外的一切掌握器
[self.navigationController popToRootViewControllerAnimated:YES];
// 只需傳入棧中的某一個掌握器,就會跳轉到指定掌握器
//不克不及如許,沒添加到導航掌握器YYTwoViewController *two = [[YYTwoViewController alloc] init];
//[self.navigationController popToViewController:<#(UIViewController *)#> animated:<#(BOOL)#>];
}
@end
完成後果:

3、導航掌握器經由過程棧來治理子掌握器
表示圖
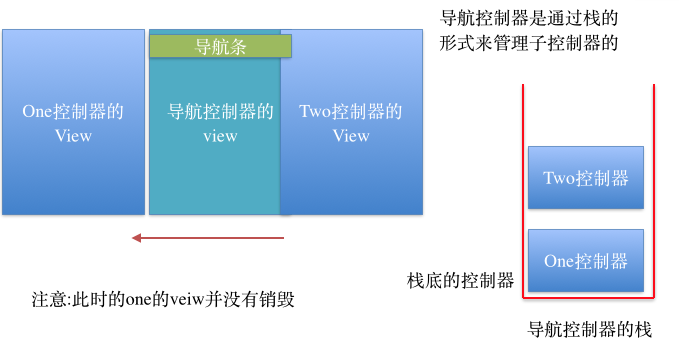
解釋:
導航掌握器是經由過程棧的情勢來治理子掌握器的(先輩後出)
顯示在導航掌握器上得view永久是棧頂掌握器的view
一個導航掌握器只要一個導航條,也就是說一切的自掌握器公用一個導航條。
4、彌補
在署理辦法中,打印以後window上面的一切子控件,並經由過程XmlRss/ target=_blank class=infotextkey>Xml文件來保留,代碼以下。
// 運用法式獲得核心(代表著可以和用戶交互)
- (void)applicationDidBecomeActive:(UIApplication *)application
{
NSLog(@"applicationDidBecomeActive");
UINavigationController *nav = (UINavigationController *)self.window.rootViewController;
UINavigationBar *bar = nav.navigationBar;
// NSLog(@"%@", NSStringFromCGRect(bar.frame));
NSString *str = [self digView:self.window];
[str writeToFile:@"/Users/apple/Desktop/IOS6.XmlRss/ target=_blank class=infotextkey>Xml" atomically:YES];
}
/**
* 前往傳入veiw的一切層級構造
*
* @param view 須要獲得層級構造的view
*
* @return 字符串
*/
- (NSString *)digView:(UIView *)view
{
if ([view isKindOfClass:[UITableViewCell class]]) return @"";
// 1.初始化
NSMutableString *Xml = [NSMutableString string];
// 2.標簽開首
[xml appendFormat:@"<%@ frame=\"%@\"", view.class, NSStringFromCGRect(view.frame)];
if (!CGPointEqualToPoint(view.bounds.origin, CGPointZero)) {
[xml appendFormat:@" bounds=\"%@\"", NSStringFromCGRect(view.bounds)];
}
if ([view isKindOfClass:[UIScrollView class]]) {
UIScrollView *scroll = (UIScrollView *)view;
if (!UIEdgeInsetsEqualToEdgeInsets(UIEdgeInsetsZero, scroll.contentInset)) {
[xml appendFormat:@" contentInset=\"%@\"", NSStringFromUIEdgeInsets(scroll.contentInset)];
}
}
// 3.斷定能否要停止
if (view.subviews.count == 0) {
[xml appendString:@" />"];
return xml;
} else {
[xml appendString:@">"];
}
// 4.遍歷一切的子控件
for (UIView *child in view.subviews) {
NSString *childXml = [self digView:child];
[xml appendString:childXml];
}
// 5.標簽開頭
[xml appendFormat:@"</%@>", view.class];
return xml;
}
留意:在ios7和之前版本中,各個控件,包含子掌握器界面frame的分歧。
【iOS開辟中導航掌握器的根本應用教程】的相關資料介紹到這裡,希望對您有所幫助! 提示:不會對讀者因本文所帶來的任何損失負責。如果您支持就請把本站添加至收藏夾哦!


- iOS中應用URL Scheme停止App跳轉的教程
- iOS App應用SQLite之句柄的界說及數據庫的根本操作
- 若何完成IOS_SearchBar搜刮欄及症結字高亮
- IOS UITableView和UITableViewCell的幾種樣式詳細介紹
- ios提交市場報錯誤ERROR ITMS-9000: "this bundle is invalid. armv7s are required to include armv7 architectur
- iOS 委托與文本輸入(內容根據iOS編程編寫)
- Swift3.0帶來的變化匯總系列一——字符串與基本運算符中的變化
- ios客戶端發現_世界杯送流量活動項目總結
- iOS Base64轉碼(使用ios7系統自帶編碼庫 和 GMTBase64 兩種方式)
- iOS實現UITableView數據為空時的提示頁面