iOS 委托與文本輸入(內容根據iOS編程編寫)
•文本框(UITextField)
本章節繼續編輯 JXHypnoNerd 。文件地址 。
首先我們繼續編輯 JXHypnosisViewController.m 修改 loadView 方法,向 view 中添加一個 UITextField 對象:
#import "JXHypnosisViewController.h"
#import "JXHypnosisView.h"
@interface JXHypnosisViewController ()
@end
@implementation JXHypnosisViewController
- (instancetype)initWithNibName:(NSString *)nibNameOrNil
bundle:(NSBundle *)nibBundleOrNil {
self = [super initWithNibName:nibNameOrNil bundle:nibBundleOrNil];
if (self) {
// 設置標簽項的標題
self.tabBarItem.title = @"Hypnotize";
// 從圖片文件創建一個 UIImage 對象
UIImage * i = [UIImage imageNamed:@"Hypno"];
// 將 UIImage 對象賦值給標簽項的 iamge 屬性
self.tabBarItem.image = i;
}
return self;
}
- (void)viewDidLoad {
[super viewDidLoad];
}
- (void)loadView {
// 創建一個 JXHypnosisView 對象
JXHypnosisView * backgroundView = [[JXHypnosisView alloc] init];
CGRect textFieldRect = CGRectMake(40, 70, 240, 30);
UITextField * textField = [[UITextField alloc] init];
textField.frame = textFieldRect;
// 設置 UITextField 對象的邊框樣式,便於查看它在屏幕上的位置
textField.borderStyle = UITextBorderStyleRoundedRect;
[backgroundView addSubview:textField];
// 將 JXHypnosisView 對象賦給視圖控制器的view 屬性
self.view = backgroundView;
}
@end
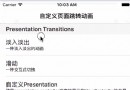
構建並運行應用,項目中會顯示一個文本框,該文本框就是剛才我們添加的 UITextField 對象。點擊文本框,這時屏幕底部就會彈出鍵盤,用於向文本框中輸入文字,下面我們介紹一下第一響應者。
•UIResponder
UIResponder 是 UIKit 框架中的一個抽象類。之前我們了解過他的幾個子類。
1. UIView
2. UIViewController
3. UIApplication
UIResponder 定義了一系列方法,用於接收和處理用戶事件,例如 觸摸事件、運動事件(搖晃設備)和功能控制事件(如編輯文本或者音樂播放)等。 UIResponder 的子類會覆蓋這些方法,實現自己的事件響應代碼。
在以上事件中,觸摸事件顯然應該由被觸摸的視圖負責處理。系統會將觸摸事件直接發送給被觸摸的視圖。
其他類型的事件則會由第一響應者負責處理,UIWindow 有一個 firstResponder 屬性指向第一響應者。例如,當用戶點擊 UITextField 對象時, UITextField 對象就會成為第一響應者。UIWindow 會將 firstResponder 指向該對象,之後,如果應用接收到運動事件和功能控制事件,都會發送給 UITextField 對象。
當某個 UITextField 對象或 UITextView 對象成為第一響應者時,屏幕就會彈出鍵盤。除了用戶點擊之外,還可以在代碼中向 UITextField 對象發送 becomeFirstResponder 消息,使其成為第一響應者。相反,如果要關閉鍵盤,則可以向 UITextField 對象發送 resignFirstResponder 消息,且要求改對象放棄第一響應者狀態。一旦第一響應者不是 UITextField 對象,鍵盤就會消失。
實際上,大部分視圖都不需要成為第一響應者。例如 UISlider 對象,該對象只會處理觸摸事件(用戶拖拽滑塊),而不會接收其他類型的事件,因此它不需要成為第一響應者。
•設置 UITextField 的鍵盤
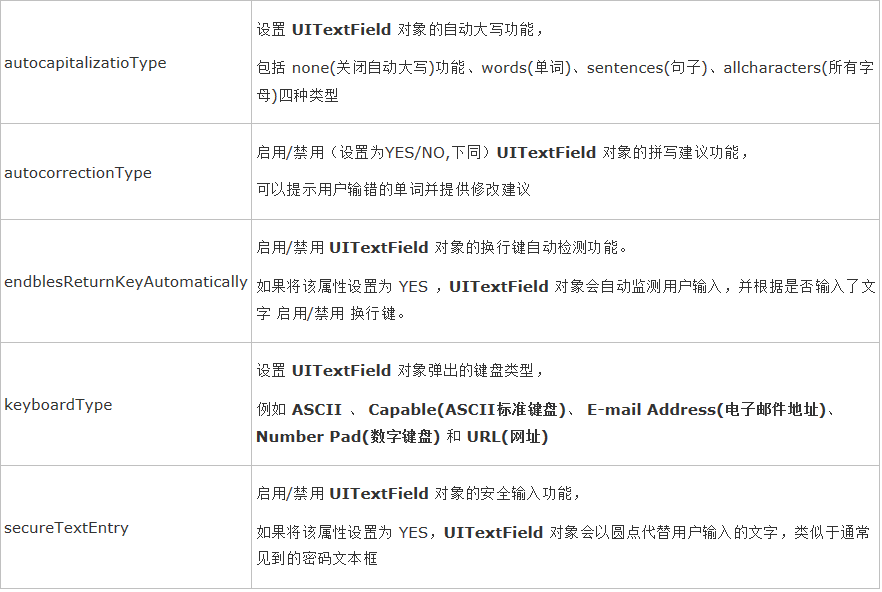
UITextField 對象有一系列屬性,用於設置彈出的鍵盤。下面就修改這些屬性,為 UITextField 對象添加占位符文本,並修改鍵盤的換行鍵盤類型。
#import "JXHypnosisViewController.h"
#import "JXHypnosisView.h"
@interface JXHypnosisViewController ()
@end
@implementation JXHypnosisViewController
- (instancetype)initWithNibName:(NSString *)nibNameOrNil
bundle:(NSBundle *)nibBundleOrNil {
self = [super initWithNibName:nibNameOrNil bundle:nibBundleOrNil];
if (self) {
// 設置標簽項的標題
self.tabBarItem.title = @"Hypnotize";
// 從圖片文件創建一個 UIImage 對象
UIImage * i = [UIImage imageNamed:@"Hypno"];
// 將 UIImage 對象賦值給標簽項的 iamge 屬性
self.tabBarItem.image = i;
}
return self;
}
- (void)viewDidLoad {
[super viewDidLoad];
}
- (void)loadView {
// 創建一個 JXHypnosisView 對象
JXHypnosisView * backgroundView = [[JXHypnosisView alloc] init];
CGRect textFieldRect = CGRectMake(40, 70, 240, 30);
UITextField * textField = [[UITextField alloc] init];
textField.frame = textFieldRect;
// 設置 UITextField 對象的邊框樣式,便於查看它在屏幕上的位置
textField.borderStyle = UITextBorderStyleRoundedRect;
// 修改占位符
textField.placeholder = @"Hypontize me";
// 修改鍵盤類型
textField.returnKeyType = UIReturnKeyDone;
[backgroundView addSubview:textField];
// 將 JXHypnosisView 對象賦給視圖控制器的view 屬性
self.view = backgroundView;
}
@end
構建並運行,在程序中就會發現有一行占位符文本 Hypontize me ,當用戶在程序中輸入文字的時候,占位文本就會消失。換行鍵不再顯示默認的 Return,而是 Done。
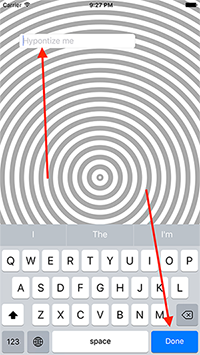
但是,如果我們點擊 Done 就會發現沒有任何反應。實際上,修改換行鍵盤的類型知識改變了換行鍵的外觀,如果需要實現用戶點擊換行鍵後的功能,必須實現編寫響應的代碼。在編寫代碼之前,在介紹 UITextField 對象中另外介個有用的屬性
•委托
我們知道 目標-動作(Target-Action)設計模式。目標-動作 是 UIKit 中通常用的設計模式之一。目標-動作的工作方式為:當某個特定的事件發生時(例如按下按鈕),發生事件的一方會向指定的目標對象發送一個之前設定好的動作消息。所有繼承 UIControl 對象都可以設置目標-動作。
在 目標-動作中,針對不同的事件,需要創建不同的動作消息。UIButton 對象的事件比較簡單,通常只需要處理點擊事件:相反,像 UITextField 這類事件復雜的對象,偉大的蘋果使用了 委托設計模式 。UITextField 對象具有一個委托屬性,通過為 UITextField 對象設置委托,UITextField 對象會在發生事件時向委托發送響應的消息,由委托處理該時間。例如,對於編輯 UITextField 對象文本內容的事件,有對象的委托方法。
@protocol UITextFieldDelegate <NSObject>
@optional
- (BOOL)textFieldShouldBeginEditing:(UITextField *)textField; // return NO to disallow editing.
- (void)textFieldDidBeginEditing:(UITextField *)textField; // became first responder
- (BOOL)textFieldShouldEndEditing:(UITextField *)textField; // return YES to allow editing to stop and to resign first responder status. NO to disallow the editing session to end
- (void)textFieldDidEndEditing:(UITextField *)textField; // may be called if forced even if shouldEndEditing returns NO (e.g. view removed from window) or endEditing:YES called
- (BOOL)textField:(UITextField *)textField shouldChangeCharactersInRange:(NSRange)range replacementString:(NSString *)string; // return NO to not change text
- (BOOL)textFieldShouldClear:(UITextField *)textField; // called when clear button pressed. return NO to ignore (no notifications)
- (BOOL)textFieldShouldReturn:(UITextField *)textField; // called when 'return' key pressed. return NO to ignore.
@end
注意:在委托方法中,通常應該將對象自身作為第一個參數。多個對象可能具有相同的委托,當委托收到消息的時候,需要根據該參數判斷發送該消息的對象。例如,如果某個視圖控制器中包含多個 UITextField 對象,它們的委托都是該視圖控制器,那麼視圖控制器就需要根據 textField 參數獲取響應的 UITextField 對象並執行不同的操作。
下面我們就將 UITextField 對象所位於的視圖控制器- JXHypnosisViewController 設置為它的委托,並實現 textFieldShouldReturn: 委托方法,當用戶點擊 Done 按鈕時,UITextField 對象就會調用該方法。
打開 JXHypnosisViewController 修改 loadView 方法,將 UITextField 對象的委托屬性設置為 JXHypnosisViewController 自身。
textFieldShouldReturn: 只有一個參數,就是用戶點擊換行鍵的相應 UITextField 對象。目前,應用只會向控制台輸出 UITextField 對象的文本內容。
接下來在代碼中實現 textFieldShouldReturn: 方法。
#import "JXHypnosisViewController.h"
#import "JXHypnosisView.h"
@interface JXHypnosisViewController ()
@end
@implementation JXHypnosisViewController
- (instancetype)initWithNibName:(NSString *)nibNameOrNil
bundle:(NSBundle *)nibBundleOrNil {
self = [super initWithNibName:nibNameOrNil bundle:nibBundleOrNil];
if (self) {
// 設置標簽項的標題
self.tabBarItem.title = @"Hypnotize";
// 從圖片文件創建一個 UIImage 對象
UIImage * i = [UIImage imageNamed:@"Hypno"];
// 將 UIImage 對象賦值給標簽項的 iamge 屬性
self.tabBarItem.image = i;
}
return self;
}
- (void)viewDidLoad {
[super viewDidLoad];
}
- (void)loadView {
// 創建一個 JXHypnosisView 對象
JXHypnosisView * backgroundView = [[JXHypnosisView alloc] init];
CGRect textFieldRect = CGRectMake(40, 70, 240, 30);
UITextField * textField = [[UITextField alloc] init];
textField.frame = textFieldRect;
// 設置 UITextField 對象的邊框樣式,便於查看它在屏幕上的位置
textField.borderStyle = UITextBorderStyleRoundedRect;
// 修改占位符
textField.placeholder = @"Hypontize me";
// 修改鍵盤類型
textField.returnKeyType = UIReturnKeyDone;
textField.delegate = self;
[backgroundView addSubview:textField];
// 將 JXHypnosisView 對象賦給視圖控制器的view 屬性
self.view = backgroundView;
}
- (BOOL)textFieldShouldReturn:(UITextField *)textField {
NSLog(@"%@",textField.text);
return YES;
}
@end
構建並運行程序,就可以在控制台打印信息,但是這裡會有一處警告,暫時先不管。
請注意, JXHypnosisViewController 不需要實現 UITextField 對象的所有委托方法,UITextField 對象會在運行時檢查委托方法是否實現了某個方法,如果沒有實現 UITextField 對象就不會調用該方法。
•協議
凡是支持委托的對象,其背後都有一個相應的協議,聲明可以向該對象(例如:UITextField)的委托對象(例如:JXHypnosisViewController)發送的消息。委托對象(例如:JXHypnosisViewController)需要根據這個協議為其響應的事件實現響應的方法。如果一個類實現了某個協議中規定的方法,就稱這個類遵守該協議。
聲明協議的語法是,使用 @protocol 指令開頭,後跟協議的名稱(例如:UITextFieldDelegate)。尖括號裡的 NSObject 是指只 NSObject 協議,其作用是聲明 UITextFieldDelegate 中包含 NSObject 協議的全部方法。接著聲明新協議特有的方法,最後使用 @end 指令來結束。
協議不是類,只是一組方法聲明。不能為協議創建對象,或者添加實例變量。協議自身不實現方法,需要由遵守相應協議的類來實現。
協議所聲明的方法可以是必須的(required)或者是可選的(optional)。協議方法默認都是必須的,所以當我們自定義協議的時候最好設置一下。使用 @optional 指令,可以將寫在該指令之後的方法去全部聲明為可選的。
發送方在發送可選方法之前,都會先向其委托發送另一個名為 respondsToSelector: 的消息。所有Objective-C 對象都從 NSObject 繼承了 respondsToSelector: 方法,該方法能在運行時檢查對象是否實現了指定的方法。 @selector() 指令可以將選擇器(selector)轉換成數值,以便將其作為參數進行傳遞。
- (void)clearButtonTapped {
// textFieldShouldClear:是可選方法,需要先檢查委托是否實現了該方法
SEL clearSelector = @selector(textFieldShouldClear:);
if ([self.delegate respondsToSelector:clearSelector]) {
self.text = @"";
}
}
如果某個方法是必須的,那麼發送發可以直接向其委托對象發送相應的消息,不用檢查委托對象是否實現了該方法。這也就意味著,如果委托對象沒有實現相應的方法,應用就會拋出位置選擇器(unrecognized selector)異常,導致應用崩潰。
為了防止問題,編譯器會檢查某個類是否實現了相關協議的必須方法。要讓編譯器能夠執行此類檢查,必須將相應的類聲明為遵守指定的協議,其語法格式為:在頭文件或類擴展 @interface 指令末尾,將類所遵守的協議以都好分隔的列表形式寫在尖括號裡。
#import "JXHypnosisViewController.h"
#import "JXHypnosisView.h"
@interface JXHypnosisViewController ()<UITextFieldDelegate>
@end
@implementation JXHypnosisViewController
- (instancetype)initWithNibName:(NSString *)nibNameOrNil
bundle:(NSBundle *)nibBundleOrNil {
self = [super initWithNibName:nibNameOrNil bundle:nibBundleOrNil];
if (self) {
// 設置標簽項的標題
self.tabBarItem.title = @"Hypnotize";
// 從圖片文件創建一個 UIImage 對象
UIImage * i = [UIImage imageNamed:@"Hypno"];
// 將 UIImage 對象賦值給標簽項的 iamge 屬性
self.tabBarItem.image = i;
}
return self;
}
- (void)viewDidLoad {
[super viewDidLoad];
}
- (void)loadView {
// 創建一個 JXHypnosisView 對象
JXHypnosisView * backgroundView = [[JXHypnosisView alloc] init];
CGRect textFieldRect = CGRectMake(40, 70, 240, 30);
UITextField * textField = [[UITextField alloc] init];
textField.frame = textFieldRect;
// 設置 UITextField 對象的邊框樣式,便於查看它在屏幕上的位置
textField.borderStyle = UITextBorderStyleRoundedRect;
// 修改占位符
textField.placeholder = @"Hypontize me";
// 修改鍵盤類型
textField.returnKeyType = UIReturnKeyDone;
textField.delegate = self;
[backgroundView addSubview:textField];
// 將 JXHypnosisView 對象賦給視圖控制器的view 屬性
self.view = backgroundView;
}
- (BOOL)textFieldShouldReturn:(UITextField *)textField {
NSLog(@"%@",textField.text);
return YES;
}
@end
幾乎所有的委托都是弱引用屬性。這是為了避免對象及其委托之間產生強引用循環。例如: JXHypnosisViewController 是 UITextField 對象的委托,而且 UITextField 對象是 JXHypnosisViewController 的強引用屬性,如果 UITextField 對象再對其委托保持強引用就會在兩者之間產生強引用循環。
•向屏幕中添加UILabel對象
下面我們在 JXHypnosisViewController 中添加一個新方法,在屏幕中隨機位置繪制20個 UILabel 對象。同時,該方法有一個 NSString 類型的參數,表示 UILabel 對象顯示的文字。
#import "JXHypnosisViewController.h"
#import "JXHypnosisView.h"
@interface JXHypnosisViewController ()<UITextFieldDelegate>
@end
@implementation JXHypnosisViewController
- (instancetype)initWithNibName:(NSString *)nibNameOrNil
bundle:(NSBundle *)nibBundleOrNil {
self = [super initWithNibName:nibNameOrNil bundle:nibBundleOrNil];
if (self) {
// 設置標簽項的標題
self.tabBarItem.title = @"Hypnotize";
// 從圖片文件創建一個 UIImage 對象
UIImage * i = [UIImage imageNamed:@"Hypno"];
// 將 UIImage 對象賦值給標簽項的 iamge 屬性
self.tabBarItem.image = i;
}
return self;
}
- (void)viewDidLoad {
[super viewDidLoad];
}
- (void)loadView {
// 創建一個 JXHypnosisView 對象
JXHypnosisView * backgroundView = [[JXHypnosisView alloc] init];
CGRect textFieldRect = CGRectMake(40, 70, 240, 30);
UITextField * textField = [[UITextField alloc] init];
textField.frame = textFieldRect;
// 設置 UITextField 對象的邊框樣式,便於查看它在屏幕上的位置
textField.borderStyle = UITextBorderStyleRoundedRect;
// 修改占位符
textField.placeholder = @"Hypontize me";
// 修改鍵盤類型
textField.returnKeyType = UIReturnKeyDone;
textField.delegate = self;
[backgroundView addSubview:textField];
// 將 JXHypnosisView 對象賦給視圖控制器的view 屬性
self.view = backgroundView;
}
- (BOOL)textFieldShouldReturn:(UITextField *)textField {
NSLog(@"%@",textField.text);
return YES;
}
- (void)drawHypnoticMessage:(NSString *)message {
for (NSInteger i = 0; i < 20; i++) {
UILabel * messageLabel = [[UILabel alloc] init];
// 設置 UIlabel 對象的文字和顏色
messageLabel.backgroundColor = [UIColor clearColor];
messageLabel.textColor = [UIColor whiteColor];
messageLabel.text = message;
//根據要顯示的文字調整 UILabel 對象的大小
[messageLabel sizeToFit];
// 獲取隨機 x 坐標
// 使 UILabe 對象的寬度不超出控制器的 view 寬度
NSInteger width = self.view.bounds.size.width - messageLabel.bounds.size.width;
NSInteger x = arc4random() % width;
// 獲取隨機 y 坐標
// 使 UILabel 對象的高度不超出控制器的 view 寬度
NSInteger height = self.view.bounds.size.height - messageLabel.bounds.size.height;
NSInteger y = arc4random() % height;
// 設置 UILabel 對象的 frame
CGRect frame = messageLabel.frame;
frame.origin = CGPointMake(x, y);
messageLabel.frame = frame;
// 將 UILabel 對象添加到控制器的 view 中
[self.view addSubview:messageLabel];
}
}
@end
接下來修改 textFieldShouldReturn: 將 UITextField 對象的文本內容作為 參數,調動我們自定義的方法,之後清空文本內容,最後調用 resignFirstResponder 關閉鍵盤。
#import "JXHypnosisViewController.h"
#import "JXHypnosisView.h"
@interface JXHypnosisViewController ()<UITextFieldDelegate>
@end
@implementation JXHypnosisViewController
- (instancetype)initWithNibName:(NSString *)nibNameOrNil
bundle:(NSBundle *)nibBundleOrNil {
self = [super initWithNibName:nibNameOrNil bundle:nibBundleOrNil];
if (self) {
// 設置標簽項的標題
self.tabBarItem.title = @"Hypnotize";
// 從圖片文件創建一個 UIImage 對象
UIImage * i = [UIImage imageNamed:@"Hypno"];
// 將 UIImage 對象賦值給標簽項的 iamge 屬性
self.tabBarItem.image = i;
}
return self;
}
- (void)viewDidLoad {
[super viewDidLoad];
}
- (void)loadView {
// 創建一個 JXHypnosisView 對象
JXHypnosisView * backgroundView = [[JXHypnosisView alloc] init];
CGRect textFieldRect = CGRectMake(40, 70, 240, 30);
UITextField * textField = [[UITextField alloc] init];
textField.frame = textFieldRect;
// 設置 UITextField 對象的邊框樣式,便於查看它在屏幕上的位置
textField.borderStyle = UITextBorderStyleRoundedRect;
// 修改占位符
textField.placeholder = @"Hypontize me";
// 修改鍵盤類型
textField.returnKeyType = UIReturnKeyDone;
textField.delegate = self;
[backgroundView addSubview:textField];
// 將 JXHypnosisView 對象賦給視圖控制器的view 屬性
self.view = backgroundView;
}
- (BOOL)textFieldShouldReturn:(UITextField *)textField {
NSLog(@"%@",textField.text);
[self drawHypnoticMessage:textField.text];
textField.text = @"";
[textField resignFirstResponder];
return YES;
}
- (void)drawHypnoticMessage:(NSString *)message {
for (NSInteger i = 0; i < 20; i++) {
UILabel * messageLabel = [[UILabel alloc] init];
// 設置 UIlabel 對象的文字和顏色
messageLabel.backgroundColor = [UIColor clearColor];
messageLabel.textColor = [UIColor whiteColor];
messageLabel.text = message;
//根據要顯示的文字調整 UILabel 對象的大小
[messageLabel sizeToFit];
// 獲取隨機 x 坐標
// 使 UILabe 對象的寬度不超出控制器的 view 寬度
NSInteger width = self.view.bounds.size.width - messageLabel.bounds.size.width;
NSInteger x = arc4random() % width;
// 獲取隨機 y 坐標
// 使 UILabel 對象的高度不超出控制器的 view 寬度
NSInteger height = self.view.bounds.size.height - messageLabel.bounds.size.height;
NSInteger y = arc4random() % height;
// 設置 UILabel 對象的 frame
CGRect frame = messageLabel.frame;
frame.origin = CGPointMake(x, y);
messageLabel.frame = frame;
// 將 UILabel 對象添加到控制器的 view 中
[self.view addSubview:messageLabel];
}
}
@end
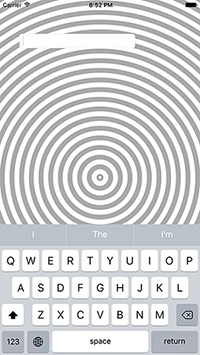
構建並運行。
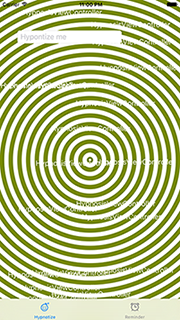
•運動效果
iOS設備內嵌了許多功能強大的傳感器,例如加速傳感器,磁場傳感器和三軸陀螺儀等。應用可以通過這些傳感器了解設備加速,方向和角度,並實現有用的功能。例如,應用可以根據設備的方向自動將界面調整為橫屏或者豎屏模式。從iOS7開始,蘋果引用了一些新 API 可以輕松為應用添加一種通過傳感器實現的視覺差效果。
我們可以想象自己坐在一輛飛馳的大奔中,我們看想窗外,會發現遠處的景物的倒退速度比近處的慢很多。這是大腦對空間和速度差異產生的一種錯覺,稱之為視差。在iOS7 及之後這種效果隨處可見,例如,在主屏幕中,如果稍微傾斜設備,可以發現主屏幕中的圖標會隨著傾斜方向相對於壁紙移動。
應用可以通過 UIInterpolatingMotionEffect 類來實現相同的效果,我們只需要創建一個 UIInterpolatingMotionEffect 對象,設置其方向(垂直或者水平)、鍵路勁(key path,需要使用視差效果的屬性)和相對最小/最大值(視覺差的范圍),再將其添加到某個視圖上,該視圖就能獲得相應的視差效果。
#import "JXHypnosisViewController.h"
#import "JXHypnosisView.h"
@interface JXHypnosisViewController ()<UITextFieldDelegate>
@end
@implementation JXHypnosisViewController
- (instancetype)initWithNibName:(NSString *)nibNameOrNil
bundle:(NSBundle *)nibBundleOrNil {
self = [super initWithNibName:nibNameOrNil bundle:nibBundleOrNil];
if (self) {
// 設置標簽項的標題
self.tabBarItem.title = @"Hypnotize";
// 從圖片文件創建一個 UIImage 對象
UIImage * i = [UIImage imageNamed:@"Hypno"];
// 將 UIImage 對象賦值給標簽項的 iamge 屬性
self.tabBarItem.image = i;
}
return self;
}
- (void)viewDidLoad {
[super viewDidLoad];
}
- (void)loadView {
// 創建一個 JXHypnosisView 對象
JXHypnosisView * backgroundView = [[JXHypnosisView alloc] init];
CGRect textFieldRect = CGRectMake(40, 70, 240, 30);
UITextField * textField = [[UITextField alloc] init];
textField.frame = textFieldRect;
// 設置 UITextField 對象的邊框樣式,便於查看它在屏幕上的位置
textField.borderStyle = UITextBorderStyleRoundedRect;
// 修改占位符
textField.placeholder = @"Hypontize me";
// 修改鍵盤類型
textField.returnKeyType = UIReturnKeyDone;
textField.delegate = self;
[backgroundView addSubview:textField];
// 將 JXHypnosisView 對象賦給視圖控制器的view 屬性
self.view = backgroundView;
}
- (BOOL)textFieldShouldReturn:(UITextField *)textField {
[self drawHypnoticMessage:textField.text];
textField.text = @"";
[textField resignFirstResponder];
return YES;
}
- (void)drawHypnoticMessage:(NSString *)message {
for (NSInteger i = 0; i < 20; i++) {
UILabel * messageLabel = [[UILabel alloc] init];
// 設置 UIlabel 對象的文字和顏色
messageLabel.backgroundColor = [UIColor clearColor];
messageLabel.textColor = [UIColor whiteColor];
messageLabel.text = message;
//根據要顯示的文字調整 UILabel 對象的大小
[messageLabel sizeToFit];
// 獲取隨機 x 坐標
// 使 UILabe 對象的寬度不超出控制器的 view 寬度
NSInteger width = self.view.bounds.size.width - messageLabel.bounds.size.width;
NSInteger x = arc4random() % width;
// 獲取隨機 y 坐標
// 使 UILabel 對象的高度不超出控制器的 view 寬度
NSInteger height = self.view.bounds.size.height - messageLabel.bounds.size.height;
NSInteger y = arc4random() % height;
// 設置 UILabel 對象的 frame
CGRect frame = messageLabel.frame;
frame.origin = CGPointMake(x, y);
messageLabel.frame = frame;
// 將 UILabel 對象添加到控制器的 view 中
[self.view addSubview:messageLabel];
UIInterpolatingMotionEffect * motionEffect;
motionEffect = [[UIInterpolatingMotionEffect alloc] initWithKeyPath:@"center.x" type:UIInterpolatingMotionEffectTypeTiltAlongHorizontalAxis];
motionEffect.minimumRelativeValue = @(-25);
motionEffect.maximumRelativeValue = @(25);
[messageLabel addMotionEffect:motionEffect];
motionEffect = [[UIInterpolatingMotionEffect alloc] initWithKeyPath:@"center.y" type:UIInterpolatingMotionEffectTypeTiltAlongVerticalAxis];
motionEffect.minimumRelativeValue = @(-25);
motionEffect.maximumRelativeValue = @(25);
[messageLabel addMotionEffect:motionEffect];
}
}
@end
測試運動效果必須在真機上。
•深入學習:main() 和 UIApplication
用C語言編寫的程序,其至此那個入口都是 main() 。用 Objective-C 語言編寫的程序也是這樣。
在 JXHypnoNerd 項目中我們在 mian.m,可以看到有如下代碼
#import <UIKit/UIKit.h>
#import "AppDelegate.h"
int main(int argc, char * argv[]) {
@autoreleasepool {
return UIApplicationMain(argc, argv, nil, NSStringFromClass([AppDelegate class]));
}
}
這段代碼中的 UIApplicationMain 函數會創建一個 UIApplication 對象。 每個iOS應用都有且只有一個UIApplication對象,該對象的作用就是維護運行循環。一旦程序創建了某個 UIApplication 對象,該對象的運行循環就會一直循環下去,main() 的執行也會因此堵塞。
此外, UIApplicationMain 函數還會創建某個指定類的對象,並將其設置為 UIApplication 對象的 delegate 。該對象的類是由 UIApplicationMain 函數的最後一個實參指定的,該實參的類型是 NSString 對象,代表的是某個類的類名。所以在以上這段代碼中, UIApplicationMain 會創建一個 AppDelegate 對象,並將其設置為 UIApplication 對象的 delegate 。
在應用啟動運行循環並開始接收事件之前,UIApplication 對象會向其委托發送一個特性的消息,使應用能有機會完成相應的初始化工作。這個消息的名稱是
- (BOOL)application:(UIApplication *)application didFinishLaunchingWithOptions:(NSDictionary *)launchOptions
以上所述是小編給大家介紹的iOS 委托與文本輸入(內容根據iOS編程編寫),希望對大家有所幫助,如果大家有任何疑問請給我留言,小編會及時回復大家的。在此也非常感謝大家對本站網站的支持!