
iOS完成“搖一搖”與“掃一掃”功用示例代碼
編輯:IOS開發綜合
“搖一搖”功用的完成:
iPhone對 “搖一搖”有很好的支持,總體說來就兩步:
在視圖控制器中翻開承受“搖一搖”的開關;
 - (void)viewDidLoad {
  // 設置允許搖一搖功用
  [UIApplication sharedApplication].applicationSupportsShakeToEdit = YES;
  // 並讓自己成為第一呼應者
  [self becomeFirstResponder];
}
在“搖一搖”觸發的制定的辦法中完成需求完成的功用(”搖一搖“檢測辦法)。
// 搖一搖開端搖動
- (void)motionBegan:(UIEventSubtype)motion withEvent:(UIEvent *)event {
  NSLog(@"開端搖動");
  //添加“搖一搖”動畫
  [self addAnimations];
  //音效
  AudIOServicesPlaySystemSound (soundID);
  return;
}

// “搖一搖”取消搖動
- (void)motionCancelled:(UIEventSubtype)motion withEvent:(UIEvent *)event {
  NSLog(@"取消搖動");
  return;
}

// “搖一搖”搖動完畢
- (void)motionEnded:(UIEventSubtype)motion withEvent:(UIEvent *)event {
  if (event.subtype == UIEventSubtypeMotionShake) { // 判別能否是搖動完畢
    NSLog(@"搖動完畢");
  }
  return;
}
”搖一搖“的動畫效果:
- (void)addAnimations {
  //音效
  AudIOServicesPlaySystemSound (soundID);
  //讓下面圖片的上下挪動
  CABasicAnimation *translation2 = [CABasicAnimation animationWithKeyPath:@"position"];
  translation2.timingFunction = [CAMediaTimingFunction functionWithName:kCAMediaTimingFunctionEaseInEaSEOut];
  translation2.fromValue = [NSValue valueWithCGPoint:CGPointMake(160, 115)];
  translation2.toValue = [NSValue valueWithCGPoint:CGPointMake(160, 40)];
  translation2.duration = 0.4;
  translation2.repeatCount = 1;
  translation2.autoreverses = YES;

  //讓上面的圖片上下挪動
  CABasicAnimation *translation = [CABasicAnimation animationWithKeyPath:@"position"];
  translation.timingFunction = [CAMediaTimingFunction functionWithName:kCAMediaTimingFunctionEaseInEaSEOut];
  translation.fromValue = [NSValue valueWithCGPoint:CGPointMake(160, 345)];
  translation.toValue = [NSValue valueWithCGPoint:CGPointMake(160, 420)];
  translation.duration = 0.4;
  translation.repeatCount = 1;
  translation.autoreverses = YES;

  [imgDown.layer addAnimation:translation forKey:@"translation"];
  [imgUp.layer addAnimation:translation2 forKey:@"translation2"];
}
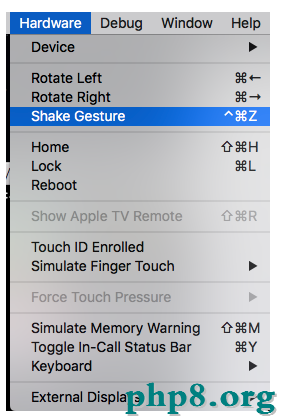
留意:在模仿器中運轉時,可以經過「Hardware」-「Shake Gesture」來測試「搖一搖」功用。如下:
“掃一掃”功用的完成:
基於AVCaptureDevice做的二維碼掃描器,根本步驟如下:
初始化相機,生成掃描器
設置參數
 - (void)setupCamera {

  dispatch_async(dispatch_get_global_queue(DISPATCH_QUEUE_PRIORITY_DEFAULT, 0), ^{

    _device = [AVCaptureDevice defaultDeviceWithMediaType:AVMediaTypeVideo];

    _input = [AVCaptureDeviceInput deviceInputWithDevice:_device error:nil];

    _output = [[AVCaptureMetadataOutput alloc]init];
    [_output setMetadataObjectsDelegate:self queue:dispatch_get_main_queue()];

    _session = [[AVCaptureSession alloc]init];
    [_session setSessionPreset:AVCaptureSessionPresetHigh];
    if ([_session canAddInput:self.input])
    {
      [_session addInput:self.input];
    }

    if ([_session canAddOutput:self.output])
    {
      [_session addOutput:self.output];
    }

    // 條碼類型 AVMetadataObjectTypeQRCode
    _output.metadataObjectTypes = [NSArray arrayWithObjects:AVMetadataObjectTypeEAN13Code, AVMetadataObjectTypeEAN8Code, AVMetadataObjectTypeCode128Code, AVMetadataObjectTypeQRCode, nil];

    dispatch_async(dispatch_get_main_queue(), ^{
      //更新界面
      _preview =[AVCaptureVideoPreviewLayer layerWithSession:self.session];
      _preview.videoGravity = AVLayerVideoGravityResizeaspectFill;
      _preview.frame = CGRectMake(0, 0, CGRectGetWidth(self.centerView.frame), CGRectGetHeight(self.centerView.frame));
      [self.centerView.layer insertSublayer:self.preview atIndex:0];
      [_session startRunning];
    });
  });
}
在viewWillAppear和viewWillDisappear裡對session做優化(timer是個掃描動畫的計時器)
 - (void)viewWillAppear:(BOOL)animated {
  [super viewWillAppear:animated];

  if (_session && ![_session isRunning]) {
    [_session startRunning];
  }
  timer = [NSTimer scheduledTimerWithTimeInterval:0.02 target:self selector:@selector(scanningAnimation) userInfo:nil repeats:YES];
  [self setupCamera];
}

 - (void)viewWillDisappear:(BOOL)animated {
  [super viewWillDisappear:animated];
  _count = 0;
  [timer invalidate];
  [self stopReading];
}
處置掃描後果
 - (void)captureOutput:(AVCaptureOutput *)captureOutput didOutputMetadataObjects:(NSArray *)metadataObjects fromConnection:(AVCaptureConnection *)connection {

  NSString *stringValue;
  if ([metadataObjects count] >0){
    AVMetadataMachineReadableCodeObject * metadataObject = [metadataObjects objectAtIndex:0];
    stringValue = metadataObject.stringValue;
    NSLog(@"%@",stringValue);
  }
  [_session stopRunning];
  [timer invalidate];
  _count ++ ;
  [self stopReading];
  if (stringValue && _count == 1) {
    //掃描完成
  }
}
用二維碼掃描器掃描自己的二維碼:
NSString *url = [NSURL URLWithString:@"html/judgement.html" relativeToURL:[ZXApiClient sharedClient].baseURL].absoluteString;

  if ([stringValue hasprefix:url]) {
    //假如掃出來的url是自己的域名掃尾的,那麼做如下的處置
  }
最後附上自己完好的源碼:
// Created by Ydw on 16/3/15.
// Copyright © 2016年 IZHUO.net. All rights reserved.
//

import “ViewController.h”
import <AVFoundation/AVFoundation.h>

@interface ViewController ()
{
int number;
NSTimer *timer;
NSInteger _count;
BOOL upOrdown;
AVCaptureDevice *lightDevice;
}

@property (nonatomic,strong) UIView *centerView;//掃描的顯示視圖

/**
* 二維碼掃描參數
*/
@property (strong,nonatomic) AVCaptureDevice *device;
@property (strong,nonatomic) AVCaptureDeviceInput *input;
@property (strong,nonatomic) AVCaptureMetadataOutput *output;
@property (strong,nonatomic) AVCaptureSession *session;
@property (strong,nonatomic) AVCaptureVideoPreviewLayer *preview;
@property (nonatomic,retain) UIImageView *imageView;//掃描線

(void)setupCamera;
(void)stopReading;
@end

@implementation ViewController

- (void)viewWillAppear:(BOOL)animated {
  [super viewWillAppear:animated];

  if (_session && ![_session isRunning]) {
    [_session startRunning];
  }
  timer = [NSTimer scheduledTimerWithTimeInterval:0.02 target:self selector:@selector(scanningAnimation) userInfo:nil repeats:YES];
  [self setupCamera];
}

- (void)viewDidLoad {
  [super viewDidLoad];

  self.view.backgroundColor = [UIColor clearColor];
  self.automaticallyAdjustsScrollVieWinsets = NO;

  _count = 0 ;
  //初始化閃光燈設備
  lightDevice = [AVCaptureDevice defaultDeviceWithMediaType:AVMediaTypeVideo];
  //掃描范圍
  _centerView = [[UIView alloc]initWithFrame:CGRectMake(0, 0, CGRectGetWidth(self.view.frame), CGRectGetHeight(self.view.frame))];
  _centerView.backgroundColor = [UIColor clearColor];
  [self.view addSubview:_centerView];

  //掃描的視圖加載
  UIView *scanningViewOne = [[UIView alloc]initWithFrame:CGRectMake(0, 0, self.view.frame.size.width, 120)];
  scanningViewOne.backgroundColor= [[UIColor blackColor] colorWithAlphaComponent:0.4];
  [self.centerView addSubview:scanningViewOne];

  UIView *scanningViewTwo = [[UIView alloc]initWithFrame:CGRectMake(0, 120, (self.view.frame.size.width-300)/2, 300)];
  scanningViewTwo.backgroundColor= [[UIColor blackColor] colorWithAlphaComponent:0.4];
  [self.centerView addSubview:scanningViewTwo];

  UIView *scanningViewThree = [[UIView alloc]initWithFrame:CGRectMake(CGRectGetWidth(self.view.frame)/2+150, 120, (self.view.frame.size.width-300)/2, 300)];
  scanningViewThree.backgroundColor= [[UIColor blackColor] colorWithAlphaComponent:0.4];
  [self.centerView addSubview:scanningViewThree];

  UIView *scanningViewFour = [[UIView alloc]initWithFrame:CGRectMake(0, 420, self.view.frame.size.width,CGRectGetHeight(self.view.frame)- 420)];
  scanningViewFour.backgroundColor= [[UIColor blackColor] colorWithAlphaComponent:0.4];
  [self.centerView addSubview:scanningViewFour];


  UILabel *labIntroudction= [[UILabel alloc] initWithFrame:CGRectMake(15, 430, self.view.frame.size.width - 30, 30)];
  labIntroudction.backgroundColor = [UIColor clearColor];
  labIntroudction.textAlignment = NSTextAlignmentCenter;
  labIntroudction.textColor = [UIColor whiteColor];
  labIntroudction.text = @"請將企業約請碼放入掃描框內";
  [self.centerView addSubview:labIntroudction];

  UIButton *openLight = [[UIButton alloc]initWithFrame:CGRectMake(CGRectGetWidth(self.view.frame)/2-25, 470, 50, 50)];
  [openLight setImage:[UIImage imageNamed:@"燈泡"] forState:UIControlStateNormal];
  [openLight setImage:[UIImage imageNamed:@"燈泡2"] forState:UIControlStateSelected];
  [openLight addTarget:self action:@selector(openLightWay:) forControlEvents:UIControlEventTouchUpInside];
  [self.centerView addSubview:openLight];

  //掃描線
  _imageView = [[UIImageView alloc] initWithFrame:CGRectMake(CGRectGetWidth(self.view.frame)/2-110, 130, 220, 5)];
  _imageView.image = [UIImage imageNamed:@"scanning@3x"];
  [self.centerView addSubview:_imageView];
}

- (void)viewWillDisappear:(BOOL)animated {
  _count= 0;
  [timer invalidate];
  [self stopReading];
}

pragma mark -- 設置參數
- (void)setupCamera {

  dispatch_async(dispatch_get_global_queue(DISPATCH_QUEUE_PRIORITY_DEFAULT, 0), ^{

    _device = [AVCaptureDevice defaultDeviceWithMediaType:AVMediaTypeVideo];

    _input = [AVCaptureDeviceInput deviceInputWithDevice:_device error:nil];

    _output = [[AVCaptureMetadataOutput alloc]init];
    [_output setMetadataObjectsDelegate:self queue:dispatch_get_main_queue()];

    _session = [[AVCaptureSession alloc]init];
    [_session setSessionPreset:AVCaptureSessionPresetHigh];
    if ([_session canAddInput:self.input])
    {
      [_session addInput:self.input];
    }

    if ([_session canAddOutput:self.output])
    {
      [_session addOutput:self.output];
    }

    // 條碼類型 AVMetadataObjectTypeQRCode
    _output.metadataObjectTypes = [NSArray arrayWithObjects:AVMetadataObjectTypeEAN13Code, AVMetadataObjectTypeEAN8Code, AVMetadataObjectTypeCode128Code, AVMetadataObjectTypeQRCode, nil];

    dispatch_async(dispatch_get_main_queue(), ^{
      //更新界面
      _preview =[AVCaptureVideoPreviewLayer layerWithSession:self.session];
      _preview.videoGravity = AVLayerVideoGravityResizeaspectFill;
      _preview.frame = CGRectMake(0, 0, CGRectGetWidth(self.centerView.frame), CGRectGetHeight(self.centerView.frame));
      [self.centerView.layer insertSublayer:self.preview atIndex:0];
      [_session startRunning];
    });
  });
}

//掃描動畫
- (void)scanningAnimation {
  if (upOrdown == NO) {
    number ++;
    _imageView.frame = CGRectMake(CGRectGetWidth(self.view.frame)/2-115, 130+2*number, 230, 5);
    if (2*number == 280) {
      upOrdown = YES;
    }
  }
  else {
    number --;
    _imageView.frame = CGRectMake(CGRectGetWidth(self.view.frame)/2-115, 130+2*number, 230, 5);
    if (number == 0) {
      upOrdown = NO;
    }
  }
}

- (void)stopReading {
  [_session stopRunning];
  _session = nil;
  [_preview removeFromSuperlayer];
  [timer invalidate];
  timer = nil ;
}

-(void)openLightWay:(UIButton *)sender {

  if (![lightDevice hasTorch]) {//判別能否有閃光燈
    UIAlertController *alert = [UIAlertController alertControllerWithTitle:@"以後設備沒有閃光燈,不能提供手電筒功用" message:nil preferredStyle:UIAlertControllerStyleAlert];
    UIAlertAction *sureAction = [UIAlertAction actionWithTitle:@"確定" style:UIAlertActionStyleCancel handler:nil];
    [alert addAction:sureAction];
    [self presentViewController:alert animated:YES completion:nil];
    return;
  }
  sender.selected = !sender.selected;
  if (sender.selected == YES) {
    [lightDevice lockForConfiguration:nil];
    [lightDevice setTorchMode:AVCaptureTorchModeOn];
    [lightDevice unlockForConfiguration];
  }
  else
  {
    [lightDevice lockForConfiguration:nil];
    [lightDevice setTorchMode: AVCaptureTorchModeOff];
    [lightDevice unlockForConfiguration];
  }
}

pragma mark -- AVCaptureMetadataOutputObjectsDelegate
- (void)captureOutput:(AVCaptureOutput *)captureOutput didOutputMetadataObjects:(NSArray *)metadataObjects fromConnection:(AVCaptureConnection *)connection {

  NSString *stringValue;
  if ([metadataObjects count] >0){
    AVMetadataMachineReadableCodeObject * metadataObject = [metadataObjects objectAtIndex:0];
    stringValue = metadataObject.stringValue;
    NSLog(@"%@",stringValue);
  }
  [_session stopRunning];
  [timer invalidate];
  _count ++ ;
  [self stopReading];
  if (stringValue && _count == 1) {
    //掃描完成
  }
}

- (void)didReceiveMemoryWarning {
  [super didReceiveMemoryWarning];
  // Dispose of any resources that can be recreated.
}

@end
以上就是本文的全部內容,希望對大家的學習有所協助,也希望大家多多支持本站。
【iOS完成“搖一搖”與“掃一掃”功用示例代碼】的相關資料介紹到這裡,希望對您有所幫助! 提示:不會對讀者因本文所帶來的任何損失負責。如果您支持就請把本站添加至收藏夾哦!


相關文章
+