
IOS上完成的自定義儀表盤示例
編輯:IOS開發綜合
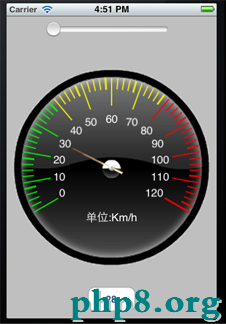
明天給大家帶來一個自定義的儀表盤,效果圖如下。
Demo中用到了 QuartzCore類 首先承繼一個UIView。
// Gauge.h
// GaugeDemo
//
// Created by 海鋒 周 on 12-3-27.
// Copyright (c) 2012年 CJLU rights reserved.
//

#import <UIKit/UIKit.h>
#import <QuartzCore/QuartzCore.h>

@interface Gauge : UIView
{
  UIImage *gaugeView;
  UIImageView *pointer;

  CGFloat maxNum;
  CGFloat minNum;

  CGFloat maxAngle;
  CGFloat minAngle;

  CGFloat gaugeValue;
  CGFloat gaugeAngle;

  CGFloat angleperValue;
  CGFloat scoleNum;

  NSMutableArray *labelArray;
  CGContextRef context;
}

@property (nonatomic,retain) UIImage *gaugeView;
@property (nonatomic,retain) UIImageView *pointer;
@property (nonatomic,retain) NSMutableArray *labelArray;
@property (nonatomic) CGContextRef context;
-(void)setGaugeValue:(CGFloat)value animation:(BOOL)isAnim;

@end
指針的旋轉是經過QuartzCore.framework中的CATransform3DRotate 來完成的,所以一定要記得把框架添加出去。當然在旋轉之前,我們還需求把指針的中心pointer.layer.anchorPoint 挪動到你需求的轉動中心。
在設置旋轉動畫的時分,我們用的不是CABaseAnimiation 而是用 CAKeyframeAnimation。這是由於假如運用中的 toValue 來完成旋轉的話,它默許是以最小的旋轉的,假如要完成控制旋轉的方向的話,我們就只能用關鍵幀來設置旋轉的途徑。用關鍵幀的益處還有一個,就是可以給指針添加,旋轉到指定地位當前的左右擺動的效果。
繪制儀表盤是經過Quartz2D來完成的,首先我們需求用UIGraphicsGetCurrentContext函數來獲取一個Context上下文,就是相當於獲取一個畫布。然後就可以在下面經過三角函數的計算,畫出背景圖片,和下面的刻度線了。
// Gauge.m
// GaugeDemo
//
// Created by 海鋒 周 on 12-3-27.
// Copyright (c) 2012年 CJLU. All rights reserved.
//

#import "Gauge.h"
#import <QuartzCore/QuartzCore.h>

#define MAXOFFSETANGLE 120.0f
#define POINTEROFFSET 90.0f
#define MAXVALUE    120.0f
#define CELLMARKNUM  5
#define CELLNUM    12
#define GAUGESTRING  @"單位:Km/h"
#define DEFLuaTSIZE  300
/************************************************
  儀表盤的大小不建議設置的太小。
  長寬都是300是最合適的
  假如要更小的需求自行修正刻度長度和文字大小
              ---powered by 周海鋒
                2012-3-29
 ***********************************************/


@implementation Gauge

@interface Gauge (private)
- (CGFloat) parseToX:(CGFloat) radius Angle:(CGFloat)angle;
- (CGFloat) parseToY:(CGFloat) radius Angle:(CGFloat)angle;
- (CGFloat) transToRadian:(CGFloat)angel;
- (CGFloat) parseToAngle:(CGFloat) val;
- (CGFloat) parseToValue:(CGFloat) val;
- (void)setTextLabel:(NSInteger)labelNum;
- (void)setLineMark:(NSInteger)labelNum;
- (void) pointToAngle:(CGFloat) angle Duration:(CGFloat) duration;
@end

@synthesize gaugeView,pointer,context;
@synthesize labelArray;

- (id)initWithFrame:(CGRect)frame
{
  self = [super initWithFrame:frame];
  if (self) {
    //設置背景通明
    [self setBackgroundColor:[UIColor clearColor]];

    scoleNum = DEFLuaTSIZE/frame.size.width;
    maxNum = MAXVALUE;
    minNum = 0.0f;
    minAngle = -MAXOFFSETANGLE;
    maxAngle = MAXOFFSETANGLE;
    gaugeValue = 0.0f;
    gaugeAngle = -MAXOFFSETANGLE;
    angleperValue = (maxAngle - minAngle)/(maxNum - minNum);

    gaugeView= [UIImage imageNamed:@"gaugeback.png"];
    //添加指針
    UIImage *_pointer = [UIImage imageNamed:@"pointer2.png"];
    pointer = [[UIImageView alloc] initWithImage:_pointer];
    pointer.layer.anchorPoint = CGPointMake(0.5, 0.78);
    pointer.center = self.center;
    pointer.transform = CGAff.netransformMakeScale(scoleNum, scoleNum);
    [self addSubview:pointer];
    //設置文字標簽
    [self setTextLabel:CELLNUM];
    //設置指針到0地位
    pointer.layer.transform = CATransform3DMakeRotation([self transToRadian:-MAXOFFSETANGLE], 0, 0, 1);
  }
  return self;
}

/*
 * setTextLabel 繪制刻度值
 * @labelNum NSInteger 刻度值的數目
 */
-(void)setTextLabel:(NSInteger)labelNum
{
   labelArray = [NSMutableArray arrayWithCapacity:labelNum];

  CGFloat textDis = (maxNum - minNum)/labelNum;
  CGFloat angelDis = (maxAngle - minAngle)/labelNum;
  CGFloat radius = (self.center.x - 75)*scoleNum;
  CGFloat currentAngle;
  CGFloat currentText = 0.0f;
  CGPoint centerPoint = self.center;

  for(int i=0;i<=labelNum;i++)
  {
    currentAngle = minAngle + i * angelDis - POINTEROFFSET;
    currentText = minNum + i * textDis;
    UILabel *label = [[UILabel alloc]initWithFrame:CGRectMake(0 , 0 , 30, 50)];
    label.autoresizesSubviews = YES;
    label.textColor = [UIColor whiteColor];
    label.backgroundColor = [UIColor clearColor];
    //設置刻度的文字的格式
    if(i<labelNum/2){
      label.textAlignment = UITextAlignmentLeft;
    }else if (i==labelNum/2){
      label.textAlignment = UITextAlignmentCenter;
    }else{
      label.textAlignment = UITextAlignmentRight;
    }
    label.text = [NSString stringWithFormat:@"%d",(int)currentText];
    label.center = CGPointMake(centerPoint.x+[self parseToX:radius Angle:currentAngle],centerPoint.y+[self parseToY:radius Angle:currentAngle]);

    [labelArray addObject:label];
    [self addSubview:label];
  }
  // 設置刻度表的稱號
  UILabel *label = [[UILabel alloc]initWithFrame:CGRectMake(0 , 0 ,100, 40)];
  label.autoresizesSubviews = YES;
  label.textColor = [UIColor whiteColor];
  label.backgroundColor = [UIColor clearColor];
  label.textAlignment = UITextAlignmentCenter;
  label.text = GAUGESTRING;
  label.center = CGPointMake(centerPoint.x,centerPoint.y*3/2);
  [self addSubview:label];
}

/*
 * setLineMark 繪制刻度的標志
 * @labelNum NSInteger 刻度是數目
 */
-(void)setLineMark:(NSInteger)labelNum
{

  CGFloat angelDis = (maxAngle - minAngle)/labelNum;
  CGFloat radius = self.center.x;
  CGFloat currentAngle;
  CGPoint centerPoint = CGPointMake(self.frame.size.width/2, self.frame.size.height/2);

  for(int i=0;i<=labelNum;i++)
  {
    currentAngle = minAngle + i * angelDis - POINTEROFFSET;
    //給刻度標志繪制不同的顏色
    if(i>labelNum*2/3)
    {
      CGContextSetStrokeColorWithColor(context, [[UIColor colorWithRed:1 green:0 blue:0 alpha:0.8] CGColor]);
    }else if(i>labelNum*1/3){
      CGContextSetStrokeColorWithColor(context, [[UIColor colorWithRed:1 green:1 blue:0 alpha:0.8] CGColor]);
    }else{
      CGContextSetStrokeColorWithColor(context, [[UIColor colorWithRed:0 green:1 blue:0 alpha:0.8] CGColor]);
    }
    //繪制不同的長短的刻度
    if(i%5==0)
    {
      CGContextSetLineCap(context, kCGLineCapSquare);
      CGContextSetLineWidth(context, 3);
      CGContextStrokePath(context);
      CGContextMoveToPoint(context,centerPoint.x+[self parseToX:radius-25*scoleNum Angle:currentAngle], centerPoint.y+[self parseToY:radius-25*scoleNum Angle:currentAngle]);
      CGContextAddL.netoPoint(context,centerPoint.x+[self parseToX:radius-65*scoleNum Angle:currentAngle], centerPoint.y+[self parseToY:radius-65*scoleNum Angle:currentAngle]);
    }else{
      CGContextSetLineWidth(context, 2);
      CGContextSetLineCap(context, kCGLineCapSquare);
      CGContextStrokePath(context);
      CGContextMoveToPoint(context,centerPoint.x+[self parseToX:radius-25*scoleNum Angle:currentAngle], centerPoint.y+[self parseToY:radius-25*scoleNum Angle:currentAngle]);
      CGContextAddL.netoPoint(context,centerPoint.x+[self parseToX:radius-40*scoleNum Angle:currentAngle], centerPoint.y+[self parseToY:radius-40*scoleNum Angle:currentAngle]);
    }
  }
}

/*
 * setGaugeValue 挪動到某個數值
 * @value CGFloat 挪動到的數值
 * @isAnim BOOL  能否執舉動畫
 */
-(void)setGaugeValue:(CGFloat)value animation:(BOOL)isAnim
{
  CGFloat tempAngle = [self parseToAngle:value];
  gaugeValue = value;
  //設置轉動時間和轉動動畫
  if(isAnim){
    [self pointToAngle:tempAngle Duration:0.6f];
  }else
  {
    [self pointToAngle:tempAngle Duration:0.0f];
  }
}

/*
 * pointToAngle 按角度旋轉
 * @angel CGFloat 角度
 * @duration CGFloat 動畫執行時間
 */
- (void) pointToAngle:(CGFloat) angle Duration:(CGFloat) duration
{
  CAKeyframeAnimation *anim=[CAKeyframeAnimation animationWithKeyPath:@"transform"];
  NSMutableArray *values=[NSMutableArray array];
  anim.duration = duration;
  anim.autoreverses = NO;
  anim.fillMode = kCAFillModeForwards;
  anim.removedOnCompletion= NO;

  CGFloat distance = angle/10;
  //設置轉動途徑,不能直接用 CABaseAnimation 的toValue,那樣是按最短途徑的,轉動超越180度時無法控制方向
  int i = 1;
  for(;i<=10;i++){
    [values addObject:[NSValue valueWithCATransform3D:CATransform3DRotate(CATransform3DIdentity, [self transToRadian:(gaugeAngle+distance*i)], 0, 0, 1)]];
    }
  //添加緩動效果
   [values addObject:[NSValue valueWithCATransform3D:CATransform3DRotate(CATransform3DIdentity, [self transToRadian:(gaugeAngle+distance*(i))], 0, 0, 1)]];
   [values addObject:[NSValue valueWithCATransform3D:CATransform3DRotate(CATransform3DIdentity, [self transToRadian:(gaugeAngle+distance*(i-2))], 0, 0, 1)]];
   [values addObject:[NSValue valueWithCATransform3D:CATransform3DRotate(CATransform3DIdentity, [self transToRadian:(gaugeAngle+distance*(i-1))], 0, 0, 1)]];

  anim.values=values; ;
  [pointer.layer addAnimation:anim forKey:@"cubeIn"];

  gaugeAngle = gaugeAngle+angle;

}

/*
 * parseToX 角度轉弧度
 * @angel CGFloat 角度
 */
-(CGFloat)transToRadian:(CGFloat)angel
{
  return angel*M_PI/180;
}


/*
 * parseToX 依據角度,半徑計算X坐標
 * @radius CGFloat 半徑
 * @angle CGFloat 角度
 */
- (CGFloat) parseToX:(CGFloat) radius Angle:(CGFloat)angle
{
  CGFloat tempRadian = [self transToRadian:angle];
  return radius*cos(tempRadian);
}

/*
 * parseToY 依據角度,半徑計算Y坐標
 * @radius CGFloat 半徑
 * @angle CGFloat 角度
 */
- (CGFloat) parseToY:(CGFloat) radius Angle:(CGFloat)angle
{
  CGFloat tempRadian = [self transToRadian:angle];
  return radius*sin(tempRadian);
}

/*
 * parseToAngle 依據數據計算需求轉動的角度
 * @val CGFloat 要挪動到的數值
 */
-(CGFloat) parseToAngle:(CGFloat) val
{
  //異常的數據
  if(val<minNum){
    return minNum;
  }else if(val>maxNum){
    return maxNum;
  }
  CGFloat temp =(val-gaugeValue)*angleperValue;
  return temp;
}

/*
 * parseToValue 依據角度計算數值
 * @val CGFloat 要挪動到的角度
 */
-(CGFloat) parseToValue:(CGFloat) val
{
  CGFloat temp=val/angleperValue;
  CGFloat temp2=maxNum/2+temp;
  if(temp2>maxNum){
    return maxNum;
  }else if(temp2<maxNum){
    return maxNum;
  }
  return temp2;
}

- (void)drawRect:(CGRect)rect
{
  //獲取上下文
  context = UIGraphicsGetCurrentContext();
  //設置背景通明
  CGContextSetFillColorWithColor(context,self.backgroundColor.CGColor);
  CGContextFillRect(context, rect);
  //繪制儀表背景
  [[self gaugeView ]draWinRect:self.bounds];
  //繪制刻度
  [self setLineMark:CELLNUM*CELLMARKNUM];

  CGContextStrokePath(context);
}

@end
Demo的下載地址:http://xiazai.jb51.net/201701/yuanma/GaugeDemo_jb51.rar
以上就是本文的全部內容,希望對大家的學習有所協助,也希望大家多多支持本站。
【IOS上完成的自定義儀表盤示例】的相關資料介紹到這裡,希望對您有所幫助! 提示:不會對讀者因本文所帶來的任何損失負責。如果您支持就請把本站添加至收藏夾哦!

相關文章
+
- 手把手教你完成微信藐視頻iOS代碼完成
- [iPhone高級] 基於XMPP的IOS聊天客戶端程序
- IOS成長之路-ASIFormDataRequest實現上傳圖片
- Objective-C實現無限循環輪播器
- NT_iOS筆記—NSURLConnection怎麼把http改為https
- Xcode的playground中對於SpriteKit物理對象的更新為何無效
- AFNetworking 如何POST一個JSON數據到服務器
- iphone開發適配iphone5的步驟
- iOS開發系列--通訊錄、藍牙、內購、GameCenter、iCloud、Passbook系統服務開發匯總
- iOS基礎UI控件之UIView、UITextField、UILabel、UIColor、UIButton、UIImageView