IOS 開發之操作圖庫自定義控制器
編輯:IOS開發綜合
IOS 開發之操作圖庫自定義控制器
步驟如下:
新建此類的代理屬性必須遵守的協議:
新建PhotoButtonDelegate.h如下:
//
// PhotoButtonDelegate.h
// 作業整理
//
// Created by apple on 15/9/16.
// Copyright (c) 2015年 LiuXun. All rights reserved.
//

#import <Foundation/Foundation.h>
@class ImageAndPhotos;
@protocol PhotoButtonDelegate <NSObject>

-(void) setPhotoButton:(ImageAndPhotos *) imgAndP;
@end
新建此類如下:
編輯ImageAndPhotos.h如下:
//
// ImageAndPhotos.h
// 作業整理
//
// Created by apple on 15/9/16.
// Copyright (c) 2015年 LiuXun. All rights reserved.
//

#import <Foundation/Foundation.h>
#import "PhotoButtonDelegate.h"
@class UIBaseScrollView;
@interface ImageAndPhotos : NSObject <UIAlertViewDelegate,UIActionSheetDelegate,UIImagePickerControllerDelegate,UINavigationControllerDelegate>

@property (nonatomic, strong) UIViewController *controller;
@property (nonatomic, strong) UIImage *img;
@property (nonatomic, strong) UIButton *btn;
@property (nonatomic, weak) id<PhotoButtonDelegate> delegate;


-(id)initWithControler:(UIViewController *) crtler AndButton:(UIButton *) button;
@end
編輯ImageAndPhotos.m如下:
//
// ImageAndPhotos.m
// 作業整理
//
// Created by apple on 15/9/16.
// Copyright (c) 2015年 LiuXun. All rights reserved.
//

#import "ImageAndPhotos.h"

@implementation ImageAndPhotos

-(id)initWithControler:(UIViewController *) crtler AndButton:(UIButton *) button
{
  if (self = [super init]) {
    self.controller = crtler;
    self.btn = button;
    [self CameraEvent];
  }
  return self;
}


-(void)CameraEvent
{
  [self.btn addTarget:self action:@selector(showActionSheet) forControlEvents:UIControlEventTouchUpInside];
}

-(void) showActionSheet
{
  UIActionSheet *actionSheet = [[UIActionSheet alloc] initWithTitle:nil delegate:self cancelButtonTitle:@"取消" destructiveButtonTitle:nil otherButtonTitles:@"拍照",@"我的相冊", nil nil];
  [actionSheet shoWinView:self.controller.view];
 }

// 實現UIActionSheetDelegate協議中監聽按鈕的方法
-(void) actionSheet:(UIActionSheet *)actionSheet clickedButtonAtIndex:(NSInteger)buttonIndex
{
  if (buttonIndex == 0) {
    [self addCamera];
  }
  else if(buttonIndex == 1)
  {
    [self addPhoto];
  }

}

-(void)addCamera
{
  // 判斷是否可以打開一個相機
  if ([UIImagePickerController isSourceTypeAvailable:UIImagePickerControllerSourceTypeCamera]) {
    // 創建一個調出拍照的控制器
    UIImagePickerController *picker = [[UIImagePickerController alloc] init];
    picker.delegate = self;
    picker.allowsEditing = YES;
    // 攝像頭
    NSLog(@"++++addCamera++++");
    picker.sourceType = UIImagePickerControllerSourceTypeCamera;
    [self.controller presentViewController:picker animated:YES completion:^{

    }];
  }
  else
  {
    [self showAlertView];
  }
}
-(void) addPhoto
{   // 相冊可以用模擬器打開,但是相機不可以用模擬器打開
  if ([UIImagePickerController isSourceTypeAvailable:UIImagePickerControllerSourceTypePhotoLibrary]) {
    UIImagePickerController *picker = [[UIImagePickerController alloc] init];

    picker.delegate = self;
    picker.allowsEditing = YES; // 是否可以編輯

    // 打開相冊選擇相片
    picker.sourceType = UIImagePickerControllerSourceTypePhotoLibrary; //表示管理圖庫
    [self.controller presentViewController:picker animated:YES completion:nil];

  }
  else
  {
    [self showAlertView];
  }

}

-(void)showAlertView
{
  UIAlertView *alert =[[UIAlertView alloc] initWithTitle:@"提示" message:@"你沒有攝像頭" delegate:self cancelButtonTitle:@"確定" otherButtonTitles:nil, nil nil];
  [alert show];
}

// 代理協議中的方法
// 拍攝完成後,其實是選中圖片後的方法要執行的方法,如果是照相的話則選中拍照後的相片
-(void) imagePickerController:(UIImagePickerController *)picker didFinishPickingMediaWithInfo:(NSDictionary *)info
{
  // 得到圖片
  self.img = [info objectForKey:UIImagePickerControllerEditedImage];
  // 圖片存入圖庫
  if (picker.sourceType == UIImagePickerControllerSourceTypeCamera) {
    UIImageWriteToSavedPhotosAlbum(self.img, nil, nil, nil); // 如果是相機
  }

  [self.controller dismissViewControllerAnimated:YES completion:^{
    if ([self.delegate respondsToSelector:@selector(setPhotoButton:)]) {
      [self.delegate setPhotoButton:self];
    }
  }];

}

//選中圖片點擊cancel按鈕後執行的方法
-(void)imagePickerControllerDidCancel:(UIImagePickerController *)picker
{

  [self.controller dismissViewControllerAnimated:YES completion:nil];
}


@end
此類新建完成,在自定義控件中的應用如下:(此自定義控件是一個上傳圖片的scrollVIew)
新建自定義控件類編輯UIBaseScrollView.h如下
//
// UIBaseScrollView.h
// 作業整理
//
// Created by apple on 15/9/16.
// Copyright (c) 2015年 LiuXun. All rights reserved.
//

#import "UIBaseVIew.h"
#import "ImageAndPhotos.h"


@interface UIBaseScrollView : UIBaseVIew<PhotoButtonDelegate>

@property (nonatomic, strong) NSMutableArray *arrayImgs;
@property (nonatomic, strong) UIScrollView *scroll;
@property (nonatomic, strong) ImageAndPhotos *imgChange;
@property (nonatomic, strong) UIButton *btnImg;
@property (nonatomic, strong) UIImageView *imgV;
-(id)initWithFrame:(CGRect)frame CurrenContr:(UIViewController *) crtl;

@end
編輯定義控件的.m文件如下:

[objc] view plain copy
//
// UIBaseScrollView.m
// 作業整理
//
// Created by apple on 15/9/16.
// Copyright (c) 2015年 LiuXun. All rights reserved.
//

#import "UIBaseScrollView.h"

@implementation UIBaseScrollView

-(id)initWithFrame:(CGRect)frame CurrenContr:(UIViewController *) crtl
{
  if (self = [super initWithFrame:frame]) {
    self.scroll = [[UIScrollView alloc] initWithFrame:CGRectMake(0, 0, self.frame.size.width, self.frame.size.height)];

    self.btnImg = [[UIButton alloc] initWithFrame:CGRectMake(10, 10, frame.size.height-20, frame.size.height-20)];
    [self.btnImg setImage:[UIImage imageNamed:@"tizhong_photo_increase_bj"] forState:UIControlStateNormal];

    self.imgChange = [[ImageAndPhotos alloc] initWithControler:crtl AndButton:self.btnImg];
    self.scroll.showsHorizontalScrollIndicator = YES;
    self.imgChange.delegate = self;
    [self.scroll addSubview:self.btnImg];
    [self addSubview:self.scroll];
  }
  return self;
}

-(void)setPhotoButton:(ImageAndPhotos *)imgAndP
{
  NSLog(@"%@&&&&&&&&&",self.imgChange.img);
  if (imgAndP.img) {
    self.imgV =[[UIImageView alloc] initWithFrame: self.btnImg.frame ];
    self.imgV.image = imgAndP.img;
    self.imgV.backgroundColor = [UIColor yellowColor];
    [self.scroll addSubview:self.imgV];
    self.btnImg.frame = CGRectMake(CGRectGetMaxX(self.imgV.frame)+10, self.imgV.frame.origin.y, self.imgV.frame.size.width, self.imgV.frame.size.height);
    self.scroll.contentSize = CGSizeMake(CGRectGetMaxX(imgAndP.btn.frame)+10, 0);
    if (CGRectGetMaxX(self.btnImg.frame)>self.scroll.frame.size.width) {
      self.scroll.contentOffset = CGPointMake(self.btnImg.frame.origin.x-10, 0);
    }
  }

}

@end
在控制器中使用此自定義控件如下:
UIBaseScrollView *det5 = [[UIBaseScrollView alloc] initWithFrame:CGRectMake
(20, CGRectGetMaxY(det4.frame)+20, WIDTH-40, 80) CurrenContr:self];
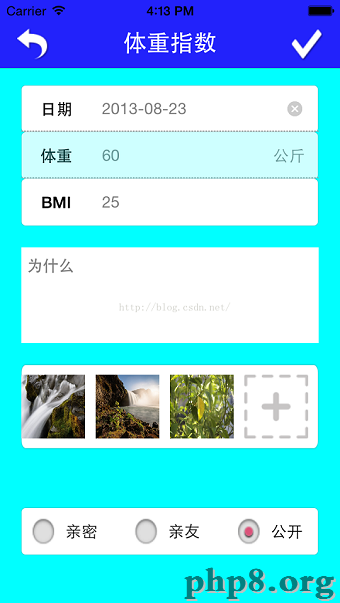
運行結果如下:
在控制器中直接使用此相冊類也與此類似,不同之處就是讓所在控制器遵守類屬性的協議,然後實現即可,在此不再奧數。
感謝閱讀,希望能幫助到大家,謝謝大家對本站的支持!
【IOS 開發之操作圖庫自定義控制器】的相關資料介紹到這裡,希望對您有所幫助! 提示:不會對讀者因本文所帶來的任何損失負責。如果您支持就請把本站添加至收藏夾哦!

相關文章
+