iOS基礎通過案例學知識之UITableView
IOS基礎——通過案例學知識之UITableView 案例一:英雄聯盟展示
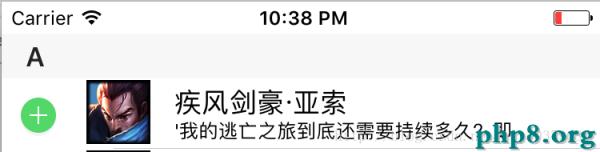
對於UITableView的知識點特別多,因為它是IOS用得最多控件之一,我會盡我最大努力和語言的組織,將所有知識點介紹到位,下面是要實現的效果圖

吐槽
與Android對比,可以說跟ListView的實現幾乎一樣,跟RecyclerView一模一樣 Android寫起來似乎比iOS復雜一點,因為iOS大部分都被封裝好了,這一點iOS做得好 對於iOS的方法的命名只能說又長又臭知識點包括
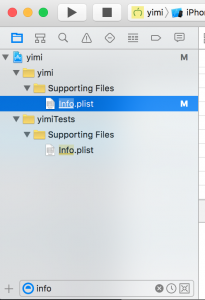
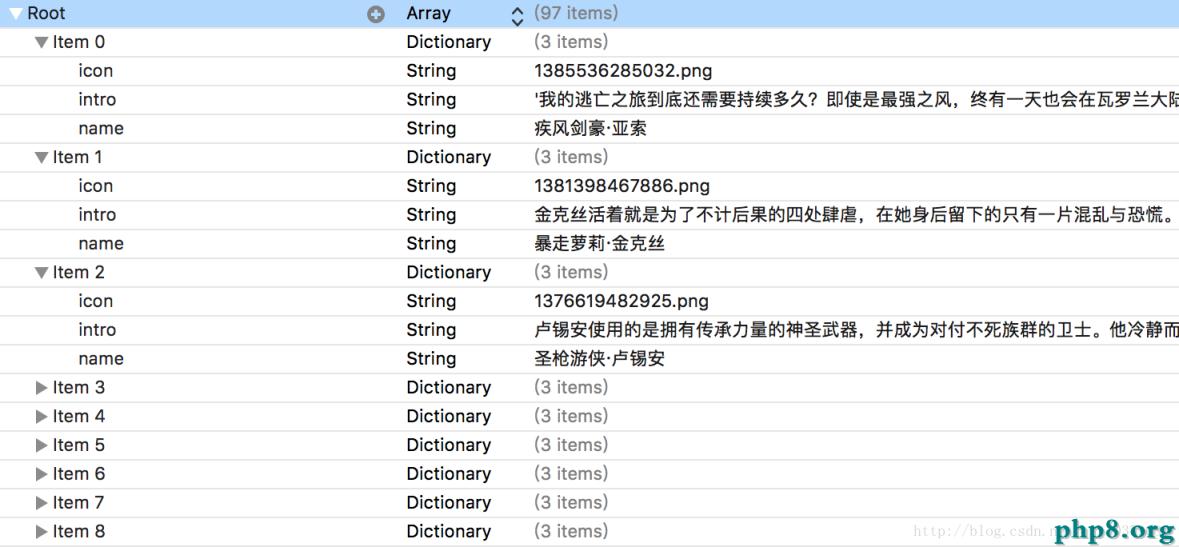
UITableView的UITableViewDataSource UITableView的UITableViewDelegate UITableView的cell的重用 一、准備工作1、准備數據源(plist)
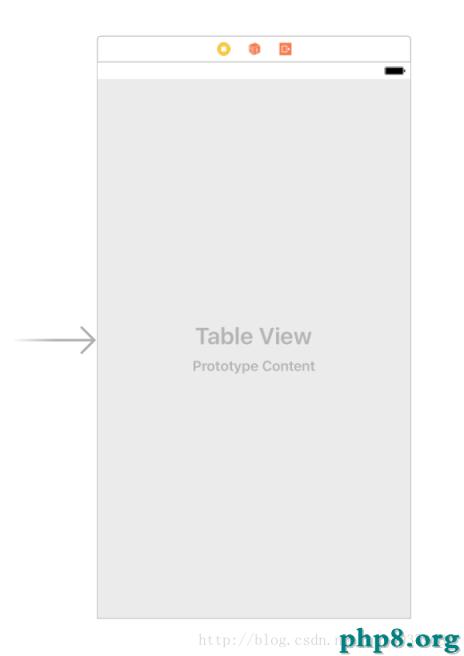
2、布局文件
分析plist數據的格式,然後創建對應的對象模型,並提供相應的初始化方法,這是mvc中經典的一個步驟
特別注意:@property中屬性不可以使用weak屬性,否則在UITableView復用機制中會被回收,導致畫面顯示不出來@interface HeroModel : NSObject
@property(nonatomic,strong) NSString *icon;
@property(nonatomic,strong) NSString *intro;
@property(nonatomic,strong) NSString *name;
-(instancetype)initWithDict:(NSDictionary *)dict;
+(instancetype)HeroModelWithDict:(NSDictionary *)dict;
@end在m文件中實現初始化方法,方法中實現字典轉換為對象
@implementation HeroModel

-(instancetype)initWithDict:(NSDictionary *)dict{
    if(self = [super init]){
        [self setValuesForKeysWithDictionary:dict];
    }
    return self;
}

+(instancetype)HeroModelWithDict:(NSDictionary *)dict{
    return [[self alloc]initWithDict:dict];
}
@end1、聲明委托代理,聲明屬性
要想UITableView有數據,那麼就必須通過它的委托代理方法才能顯示UITableView中的數據
@interface ViewController ()<UITableViewDataSource>
//存放數據的可變數組
@property (strong, nonatomic) NSMutableArray *dataArray;
//tableview
@property (strong, nonatomic) IBOutlet UITableView *tableView;
@end
2、實現屬性的轉換
毫無疑問是通過懶加載將plist的內容轉為模型存進我們聲明的可變數組中
#pragma 復寫get方法
#pragma 懶加載,讀取plist文件並轉換為模型
- (NSMutableArray *)dataArray{
    if(nil == _dataArray){
        //初始化數組
        _dataArray = [NSMutableArray array];
        //獲取plist文件路徑
        NSString *path = [[NSBundle mainBundle]pathForResource:@"heros.plist" ofType:nil];
        //讀取plist文件內容
        NSArray *tempArray = [NSArray arrayWithContentsOfFile:path];
        //遍歷plist文件內容,存到可變數組中
        for (NSDictionary * dict in tempArray) {
            HeroModel *heroModel = [HeroModel HeroModelWithDict:dict];
            [_dataArray addObject:heroModel];
        }
    }
    //返回
    return _dataArray;
}
3、交付委托
//交付委托
_tableView.dataSource = self;
4、實現代理的方法
通過實現UITableViewDataSource代理的方法,來顯示數據,類似於ListView的Adapter
#pragma UITableViewDataSource委托方法
#pragma 返回一共有多少組
-(NSInteger)numberOfSectionsInTableView:(UITableView *)tableView{
//默認返回1組
return 1;
}
#pragma UITableViewDataSource委托方法
#pragma 返回一個組由多少行
-(NSInteger)tableView:(UITableView *)tableView numberOfRowsInSection:(NSInteger)section{
//返回數據的數量
return self.dataArray.count;
}
#pragma UITableViewDataSource委托方法
#pragma 返回每一行Item的內容
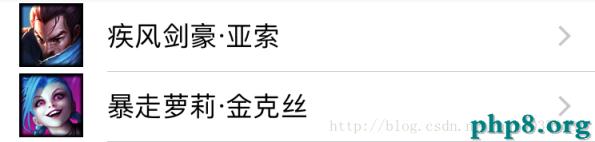
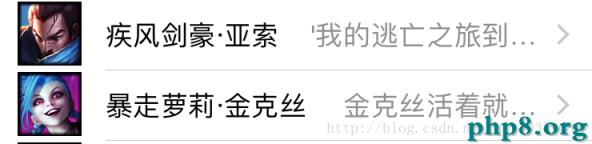
-(UITableViewCell *)tableView:(UITableView *)tableView cellForRowAtIndexPath:(NSIndexPath *)indexPath{
//創建tableview的item
UITableViewCell *cell = [[UITableViewCell alloc]initWithStyle:UITableViewCellStyleSubtitle reuseIdentifier:nil];
//通過indexPath的行屬性,取出對應的模型
HeroModel *heroModel = _dataArray[indexPath.row];
//設置文本信息
cell.textLabel.text = heroModel.name;
//設置圖片信息
UIImage *image = [UIImage imageNamed:heroModel.icon];
cell.imageView.image = image;
//設置詳細信息文本
cell.detailTextLabel.text = heroModel.intro;
//設置最右邊的箭頭
cell.AccessoryType = UITableViewCellAccessoryDisclosureIndicator;
//返回
return cell;
}① UITableView的顯示有兩種方式,在storyboard中可以設置
1.plain:數據平鋪顯示,中間沒有空隙,數組的頭標題有懸浮效果
2.group:數據分組顯示,中間留有空隙
② UITableViewDataSource的委托方法,程序會按以下順序執行
numberOfSectionsInTableView:數據中有呈多少組展示(可選實現,默認返回1組) numberOfRowsInSection:數據中每組有多少行(必須實現,否則會報錯) cellForRowAtIndexPath:數據中每行的內容(必須實現,否則會報錯)③ UITableViewCell的四種樣式
1.UITableViewCellStyleDefault
2.UITableViewCellStyleValue1
3.UITableViewCellStyleValue2

4.UITableViewCellStyleSubtitle

④ cell.AccessoryType的五種樣式,用得不多就不解釋了
UITableViewCellAccessoryNone UITableViewCellAccessoryDisclosureIndicator UITableViewCellAccessoryDetailDisclosureButton UITableViewCellAccessoryCheckmark UITableViewCellAccessoryDetailButton5、UITableViewDataSource其他代理方法
這兩個代理方法會在group樣式上展示得比較清晰
#pragma UITableViewDataSource委托方法
#pragma 返回tableview中頭部的標題
-(NSString *)tableView:(UITableView *)tableView titleForHeaderInSection:(NSInteger)section{
    return @"header";
}

#pragma UITableViewDataSource委托方法
#pragma 返回tableview中底部的標題
-(NSString *)tableView:(UITableView *)tableView titleForFooterInSection:(NSInteger)section{
    return @"footer";
}
6、cell的重用
cell與ListView的Item中是一樣的,它也是要對Item進行重用的 這裡的重用主要是用到重用標識符 在cellForRowAtIndexPath方法中改一下cell的創建代碼即可//重用標識符,需要用static修飾,避免多次分配內存給NSString
static NSString *identifier = @"h1";
//從緩存池中取出tableview的item
UITableViewCell *cell = [tableView dequeueReusableCellWithIdentifier:identifier];
//創建cell
if(nil == cell){
cell = [[UITableViewCell alloc]initWithStyle:UITableViewCellStyleSubtitle reuseIdentifier:identifier];
}7、tableView的屬性介紹
_tableView.separatorColor:分割線顏色 _tableView.separatorInset:分割線縮進 _tableView.separatorStyle:分割線類型 _tableView.allowsMultipleSelection:允許選項多選 _tableView.tableHeaderView:可以添加一個在頭部的View _tableView.tableFooterView:可以添加一個在底部的View _tableView.sectionHeaderHeight:每個組的間隔8、實現cell的點擊事件
① 聲明委托與交付委托
cell的點擊事件是在UITableViewDelegate的實現方法
//聲明委托
@interface ViewController ()<UITableViewDataSource,UITableViewDelegate>
//交付委托
_tableView.delegate = self;
② 實現點擊事件函數
#pragma UITableViewDelegate委托方法
#pragma 反選數據時調用
-(void)tableView:(UITableView *)tableView didDeselectRowAtIndexPath:(NSIndexPath *)indexPath{

}

#pragma UITableViewDelegate委托方法
#pragma 選擇數據時調用
-(void)tableView:(UITableView *)tableView didSelectRowAtIndexPath:(NSIndexPath *)indexPath{

}
9、實現cell的編輯模式和cell的增加插入
cell的編輯模式和cell的增加插入也是在UITableViewDelegate的實現方法
#pragma UITableViewDelegate委托方法
#pragma 決定哪一行可進入編輯模式
-(BOOL)tableView:(UITableView *)tableView canEditRowAtIndexPath:(NSIndexPath *)indexPath{
    if(indexPath.row == 2){
        return NO;
    }else{
        return YES;
    }
}

#pragma UITableViewDelegate委托方法
#pragma 點擊delete和insert的回調函數,該函數同時回開啟側滑刪除功能
-(void)tableView:(UITableView *)tableView commitEditingStyle:(UITableViewCellEditingStyle)editingStyle forRowAtIndexPath:(NSIndexPath *)indexPath{
    if(editingStyle == UITableViewCellEditingStyleDelete){
        //刪除數組中的數據
        [_dataArray removeObjectAtIndex:indexPath.row];
        //tableview完成刪除操作,更新UI
        [_tableView deleteRowsAtIndexPaths:@[indexPath] withRowAnimation:UITableViewRowAnimationLeft];
    }else if(editingStyle == UITableViewCellEditingStyleInsert){
        //模擬添加數據
        HeroModel *hero = [[HeroModel alloc]init];
        hero.name = @"寒冰射手";
        //添加到數組中
        [_dataArray insertObject:hero atIndex:indexPath.row];
        //tableview完成添加操作,更新UI
        [_tableView insertRowsAtIndexPaths:@[indexPath] withRowAnimation:UITableViewRowAnimationRight];
    }
}

#pragma UITableViewDelegate委托方法
#pragma 決定哪一行開啟的編輯模式是插入模式還是刪除模式
-(UITableViewCellEditingStyle)tableView:(UITableView *)tableView editingStyleForRowAtIndexPath:(NSIndexPath *)indexPath{
    if(indexPath.row <= 5){
        return UITableViewCellEditingStyleInsert;
    }else{
        return UITableViewCellEditingStyleDelete;
    }
}

#pragma UITableViewDelegate委托方法
#pragma 刪除模式下的刪除按鈕文字顯示
-(NSString *)tableView:(UITableView *)tableView titleForDeleteConfirmationButtonForRowAtIndexPath:(NSIndexPath *)indexPath{
    return @"蹦瞎卡拉卡";
}
① UITableViewDelegate的委托方法
canEditRowAtIndexPath:允許哪一行開啟編輯模式 commitEditingStyle:點擊事件的回調,同時開啟側滑刪除 editingStyleForRowAtIndexPath:決定哪一行的編輯模式② indexPath屬性
indexPath.row:行的索引 indexPath.section:組的索引③ 編輯模式動畫,大家看名字應該都可以猜得出
UITableViewRowAnimationFade UITableViewRowAnimationRight UITableViewRowAnimationLeft UITableViewRowAnimationTop UITableViewRowAnimationBottom UITableViewRowAnimationNone UITableViewRowAnimationMiddle UITableViewRowAnimationAutomatic④ 最後只要開啟編輯模式
_tableView.editing = YES;源碼下載
案例二:汽車展示這是對上面博客缺少的內容進行補充,實現的效果如圖
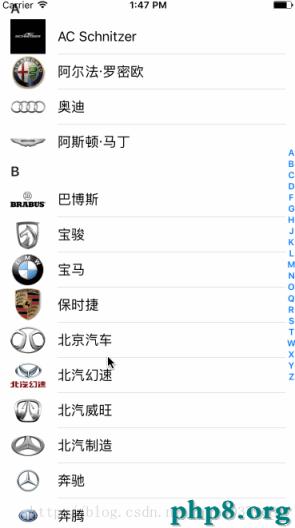
知識點
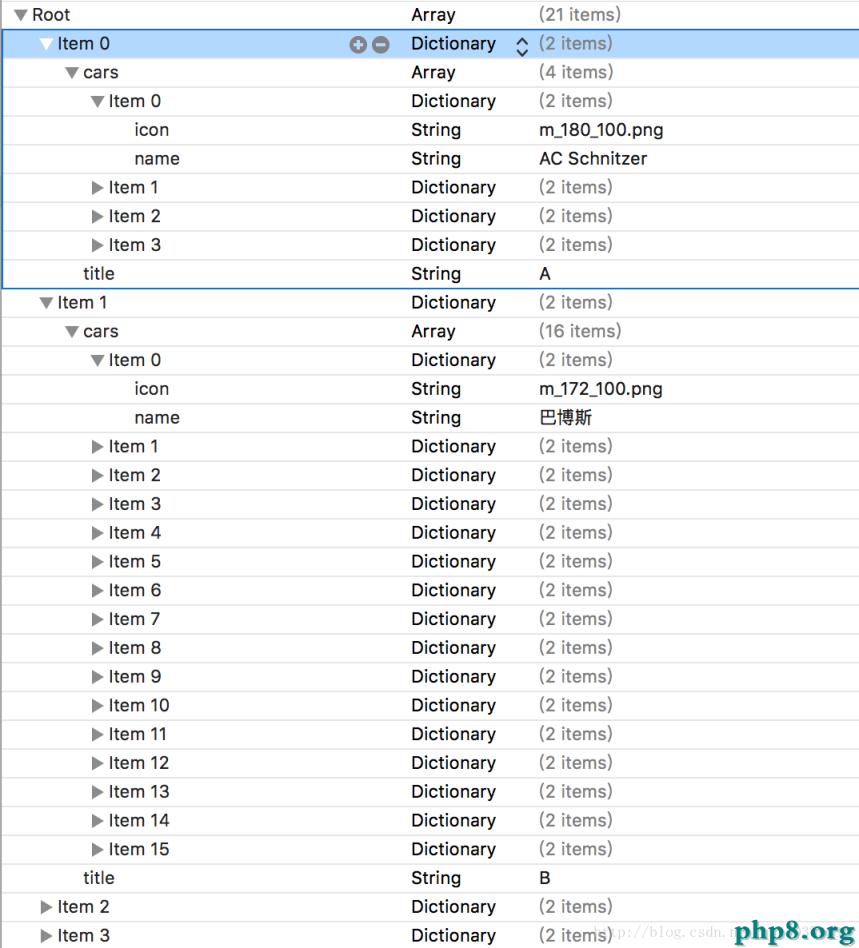
UITableViewController 側邊字母導航欄 一、准備工作1、准備數據源(plist)
2、布局文件
這次采用UITableViewController作為啟動界面,其好處是自動將UITableViewDelegate和UITableViewDataSource自動綁定到對應的m文件中

不過需要注意的是m文件中必須實現UITableViewController
@interface ViewController : UITableViewController
@end跟上篇文章一樣,分析Model中擁有的屬性,這裡包括有兩個Model,Cars和Car,分別代表多輛車的集合和單輛車的數據
Cars的h文件
@interface Cars : NSObject
@property (nonatomic,strong)NSString *title;
@property (nonatomic,strong)NSArray *cars;

-(instancetype)initWithDict:(NSDictionary *)dict;
+(instancetype)CarsModelWithDict:(NSDictionary *)dict;
@end
Cars的m文件
和Car有點區別,就是在初始化的時候,將Car的NSArray和轉換成模型
@implementation Cars
-(instancetype)initWithDict:(NSDictionary *)dict{
    if(self = [super init]){
        [self setValuesForKeysWithDictionary:dict];
        //轉換Car
        NSMutableArray *muta = [NSMutableArray array];
        for (NSDictionary *dict in self.cars) {
            Car *car = [Car CarModelWithDict:dict];
            [muta addObject:car];
        }
        self.cars = muta;
    }
    return self;
}
+(instancetype)CarsModelWithDict:(NSDictionary *)dict{
    return [[self alloc]initWithDict:dict];
}
@end
Car的h文件
@interface Car : NSObject
@property (nonatomic,strong)NSString *icon;
@property (nonatomic,strong)NSString *name;

-(instancetype)initWithDict:(NSDictionary *)dict;
+(instancetype)CarModelWithDict:(NSDictionary *)dict;
@end
Car的m文件
@implementation Car
-(instancetype)initWithDict:(NSDictionary *)dict{
    if(self = [super init]){
        [self setValuesForKeysWithDictionary:dict];
    }
    return self;
}
+(instancetype)CarModelWithDict:(NSDictionary *)dict{
    return [[self alloc]initWithDict:dict];
}
@end1、屬性聲明
@interface ViewController ()
//存放數據數組
@property (nonatomic,strong)NSMutableArray *dataArray;
//存放索引數組
@property (nonatomic,strong)NSArray *indexArray;
@end
2、plist數據的加載
#pragma 復寫set方法
#pragma 懶加載,讀取plist文件內容
-(NSArray *)dataArray{
    if(nil == _dataArray){
        //初始化數組
        _dataArray = [NSMutableArray array];
        //獲取plist文件路徑
        NSString *path = [[NSBundle mainBundle]pathForResource:@"cars_total.plist" ofType:nil];
        //讀取plist文件內容
        NSArray *tempArray = [NSArray arrayWithContentsOfFile:path];
        //遍歷plist內容存放到可變數組
        for (NSDictionary  *dict in tempArray) {
            Cars *cars = [Cars CarsModelWithDict:dict];
            [_dataArray addObject:cars];
        }
        //取出索引
        _indexArray = [_dataArray valueForKey:@"title"];
    }
    return _dataArray;
}
3、由於UITableView是繼承UITableViewController,所以可以直接使用其代理方法
#pragma UITableViewDataSource委托方法
#pragma 返回一共有多少組
-(NSInteger)numberOfSectionsInTableView:(UITableView *)tableView{
    return self.dataArray.count;
}

#pragma UITableViewDataSource委托方法
#pragma 返回一組多少行
-(NSInteger)tableView:(UITableView *)tableView numberOfRowsInSection:(NSInteger)section{
    Cars *cars = self.dataArray[section];
    return cars.cars.count;
}

#pragma UITableViewDataSource委托方法
#pragma 返回每一行Item的內容
-(UITableViewCell *)tableView:(UITableView *)tableView cellForRowAtIndexPath:(NSIndexPath *)indexPath{
    //cell的重用
    static NSString *identifier = @"car";
    UITableViewCell *cell = [tableView dequeueReusableCellWithIdentifier:identifier];
    if(nil == cell){
        cell = [[UITableViewCell alloc]initWithStyle:UITableViewCellStyleDefault reuseIdentifier:identifier];
    }
    //設置內容
    Cars *cars = self.dataArray[indexPath.section];
    Car *car = cars.cars[indexPath.row];
    UIImage *image = [UIImage imageNamed:car.icon];
    cell.textLabel.text = car.name;
    cell.imageView.image = image;
    return cell;
}

#pragma UITableViewDataSource委托方法
#pragma 返回每一組的頭部標題
-(NSString *)tableView:(UITableView *)tableView titleForHeaderInSection:(NSInteger)section{
    return _indexArray[section];
}

#pragma UITableViewDataSource委托方法
#pragma 返回右側索引值
-(NSArray<NSString *> *)sectionIndexTitlesForTableView:(UITableView *)tableView{
    return _indexArray;
}
源碼下載
以上就是iOS基礎通過案例學知識之UITableView的全文介紹,希望對您學習和使用ios應用開發有所幫助.【iOS基礎通過案例學知識之UITableView】的相關資料介紹到這裡,希望對您有所幫助! 提示:不會對讀者因本文所帶來的任何損失負責。如果您支持就請把本站添加至收藏夾哦!