iPhone開發筆記 (7) 用Layer制作圓角button
制作圓角button的方法很多這裡只介紹采用Layer的方法,隨讓layer效率上實在是不盡如人意,但是效果上絕對沒話說。
下面的代碼我是采用imageView加上透明button做的效果。直接修改button的layer我沒弄過,不過原理應該差不多。
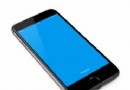
先看看效果圖

[plain]
UIImageView *imageView1 = [[UIImageView alloc] init];
imageView1.frame = CGRectMake(23.75, 16.6, 75, 75);
imageView1.image = [UIImage imageNamed:@"menu1.png"];
imageView1.layer.MasksToBounds = YES;
imageView1.layer.cornerRadius = 10.0;
imageView1.layer.borderWidth = 2;
imageView1.layer.borderColor = [[UIColor colorWithRed:161/255.0 green:47/255.0 blue:47/255.0 alpha:1] CGColor];
imageView1.backgroundColor = [UIColor colorWithRed:161/255.0 green:47/255.0 blue:47/255.0 alpha:1];
UIImageView *imageView2 = [[UIImageView alloc] init];
imageView2.frame = CGRectMake(122.5, 16.6, 75, 75);
imageView2.image = [UIImage imageNamed:@"menu2.png"];
imageView2.layer.MasksToBounds = YES;
imageView2.layer.cornerRadius = 10.0;
imageView2.layer.borderWidth = 2;
imageView2.layer.borderColor = [[UIColor colorWithRed:161/255.0 green:47/255.0 blue:47/255.0 alpha:1] CGColor];
imageView2.backgroundColor = [UIColor colorWithRed:161/255.0 green:47/255.0 blue:47/255.0 alpha:1];
UIImageView *imageView3 = [[UIImageView alloc] init];
imageView3.frame = CGRectMake(221.25, 16.6, 75, 75);
imageView3.image = [UIImage imageNamed:@"menu3.png"];
imageView3.layer.MasksToBounds = YES;
imageView3.layer.cornerRadius = 10.0;
imageView3.layer.borderWidth = 2;
imageView3.layer.borderColor = [[UIColor colorWithRed:161/255.0 green:47/255.0 blue:47/255.0 alpha:1] CGColor];
imageView3.backgroundColor = [UIColor colorWithRed:161/255.0 green:47/255.0 blue:47/255.0 alpha:1];
UIImageView *imageView4 = [[UIImageView alloc] init];
imageView4.frame = CGRectMake(23.75, 118.2, 75, 75);
imageView4.image = [UIImage imageNamed:@"menu4.png"];
imageView4.layer.MasksToBounds = YES;
imageView4.layer.cornerRadius = 10.0;
imageView4.layer.borderWidth = 2;
imageView4.layer.borderColor = [[UIColor colorWithRed:161/255.0 green:47/255.0 blue:47/255.0 alpha:1] CGColor];
imageView4.backgroundColor = [UIColor colorWithRed:161/255.0 green:47/255.0 blue:47/255.0 alpha:1];
UIImageView *imageView5 = [[UIImageView alloc] init];
imageView5.frame = CGRectMake(122.5, 118.2, 75, 75);
imageView5.image = [UIImage imageNamed:@"menu5.png"];
imageView5.layer.MasksToBounds = YES;
imageView5.layer.cornerRadius = 10.0;
imageView5.layer.borderWidth = 2;
imageView5.layer.borderColor = [[UIColor colorWithRed:161/255.0 green:47/255.0 blue:47/255.0 alpha:1] CGColor];
imageView5.backgroundColor = [UIColor colorWithRed:161/255.0 green:47/255.0 blue:47/255.0 alpha:1];
UIImageView *imageView6 = [[UIImageView alloc] init];
imageView6.frame = CGRectMake(221.25, 118.2, 75, 75);
imageView6.image = [UIImage imageNamed:@"menu6.png"];
imageView6.layer.MasksToBounds = YES;
imageView6.layer.cornerRadius = 10.0;
imageView6.layer.borderWidth = 2;
imageView6.layer.borderColor = [[UIColor colorWithRed:161/255.0 green:47/255.0 blue:47/255.0 alpha:1] CGColor];
imageView6.backgroundColor = [UIColor colorWithRed:161/255.0 green:47/255.0 blue:47/255.0 alpha:1];
- 上一頁:iPhone開發筆記(8)iPhone Simulator中的應用存放位置
- 下一頁:iPhone開發筆記 (6) [UIColor colorWithRed:(CGFloat) green:(CGFloat) blue:(CGFloat) alpha:(CGFloat)]

- iOS獲得以後裝備型號等信息(全)包括iPhone7和iPhone7P
- xcode8提交ipa掉敗沒法構建版本成績的處理計劃
- Objective-C 代碼與Javascript 代碼互相挪用實例
- iOS開辟之UIPickerView完成城市選擇器的步調詳解
- iPhone/iPad開辟經由過程LocalNotification完成iOS准時當地推送功效
- iOS法式開辟之應用PlaceholderImageView完成優雅的圖片加載後果
- iOS Runntime 靜態添加類辦法並挪用-class_addMethod
- iOS開辟之用javascript挪用oc辦法而非url
- iOS App中挪用iPhone各類感應器的辦法總結
- 實例講授iOS中的UIPageViewController翻頁視圖掌握器
- IOS代碼筆記UIView的placeholder的後果
- iOS中應用JSPatch框架使Objective-C與JavaScript代碼交互
- iOS中治理剪切板的UIPasteboard粘貼板類用法詳解
- iOS App開辟中的UIPageControl分頁控件應用小結
- 詳解iOS App中UIPickerView轉動選擇欄的添加辦法