深入講解iOS開發中應用數據的存儲方式
XML屬性列表-plist
一、應用沙盒
每個iOS應用都有⾃己的應⽤沙盒(應用沙盒就是文件系統目錄),與其他文件系統隔離。應⽤必須待在⾃己的沙盒裡,其他應用不能訪問該沙盒(提示:在IOS8中已經開放訪問)
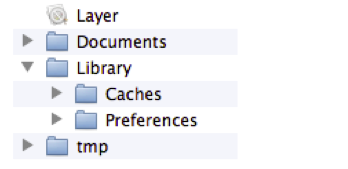
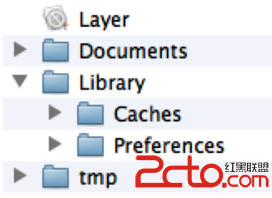
應⽤沙盒的文件系統⽬錄,如下圖所示(假設應用的名稱叫Layer)
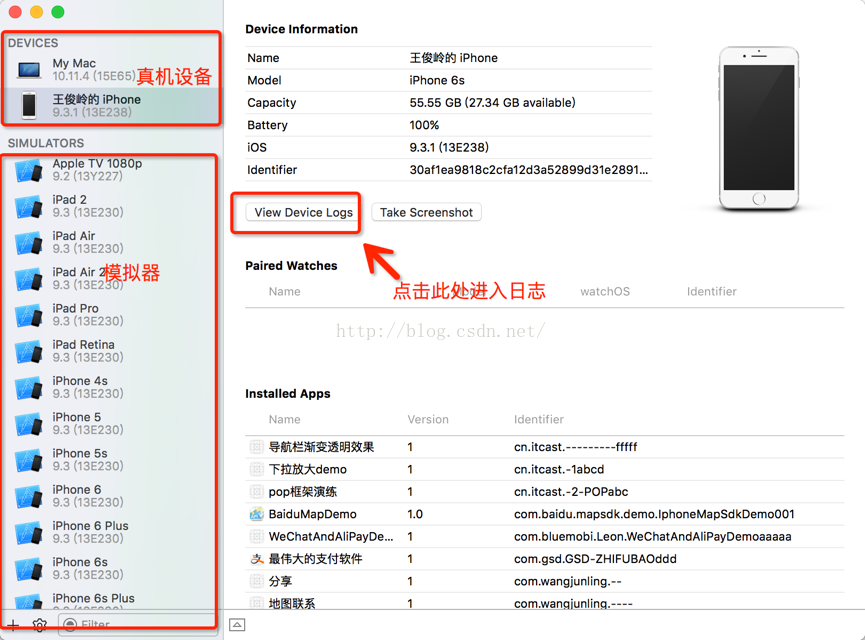
模擬器應⽤用沙盒的根路徑在: (apple是⽤用戶名, 7.0是模擬器版本) /Users/apple/Library/Application Support/iPhone Simulator/7.0/Applications
二、應用沙盒結構分析
應⽤程序包:(上圖中的Layer)包含了所有的資源文件和可執行文件
Documents:保存應⽤運行時生成的需要持久化的數據,iTunes同步設備時會備份該目錄。例如,游戲應用可將游戲存檔保存在該目錄
tmp:保存應⽤運行時所需的臨時數據,使⽤完畢後再將相應的文件從該目錄刪除。應用沒有運行時,系統也可能會清除該目錄下的文件。iTunes同步設備時 不會備份該目錄
Library/Caches:保存應用運行時⽣成的需要持久化的數據,iTunes同步設備時不會備份該目錄。⼀一般存儲體積大、不需要備份的非重要數據
Library/Preference:保存應用的所有偏好設置,iOS的Settings(設置) 應⽤會在該⺫錄中查找應⽤的設置信息。iTunes同步設備時會備份該目錄
三、應用沙盒常見的獲取方式
沙盒根目錄:NSString *home = NSHomeDirectory();
Documents:(2種⽅方式)
利用沙盒根目錄拼接”Documents”字符串
復制代碼 代碼如下:
NSString *home = NSHomeDirectory();
NSString *documents = [home stringByAppendingPathComponent:@"Documents"]; // 不建議采用,因為新版本的操作系統可能會修改目錄名
利用NSSearchPathForDirectoriesInDomains函數
復制代碼 代碼如下:
// NSUserDomainMask 代表從用戶文件夾下找
// YES 代表展開路徑中的波浪字符“~”
NSArray *array = NSSearchPathForDirectoriesInDomains(NSDocumentDirectory, NSUserDomainMask, NO); // 在iOS中,只有一個目錄跟傳入的參數匹配,所以這個集合裡面只有一個元素
NSString *documents = [array objectAtIndex:0];
tmp:NSString *tmp = NSTemporaryDirectory();
Library/Caches:(跟Documents類似的2種⽅方法)
利用沙盒根目錄拼接”Caches”字符串
利⽤NSSearchPathForDirectoriesInDomains函數(將函數的第2個參數改 為:NSCachesDirectory即可)
Library/Preference:通過NSUserDefaults類存取該目錄下的設置信息
相應的代碼:
復制代碼 代碼如下:
#import "NJViewController.h"
#import "NJPerson.h"
@interface NJViewController ()
- (IBAction)saveDataBtnClick:(id)sender;
- (IBAction)readDataBtnClick:(id)sender;
@end
復制代碼 代碼如下:
@implementation NJViewController
/**
* 點擊保存按鈕
*/
- (IBAction)saveDataBtnClick:(id)sender {
// youtube做法
// NSString *path = @"/Users/apple/Library/Application Support/iPhone Simulator/7.1/Applications/A6D53E11-DDF0-4392-B2D4-FE77A96888A6/Documents/abc.plist";
// 獲取應用程序根目錄
NSString *home = NSHomeDirectory();
// 不建議寫/
//NSString *path = [home stringByAppendingString:@"/Documents"];
// 不建議Documents寫死
//NSString *path = [home stringByAppendingPathComponent:@"Documents"];
// NSUserDomainMask 在用戶目錄下查找
// YES 代表用戶目錄的~
// NSDocumentDirectory 查找Documents文件夾
// 建議使用如下方法動態獲取
NSString *doc = [NSSearchPathForDirectoriesInDomains(NSDocumentDirectory, NSUserDomainMask, YES) lastObject];
// 拼接文件路徑
NSString *path = [doc stringByAppendingPathComponent:@"abc.plist"];
NSLog(@"%@", path);
//NSArray *arr = @[@"lnj", @"28"];
//[arr writeToFile:path atomically:YES];
// NSDictionary *dict = @{@"name": @"lnj", @"age":@"28"};
// 調用writeToFile將數據寫入文件
// [dict writeToFile:path atomically:YES];
/*
plist只能存儲系統自帶的一些常規的類, 也就是有writeToFile方法的對象才可以使用plist保存數據
字符串/字典/數據/NSNumber/NSData ...
*/
// 自定義的對象不能保存到plist中
NJPerson *p = [[NJPerson alloc] init];
p.name =@"lnj";
NSDictionary *dict = @{@"person": @"abc"};
[dict writeToFile:path atomically:YES];
}
/**
* 點擊讀取按鈕
*/
- (IBAction)readDataBtnClick:(id)sender {
NSString *doc = [NSSearchPathForDirectoriesInDomains(NSDocumentDirectory, NSUserDomainMask, YES) lastObject];
NSString *path = [doc stringByAppendingPathComponent:@"abc.plist"]
;
// 讀取數據
NSDictionary *dict = [NSDictionary dictionaryWithContentsOfFile:path];
NSLog(@"%@", dict);
}
@end
四、屬性列表
屬性列表是一種XML格式的文件,拓展名為plist
如果對象是NSString、NSDictionary、NSArray、NSData、 NSNumber等類型,就可以使用writeToFile:atomically:⽅法 直接將對象寫到屬性列表文件中
NSKeydeArchiver歸檔
一、簡單說明
在使用plist進行數據存儲和讀取,只適用於系統自帶的一些常用類型才能用,且必須先獲取路徑相對麻煩;
偏好設置(將所有的東西都保存在同一個文件夾下面,且主要用於存儲應用的設置信息)
歸檔:因為前兩者都有一個致命的缺陷,只能存儲常用的類型。歸檔可以實現把自定義的對象存放在文件中。
二、代碼示例
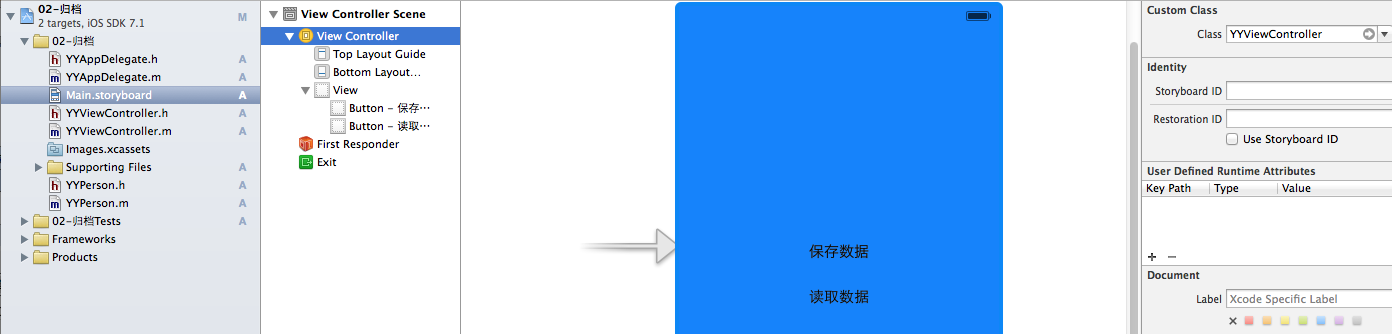
1.文件結構
復制代碼 代碼如下:
//
// YYViewController.m
// 02-歸檔
//
// Created by apple on 14-6-7.
// Copyright (c) 2014年 itcase. All rights reserved.
//
#import "YYViewController.h"
#import "YYPerson.h"
@interface YYViewController ()
- (IBAction)saveBtnOnclick:(id)sender;
- (IBAction)readBtnOnclick:(id)sender;
@end
復制代碼 代碼如下:
@implementation YYViewController
- (void)viewDidLoad
{
[super viewDidLoad];
}
- (IBAction)saveBtnOnclick:(id)sender {
//1.創建對象
YYPerson *p=[[YYPerson alloc]init];
p.name=@"文頂頂";
p.age=23;
p.height=1.7;
//2.獲取文件路徑
NSString *docPath=[NSSearchPathForDirectoriesInDomains(NSDocumentDirectory, NSUserDomainMask, YES)lastObject];
NSString *path=[docPath stringByAppendingPathComponent:@"person.yangyang"];
NSLog(@"path=%@",path);
//3.將自定義的對象保存到文件中
[NSKeyedArchiver archiveRootObject:p toFile:path];
}
- (IBAction)readBtnOnclick:(id)sender {
//1.獲取文件路徑
NSString *docPath=[NSSearchPathForDirectoriesInDomains(NSDocumentDirectory, NSUserDomainMask, YES)lastObject];
NSString *path=[docPath stringByAppendingPathComponent:@"person.yangyang"];
NSLog(@"path=%@",path);
//2.從文件中讀取對象
YYPerson *p=[NSKeyedUnarchiver unarchiveObjectWithFile:path];
NSLog(@"%@,%d,%.1f",p.name,p.age,p.height);
}
@end
新建一個person類
YYPerson.h文件
復制代碼 代碼如下:
//
// YYPerson.h
// 02-歸檔
//
// Created by apple on 14-6-7.
// Copyright (c) 2014年 itcase. All rights reserved.
//
#import <Foundation/Foundation.h>
// 如果想將一個自定義對象保存到文件中必須實現NSCoding協議
@interface YYPerson : NSObject<NSCoding>
//姓名
@property(nonatomic,copy)NSString *name;
//年齡
@property(nonatomic,assign)int age;
//身高
@property(nonatomic,assign)double height;
@end
YYPerson.m文件
復制代碼 代碼如下:
//
// YYPerson.m
// 02-歸檔
//
// Created by apple on 14-6-7.
// Copyright (c) 2014年 itcase. All rights reserved.
//
#import "YYPerson.h"
@implementation YYPerson
// 當將一個自定義對象保存到文件的時候就會調用該方法
// 在該方法中說明如何存儲自定義對象的屬性
// 也就說在該方法中說清楚存儲自定義對象的哪些屬性
-(void)encodeWithCoder:(NSCoder *)aCoder
{
NSLog(@"調用了encodeWithCoder:方法");
[aCoder encodeObject:self.name forKey:@"name"];
[aCoder encodeInteger:self.age forKey:@"age"];
[aCoder encodeDouble:self.height forKey:@"height"];
}
// 當從文件中讀取一個對象的時候就會調用該方法
// 在該方法中說明如何讀取保存在文件中的對象
// 也就是說在該方法中說清楚怎麼讀取文件中的對象
-(id)initWithCoder:(NSCoder *)aDecoder
{
NSLog(@"調用了initWithCoder:方法");
//注意:在構造方法中需要先初始化父類的方法
if (self=[super init]) {
self.name=[aDecoder decodeObjectForKey:@"name"];
self.age=[aDecoder decodeIntegerForKey:@"age"];
self.height=[aDecoder decodeDoubleForKey:@"height"];
}
return self;
}
@end
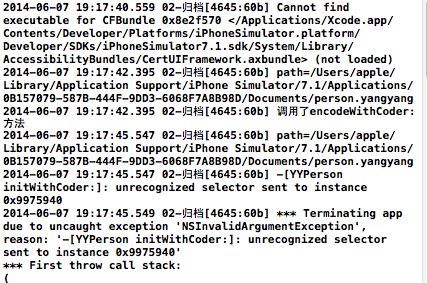
3.打印效果和兩個重要的錯誤提示
點擊保存按鈕和讀取按鈕,成功打印結果如下:

關於不實現兩個協議方法的錯誤提示:
-(void)encodeWithCoder:(NSCoder *)aCoder方法:
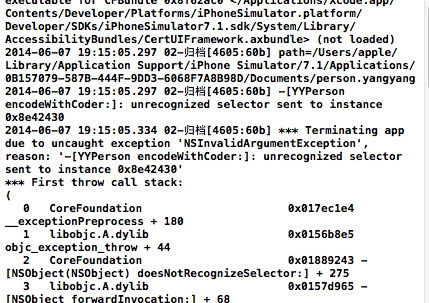
-(id)initWithCoder:(NSCoder *)aDecoder方法:
三、繼承類中的使用
新建一個學生類,讓這個類繼承自Preson這個類,增加一個體重的屬性。
YYstudent.h文件
復制代碼 代碼如下:
//
// YYstudent.h
// 02-歸檔
//
// Created by apple on 14-6-7.
// Copyright (c) 2014年 itcase. All rights reserved.
//
#import "YYPerson.h"
@interface YYstudent : YYPerson
//增加一個體重屬性
@property(nonatomic,assign) double weight;
@end
YYstudent.m文件
復制代碼 代碼如下:
//
// YYstudent.m
// 02-歸檔
//
// Created by apple on 14-6-7.
// Copyright (c) 2014年 itcase. All rights reserved.
//
#import "YYstudent.h"
@implementation YYstudent
//在子類中重寫這兩個方法
- (void)encodeWithCoder:(NSCoder *)aCoder
{
[super encodeWithCoder:aCoder];
NSLog(@"調用了YYStudent encodeWithCoder");
[aCoder encodeFloat:self.weight forKey:@"weight"];
}
- (id)initWithCoder:(NSCoder *)aDecoder
{
if (self = [super initWithCoder:aDecoder]) {
NSLog(@"調用了YYstudent initWithCoder");
self.weight = [aDecoder decodeFloatForKey:@"weight"];
}
return self;
}
@end
YYViewController.m文件
復制代碼 代碼如下:
//
// YYViewController.m
// 02-歸檔
//
// Created by apple on 14-6-7.
// Copyright (c) 2014年 itcase. All rights reserved.
//
#import "YYViewController.h"
#import "YYPerson.h"
#import "YYstudent.h"
@interface YYViewController ()
- (IBAction)saveBtnOnclick:(id)sender;
- (IBAction)readBtnOnclick:(id)sender;
@end
復制代碼 代碼如下:
@implementation YYViewController
- (void)viewDidLoad
{
[super viewDidLoad];
}
- (IBAction)saveBtnOnclick:(id)sender {
//1.創建對象
// YYPerson *p=[[YYPerson alloc]init];
// p.name=@"文頂頂";
// p.age=23;
// p.height=1.7;
YYstudent *s=[[YYstudent alloc]init];
s.name=@"wendingding";
s.age=23;
s.height=1.7;
s.weight=62;
//2.獲取文件路徑
NSString *docPath=[NSSearchPathForDirectoriesInDomains(NSDocumentDirectory, NSUserDomainMask, YES)lastObject];
NSString *path=[docPath stringByAppendingPathComponent:@"person.yangyang"];
NSLog(@"path=%@",path);
//3.將自定義的對象保存到文件中
// [NSKeyedArchiver archiveRootObject:p toFile:path];
[NSKeyedArchiver archiveRootObject:s toFile:path];
}
- (IBAction)readBtnOnclick:(id)sender {
//1.獲取文件路徑
NSString *docPath=[NSSearchPathForDirectoriesInDomains(NSDocumentDirectory, NSUserDomainMask, YES)lastObject];
NSString *path=[docPath stringByAppendingPathComponent:@"person.yangyang"];
NSLog(@"path=%@",path);
//2.從文件中讀取對象
// YYPerson *p=[NSKeyedUnarchiver unarchiveObjectWithFile:path];
// NSLog(@"%@,%d,%.1f",p.name,p.age,p.height);
YYstudent *s=[NSKeyedUnarchiver unarchiveObjectWithFile:path];
NSLog(@"%@,%d,%.1f,%f",s.name,s.age,s.height,s.weight);
}
@end
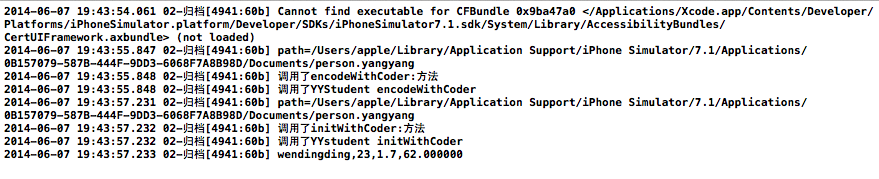
點擊保存按鈕和讀取按鈕後的打印輸出:
四、重要說明
1.保存數據過程:
復制代碼 代碼如下:
//1.創建對象
YYstudent *s=[[YYstudent alloc]init];
s.name=@"wendingding";
s.age=23;
s.height=1.7;
s.weight=62;
//2.獲取文件路徑
NSString *docPath=[NSSearchPathForDirectoriesInDomains(NSDocumentDirectory, NSUserDomainMask, YES)lastObject];
NSString *path=[docPath stringByAppendingPathComponent:@"person.yangyang"];
NSLog(@"path=%@",path);
//3.將自定義的對象保存到文件中
[NSKeyedArchiver archiveRootObject:s toFile:path];
2.讀取數據過程:
復制代碼 代碼如下:
//1.獲取文件路徑
NSString *docPath=[NSSearchPathForDirectoriesInDomains(NSDocumentDirectory, NSUserDomainMask, YES)lastObject];
NSString *path=[docPath stringByAppendingPathComponent:@"person.yangyang"];
//2.從文件中讀取對象
YYstudent *s=[NSKeyedUnarchiver unarchiveObjectWithFile:path];
3.遵守NSCoding協議,並實現該協議中的兩個方法。
4.如果是繼承,則子類一定要重寫那兩個方法。因為person的子類在存取的時候,會去子類中去找調用的方法,沒找到那麼它就去父類中找,所以最後保存和讀取的時候新增加的屬性會被忽略。需要先調用父類的方法,先初始化父類的,再初始化子類的。
5.保存數據的文件的後綴名可以隨意命名。
6.通過plist保存的數據是直接顯示的,不安全。通過歸檔方法保存的數據在文件中打開是亂碼的,更安全。

- 有關 __weak, __strong, __unsafe__unretained以及 __autoreleasing的一些深入思考
- iOS經典講解之變更Xcode checkout項目的svn地址
- iOS開發深入了解宏定義#define
- iOS版《微軟小娜》v1.9.10更新:深入適配iOS10
- 深入體驗iOS8 十招加強iPhone隱私保護
- 深入淺出 React Native:使用 JavaScript 構建原生應用
- 深入理解RunLoop
- Autolayout的奧秘 Part1 聽譯加講解第一篇
- RACSignal的Subscription深入分析
- 源碼推薦(7.27):仿城覓2.0 附博客講解及超全注釋,聊天UI
- 這些 iOS 面試基礎題目,你都深入了解嗎?
- 深入理解dispatch_queue
- 深入探究Swift數組背後的協議、方法、拓展
- 深入淺出
- 深入淺出-iOS函數式編程的實現 && 響應式編程概念