iOS應用UI開發中的字體和按鈕控件使用指南
UILabel的使用
一、初始化
復制代碼 代碼如下:
UILabel *myLabel = [[UILabel alloc] initWithFrame:CGRectMake(40, 40, 120, 44)];
[self.view addSubview:myLabel];
二、設置文字
①、設置默認文本
復制代碼 代碼如下:
NSString *text = @"標簽文本";
myLabel.text = text;
效果:

②、設置標簽文本(此屬性是iOS6.0之後才出現,如若不是必要,不建議使用此屬性)
復制代碼 代碼如下:
NSString *text = @"其實沒什麼";
NSMutableAttributedString *attributeString = [[NSMutableAttributedString alloc] initWithString:text];
[attributeString setAttributes:@{NSForegroundColorAttributeName : [UIColor redColor], NSFontAttributeName : [UIFont systemFontOfSize:17]} range:NSMakeRange(2, 1)];
myLabel.attributedText = attributeString;
效果:

關鍵字標紅的效果
復制代碼 代碼如下:
NSString *keyword = @"腳本";
NSString *result = @"本站";
// 設置標簽文字
NSMutableAttributedString *attrituteString = [[NSMutableAttributedString alloc] initWithString:result];
// 獲取標紅的位置和長度
NSRange range = [result rangeOfString:keyword];
// 設置標簽文字的屬性
[attrituteString setAttributes:@{NSForegroundColorAttributeName : [UIColor redColor], NSFontAttributeName : [UIFont systemFontOfSize:17]} range:range];
// 顯示在Label上
label.attributedText = attrituteString;
③、設置字體,如果是使用②中的文本,那在設置AttributeString的屬性時已經設置過Font了和textColor了,直接使用①設置文本時設置文本時,設置字體方法
復制代碼 代碼如下:
myLabel.font = [UIFont systemFontOfSize:13];
④、設置顏色
復制代碼 代碼如下:
myLabel.textColor = [UIColor blueColor];
⑤、設置對齊方式
復制代碼 代碼如下:
myLabel.textAlignment = NSTextAlignmentCenter;//居中
NSTextAlignmentLeft //左對齊
NSTextAlignmentCenter //居中
NSTextAlignmentRight //右對齊
NSTextAlignmentJustified//最後一行自然對齊
NSTextAlignmentNatural //默認對齊腳本
NSTextAlignmentJustified和 NSTextAlignmentNatural用的時候會報錯,程序崩潰,暫時不知道什麼時候可以使用,希望知道的指教一下,感激不盡。
⑥、文字剪裁方式
復制代碼 代碼如下:
NSLineBreakByWordWrapping = 0,//以空格為邊界,保留單詞
NSLineBreakByCharWrapping, //保留整個字符
NSLineBreakByClipping, //簡單剪裁,到邊界為止
NSLineBreakByTruncatingHead, //按照"……文字"顯示
NSLineBreakByTruncatingTail, //按照"文字……文字"顯示
NSLineBreakByTruncatingMiddle //按照"文字……"顯示
myLabel.lineBreakMode = NSLineBreakByTruncatingHead;
⑦、設置Label enabled屬性
如果設置為No,則文字顏色會變暗,表明其是不可用的,默認值為YES。
復制代碼 代碼如下:
myLabel.enabled = NO;
三、匹配Label上的文字
①、是否根據文本寬度改變字體大小
復制代碼 代碼如下:
myLabel.adjustsFontSizeToFitWidth = YES;
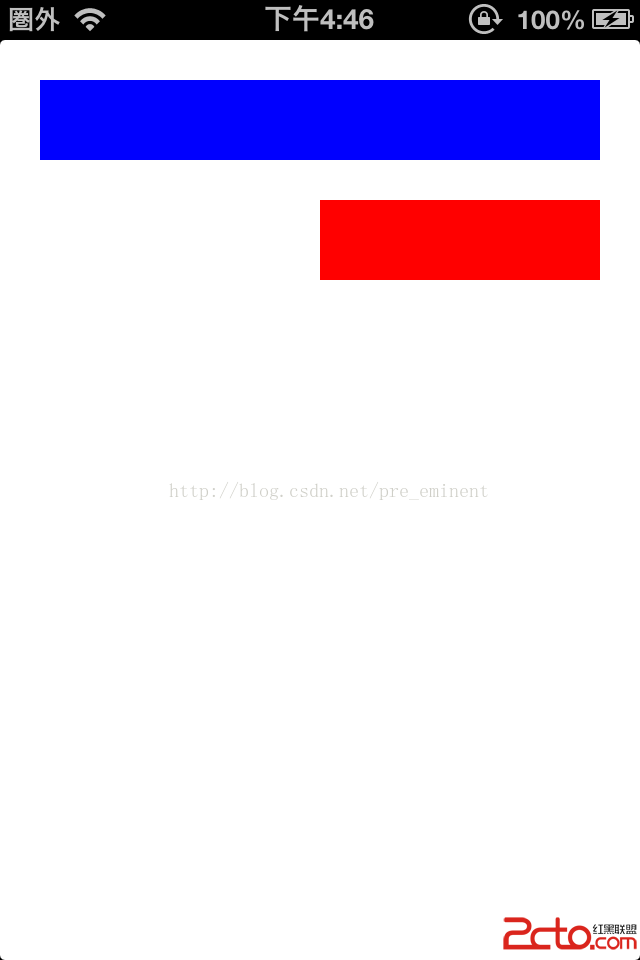
假設文字內容為@"曾在月光之下望煙花,曾共看夕陽漸降下",Label長度為200,則一行顯示不下,若設置此屬性為YES,則會降低字體大小,以顯示全部內容。
前後對比:


②、改變字母之間的間距來適應label大小
當這個屬性是YES,標簽可能改變標簽文本的字母間距,以使該文本更適合標簽的邊界內。此屬性的字符串,而不管當前行的行的裁剪模式。該屬性的默認值是NO。
復制代碼 代碼如下:
myLabel.adjustsLetterSpacingToFitWidth = NO;
個人使用了一下,沒發現有什麼區別,不知道具體是什麼時候發揮作用。
③、設置對齊基線
復制代碼 代碼如下:
myLabel.adjustsFontSizeToFitWidth = YES;//調整基線位置需將此屬性設置為YES
myLabel.baselineAdjustment = UIBaselineAdjustmentAlignBaselines;
此屬性有三個值可選
復制代碼 代碼如下:
UIBaselineAdjustmentAlignBaselines //文本最上端與Label中線對齊,默認值
UIBaselineAdjustmentAlignCenters //文本中線與Label中線對齊
UIBaselineAdjustmentNone //文本最下端與Label中線對齊
④、最小字體大小,當字體小於這個最小值時無效,顯示此屬性值
iOS6.0之前:minimumFontSize
iOS6.0之後:minimumScaleFactor
myLabel.minimumScaleFactor = 10.0;//默認值為0,為當前字體大小
⑤、行數
復制代碼 代碼如下:
myLabel.numberOfLines = 2;//Label行數
⑥、高亮
復制代碼 代碼如下:
myLabel.highlighted = YES;//是否高亮
myLabel.highlightedTextColor = [UIColor redColor];//高亮顏色;此屬性在設置按鈕的titleLabel時,無論highlighted是YES還是NO,在按鈕按下時標題都顯示此高亮顏色
⑦、陰影
復制代碼 代碼如下:
myLabel.shadowColor = [UIColor grayColor];//陰影顏色,默認為nil
myLabel.shadowOffset = CGSizeMake(1, 1);//陰影的偏移點
四、Label位置
①、計算UIlabel 隨字體多行後的高度
復制代碼 代碼如下:
CGRect result,bounds;
bounds = CGRectMake(0, 0,200, 300);
heightLabel = [myLabel textRectForBounds:bounds limitedToNumberOfLines:20];//計算20行後的Label的Frame
NSLog(@"%f",heightLabel.size.height);
②、繪制text到指定區域
復制代碼 代碼如下:
- (void)drawTextInRect:(CGRect)rect
//需要重載此方法,然後由子類調用,重寫時調用super可以按默認圖形屬性繪制,若自己完全重寫繪制函數,就不用調用super了
UIButton的簡單使用
Button(按鈕)是使用最頻繁的控件之一,UIButton的使用並不難,但是有一點必須要注意
UIButton默認Type是Rounded Rect button,這個形態是不被App Store所接受的,即便是你給這個button添加了背景圖片,不再是Rounded Rect 的外觀,還是會被App Store所拒,總之Button的類型不能是Rounded Rect。
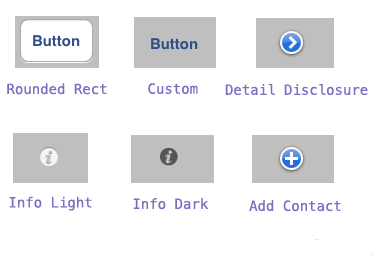
一、UIButton的外觀
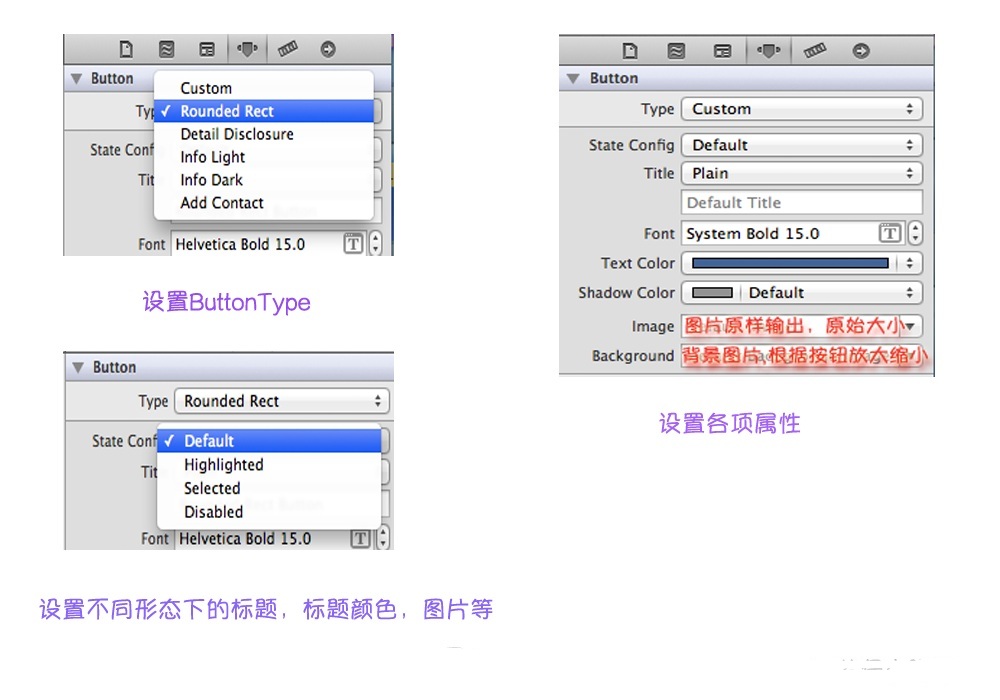
1.1 UIButton有6種類型, 如下圖所示
復制代碼 代碼如下:
UIButtonTypeCustom
UIButtonTypeRoundedRect
UIButtonTypeDetailDisclosure
UIButtonTypeInfoLight
UIButtonTypeInfoDark
UIButtonTypeContactAdd
1.2 設置buttonType
復制代碼 代碼如下:
UIButton *button = [[UIButton alloc] initWithFrame:CGRectMake(10, 10, 100, 44)];
[UIButton buttonWithType:UIButtonTypeCustom];
二、設置背景圖片
2.1可以設置正常狀態,不可點擊狀態,選中狀態等各種形態下的背景圖片
復制代碼 代碼如下:
// 正常狀態下的圖片
[button setBackgroundImage:[UIImage imageNamed:@"normal.png"] forState:UIControlStateNormal];
// 點擊後的圖片
[button setBackgroundImage:[UIImage imageNamed:@"pressed.png"] forState:UIControlStateSelected];
2.2 可延伸的圖片,有一張26*46的圖片,但是按鈕是100*46,這時將圖片延伸一下效果就會很好,這樣的話可以使得項目中的圖片文件比較小,為項目瘦身,QQ的會話氣泡也是利用此種方法達到延伸的效果,先上對比圖
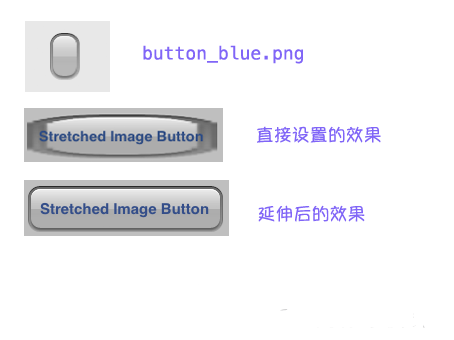
復制代碼 代碼如下:
UIImage *buttonNormal = [UIImage imageNamed:@"button-white-part"];
// 進行寬度上的延伸,如果要進行高度上的延伸,改變第一個和第三個參數的值,此方法是保證圖片邊緣的框架的前提下對圖片中間進行高度或者寬度的延伸
UIImage *stretchNormal = [buttonNormal resizableImageWithCapInsets:UIEdgeInsetsMake(0, 15, 0, 30)];
[button setBackgroundImage:stretchNormal forState:UIControlStateNormal];
三、按鈕事件
按鈕事件還有好多種,可以自行查看文檔
復制代碼 代碼如下:
[button addTarget:self action:@selector(buttonPress:) forControlEvents:UIControlEventTouchUpInside];
// 點擊事件
- (IBAction)buttonPress:(id)sender {
NSLog("@"button pressed!");
}
以上是代碼添加。
四、xib添加
4.1 在View中拖動一個Button放入畫布

4.2 設置button屬性
4.3 創建映射,以及按鈕事件
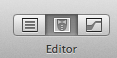
選中xib,點擊xcode右上方的Editor
,讓一個界面為xib,另一個界面為其對應的.h文件。
選中button 右鍵拖拽出一條線到.h文件@interface與@end之間的位置,如果要創建映射則選擇IBOutlet,創建按鈕事件則選擇Action,填寫完成後點擊connet即可
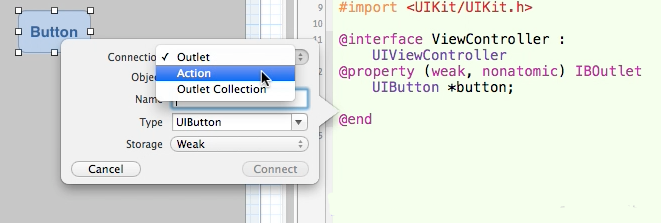
在.m文件中會出現所創建的點擊事件,在方法裡完成對應的操作即可。