實例講解iOS應用開發中使用UITableView創建自定義表格
一、帶索引目錄的表視圖
1.效果圖
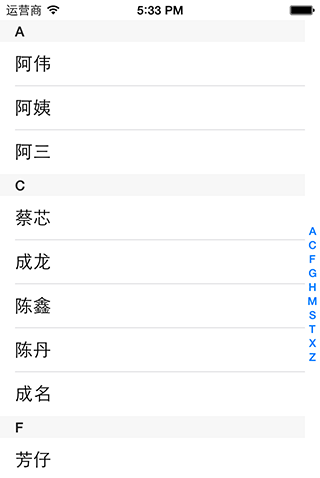
2.數據源
本想獲取通訊錄中得名字,但為了用模擬器調試方便,就寫死了數據,所以也只寫了部分字母,總之有那麼點意思就成
復制代碼 代碼如下:
@interface ViewController ()<UITableViewDataSource,UITableViewDelegate>
{
NSArray *sectionTitles; // 每個分區的標題
NSArray *contentsArray; // 每行的內容
}
/** @brief 准備數據源 在viewDidLoad方法中調用*/
- (void)readySource
{
sectionTitles = [[NSArray alloc] initWithObjects:
@"A",@"C",@"F",@"G",@"H",@"M",@"S",@"T",@"X",@"Z", nil];
contentsArray = [[NSArray alloc] initWithObjects:
@[@"阿偉",@"阿姨",@"阿三"],
@[@"蔡芯",@"成龍",@"陳鑫",@"陳丹",@"成名"],
@[@"芳仔",@"房祖名",@"方大同",@"芳芳",@"范偉"],
@[@"郭靖",@"郭美美",@"過兒",@"過山車"],
@[@"何仙姑",@"和珅",@"郝歌",@"好人"],
@[@"媽媽",@"毛主席"],
@[@"孫中山",@"沈冰",@"嬸嬸"],
@[@"濤濤",@"淘寶",@"套娃"],
@[@"小二",@"夏紫薇",@"許巍",@"許晴"],
@[@"周恩來",@"周傑倫",@"張柏芝",@"張大仙"],nil];
}
3.顯示索引
復制代碼 代碼如下:
// 每個分區的頁眉
-(NSString *)tableView:(UITableView *)tableView titleForHeaderInSection:(NSInteger)section
{
return [sectionTitles objectAtIndex:section];
}
// 索引目錄
-(NSArray *)sectionIndexTitlesForTableView:(UITableView *)tableView
{
return sectionTitles;
}
④點擊索引,跳轉到點擊的分區
// 點擊目錄
-(NSInteger)tableView:(UITableView *)tableView sectionForSectionIndexTitle:(NSString *)title atIndex:(NSInteger)index
{
// 獲取所點目錄對應的indexPath值
NSIndexPath *selectIndexPath = [NSIndexPath indexPathForRow:0 inSection:index];
// 讓table滾動到對應的indexPath位置
[tableView scrollToRowAtIndexPath:selectIndexPath atScrollPosition:UITableViewScrollPositionBottom animated:YES];
return index;
}
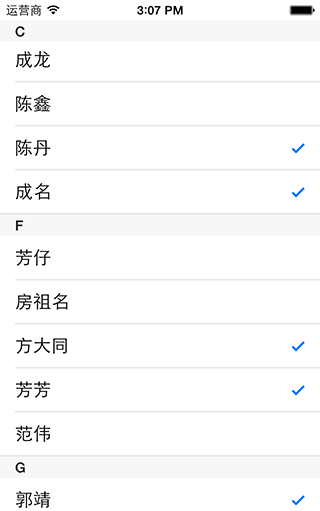
二、可以進行行標記的表視圖
1.效果圖
2.在cellForRow方法中,將Cell的accessoryType設置為None
復制代碼 代碼如下:
// 定義其輔助樣式
cell.accessoryType = UITableViewCellAccessoryNone;
3.在didSelectRow方法中
復制代碼 代碼如下:
// 點擊行事件
-(void)tableView:(UITableView *)tableView didSelectRowAtIndexPath:(NSIndexPath *)indexPath
{
// 獲取點擊行的cell
UITableViewCell *cell = [tableView cellForRowAtIndexPath:indexPath];
// 如果cell已經被標記
if (cell.accessoryType == UITableViewCellAccessoryCheckmark) {
// 取消標記
cell.accessoryType = UITableViewCellAccessoryNone;
}
// 如果cell未標記
else{
// 標記cell
cell.accessoryType = UITableViewCellAccessoryCheckmark;
}
// 取消選中效果
[tableView deselectRowAtIndexPath:indexPath animated:YES];
}
此時,點擊行即可選中,取消選中,但是滾動一下視圖吧,你會發現下面某些未被點擊的行也已經被標記了,這是因為cell的重用機制造成的,在第一篇文章中就這個問題有提到過
4.解決cell重用問題,在cellForRow方法中,定義cellIdetifier時,將其每一行都定義為不同的值,就不會出現覆蓋,重復等現象了,但是這個方法太過粗暴,並不是最好的解決辦法,情急之下可以先用,然後再慢慢調試Table上的數據
復制代碼 代碼如下:
NSString *cellIdentifier = [NSString stringWithFormat:@"cellIdentifier%d%d",indexPath.row,indexPath.section];
三、定制表視圖的每一行內容
1.我們做一個類似網易新聞客戶端的新聞列表的table,如下圖左;簡易效果圖,如下圖右


2.數據源,在interface中聲明
復制代碼 代碼如下:
NSMutableArray *news_MArray;// 新聞內容數據源
新建一個model類,命名為"newsModel",存放每一項數據
newsModel.h如下,.m中沒有添加其他代碼,如果需要拷貝,可以重載copyWithZone方法,
#import <Foundation/Foundation.h>
typedef NS_ENUM(NSInteger, NEWSReportType){
NEWSReportOrdinary, // 普通新聞
NEWSReportExclusive,// 獨家新聞
NEWSReportSpecial, // 專題新聞
};
@interface newsModel : NSObject
@property (nonatomic, copy)NSString * news_image; //圖片
@property (nonatomic, copy)NSString * news_title; //標題
@property (nonatomic, copy)NSString * news_summary; //摘要
@property (nonatomic, assign)NSInteger news_replyNo; //跟帖數量
@property (nonatomic, assign)NEWSReportType reportType; //報道類型
@end
在viewDidLoad方法中
復制代碼 代碼如下:
news_MArray = [[NSMutableArray alloc] init];
for(NSInteger index =0; index<10; index++){
newsModel *model = [[newsModel alloc] init];
model.news_image = [NSString stringWithFormat:@"%d.jpg",index+1];
model.news_title = @"曾在月光之下望煙花";
model.news_summary = @"曾共看夕陽漸降下 我怎麼捨得去放下 要怎麼捨得去放下";
model.news_replyNo = index+196;
model.reportType = index%3;
[news_MArray addObject:model];
}
3.行數
復制代碼 代碼如下:
// 每個分區行數
-(NSInteger)tableView:(UITableView *)tableView numberOfRowsInSection:(NSInteger)section
{
return [news_MArray count];
}
4.自定義cell上控件
在cellForRow方法中if(cell==nil)前
復制代碼 代碼如下:
/*****自定義cell******/
newsModel *model = [news_MArray objectAtIndex:indexPath.row];
UIImageView * image_view; //1.添加imageView
UILabel * title_label; //2.添加標題Label
UILabel * summary_label; //3.添加摘要Label
UILabel * replyNo_label; //4.添加跟帖數量Label
UIButton * extra_view; //5.屬於專題或者獨家報道,進行標記
/********************/
在if(cell==nil)內
復制代碼 代碼如下:
/*****自定義cell******/
//1.添加imageView
CGRect imageViewF = CGRectMake(5, 5, 85, 65);
image_view = [[UIImageView alloc] initWithFrame:imageViewF];
[cell addSubview:image_view];
//2.添加標題Label
CGRect titleLabelF = CGRectMake(95, 5, 230, 24);
title_label = [[UILabel alloc] initWithFrame:titleLabelF];
title_label.font = [UIFont systemFontOfSize:16];//字體大小
[cell addSubview:title_label];
//3.添加摘要Label
CGRect summaryLabelF = CGRectMake(97, 27, 210, 40);
summary_label = [[UILabel alloc] initWithFrame:summaryLabelF];
summary_label.font = [UIFont systemFontOfSize:12]; // 字體大小
summary_label.textColor = [UIColor darkGrayColor]; // 文字顏色
summary_label.numberOfLines = 2;
[cell addSubview:summary_label];
//4.跟帖數量Label
CGRect replyNoLabelF = CGRectMake(210, 45, 95, 24);
replyNo_label = [[UILabel alloc] initWithFrame:replyNoLabelF];
replyNo_label.font = [UIFont systemFontOfSize:12]; // 字體大小
replyNo_label.textColor = [UIColor darkGrayColor]; // 文字顏色
replyNo_label.textAlignment = NSTextAlignmentRight; // 文字右對齊
//5.專題extraView
CGRect extraViewF = CGRectMake(270, 50, 28, 14);
extra_view = [[UIButton alloc] initWithFrame:extraViewF];
extra_view.titleLabel.font = [UIFont boldSystemFontOfSize:10];
[extra_view setTitleColor:[UIColor whiteColor] forState:UIControlStateNormal];
// 普通新聞,只添加跟帖數量
if (model.reportType==NEWSReportOrdinary) {
[cell addSubview:replyNo_label];
}
// 專題新聞,添加專題標志,並添加跟帖數量
else if(model.reportType == NEWSReportSpecial){
// 設置背景色
extra_view.backgroundColor = [UIColor colorWithRed:120.0/255.0 green:170.0/255.0 blue:245.0/255.0 alpha:1.0];
[extra_view setTitle:@"獨家" forState:UIControlStateNormal];// 設置標題
[cell addSubview:extra_view]; // 添加
replyNo_label.frame = CGRectMake(170, 45, 95, 24); // 改變跟帖數量Label的坐標
[cell addSubview:replyNo_label]; // 添加跟帖數量Label
}
// 獨家新聞,只添加獨家標志
else if(model.reportType == NEWSReportExclusive){
extra_view.backgroundColor = [UIColor redColor]; // 設置背景顏色
[extra_view setTitle:@"專題" forState:UIControlStateNormal]; // 設置標題
[cell addSubview:extra_view]; // 添加到cell
}
/********************/
在if(cell==nil)後
復制代碼 代碼如下:
/*****自定義cell******/
[image_view setImage:[UIImage imageNamed:model.news_image]];// 設置圖片
title_label.text = model.news_title; // 設置標題
summary_label.text = model.news_summary; // 設置小標題
replyNo_label.text = [NSString stringWithFormat:@"%d 跟帖",model.news_replyNo];// 設置跟帖數量
/********************/
5.設置行高
復制代碼 代碼如下:
-(CGFloat) tableView:(UITableView *)tableView heightForRowAtIndexPath:(NSIndexPath *)indexPath
{
return 75;
}

- iOS 完成多署理的辦法及實例代碼
- IOS 陀螺儀開辟(CoreMotion框架)實例詳解
- ajax 三種完成辦法實例代碼
- iOS中 LGLAlertView 提醒框的實例代碼
- IOS 仿時間網選票UI實例代碼
- iOS 雷達後果實例詳解
- IOS 粒子體系 (CAEmitterLayer)實例詳解
- iOS 動畫 —— 禮花後果實例具體
- 在Swift中應用JSONModel 實例代碼
- iOS 9 Core Spotlight搜刮實例代碼
- 實例講授iOS中的UIPageViewController翻頁視圖掌握器
- 實例講授iOS中的CATransition轉場動畫應用
- 應用Swift代碼完成iOS手勢解鎖、指紋解鎖實例詳解
- iOS App開辟中應用設計形式中的單例形式的實例解析
- iOS中應用UIDatePicker制造時光選擇器的實例教程