iOS開發之手勢識別實例
感覺有必要把iOS開發中的手勢識別做一個小小的總結。下面會先給出如何用storyboard給相應的控件添加手勢,然後在用純代碼的方式給我們的控件添加手勢,手勢的用法比較簡單。和button的用法類似,也是目標 動作回調,話不多說,切入今天的正題。
總共有六種手勢識別:輕擊手勢(TapGestureRecognizer),輕掃手勢 (SwipeGestureRecognizer), 長按手勢(LongPressGestureRecognizer), 拖動手勢(PanGestureRecognizer), 捏合手勢(PinchGestureRecognizer),旋轉手勢(RotationGestureRecognizer);
其實這些手勢用touche事件完全可以實現,蘋果就是把常用的觸摸事件封裝成手勢,來提供給用戶。讀者完全可以用TouchesMoved來寫拖動手勢等
一,用storyboard給控件添加手勢識別
1.用storyboard添加手勢識別,和添加一個Button的步驟一樣,首先我們得找到相應的手勢,把手勢識別的控件拖到我們要添加手勢的控件中,截圖如下: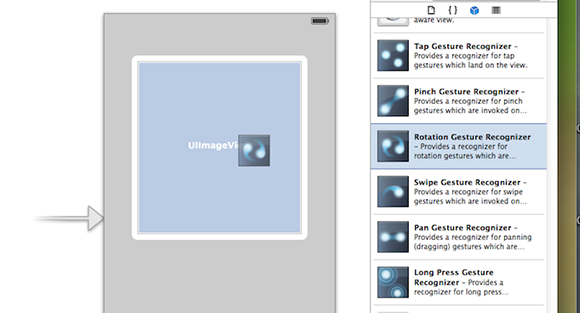
2.給我們拖出的手勢添加回調事件,和給Button回調事件沒啥區別的,在回調方法中添加要實現的業務邏輯即可,截圖如下:
二,純代碼添加手勢識別
用storyboard可以大大簡化我們的操作,不過純代碼的方式還是要會的,就像要Dreamwear編輯網頁一樣(當然啦,storyboard的拖拽功能要比Dreamwear的拖拽強大的多),用純代碼敲出來的更為靈活,更加便 於維護。不過用storyboard可以減少我們的工作量,這兩個要配合著使用才能大大的提高我們的開發效率。個人感覺用storyboard把框架搭起 來(Controller間的關系),一下小的東西還是用純代碼敲出來更好一些。下面就給出如何給我們的控件用純代碼的方式來添加手勢識別。
1.輕擊手勢(TapGestureRecognizer)的添加
初始化代碼TapGestureRecongnizer的代碼如下:
//新建tap手勢
 UITapGestureRecognizer *tapGesture = [[UITapGestureRecognizer alloc] initWithTarget:self action:@selector(tapGesture:)];
 //設置點擊次數和點擊手指數
 tapGesture.numberOfTapsRequired = 1; //點擊次數
 tapGesture.numberOfTouchesRequired = 1; //點擊手指數
 [self.view addGestureRecognizer:tapGesture];
在回調方法中添加相應的業務邏輯:
//輕擊手勢觸發方法
-(void)tapGesture:(id)sender
{
 //輕擊後要做的事情
}
2.長按手勢(LongPressGestureRecognizer)
初始化代碼:
//添加長摁手勢
 UILongPressGestureRecognizer *longPressGesture = [[UILongPressGestureRecognizer alloc] initWithTarget:self action:@selector(longPressGesture:)];
 //設置長按時間
 longPressGesture.minimumPressDuration = 0.5; //(2秒)
 [self.view addGestureRecognizer:longPressGesture];
在對應的回調方法中添加相應的方法(當手勢開始時執行):
//常摁手勢觸發方法
-(void)longPressGesture:(id)sender
{
 UILongPressGestureRecognizer *longPress = sender;
 if (longPress.state == UIGestureRecognizerStateBegan)
 {
  UIAlertView *alter = [[UIAlertView alloc] initWithTitle:@"提示" message:@"長按觸發" delegate:nil cancelButtonTitle:@"取消" otherButtonTitles: nil];
  [alter show];
 }
}
代碼說明:手勢的常用狀態如下
- 開始:UIGestureRecognizerStateBegan
- 改變:UIGestureRecognizerStateChanged
- 結束:UIGestureRecognizerStateEnded
- 取消:UIGestureRecognizerStateCancelled
- 失敗:UIGestureRecognizerStateFailed
3.輕掃手勢(SwipeGestureRecognizer)
在初始化輕掃手勢的時候得指定輕掃的方向,上下左右。 如果要要添加多個輕掃方向,就得添加多個輕掃手勢,不過回調的是同一個方法。
添加輕掃手勢,一個向左一個向右,代碼如下:
//添加輕掃手勢
 UISwipeGestureRecognizer *swipeGesture = [[UISwipeGestureRecognizer alloc] initWithTarget:self action:@selector(swipeGesture:)];
 //設置輕掃的方向
 swipeGesture.direction = UISwipeGestureRecognizerDirectionRight; //默認向右
 [self.view addGestureRecognizer:swipeGesture];

 //添加輕掃手勢
 UISwipeGestureRecognizer *swipeGestureLeft = [[UISwipeGestureRecognizer alloc] initWithTarget:self action:@selector(swipeGesture:)];
 //設置輕掃的方向
 swipeGestureLeft.direction = UISwipeGestureRecognizerDirectionLeft; //默認向右
 [self.view addGestureRecognizer:swipeGestureLeft];
回調方法如下:
//輕掃手勢觸發方法
-(void)swipeGesture:(id)sender
{
 UISwipeGestureRecognizer *swipe = sender;
 if (swipe.direction == UISwipeGestureRecognizerDirectionLeft)
 {
  //向左輕掃做的事情
 }
 if (swipe.direction == UISwipeGestureRecognizerDirectionRight)
 {
  //向右輕掃做的事情
 }
}
4.捏合手勢(PinchGestureRecognizer)
捏合手勢初始化
//添加捏合手勢
UIPinchGestureRecognizer *pinchGesture = [[UIPinchGestureRecognizer alloc] initWithTarget:self action:@selector(pinchGesture:)];
[self.view addGestureRecognizer:pinchGesture];
捏合手勢要觸發的方法(放大或者縮小圖片):
////捏合手勢觸發方法
-(void) pinchGesture:(id)sender
{
  UIPinchGestureRecognizer *gesture = sender;

 //手勢改變時
 if (gesture.state == UIGestureRecognizerStateChanged)
 {
  //捏合手勢中scale屬性記錄的縮放比例
  _imageView.transform = CGAffineTransformMakeScale(gesture.scale, gesture.scale);
 }

 //結束後恢復
 if(gesture.state==UIGestureRecognizerStateEnded)
 {
  [UIView animateWithDuration:0.5 animations:^{
   _imageView.transform = CGAffineTransformIdentity;//取消一切形變
  }];
 }
}
5.拖動手勢(PanGestureRecognizer)
拖動手勢的初始化
//添加拖動手勢
UIPanGestureRecognizer *panGesture = [[UIPanGestureRecognizer alloc] initWithTarget:self action:@selector(panGesture:)];
[self.view addGestureRecognizer:panGesture];
拖動手勢要做的方法(通過translationInView獲取移動的點,和TouchesMoved方法類似)
//拖動手勢
-(void) panGesture:(id)sender
{
 UIPanGestureRecognizer *panGesture = sender;

 CGPoint movePoint = [panGesture translationInView:self.view];

 //做你想做的事兒
}
6.旋轉手勢(RotationGestureRecognizer)
旋轉手勢的初始化
//添加旋轉手勢
UIRotationGestureRecognizer *rotationGesture = [[UIRotationGestureRecognizer alloc] initWithTarget:self action:@selector(rotationGesture:)];
[self.view addGestureRecognizer:rotationGesture];
旋轉手勢調用的方法:
//旋轉手勢
-(void)rotationGesture:(id)sender
{

 UIRotationGestureRecognizer *gesture = sender;

 if (gesture.state==UIGestureRecognizerStateChanged)
 {
  _imageView.transform=CGAffineTransformMakeRotation(gesture.rotation);
 }

 if(gesture.state==UIGestureRecognizerStateEnded)
 {

  [UIView animateWithDuration:1 animations:^{
   _imageView.transform=CGAffineTransformIdentity;//取消形變
  }];
 }

}
上面的東西沒有多高深的技術,就是對iOS開發中的手勢做了一下小小的總結,溫故一下基礎知識。在之前的博客中也有用到手勢識別的內容,就是沒有系統的梳理一下手勢識別的知識,本文做一個基礎的補充吧。
以上就是本文的全部內容,希望對大家的學習有所幫助,也希望大家多多支持本站。